Plastic tape made from plastic bottles is used in household farming. Thanks to it, you can strengthen a wooden fence or tie up berry bushes. This rope can withstand up to 50 kg. It depends on its thickness and length. It is mainly used as a fixative.
There are two ways to cut plastic bottles: manual and machine. You can make transparent tape yourself at home. To do this you will need sharp scissors and proper markings.
You must admit that producing such material manually is a rather labor-intensive process. A special device will help make cutting transparent tape easier.
What can a bottle cutting device be made from? What materials will be needed to build such a structure? The answers to these questions are presented in our article. Advice from experienced craftsmen will help you cope with the task.
Advantages of plastic tape
There are several positive qualities of transparent tape in the household. These include:
- does not deteriorate when exposed to sunlight;
- long service life;
- resists low temperatures;
- can withstand up to 80 kg;
- low cost of material;
- no odor;
- decorativeness.
DIY bottle cutter
It has long been known that plastic can lie in the ground for many years without decomposing, thereby causing severe harm to the environment.
To recycle such waste, which can be put to useful use in the future, enterprising people came up with a bottle cutter.
It cuts plastic bottles into narrow strips, which are used as a strong fastening and shrinking material. You can learn how to make a bottle cutter with your own hands from the information below.
How to make a bottle cutter with your own hands
Application of polyethylene tape
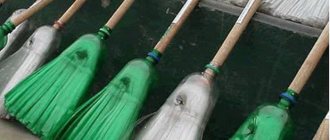
Tape made from plastic bottles is widely used in everyday life and households:
- In the manufacture of brooms and brushes.
- For use as shrink tape in the garden for tying up plants, during the construction of greenhouses.
- As a fishing line
- For the manufacture of wicker furniture, bags, baskets.
You can make two types of bottle cutters with your own hands: manual or locking. Its basis is a blade, usually from a stationery knife.
It is inexpensive, very sharp, and does not require sharpening.
A portable version of the device for cutting plastic bottles is very useful, because as a result you can get a strong rope, fishing line, tape for wrapping the handles of any tools, weaving nets and other items necessary for survival. The advantage of such a tape is that when heated, it shrinks several times, tightening and securely securing what is wrapped in it.
DIY plastic bottle cutter
Simple bottle cutter
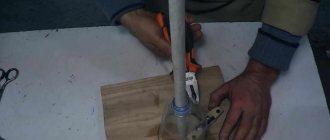
The simplest option, a camping bottle cutter, can be made with your own hands as follows:
- You will need a wooden block measuring 2.5x2.5x12-15 cm. At one end, cuts are made with a depth corresponding to the thickness of the tape being cut. You can make several of them so that each one cuts the tape to a different width.
- The blade from a stationery knife is attached to the top of the block above the cuts. This can be done using hot-melt glue, so that when traveling you can remove the knife by heating the adhesive layer to replace the blade or sharpen it.
- The bottom of the bottle is cut off, a small incision is made, and it is pulled through a cut of the required width. Now you need to pull the cut end, cutting the bottle to the very neck.
The video clearly shows the manufacturing process of this simple device.
How to make equipment for cutting plastic tape?
The device for cutting plastic bottles consists of simple parts and elements. For this you will need:
- wooden base. Its width must be at least 30 cm;
- medium size washers 10 pcs.;
- small diameter washer 4 pcs.;
- drill 2 pcs. Its diameter must correspond to the size of the washer;
- a small part of a stationery knife 10 cm;
- screwdriver and wrench;
- simple pencil.
Thanks to this machine, cutting plastic bottles with your own hands is fast and efficient, and the thread has a uniform texture. The process of creating equipment includes several stages:
Markings are made on a wooden base to fix washers of different diameters. For this you will need a simple pencil. Using a screwdriver, make through holes at the marks.
Next, insert a bolt to secure the washers. The lower part is secured with a nut. To prevent the joint from coming loose when using the machine, it is recommended to tighten it with a wrench.
The width of the plastic tape can be adjusted by moving the washers to the desired distance. Basically, this gap is 1 cm. A through hole is made on a stationery knife. It is placed on top of metal parts.
An additional nut will help connect the knife to the machine structure. In this case, you should not tighten it too much. This will create discomfort during the work process.
When the equipment is ready, it is checked for functionality. To do this, the bottom of the bottle is cut off and secured between the nuts. Now one edge is cut with a sharp knife blade, and the other is turned clockwise. The result is a plastic tape of the desired size. The photo of cutting plastic bottles shows the work process.
Simple design
To assemble a primitive machine, which will take a maximum of 15 minutes, you will need:
- Plywood or board 30 mm thick.
- Two nuts.
- Two small and one large washer.
- Two wood screws.
- Blade from a stationery knife.
Step-by-step procedure for making a homemade bottle cutter:
- Two holes are drilled in the board into which the self-tapping screws will be screwed in (the distance between the holes should be equivalent to the radius of two washers).
- A nut is fixed above each hole.
- The washers are placed on top.
- Take the cutting blade and cover it with washers.
- The entire structure is fixed with self-tapping screws.
The result is a simple machine for cutting tape from PET bottles. You can get acquainted with the principle of operation of the bottle cutter by watching the video.
Small tricks that will make using the device a little easier:
- It is preferable to use stacks of washers instead of nuts. It is better if the diameter of the parts is as large as possible, at least in the area where the plastic bottle is located. A large washer will act as a guide for the PET bottle.
- The uniformity and speed of the process of cutting plastic bottles depends on how correctly the gap between two stacks of bottle cutter elements is calculated. The correct solution would be to choose a value equal to the wall thickness of the bottle.
- Adjust the thickness of the cut strip by changing the place where the cutting edge is fixed between the machine washers. It should be noted that the smaller the width of the cut strip, the more careful you need to be in order to avoid premature cutting.
- For ease of use of the bottle cutter, if desired, it can be attached to the tabletop using a clamp or self-tapping screws.
Craftsmen who regularly need thin plastic tape equip the machine based on complex technological drawings. If desired, from a two-liter bottle you can get about forty meters of tape 1 mm thick.
Metal cutting machine for plastic bottles
We bring to your attention another idea on how to make a device for cutting bottles. For this you will need:
- a small piece of construction corner;
- stationery blade 10 cm long;
- small nuts 2 pcs.;
- metal drill;
- electric drill;
- hacksaw.
Manufacturing process:
A small through hole is made on the surface of the metal corner. Do the same with a stationery blade.
Having measured the width of the fixing nut with a hacksaw, make notches on the surface of the angle. In the future, they will help adjust the width of the plastic strip. The distance between each mark will be 1.5 cm.
The knife is fixed in the corner part of the metal base using an additional nut.
Note!
FIFA 22 (PS4)- Why do you need interior dolls?
- How to choose shoes that don't go out of fashion?
Next, the entire structure must be secured to a solid surface. The production of tape from bottles is carried out by rotating the plastic product clockwise. You should not make sudden movements. This may cause damage to the plastic thread.
Adapting processing to home conditions
There are no difficulties in recycling PET packaging waste.
But there are very important key steps that should be strictly followed:
- Sorting is the most important point. Plastic must be sorted by color, so the quality of the recycled material will be much higher. Caps, rings and labels must be completely removed.
- Pre-wash. If this is a water container, then this stage can be skipped. It is advisable to wash the inside of packaging for dairy products and drinks. This can be done with running water.
- Shredding bottles. Impact crushers with long, sharp blades are ideal. Industrial equipment is very expensive, so homemade devices are suitable for home use. Design options are described below.
- Washing. Regular containers (basins, buckets, tanks) are suitable for washing bottles. For bottles that are not heavily soiled, washing them in regular warm water is sufficient. To remove food residues, you can use a three-stage wash: soaking in a soda solution, washing with dishwashing detergent, rinsing in running water.
- Drying. You can use an oven. Drying temperature 100-120°C, time 2 hours. It is advisable to periodically turn the crushed pieces.
- Extrusion. Since it is intended to use exclusively a home-made device (description below), options for making either a granule, or a rope or thread are possible.
The second, more advanced model of Egorov’s bottle cutter
Working video
Addition
Explanation of how to make a bottle machine
Next is a video that clearly and clearly describes in detail the entire manufacturing technology of the machine, which is not so clearly visible in the previous video, but here you can familiarize yourself with the entire process in detail. The author of this craft is Alexander Tkachenko (YouTube).
https://youtube.com/watch?v=3f-1TRm2SAA
Aluminum channel measuring 20 x 30 x 20 millimeters. Bolts are 6 mm. The hairpin is 50 centimeters long, by 6 millimeters. Nuts, washers 6 mm. Set of bits for a screwdriver. The blade of a construction knife is 18 millimeters wide. 6mm drill bit. Auxiliary tools, screwdriver, tape measure, metal saw, marker. So, there is an aluminum channel. There will be a blade inside, which will be pressed in the finished machine against the wall of the channel using a wooden block. You will find a drawing of a bottle cutter based on Egorov’s bottle cutting device at the bottom of the page.
We focus on the location so that it is convenient to hold the channel with your hand and so that you can screw the bottle cutter sideways to a wooden stand and cut a strip of plastic bottles. We assume that the blade will be located inside the channel, but marking is not very convenient. Therefore, we put the blade on the outside and mark the holes on it with a marker. Next, mark the place where the cuts should be. There are 7 cuts in total. We also indicate the upper part of the knife. There is one caveat. When the master applied the marking knife, he did not take into account the thickness of the metal. Therefore, when marking, you need to apply the blade taking into account the thickness of the metal. In this case it is 1.5-2 millimeters. The technician corrected the error by re-drilling the holes. The marking is complete. A pin will be inserted into the marked hole. In the marked places we cut slits with a hacksaw. We cut it like this: first, a short slot for a thin plastic tape, then gradually increase its length with each step. That is, first we cut through the nearest one, which is closest to the hole from the pin. The pitch is about 2 millimeters. Then we increase the step. The photo shows what a channel with slots should look like. The length of each of them corresponds to the width of the pet tape.
Next, drill a hole on the side opposite to the one that has already been made. After this, you can insert the pin by pushing it through both holes.
Tips for working with a bottle cutter
There are nuances. When you make cuts, be sure to cut clearly on the side on which you are adjusting the width of the tape to the width you want to achieve. On the other hand, on the contrary, you need to make wider cuts so that the bottle fits as closely as possible to the knife in this part. When you twist the hairpin, it is better to bend it beforehand. On the channel it remains level. The blade should fit snugly against the channel. What is a bottle cutter used for? First of all, you can use it to make shrink tape. It is great for repairing various tools and devices.
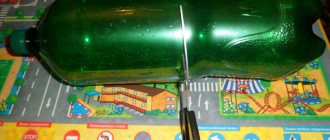
What plastic bottles are best suited to work with this bottle cutter? They must be without relief. If you use a bottle with a relief, you will get a ribbon, but it will not be of very high quality. Moreover, working with such a workpiece is inconvenient. The cut on the bottle when you cut off the bottom should be even.
If reading doesn’t bore you, there is another article on this topic.
BOTTLE CUTTER WITH YOUR HANDS: PHOTO
BOTTLE CUTTER WITH YOUR OWN HANDS – ANOTHER DESIGN OF MY
Since crafts made from bottles have not gone out of fashion among summer residents and owners of private houses for a long time, I propose a simple method for making a device for cutting glass containers.
You needed: scraps of chipboard plywood 15 mm thick, threaded rods M 12 and nuts for them.
I cut out a base measuring 360x180 mm from chipboard. I screwed two plywood walls measuring 180x180 mm to it with self-tapping screws. On one side from above I connected the latter with an M 12 threaded rod, having previously screwed two nuts onto it (photo 1)
Then I cut out two pieces of the required size from chipboard and secured them to the base at an angle relative to each other. To do this, I used self-tapping screws and wedges with a 30 degree apex, made from bars - this is a bottle holder. From M 12 nuts I made a clamp (photo 2) for the cutter holder and placed it between two nuts on a threaded rod (photo 3)
I used a glass cutter head as a cutter. To secure it to the holder, I made an adapter from three M12 nuts, a strip of sheet metal and a screw (photo 4)
I screwed another pin into the latch on the pin (it should be positioned strictly perpendicular). I screwed an adapter onto it with a glass cutter head. The device is ready.
DIY bottle cutter
The principle of operation is simple: I place the bottle on the holder, rotating the nuts on the stud between the walls, and adjust the required distance between the holder and the cutter from the bottom or neck (depending on which part of the bottle will be used for the craft).
I press the cutter to the body of the bottle and begin to rotate it, pressing it to the base (photo 5). I make several turns around the axis, then break the container at the cutting site (as when cutting ordinary glass with a glass cutter). If the edges of the cut turn out to be uneven, I remove the excess with a needle file.
Powerful bottle cutter with drawing
Next, watch the video of a powerful installation for cutting tape from PET bottles, which can be used even on an industrial scale. Its peculiarity is high reliability and performance. The master made a drawing of a cutter, which he made based on the bottle cutter of lawyer Egorov. If you do not want to make the entire structure, then use that part of the drawing that reflects the main working part, which coincides with the device that lawyer Egorov made.
The video shows details of how to make a bottle cutter
Plastic bottles accumulate in every family. Most often, their further use is to throw them into a landfill. Not everyone understands that a plastic bottle can be a good raw material for making useful and necessary household items. Just cut it carefully and you will get a reliable shrink tape. When heated, it melts and becomes very durable. Therefore, it is easy for her to find use in the country.
It is impossible to cut plastic accurately and quickly with just a knife or scissors. To solve this problem, you can create a special device that is easy to manufacture and operate. Doing it yourself is what the article will discuss.
DIY bottle cutter: drawings
A more complex option for making a device for cutting bottles with your own hands requires more thorough preparation.
To make such a bottle cutter you will need:
- Aluminum corner with a thickness of at least 2 mm.
- Nails, die M6
- Construction knife blade
- Fasteners
- Drill with 6 and 3 mm drill bits.
- Bulgarian
- Sandpaper, file.
Before making a bottle cutter, it is better to draw up a detailed drawing of the device and its fastening. Thanks to the drawing, it will be clearly visible at what angle the knife blade should be attached, since without tilting the correct cut will not be possible.
The blade is placed on a metal corner so that the sharpening fits tightly into the corner, and a drilling location for fasteners is marked. Along the length of the blade, a cutting line is marked on the corner. A hole is drilled with a 6mm drill, the workpiece is cut off with a grinder. Next, you need to make markings for cuts in increments of 5 mm from the very edge of the hole. On one side of the corner, the depth of the cuts should correspond to the approximate width of the tape being cut, and on the other, a cut is made to almost the entire width of the corner, not reaching 1-2 mm of the jumper. All cuts are processed with sandpaper or a file so that no snags are created while pulling the tape.
Device and scope of application
The use of a bottle cutter occupies not only a place in the manufacture of various crafts, but also in other areas.
As for the design of the plastic bottle cutter, it all depends on which design was preferred. In general, the principle of operation of all options is the same and only the appearance and functionality changes.
To make it easy to secure the bottle in the device, a special groove is made in it. The blade is also attached to a groove, and when cutting several different grooves, it becomes possible to make strips of different thicknesses.
There is also a simpler design that does not contain a separate housing. It is this idea of a bottle cutter using improvised means that we will talk about next.
Check it out here too!
- How to make a homemade metal detector - the best diagrams, instructions. Review of proven options for creating a simple do-it-yourself metal detector
- How to choose a washing machine: advice from professionals, the main subtleties of choosing a reliable and high-quality machine. Types, types, programs and functions
- Homemade lanterns with your own hands: step-by-step instructions on how to make a beautiful and effective lantern (110 photos)
DIY bottle cutter: drawings
A more complex bottle cutter. A more complex option for making a device for cutting bottles with your own hands requires more thorough preparation.
To make such a bottle cutter you will need:
- Aluminum corner with a thickness of at least 2 mm.
- Nails, die M6
- Construction knife blade
- Fasteners
- Drill with 6 and 3 mm drill bits.
- Bulgarian
- Sandpaper, file.
Before making a bottle cutter, it is better to draw up a detailed drawing of the device and its fastening. Thanks to the drawing, it will be clearly visible at what angle the knife blade should be attached, since without tilting the correct cut will not be possible.
The blade is placed on a metal corner so that the sharpening fits tightly into the corner, and a drilling location for fasteners is marked. Along the length of the blade, a cutting line is marked on the corner. A hole is drilled with a 6mm drill, the workpiece is cut off with a grinder. Next, you need to make markings for cuts in increments of 5 mm from the very edge of the hole. On one side of the corner, the depth of the cuts should correspond to the approximate width of the tape being cut, and on the other, a cut is made to almost the entire width of the corner, not reaching 1-2 mm of the jumper. All cuts are processed with sandpaper or a file so that no snags are created while pulling the tape.
All holes are processed, metal dust is removed with a brush. It is recommended to remove the rounding inside the corner with a grinder so that the knife blade does not rest against it.
Another type of simple device that can be screwed to a table or other surface and removed if necessary:
- To make it you will need a blade from a stationery knife, double-sided tape, a piece of linoleum, a 30 cm din rail, a metal plate, studs, 6mm screws and nuts.
- You need to make a clamp from the slats, in the middle of which make two cuts with a distance of 2 cm between them. Bend the slats so that the shape of the letter P is formed. In order to ensure that the clamp does not leave marks when attaching to furniture, you need to make linings from linoleum, gluing them with double-sided tape.
- You need to make two holes in the plates - for fastening for a bolt to a clamp and for a bolt without a nut. The second hole will prevent the plates from moving.
- The blade is secured with nuts and washers. The thickness of the resulting plate is 1.5 mm; with one similar attachment, a tape 1.5 mm wide is obtained. To cut a wider strip, you can simply add more strips.
Fastening to a table or other support is done using a wing nut, and the pin serves as a guide. It is secured through an adapter nut for quick disassembly when the device is not in use.
A simpler device, attached to the table surface, consists of pressing the knife blade with a clamp. A piece of plywood or wood of a certain thickness is placed between the table and the blade, which will determine the width of the tape being cut. Some flat material is also placed between the clamp and the blade to prevent damage to the knife blade. This type of bottle cutter has its disadvantages: you need to hold the bottle with one hand and pull the tape with the other. In addition, it is cut unevenly, since there is no reliable fixation of the size. Therefore, it will not be possible to produce a thin and even line using this type of bottle cutter, unlike more complex devices.
What is a bottle cutter?
Based on the name, it’s easy to guess why this device is needed. To make a bottle cutter yourself, you need to have a clear idea of what elements it will consist of. The basic part of any such design is a sharp blade, which, as a rule, is removed from a stationery knife. Its cutting edge is quite sharp and does not require sharpening. The space left on one side of the cutting surface will determine the width of the strips to be cut.
The device comes in manual and locking types. If you suddenly need to cut a plastic container, a bottle cutter will come in handy. Before cutting the container, it is first removed from the bottom. From the small cut made, they begin to cut the plastic rope. As a result, depending on the width of the desired material, you can get either a small ribbon or a thread of impressive length. There is practically no waste left, except perhaps the neck and bottom.
Where can such reliable plastic strips come in handy? There are many areas of their application, in particular:
- For weaving fishing donuts.
- For wrapping tool handles.
- For decorative purposes.