Ladies and gentlemen, welcome to another tutorial! For starters, YES, the origami Rubik's Cube will be made entirely of paper and YES, it will work! If you want to see this, watch the video below or the gif in step 10.
Be that as it may, I don’t want you to think that we are building a DIY speed rubik’s cube that you can use to set a new world record. While it's surprisingly durable considering it's made from plain paper, this cube is paper... and as such needs to be used with care and gentleness.
The main reason I made this cube was because I've always been interested in how they work, and I thought it would be an interesting challenge for me to figure out how to make a rubik's cube out of paper. If you have the same curiosity and patience to build it, I can assure you that the moment you connect the last part and see that it actually works will be absolutely worth the effort!
For this tutorial, I created an original design, a Minecraft design, and a clean design so you can get creative and make your own cool bricks. I can't wait to see what you come up with!
As a visual aid for this project, I created and included a video tutorial. Check it out above!
Placement of corners
The particles have already found their place, and you almost completely know how to solve a Rubik's cube according to the scheme for beginners in Russian from the video, all that remains is to complete the corners. This must be done without paying attention to their orientation, you must know when it is in its position.
We will show you in which situations the corners are incorrect and correct for assembly. Of course, it may also turn out that the 4 corners will fall into place initially. If 1 is in place, follow one of the examples: Turn the edge forward, up to the right, the other edge - forward, again to the side, but left, down, to the right, the other edge - down, and the reverse - to the left, the left edge - up, right - left, forward, right, left - down, right - left, down, right
So, we put together a 3x3 cube, if you are interested in how to solve a Rubik's cube, there is a special diagram for beginners in Russian and for a 2x2 cube. I would like to believe that we were able to help you and you solved the Rubik's cube. This is quite an exciting activity that will help develop your mental abilities and motor skills of your fingers.
How do smart people solve a Rubik's cube?
To assemble or bring a cube into shape with faces of the same color, there are several officially developed methods:
- Rubik's official method
- author's methodology Karalov Brothers
- God's algorithm (assembly in 20 steps)
- traditional “Soviet” methodology from the magazine “Science and Life”
- cross and edge method
The latter guarantees that the cube will be solved sooner or later and is quite easy to learn. Therefore, we will consider it today, leaving other options for the fans.
Important: if the cube falls and crumbles, then incorrect “repair” will lead to the inability to assemble the puzzle.
To speed up the process, you can use the Rubik's Cube Solver. It helps, although in some cases the options suggested by the computer will not lead to a positive outcome.
Excursion into history
Modern varieties of Rubik's cube
The Rubik's Cube was created by the Hungarian scientist Erno Rubik; the professor and sculptor used this model to explain to his students the basics of mathematics, namely the mathematical theory of groups. In that same 1974, Rubik could not even imagine that this attempt to clearly demonstrate mathematics would make him a millionaire.
The assembly of the item took about a month, during which time it underwent many changes, mainly related to size. The scientist tested the future toy on his friends and loved ones. The patent was received in 1975, and the first batch was published only in 1977. “Magic cubes,” as the invention was dubbed, first appeared in Budapest, in a small cooperative just in time for the Christmas holidays. Several pieces from that very first batch ended up in the USSR.
Such mathematics soon interested the minds of other people. Tibor Lakzi started promoting the cube as a puzzle game. It was with his help that the world recognized the now beloved cube. Lakzi lived in Germany at that time, but often visited his homeland, where the object he liked was discovered. In one of the cafes where the entrepreneur was having lunch, he saw a funny little thing in the hands of the waiter. He, as a mathematician and as a businessman in the computer field, immediately saw the prospects and contacted the inventor. Another game inventor, Tom Kremer, who had already founded Seven Town Ltd., was brought in for promotion.
First popularity
And already at the end of the 20th century, hundreds of millions of copies of the Rubik's cube went on sale, making it an exciting game and hobby. The thing spread in European countries in May 1980, and the USSR saw it a year later. Of course, in our country there were some oddities. Some officials were given bribes with these toys, to receive which citizens had to stand in line and go around the circle twice.
The desire to understand the puzzle and learn its secrets enlivened the minds of everyone, even those who did not have it themselves. And in 1982, an article appeared in the famous magazine “Young Technician”, which presented diagrams and methods for making foreign toys with your own hands. And, of course, they could not do without the stigma - a bourgeois toy that takes up a lot of the workers’ time. But these arguments did not exist for long, and soon articles with diagrams for assembling a Rubik’s cube appeared on the pages of scientific journals.
So that people who could not cope with this difficult task and did not drown out their failures in alcoholic binges, special plastic hatchets were developed to destroy the unsuccessful, nasty model.
A little more history
The largest Rubik's cube
In 1982, the first puzzle assembly competitions were held. The venue was the capital of Hungary - Budapest, where the game was invented. The participants were 19 countries, represented by the best players and winners of local competitions. The winner was Minh Thai, an American student from Los Angeles, who was 16 years old at the time. He completed his task in 22.95 seconds. Although at that time there were persistent rumors about craftsmen who could complete the assembly in just 10 seconds. Of course, compared to Mats Volk's current record, these numbers seem simply huge.
The Dutchman manages this in just 5.5 seconds. Although there is a video where the previous record holder Felix Zemdegs solves the magic cube in 4.21, it has no official confirmation. But there is another record, which is also not officially included in the Guinness Book of Records. The CubeStormer-3 robot managed to beat Zemdegs, spending only 3.25 seconds on the problem. Let's hope that one day one of the people will be able to break the program's record.
Today it is the best-selling toy in the whole world, which everyone has tried to collect. She has several awards to her name: she has repeatedly received the National Hungarian Prize for the best invention, and won in France, the USA, Germany and the UK. In 1981 he received his rightful place in New York, in the Museum of National Art. There is even a special Rubik Foundation, established in 1988. It was founded to support young inventors.
: Materials
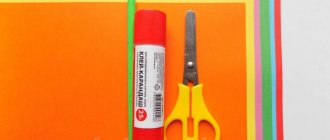
For this project you will need the following:
- Design (See below)
- Thick glossy photo paper A4
- Cutting surface
- Stationery knife
- Marker with a thin tip
- Ruler (or other flat surface)
- Needle
- PVA-based glue (50 grams of Elmer's Glue is enough for several cubes)
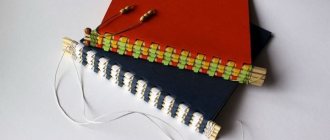
Note: I'm not exactly sure of the name of the paper I used, but it was a heavy paper with a slightly glossy finish. This coating was excellent because it gave the paper a bit of strength and a plastic-like appearance.
If you will be using a blank design and want to overlay your images onto it, you will need to make sure you rotate them correctly on each side of the die. You can use my Minecraft designs to see how I rotated each picture.
- Rubik Cubes Blank.pdf
- Rubik Cubes Minecraft.pdf
- Rubik Cubes Original.pdf
What does a Rubik's cube consist of? Important to know before collecting
Inside the Rubik's cube there is a cross-shaped frame on which the moving and static elements of the puzzle are attached.
- Centers - 6 pcs. One color, always stay in place.
- Ribs - 12 pcs. Outer elements with two colors.
- Corners - 8 pcs. Corner elements with three colors.
- A face is a set of 9 elements that can be rotated simultaneously.
To write algorithms, simplified names of basic elements are used, which are determined by the observer (the person who carries out the assembly) relative to himself:
- F - facade
- T - rear
- R - right side
- L - left side
- B - top
- N - bottom
- C - middle layer
In the formula, each symbol corresponds to a clockwise rotation of the specified element by 90°: F, T, P, L, V, N. Counterclockwise rotation determines the stroke: F', T', P', L', V', N' . The number after the letter indicates the number of repetitions of the operation.
Example: formula NP'F'V2
1. Rotate the bottom edge 90° clockwise (to the right).
2. Rotate the right side 90° counterclockwise (toward yourself).
3. Rotate the front edge 90° counterclockwise.
4. Rotate the right edge 90° clockwise (towards you) twice, or 180° once.
All formulas (rotations) are performed until a satisfactory result (shown in the figure) is obtained.
Let's go, let's start solving the Rubik's cube. Instructions below.
Begin. Volumetric cross
At the first stage of assembly, it is necessary to determine the main color, the color of the top edge, which is also the color of the central selected element.
Important: the further decision does not depend on the choice of color.
Next, you need to raise elements of the same color to get the so-called “top edge cross”:
1.1 NPF'P' - if the corner cube is on the bottom face (rotation of the side face and several turns of the bottom)
1.2 FF - if the corner cube is on the side face (rotation of the bottom face).
The assembly of the first part gives an understanding of the process and in general does not depend on formulas - this part is solved without the use of combinatorics by simple rotations.
Let's continue. Side
To assemble the top face, you need to put 4 corner cubes of the selected color in their places. In this case, several “facades” are possible, since the corner cube can be turned in 3 ways relative to the faces.
There are 3 possible situations, each of which has its own algorithm:
2.1 LN'L' – if the cube of the selected color is on the side face
2.2 F'N'F - if the cube of the selected color is on the front face
2.3 (Ф'П')Н2(ПФ) - if the cube of the selected color is on the bottom face
Following. Belt
The stage involves 2 possible layouts and 2 formulas, with the help of which it is necessary to assemble the second layer (belt) from the top edge.
After the last operation, the cube for rearranging in this one is located under the central element of the front face. It needs to be displayed on the façade so that the colors of the central and corner elements match.
There are 2 main algorithms used:
3.1 (NLN'L')(N'F'NF) - if the element goes to the left side
3.2 (N'P'NP)(NFN'F') - if the element goes to the right side
If the desired cube is in the middle layer, you need to apply any algorithm until the cube is on the bottom face.
Now - an exhibition of ribs
Important: this stage requires turning the cube 180° away from you, so that the bottom edge is at the top and the others remain in place.
At this stage, it is necessary to correctly align the edge cubes using a single formula, due to which there will be 2 cubes of the correct color on the bottom edge.
4.1 (VFP)V(P'V'F')
Making a coordinated cross
After stage 3, 3 basic starting positions are possible, applying the formulas of the stage to which the required assembly will be obtained. If the current situation does not fit any of the options, you need to run Algorithm 5.3 twice.
Does each basic situation have its own solution algorithm? which comes down to repeating one combination:
5.1 (PS)4 V (PS)4 V'
5.2 (PS)4 V' (PS)4 V
5.3 (PS)4 V2 (PS)4 V2
Attention: the rotation of the middle edge “C” is carried out from the bottom side.
Then - placement of angles
At this stage, you need to turn it over again and reorient the cube so that in the far left corner of the top face there is a corner cube that matches the color.
The choice of algorithm depends on the specific situation and remains with the “player”:
6.1 (P'F'L'F)(PF'LF) - direct algorithm class=”aligncenter” width=”835″ height=”187″[/img]
6.2 (F'L'FP')(F'LFP) - reverse algorithm
Now turn the corners
The final stage of assembly is the most critical, since incorrect assembly (execution of the algorithm) will lead to a violation of the design and a rollback several steps back.
Depending on the current combination, it is necessary to apply one of the algorithms, which boil down to one:
7.1 (PF'P'F)2 V (PF'P'F)2
7.2 (PF'P'F)2 V' (PF'P'F)2
7.3 (PF'P'F)2 B2 (PF'P'F)2
Each is performed in 2 stages: the first half until the corner cube is correctly oriented, the second half (after rotation) until order is restored in the lower layers.
Hurray, almost everything. Completing the build
The assembly is completed with a single rotation of the last assembled face by 90° clockwise/counterclockwise, depending on the current situation.
Rubik's cube solved!
How to assemble from paper modules
It is not difficult to make a cube from paper modules, although it will take more time. A similar figure consists of several identical parts. Initially, the required number of modules is made, then a cube is assembled from them. The process includes several points:
- Prepare the necessary materials - six sheets of paper. They can be either plain or multi-colored. It is not recommended to use cardboard for this craft, it is too thick. Even paper will make a strong figurine.
- A sheet of paper is folded in half. Then it is opened and each half is divided into 2 more parts.
- The lower right and upper left corners are folded, after which the lower part is folded towards the center.
- The upper part is also folded towards the middle, then the remaining corners are folded inwards. After all the manipulations, a part is obtained that looks like a parallelogram.
- Place the craft with the front side facing you and pull the corners, you get a small square with bent corners.
- Six identical parts are connected to each other, tucking the corners into pockets.
If desired, the parts can be glued together during assembly, then the figure will be more dense and will not fall apart.
Are there easier ways?
Not unless you're a record-breaking genius. First you need to learn how to assemble correctly.
Each assembly stage is carried out strictly from the basic position. Moreover, in some cases, the cube must be brought to the base position independently, by reorienting it or re-executing the current (previous) algorithm.
Not only the algorithm for a specific operation is important, but also the overall assembly sequence. Otherwise, the structure of the problem solution is disrupted and an unpredictable solution is possible.
All that remains is to answer the question for yourself: why solve a Rubik's cube?
For the bulk of the planet's population, the answer is obvious. Unlike spinners and other simple ways to keep your hands busy, the Rubik's Cube allows you to train not only your hands, but also your mind.
Solving (assembling) a cube blindly is impossible. The likelihood of this event is much less than the appearance of intelligent aliens on Earth, the beginning of Star Wars, or the independent revival of dinosaurs.
So put your hands to your feet and grab the cube!
(
124 votes, overall rating: 4.63 out of 5)