Fastening tools can be either permanent or consumable:
- glue (instant, PVA, pencil),
- glue gun (for large elements),
- double-sided tape (for temporarily securing parts),
- grommet installer (in order to insert rings connecting the sheets of the product).
Other types of tools:
- stamps,
- scoring board and stick (for creating even folds on cards),
- embossing stencils,
- ruler,
- cutting mat,
- stencils for inscriptions.
As a basic set for creating your first works (postcards are best), we recommend buying several sheets of suitable scrap paper, art cardboard (aka cardstock) or embossed watercolor paper, a pair of good scissors and several types of decorative elements (brads, translucent paper tape, a set of beautiful tags or pictures). Believe me, this is really enough to get started.
Collage of photos
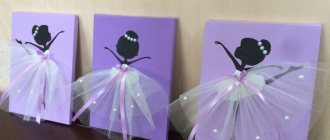
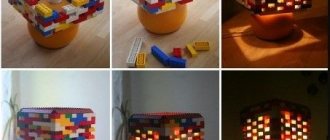
A shoebox makes a great collage display for photos, cards, and keepsakes. Line the entire box with brown wrapping paper and glue a piece of scrapbooking paper to the bottom. Make partitions from thick thick cardboard, which will be the basis for the collage.
From a piece of medium-thick lace, make a loop-handle, using which you will hang the box on the wall. Decorate the base with butterflies, flowers, leaves and any other decor. For example, you can use small flowers using the origami technique or foamiran.
Glue photos into your sections and use paper corners and frames. Decorate the collage with stickers, tapes, and small three-dimensional figures. Cut a strip of scrapbooking paper in a spiral and wrap it tightly around a pencil to create a rose.
Photo: svoimirukamy.com
Photo: handmade.jofo.me
Scrapbooking – what is it and where to start
Scrapbooking for beginners is a type of manual creativity, which is based on the design and production of photo albums, the original storage of family photographs, personal stories in the form of photographs, drawings, newspaper clippings, and notes. An original wedding and New Year's album, personal diary, invitation card, gift box, picture, book, binding, envelope for money will be very beautiful. Scrapbooking is also suitable for beginners; it is worth choosing simple options, after mastering which it will be possible to move on to complex patterns.
At its core, scrapbooking acts as a unique way of storing stories, using tactile and visual techniques that replace the story. The photo album must be decorated in a special way and consist of separate leaves, each of which will express a complete thought (collage). Such original albums should cover one topic - the birth of a child, a wedding. For beginning craftsmen, there are ready-made diagrams (sketches).
In Russia, demobilization albums are widely popular, containing not only photographs, but also drawings, collages, interesting caricatures, wishes, and addresses of colleagues. The production of such original albums is carried out by soldiers who are novice craftsmen, and everything necessary can be collected during the service.
It simply doesn’t make sense to arrange all the photographs in the house in scrapbooking style, so a specific theme must be chosen, after which photos will be selected to match it. Beginning scrapbookers may find it tiring to spend a long time creating a masterpiece, but after completing a few elements, they will have a desire to continue practicing this art.
Mini album
Take a thick sheet of paper and divide it into about 12 squares - calculate the number taking into account the sizes you need. Cut the horizontal lines so that you get a snake - without cutting the last segments, as in the photo. Fold the blank like an accordion and connect all the pages with a strip of paper or tape. Decorate the cover with cutouts, stickers, ribbons, bows and decoupage.
Take small photos and organize them on the pages the way you would like them to appear. The more free space on the page, the more space for imagination. Use stickers and stamps, add small details with colored pens, and decorate everything with stickers and ribbons at your discretion.
Photo: svoimirukamy.com
Photo: svoimirukamy.com
Tools for work
Modern scrapbookers use many different tools, but beginners don't have to buy everything at once.
Required Tools
The list of essentials for the first time will be as follows:
- Scissors. They should be sharp and easy to use. You don't have to buy several at once, but over time, your arsenal will likely include a variety of jagged edge scissors and manicure scissors for small details.
- Knife. For beginners, a comfortable construction or stationery knife with a tightly fitting blade will be enough. In the future, it will be possible to purchase special cutters, including in a set.
- Ruler. It is advisable to choose several metal ones of different lengths.
- Pencils, markers, pens.
- Hole puncher. The most useful will be the border one, with which it is easy to process the edges of the paper, and also universal. This tool is not necessary for a beginner, so it is not recommended to buy small, cheap hole punches at the initial stage.
- Stapler.
- Glue. For paper, regular PVA is suitable; “moment” can also be useful.
- Double-sided tape. It cannot be used to glue small parts and background paper, but you can attach photos and other details to each other to add volume.
Adhesive materials
In addition, it is convenient to use a breadboard mat with centimeter markings for cutting materials. But for starters, an ordinary board or plexiglass will be enough. There are special stamps made of rubber or silicone for applying ornaments. You can purchase just a couple of pieces and various ink pads for them.
Ring album
Decide on the size of the album and cut out two sides of the cover from thick packaging cardboard. A regular sheet will also work, but for texture, stick a piece of padding polyester of the same size onto it. Cover the cover with thick, expressive fabric - canvas, linen, burlap. On each side, leave at least a centimeter for the hem, which you will then cover with a sheet of paper or cover with tape.
Cut out a small square in the center of the front cover, take out the cardboard and padding polyester, and tuck the edges of the fabric inward. Print the size of the photograph or picture that you will insert into this window, and paste it in place. The dimensions of the square should be such as to just cover the folds of the fabric.
Make neat holes for the eyelets and insert large metal rings or ties. Cut the required number of sheets, make holes in them, and assemble an album!
Photo: novaplastica.ru
Decoupage for beginners step by step: 8 video lessons
Sketches
Scrapbooking sketches for beginners will help greatly facilitate the step-by-step process of creating original photo albums, postcards, and notebooks. For beginning craftsmen, sketches will be a real lifesaver, because they can give new ideas and inspiration when creating an original photo album, frame, or notepad. If you can’t make a scrapbook page yourself, you should pay attention to ready-made templates (blanks) for scrapbooking.
Bound album
Even for binding, it is better to make pages from cardboard if you plan to decorate them. This way they will not be deformed, and pens and markers will not break through. For gluing, cut narrow strips of 2-3 cm, and for decoration, make several bright separator pages from colored cardboard with patterns and prints.
Glue the pages onto narrow strips, leaving a distance of a few millimeters between them. You will need it to use voluminous decor in your album, but at the same time ensure that it closes properly. Glue in the cover in the same way, tighten the binding with gauze tape and cover with a spine of colored paper.
Photo: novaplastica.ru
From American classics to freestyle: what are the different scrapbooking styles?
There are as many trends in scrapbooking as in any other art form. And each master adds something special to them. Here we present a few of the most basic ones, which are always in demand and interesting to perform.
American
Since modern scrapbooking originated in America, it is the American style that can be considered basic and classic. It is characterized by an abundance of bright decorative details that seem a little “childish” - these are simplified images of flowers, “dancing” letters, butterflies, flags, stickers, multi-colored buttons and colorful backgrounds with stripes and polka dots. In a word, remember the fashion of the 80s, and everything will immediately become clear to you.
Colors:
bright, rainbow, contrasting.
European
In contrast to the American style, this style is distinguished by laconicism and severity, which are characteristic of British lords. Calm deep colors, simple shapes, moderation and a good sense of taste - this is what characterizes such works. Bright diversity, which distracts attention from the photographs, is not appropriate here, but collages of several similar frames are very common.
Colors:
restrained, most often in the same range (for example, blue and light blue or dark green, light green and white).
"Pure and simple"
Another laconic style, which is characterized by special lightness and airiness. Plain paper, a lot of empty background, a minimum of decorative details and certainly elements of journaling, that is, inscriptions. They can be quite long, but not necessarily very readable, since they are part of the decor.
Colors:
light, clean, a lot of white.
Rustic
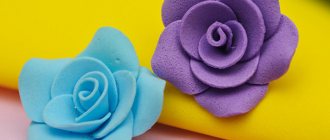
This style can be described as “rustic simplicity” or “the beauty of nature.” It allows the use of plant decoration elements (spikelets, leaves, flowers), rough fabrics, and wooden decorations. It should also feel quite light and natural, even if there are a lot of details in the composition.
Colors:
natural, calm (sand, grass, light shades of brown).
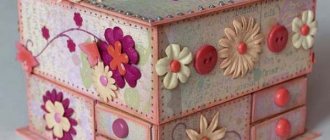
Shabby chic
But here you can have a blast with lush floral bouquets, multi-tiered compositions, voluminous lace, buttons and decorative elements sticking out in all directions. Shabby chic is one of women's favorite styles, where you can let your inner girl out, allowing her to enjoy sparkles and pearls, hearts and birds, plaster frames and the overall impression of a “exploded cake”. The bigger, the better!
Colors:
pastel, delicate, the presence of white is mandatory.
Grunge
The complete opposite of shabby chic. There will be dark colors, "dirt", a lot of craft paper, black ink, scuffs and torn edges. In this truly masculine style, you can use gears and other flat parts from mechanisms, as well as metal or metal-like decorative elements. Many craftsmen like to artificially age some parts of the composition.
Colors:
dark, a lot of black and brown with a contrasting bright accent (yellow, orange, white).
Vintage
It is reminiscent of grunge using aging techniques, but at the same time allows the use of purely feminine decorative details. Lace from grandma's stock, old buttons, vintage frames and fonts typical of the century before last are well suited for this technique. Ink and stamps, metal fittings, paper flowers, images of cherubs and young ladies in caps are also appropriate here.
Colors:
muted warm (burgundy, brown, dark green), sepia, b/w.
Mixed media
A deliberate mixture of several styles and techniques. Lovers of this style combine grunge and vintage, shabby chic and vintage, European and “pure and simple” or any other option to their taste.
Freestyle
Down with restrictions! You can create the way you want, using any techniques and materials, alternating them, adding something of your own.
Gift envelope for money
To give money as a neat and pleasant gift, for example, for a wedding, you can make an envelope with your own hands using scrapbooking techniques. To do this, you will need colored cardboard and as much cute holiday decor as possible - stamps, ribbons, stickers, artificial flowers, plastic decorations, lace.
Fold a simple envelope from a sheet of cardboard and attach a tie-tape to double-sided tape. Cut out rectangles of suitable size from scrapbooking paper and glue them inside, back and front. You can sew them with a zigzag or a beautiful hand stitch - it’s even more interesting. Glue butterflies, flowers, holiday garlands, braid, beautiful inscriptions, and tie ribbons.
Photo: novaplastica.ru
Crochet napkins: 6 simple patterns for beginners
Other interesting techniques for creating scrap compositions
Many techniques in scrapbooking exist at the intersection with other types of creativity. For example, an origami figure, parchment patterns (from tracing paper or parchment), quilling-style patterns (from folded paper strips), etc. can be included in scrap work.
An interesting example of creating a composition
One of the unique techniques in scrapbooking is journaling. This is the addition of any texts - quotes, dialogues and recordings. The text can be typed or handwritten.
Designers are advised to always think through the structure of the text in advance, before starting work. This is important for creating a harmonious composition, proper arrangement of photographs or decor.
Journaling elements are most often used for scrapbooking albums, and less often for postcards. Some tips for adding texts:
- Large texts need to be divided into small paragraphs.
- The combination of lines written by hand and printed using stamps looks interesting.
- Slanted lines and spirals of lines of text are welcome; you can even write on top of photographs and upside down.
- You shouldn’t limit yourself to quotes; you can write whatever you want in your own words.
- You can use three-dimensional letters (made of cardboard, fabric, felt, etc.).
- The “careless” inscriptions, with specially left blots, look original.
Colored textured card
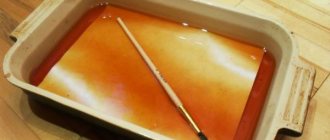
Take any sheet of A4 paper and lay it out on the table on a backing or simply on film. Wet five more of the same sheets in hot water and crumple them. Without waiting for them to dry, place them in a bowl with a warm mixture of PVA and water and let them sit for a while. Take out the wet, crumpled sheets and carefully place them in a stack on the first blank sheet spread on the film. While the paper is still wet, scatter threads, leaves, blades of grass, dried flowers and other small flat decor across the surface in a chaotic manner. Cover everything on top with another layer of plastic wrap and leave it under pressure overnight. In the morning, remove the film and let the future postcard dry completely in the air.
Carefully trim the edges, cover them with ribbon, lace, or zigzag them on a sewing machine. Apply acrylic paint with sweeping movements using a wide paint brush. You want a slight carelessness, not a flawless 100% fill. Decorate the card with bows, ribbons, ties, beads, and at the end, write wishes inside or paste photographs.
Photo: mahsar.ru
Photo: fotkay-msk.ru
Keeper of Memorable Moments
The most popular were and remain photo albums containing photographs of a wedding celebration and the first photographs of a newborn baby.
The album of the child’s first year of life contains not only photographs, but also memorable notes from the mother about how the baby grew and developed. There may be notes about the baby's first words, hand and foot prints, and the album itself turns into a bright and colorful diary of observations of the baby's development.
Since ancient times, soldiers who have served in the army have been making demobilization albums with their own hands. It contains photographs of the first day in the army, the solemn taking of the Oath, army everyday life and holidays. The photographs in the album are supplemented with notes and wishes from colleagues, and are carefully kept at home, reminding them of the service.
Nowadays, creating retro albums has become popular. Old photographs are restored and retouched, and little by little memories of those to whom we owe our birth are collected. We are not Ivans, who do not remember our kinship, and using such retro albums we can restore the family tree, leaving a memory for future generations.
Chocolate girl
A homemade chocolate maker is a simple and effective way to beautifully present the most ordinary chocolate bar. To do this, take a thick sheet of cardboard and transfer the diagram from the photo onto it, maintaining the proportions. Go along all fold lines with the tip of scissors or a non-writing ballpoint pen.
Form a box, glue the pocket with PVA and wrap the future cover. For the inside, cut out 2 rectangles from colored paper and a narrow strip for folding. Take decorative corners, lace, ribbons and decor. Glue the inside of the chocolate bowl, decorate it to your taste and decorate the edges with a beautiful seam or lace.
Glue a thin ribbon tie on the outside and cover it with scrapbooking or decoupage paper on top. For voluminous elements, take voluminous double-sided tape and add stamens and beads to the flowers. Make a small decorative wish tag. When the chocolate bowl is ready, all that remains is to put the bar itself inside and tie the ribbon with a beautiful bow.
Photo: novaplastica.ru
Photo: novaplastica.ru
Amigurumi for beginners: 6 simple patterns step by step
Decorative elements
Scrapbooking gives full scope to self-expression - materials for decoration are limited only by the artist’s imagination. The works use any printed products and their fragments, ribbons, flowers and leaves, buttons, fabrics, lace, beads, pins, cords, eyelets, rhinestones, pendants, brads, paper tape, stickers, tags, volumetric cuttings from cardboard, paper and wood, plaster elements, accessories for toys, watch parts.
Select decorative elements for scrapbooking
Banknote holder
If it is convenient to store coins in a piggy bank or a regular bank, then paper money is put in envelopes or boxes. But you can make a beautiful and effective banknote from an ordinary sheet of thick cardboard. Moreover, for the frame you need only three parts - two rectangles 11.5x21 cm and one 6x21 cm.
The parts are made separate so that the bill holder opens easily and beautifully. Connect them together with wide ribbons of thick watercolor paper and mark the fold with scissors or a non-writing pen. On the front side, glue a rectangle of synthetic padding polyester to size using double-sided tape.
Glue thin ribbon ties from the inside and decorate the front side with blanks. Use pictures, flowers, petals, three-dimensional details, special decor for scrapbooking. Glue gears, keys, locks, small pendants, beads or any other decorations on top.
Cover the inside of the cover with scrapbooking paper to hide all the seams and fabric folds. Instead of paper, you can take thin cotton fabric and sew a pocket or decorative patches to it. When you assemble everything, leave the part under the press for at least a few hours.
Mark the future box on a large watercolor sheet, maintaining the proportions from the photo. Glue the cardboard bindings into the sides and decorate the bottom and front with scrapbooking paper. When both parts are completely dry, all that remains is to glue the bottom of the box into the bottom of the cover.
Photo: domflower.ru
Photo: astfisher.ru
Photo: xeonix.ru
Photo: idoska-yaroslavl.ru
Tips for beginning scrapbookers
At the very beginning, everything seems complicated and a little overwhelming. Don't be afraid: the experience will come quickly. To make it easier to get started, use our simple tips.
How to save money on purchasing materials
- Be as discreet as possible in the scrap shop. Because as soon as you find yourself among all this unimaginable beauty, you will immediately want to buy EVERYTHING. Be strong and follow the list, which is better to make in advance. You don’t need 10 sets of paper, you don’t need 5 new hole punches, and you probably don’t need these wonderful stickers either (if you think about it and mentally attach them to your planned work).
- Try to figure out what decorative elements you can make yourself. It may be more profitable for you to buy a cutting machine and embossing stencils to make three-dimensional parts in the required quantity. Or rip off the buttons from an unnecessary old jacket. Or cut out a beautiful design from a random magazine.
- Buy fabrics and accessories from sewing stores. Buttons, ribbons, cords, lace - all this usually comes with a large markup in scrap departments, but in a regular sewing department it costs half as much.
- Remember that sometimes scrap paper can be replaced with watercolor paper, especially when it comes to postcards and notebooks, and not photo albums that will be stored for many years.
- Use your imagination more often and hone your artist’s eye: beautiful details for your work can be found anywhere. Use pages from old books and diaries, tickets, wrapping paper (and even film!), scraps of unwanted clothing, buttons from your aunt's closet, stamps from foreign envelopes, napkins from a cafe - every little thing can become part of a masterpiece.
- Even if you are modest in your means, do not take savings to the point of absurdity - there should be balance in everything. You should not replace all scrap paper with children's colored cardboard or use cheap glue instead of high-quality one.
How to Learn Scrapbooking Techniques
The best way to learn any new business is to find a decent teacher. For those who are taking their first steps in scrapbook art, it is always useful to attend various master classes, where an experienced teacher explains step by step how to use tools, select materials, build a composition on a sheet of paper and bring the job to the end.
The second way (and it’s no worse) is to carefully study other people’s work. Internet access is sufficient for this. The more you delve into the work of more experienced masters, the richer your range of fantasies and skills will become. Subscribe to the blogs of people whose work inspires you, create your own catalogs of ideas, and communicate more with similarly passionate people.
And don't be shy to ask. Fortunately, the scrapbooking community is quite open and rarely does anyone refuse advice or an answer to a beginner’s question about how this or that is done.
How to start making money with scrapbooking
First, create an account on social networks, in which it will be convenient for you to show both the works themselves and the stages of their creation. And then... don’t rush to sell the fruits of your creativity. For quite a long time they will not be very professional, even if it seems to you that these works are perfection itself. Later you will realize that you made many mistakes that are hardly acceptable for an experienced master. Let your first scrapbook creations go to your friends and acquaintances. Don’t be afraid to accumulate a whole pack of them - on New Year’s or another major holiday they will sell out like pies.
Preparing the base
As the main element for work, we take 2 sheets of paper of different shades in sizes: 11 by 20 centimeters for the first, and 10 by 20 centimeters for the second. On a sheet measuring 11 by 20, we indent 1 centimeter from the side of the smaller value, and then draw a special line along which we glue the part. It turns out a square measuring 20 by 20 centimeters.
Next, using a connecting line, we use the firmware of the part using a sewing machine (or manually). In this case, the ends of the thread should be secured in the opposite direction with glue.
Afterwards, we cut out the three necessary pieces of paper for decoration. We selected the sizes in the following values:
- 7 by 13 centimeters
- 8 by 16 centimeters
- 8 by 10 centimeters
- 9 by 12 centimeters for white cardboard as a photograph backing
Using a pencil, we mark the location of each decorative detail using a basic sheet of paper 20 by 20 centimeters. It is best to start from the left side of our square and move away from the edge, using the clockwise side in dimensions 2,1,1, and also 2 centimeters. Next, let's try on our future composition.
Next, in order to give your sketch texture and volume, you need to “plant” some details on the cardboard. To do this, you should use bulk glue or glue pads. Once you have glued all the pieces together, use a napkin to smooth your surfaces from the center to the edges. This way, the paper will be fixed more evenly and will not form air bubbles in the structure.