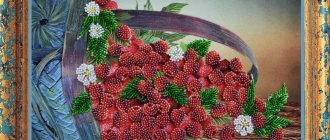
Interior decoration is the final stage of renovation or change of decor. Of course, exclusive decorations are valued above all else, but they are very expensive and do not always suit the decoration of the room. But many beautiful and modern things can be made with your own hands. For example, such a fashionable and unusual decoration as three-dimensional paintings. They can be made from a variety of materials: paper, cardboard, leather, wool, beads, putty. Undoubtedly, in every home there will be unnecessary leftovers from some kind of work, and the missing ones can easily be bought in craft stores.
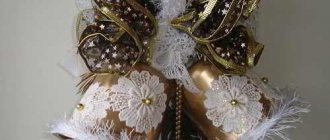
Three-dimensional paintings “Ballerinas”
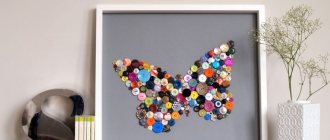
Volumetric paintings made of paper
Paper cutting: technique, master classes
This handicraft comes in several types:
- Outline.
When curled pieces of paper are used to frame a drawing along a previously drawn contour. This technique is sometimes used in conjunction with scrapbooking. - On a plane.
This is a facing technique in which the workpieces are placed next to each other, filling the entire surface with them. - When trimming in layers,
parts are glued into each other. At the same time, the combination of elements of different shades helps create interesting effects. - Volumetric trimming
is most often done on a plasticine base. Twisted parts are attached to the molded blank, which allows you to make complex compositions.
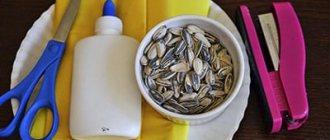
Let's look at a simple example so that you understand how to work in this technique. To make such a violet, take:
- corrugated paper;
- sheet of cardboard;
- a simple pencil;
- scissors;
- a bottle of glue with a spout.
Redraw the presented image onto light cardboard.
From corrugated paper you need to cut squares with a side of 1 cm. To fold the paper elements you need to use a special stick for trimming. If you don’t have one, you can replace it with a pen body sharpened with a pencil.
- Using one of these tools, press a small piece of paper in the center and wrap it around the stick.
- Roll with your fingers without removing from this tool. Lubricate a small area of the contour with glue, place the twisted piece here directly on the stick, and carefully remove this tool.
- Create the second element in the same way, glue it next to the first. Having completed the contours, proceed to filling the inside of the petal.
- When the blanks are glued to all the petals, roll the same elements from squares of yellow corrugated paper. Glue them to the center of the flower.
If you wish, you can draw only the outlines of the plant, then the work will be completed faster. If, on the contrary, you want to prolong the pleasure of creativity, then cut out the same squares from light paper, twist them, fill in the background, or proceed to the next work. See how napkin trimming is done. To make this work, take:
- bright napkins;
- scissors;
- sheet of cardboard;
- gouache;
- trimming stick.
Cut strips 1 cm wide from napkins and chop them into squares with the same side.
Draw the outline of a tree on a white piece of cardboard. Apply glue to a small area so that it does not have time to dry. At this time, take a square from a napkin, screw it onto the tip of a trimming stick, and glue it to the smeared outline. Then glue another one and others. Take napkins of different colors to make the tree bright and cheerful. Fill the entire crown, sketch the trunk with brown gouache. Since you made the foliage of the tree from elements of different colors, make the picture frame from napkins of the same color. Use blue napkins to create a background. Elements for this are also created using the trimming technique. You will get a wonderful picture that will surprise and delight everyone who sees it. Using this technique, children and adults can do many other amazing projects using either flat or contour cutting. For this, corrugated paper in yellow, orange, lilac, green, white and blue was used. First, glue a sheet of blue paper onto white cardboard, then draw the outlines of a fish and algae. After this, roll up blanks for trimming from yellow squares and fill the tail of the fish with them. Make her body from orange and her head from lilac. And white and blue will create the eye of the fish. All that remains is to fill the seaweed with similar elements and admire the wonderful work.
See how you can make interesting crafts using another cutting technique.
Photo printing
The technical side of the issue is taken care of by a photo workshop, which can print a suitable image on almost any basis: canvas, paper, ceramics, etc. These can be ordinary posters depicting interesting places, people, ornaments.
Advice!
A poster is not just a picture, it must convey a certain idea, correspond to the interior, the theme of the room and the character of the owners of the house. Recently, pin-up and retro style posters have gained particular popularity.
If the poster is large-format, you can divide the image into several segments and, when combined into a single canvas, play with the joints, making it look like a modular picture.
If there is a child in the house, then you can scan his drawings and select the ones that match the color, shape, etc. Such a poster can be complemented by a photo of the artist himself. All that remains is to print the poster and place it in a frame that matches the color and style.
A collage of old and new family photos can be hung as a picture in the bedroom or living room, and posters depicting the corresponding paraphernalia and fruits are suitable for the kitchen. Finally, it is worth noting that it is recommended to choose posters and panels for the kitchen in rich and bright colors, however, no one forbids you to go against the rules and create stylish ones.
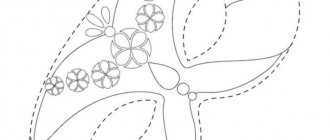
Templates for three-dimensional crafts made from paper and plasticine
Trimming will also help create such flowering cacti. For these crafts take:
- well sharpened pencil;
- plasticine;
- corrugated paper;
- toothpick;
- packing tape or satin tape;
- a pin with a bead;
- colored cardboard.
Let the child make three blanks from plasticine.
The large oval one will turn into a cactus, the small round one will become a flower, and the square one will become a pot for an artificial plant. Cut triangles from green corrugated paper, and from yellow paper - shapes of the same type, but only with an acute angle. You need to cut petals from lilac paper. Insert a toothpick into the cactus and the other end into the pot. Attach the flower base to the cactus. Fill his body with beautiful voluminous blanks. To do this, place a pencil in the center of the paper triangle, wrap it around the rod, and stick it into the plasticine base. Complete the first row, placing the elements close together, then move on to the second and the next.
To get the petal the desired shape, leave its tip free, twist only the part that you will attach to the plasticine.
To decorate a flower, you need to make 1-2 such petals, then fill its middle with triangular blanks made of orange paper. Look how the pot is decorated. It needs to be wrapped in a strip of colored cardboard or wrapping paper and tied with ribbon. A cactus made using corrugated paper cutting has been created. Look at the process of making another work using volumetric techniques. It will help your child develop creative thinking, fine motor skills, and imagination. Children show interest in working with paper, as a result of which such wonderful models appear. Prepare the following:
- corrugated paper;
- scissors;
- album sheet;
- pencil.
Cut paper into small squares.
Place the blanks of each color in separate containers. If the child is not very small, let him draw an apple on half a sheet of album paper. If he cannot do this on his own, adults will help. Coating small areas with glue, let him attach the squares here to make a fabulous rejuvenating apple. You can draw a twig or glue a thin strip of brown paper instead. You can glue one piece of a different color into an already attached one, thereby getting the effect of trimming in layers. The next two works are devoted to this technique.
All the pros and cons of the solution
It's always nice to create something with your own hands. And it’s doubly nice if something looks great and fits perfectly into the overall design concept of your interior. Moreover, volumetric paper flowers have obvious advantages:
- do not wither;
- do not require maintenance;
- do not cause allergic reactions;
- with their help you can create a wide variety of flower arrangements;
- allow you to decorate the wall as brightly, beautifully and stylishly as possible;
- create a festive mood;
- do not require rare tools or expensive auxiliary materials for production.
What can be written down as a minus? Perhaps there is only one fact: yes, no matter how hard you try, living plants still look more convincing. So to speak, “live.” However, voluminous flowers made by hand from paper have “their own atmosphere” - they go towards the art of origami and set completely different decorative standards by which they should be assessed.
Schemes for cutting corrugated paper in layers
New Year is just around the corner. Children and their parents will certainly prepare for this holiday. They will be able to make a postcard by placing a Christmas tree on its front side.
Prepare with your children:
- corrugated paper;
- Christmas tree drawing;
- glue and a brush for it;
- pencil;
- thick sheet of paper.
The work begins with drawing a Christmas tree on a sheet of paper.
You can use a template for this. Cut squares from green paper, as well as from sheets of other colors. First, the child will fill in the contours of the Christmas tree with green squares wrapped around a pencil. Then, in some places you need to glue blanks of other colors on top of them. They will become a decoration for the Christmas tree.
But you can do not trim in layers, but along a plane. Then you will need to first glue colored squares, which will become toys, and then fill the surface with green ones.
You can give your mother or grandmother a souvenir scarf. They will certainly be happy, especially since their beloved child did such a job. To make a scarf, you need to take:
- a sheet of red cardboard;
- corrugated paper of different colors or napkins;
- glue together with a brush;
- scissors;
- pencil;
- drawing template.
If the gift is made by March 8, then have dad or grandpa transfer the pattern template onto cardboard.
You will need a triangular part of the base. To do this, draw a square on cardboard, then cut it diagonally. Starting with small areas, have your child fill in the design with squares of different colors. You will need a lot of them. If your child doesn't have the patience to turn the crosscuts, help him with this so as not to reduce his interest in the work. The result is such a wonderful scarf. The next work was done by his mother and the child. A great example to follow. The result will be mushrooms and autumn leaves, made using trimming layers.
To create an autumn forest, take corrugated paper in red, orange, yellow. You can also make inclusions using brown and green.
For the craft, take:
- colored paper, cut into squares with a side of 2 cm;
- templates for application;
- trimming stick or pencil;
- glue;
- scissors.
It is convenient for children to glue using a brush or taking a glue stick.
Provide them with these materials and help them cut paper into squares. You can take your favorite mushroom and leaf templates from the Internet or use the ones presented. You can draw them yourself on thick cardboard and cut them out. The most painstaking work is cutting out squares and forming twisted blanks. To create the desired shape, place a square of paper on your left index finger. Hold it with your thumb. Place a pencil in the center of the workpiece and twist it. As you can see, this is another option for forming parts. We will also glue it in another way so that you can choose the one that is most suitable for you.
Pour glue into a bowl. Dipping the trim piece here, attach it to the leaf template. Having glued the red one, attach the yellow one directly onto it using PVA. The result will be an interesting effect. The yellow one is also glued to the orange blank; use green and brown squares as a base.
To make mushrooms, line the stem with white ends and the cap with brown, yellow or red.
Children's paintings made of corrugated paper
The trimming technique will also help you make them.
Such children's paintings turn out to be very cute and touching; they will remain for a long time and will decorate any corner of the house. If the child can, let him draw a round lake, reeds along its shores, and ducklings swimming. He will depict where the birch tree will be, a rainbow, and draw a horizon line. If this is difficult for a child, then adults will help.
For this work you will need squares of corrugated paper with a side of 1.5 cm.
The larger the size of the paper blanks for trimming, the higher the pile of the finished work.
Having cut them, you need to start gluing. In this case, it is most advisable to fill the space on the left side. First, cover the rainbow with multi-colored stripes, then make grass around it, and glue green trims. Also decorate the sky on this side, filling it with twisted blue squares. Leave some space for the clouds; glue the white blanks here. Also on the left side, start gluing brown parts in the form of reeds, make the chickens yellow, and lay out the lake blue.
Gradually moving to the right, decorate the white birch trunk with black splashes, rolled from paper of this color. Fill the entire space with voluminous blanks, after which you can enjoy the view of the colorful painting. This craft would be ideal for a kindergarten. Having brought it there, the child will certainly take first place in the competition.
But there are also more complex works that schoolchildren can do.
These violas were created by students in grades 1–8. This kind of joint work brings the guys together.
On a sheet of whatman paper you need to draw a viola with a pencil or transfer another image here. Then each of the guys will fill the flower with twisted trims of a certain color.
You can make winter paintings for the New Year.
If you draw well, draw the future art on cardboard with a pencil; if not, then just redraw it. A good template is embroidery patterns. They are transferred to a sheet and decorated with rolled paper pieces of a certain color.
Please note that the outlines of the Christmas trees are made of blue elements. This technique allows them to keep their shape and look fluffy and snowy.
Finally, look at how to make a New Year's garland, which can also be created using the trimming technique. For it, on whatman paper or white cardboard, draw the letters of the future inscription and cut them out. Now each one needs to be framed first with white trim, and red ones glued inside.
For the base, take a satin ribbon. Using a glue gun, letters are attached to it to create an inscription. Remember to maintain space between individual words.
That's how many interesting and necessary things trimming can help you do. But this is not all that can be made using this technique. If you want to create a three-dimensional snowflake, watch this visual master class.
Another will teach you how to make a heart-shaped topiary using the same technique. This is what you would give to your loved one for his birthday or Valentine's Day.
And today we will talk about how to make a paper painting with your own hands. Such a picture can look not only like an appliqué, but also like a three-dimensional sculpture.
To make a three-dimensional picture from paper you will need the following materials:
- colored paper
- scissors
- Napkins
- Double-sided tape or stapler
- Basis for the painting
- small carnations about three centimeters long
- hammer
Textile
From all kinds of scraps, fabric with beautiful patterns, ribbons, braid or lace, you can create real masterpieces in the patchwork style with your own hands. Fabric paintings are most often made using the appliqué technique. The basis is taken of dense textiles with discreet and inconspicuous patterns (stripes, polka dots, etc.), and the main elements are cut out from bright shreds.
Most often, kitchens and children's rooms are decorated with textile works, since these rooms are characterized by a certain simplicity present in the appliqué.
Advice! From felt, flannel and other fabrics that hold their shape well, you can cut out fruits, animals, cars, and houses. You can safely combine different textures and patterns on fabrics, use braid, decorative cord, and buttons for decoration. For the living room, you can make a textile picture from crinkled silk with abstract patterns.
Master class video:
3. Cutting out thin parts.
Cutting grass, feathers, hairs or fur is not difficult, try to cut in the direction of hair growth, otherwise it will “puff up”. Paint over the white edges with a pencil of a lighter shade than the drawing itself.
And when cutting out the stems, you don’t have to paint over the white edges so as not to add unnecessary thickness.
4.
Shaping.
Imagine what the object you want to depict looks like in real life, look at it layer by layer. This will help to correctly recreate the volume from paper.
As a backing, use an eraser, sponge or rubber mat (a computer mouse pad will do).
5.
Installation and gluing.
6.
Background.
The choice of background is very important. The appearance of the finished work largely depends on the color and texture of the material. If the painting is light, then a dark background will create the impression of depth and emphasize the image.
Choose a background that complements the image, rather than being an independent part of the picture.
If you are going to frame a picture, don't add decorations.
But in a postcard, correctly selected decor will only add charm. Step-by-step instructions:
1. Select a pattern for the entire composition and for the base layer. 2. Thin paper for the base layer must be compacted. 3. Cut out individual elements of the design for the second layer. The elements are cut out completely, repeating the pattern of the base layer. 4. Glue the elements of the second layer to the base using double-sided tape. The tape can be used in 1-2 folds (at this stage you can make your own changes to the drawing). 5. Cut out individual elements and form subsequent layers of the design. Before finally gluing the part, make sure it is in the correct position. 6. Finalize the work into a frame. When making cards, you can additionally decorate them with ribbons, sparkles, beads, etc.
Incredible and fantastic paintings from pieces of paper by an amazing non-professional French artist, sculptor and photographer Nathalie Boutté inspired me. I wanted to tell you how to make such a picture out of paper. The enormous possibilities of this ordinary and at the same time unique material are revealed in her wonderful colors in multi-layered paintings.
Nathalie began creative searches and experiments with various types and textures by studying the various properties and well-known techniques for working with paper. Her experiments with origami and work with three-dimensional compositions led her to the creation of an interesting technique of three-dimensional applique from strips and pieces of paper.
The possibilities of the material and this technique allow you to create very original works. Portraits made from many layers of paper turn out surprisingly alive and spiritual.
Spring panel
As already mentioned, three-dimensional paintings can be made with your own hands from almost any materials. For example, “Spring Panel” will look very organic in an eco-style interior.
To make it you will need:
- a piece of plywood;
- paint in a can;
- a piece of plain fabric;
- golden spray paint;
- brush;
- glue stick;
- LED garland;
- several branches of rowan, acacia or any other tree.
Operating procedure:
- the branches are placed under a press for several days so that they straighten;
- a piece of plywood is covered with fabric;
- if necessary, paint it with a sponge or brush;
- glue the branches to the fabric;
- lightly spray the picture with aerosol paint from a can;
- attach the LEDs to the branches using tape;
- mask the cable or make a hole and bring it out through fabric and plywood;
- place your work in a frame.
Now you know how to make a three-dimensional picture from different materials, and you can decorate your interior with an original piece of decor.
Having decided on the style, you can begin to select materials for the future work:
- Paint and canvas.
- Cardboard, designer paper, magazine clippings, old photos.
- Textiles, leather, ribbons, braid.
- Glass or crystals.
- Buttons.
- Dried flowers, shells.
Advice!
Don't throw away old children's drawings, scraps of fabric, magazines, jewelry - all this can become part of the picture. Store them in a separate box, periodically reviewing and arranging them together.