Often entrepreneurs do not have enough money in their budget to order a sign, and they decide to make it themselves. This is possible, but you need to take into account many nuances, know how and what needs to be done. Otherwise, you won’t be able to save money: you’ll only spend money on materials, and then you’ll still have to turn to specialists. The following information will be useful to those who want to figure out how to make illuminated letters with their own hands, or are planning to buy a ready-made sign. You will learn about the intricacies of the process and the result that should be obtained, and also receive valuable tips on making your own.
What’s better: making the letters yourself or ordering them
To make a sign in the form of three-dimensional letters with your own hands, you need to understand that this is not the easiest process. It is necessary to take into account many nuances, to have at least some experience in this area and in the issue of connecting the backlight.
In addition, to make it profitable to buy materials, you need to make a lot of letters. The film is sold by linear meters, plastic - by sheets. To prevent materials from being left behind, you need to make at least 6 letters, and add a logo to them. Otherwise, the cost of the sign will be unreasonably high.
At the Althea advertising agency, the production of three-dimensional letters is put on stream, which minimizes leftovers, and this has a positive effect on the price of the product. In addition, we use milling and laser cutting technologies, which ensure high quality processing. The details of the letters are even and smooth, with ideal sizes.
If necessary, we can develop a layout of your sign taking into account the permissible dimensions and select the necessary lighting. For consultation, please contact us using the form on the website or by contact number - we will answer all questions and help you fill out your application.
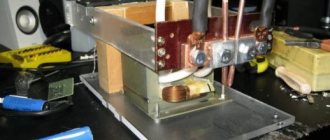
Making a box
Probably every man has dreamed of making a luminous sign with his own hands. And everyone asked the question - how to do it? Let's look at this process step by step.
- You need to make a 1:1 layout of the future product on the computer. There is a special program - Corel Draw.
- Then we cut out the resulting image using a plotter.
- Now you need to apply the mounting film from the center to the edges and trim off the excess.
- Then you need to cut out the aluminum profile and do not forget to take into account the length of the lamps.
- We mount the third part of the box (only the profile and corners).
- Now you need to make the back cover and insert it into the box.
- It's time to prepare the necessary installation tools.
- We make holders for lamps. They are attached to the back of the box using self-tapping screws.
- Next, we mount the lamps to the holders and connect the wiring. After which it needs to be isolated.
When using LED strips, the task is simplified to a minimum, since installation is extremely simple. You need to remove the protective film and properly attach the tape to the panel.
- Afterwards, you should cut out the front part from plexiglass and treat it from burrs.
- After removing the protective film, you can begin placing the text.
- We drill holes to drain moisture in the bottom shelf.
Brightly glowing billboard
Based on the above, you can also make a neon sign and luminous signs.
It turns out that you can make an excellent billboard or sign yourself. You just need to choose the right material and lighting device. At the moment, it is best to use LED strips.
Rendering the finished scene
Step 1
Having finished editing the text, go to 3 D - Render 3D Layer (3D - Rendering a 3D layer). Rendering may take a long time, but you can stop it at any time by pressing the Esc key.
After rendering is finished, right-click on the 3D layer and select Convert to Smart Object so as not to accidentally damage it.
Next, double-click on the 3D layer to open the Layer Style and apply the following styles:
Step 2
Add Outer Glow with the following settings:
- Blend Mode : Linear Light _
- Opacity : 7%
- Color: #ffcb8d
- Size : 131
Step 3
Add a Drop Shadow with the following settings:
- Opacity : 75%
- Uncheck Use Global Light _
- Angle : 63
- Distance : 6
- Size : 10
We get this result.
Advertising sign maintenance
The owner of the company carries out all sign maintenance work independently and bears financial responsibility in the event of a malfunction.
His responsibilities include:
- condition diagnostics (fasteners, electrical);
- repair;
- preventive work;
- cleaning the structure;
- replacement of worn parts.
When ordering an advertising sign, you can enter into a repair and maintenance agreement with quarterly service.
Washing advertising signs
The outer part of the sign is washed as it gets dirty. Cleaning of the interior is carried out according to the plan once every 3 months. Special cleaning products or equipment are used that do not damage microcircuits and electrical networks. Washing signs with household chemicals is not allowed, as the structure may fade or become unusable.
Dismantling an advertising sign
Dismantling is carried out through a contractor using special equipment and climbing equipment (at height). If an order to dismantle a sign is received, the procedure is carried out within 30 days. Otherwise, dismantling will be carried out by government services, which will result in an additional fine.
Can LED lamps be used?
You can, it's a great light source, but LEDs are more expensive, and if you're making your own light box, you want to make it as cheap as possible. In addition, LEDs burn out over time, and if one burns out, everything needs to be changed, because the brightness of the new LED is noticeably higher than the old ones (they lose brightness over time). This is more expensive and more difficult than replacing a lamp, which, by the way, has a longer lifespan than LEDs. Therefore, making your own LED light box is advisable only if you need a very narrow or lightweight lightbox, a special lighting effect, or a certain shade of light.
DIY LED lightbox
Lightbox translated from English is a light box.
It is widely used as an element of outdoor advertising and signage. In many cities, lightboxes are installed in such numbers that street lamps can be abandoned. The advantages of such a carrier are obvious: high reliability, low cost of production. However, the price of the finished product starts from several hundred dollars.
Making a lightbox with your own hands using LEDs will significantly save your budget.
Making a lightbox using LEDs with your own hands
The use of light boxes is in great demand today in the advertising industry. The high popularity is due to the fact that an illuminated sign contributes to a sharp increase in the attractiveness of a product or service among potential buyers. Today, the main advantage of lightboxes is their relatively low cost compared to other types of advertising structures and materials. They are widely used in airports, restaurants and bars, hairdressers, shopping and entertainment centers.
Overview of species
For operation under certain conditions and for the purpose of solving various types of problems, boxes with special purpose lighting are usually used, which are characterized by individual design features.
Types of boxes
Their main varieties:
- One-sided.
- Double-sided.
The first version of the advertising medium is used to install various objects on the facade, since only the front panel is illuminated. Double-sided illuminated boxes can be placed perpendicular to the facade of the building, while both sides of the lightbox are illuminated, which increases the effectiveness of advertising. In addition, there are designs that differ in purpose:
- for internal use;
- for outdoor installation.
There is also a division according to the type of lighting: ultra-thin light boxes, thin versions, volumetric structures of large thickness. The latest performances are usually used for outdoor advertising. But the first two types are used in interior design. In such designs, it is assumed that LED lighting is used along the entire perimeter of the panel.
We perform general color correction
Step 1
At the top of the layers panel, add a new layer (Shift+Ctrl+N) and name it “Noise”.
Go to Edit – Fill (Editing – Fill). In the window that opens, set Contents to 50% Gray and click OK.
Step 2
Convert the “Noise” layer into a smart object and switch its blending mode to Soft Light .
Step 3
Go to Filter – Noise – Add Noise (Filter – Noise – Add Noise). Set Amount to 3, Distribution to Gaussian and check the box next to Monochromatic .
Apply layer styles and duplicate the light bulb
Step 1
Place the light bulb inside the first letter, then press Ctrl+T to activate the free transform mode and adjust its scale.
When finished, press Enter to apply the changes.
Double-click on the “Bulb 01” smart object and apply the following styles:
Step 2
Add Outer Glow with the following settings:
- Blend Mode : Linear Light _
- Opacity : 75%
- Color: #ffcb8d
- Size : 20
Step 3
Add a Drop Shadow with the following settings:
- Opacity : 35%
- Uncheck Use Global Light _
- Angle : 63
- Distance : 6
- Size : 7
And we get this result.
Step 4
Hold down the Alt key, click on the light bulb and drag it to duplicate it.
Step 5
We continue to duplicate the light bulb until we fill in all the text.
When finished, group (Ctrl+G) all copies of the light bulb into the “Light Bulb” group.
Requirements for advertising signs
- Contents: information field with text plus artistic elements.
- Placement on facades and areas without memorial plaques, address plaques or architectural compositions; There should be only one roof installation (at one site).
- The height of information plates is 50 cm, width is 70% of the facade (no more than 15 m); the height of the letters is up to 10 cm, the size of the inscription is at least 15 cm (Resolution 902 + recommendations and regulations of the city authorities).
- The language is Russian (if there is no registration of a trademark in another language).
- At night, the sign should be illuminated.
- Must contain text or graphic information (thematic icons or figures); additionally - Art. 5, 19 No. 38-FZ.
- All signs must be placed on the same axis and correspond to the general architectural style.
Creating a background
Step 1
Create a new document measuring 1000 x 750 pixels, then go to File – Place Linked , open the picture with a brick wall, right-click on the layer and select Convert to Smart Object .
Adjust the scale of the texture (Ctrl+T) so that it matches the size of the document and press Enter.
Step 2
Go to Image – Adjustments – Hue / Saturation (Image – Correction – Hue / Saturation) and set Lightness (Brightness) to -65.
Step 3
Double-click on the texture layer to open the Layer Style . Apply Color Overlay with the following settings:
- Color: #e0e0e0
- Blend Mode : Linear Burn _
We get a dark background texture.
Selection of materials
Strictly speaking, a lightbox can be made from almost any material - the frame can even be wooden, and glass, film, or acrylic can be used as a light-transmitting material. It may even be of good quality, but if you use non-standard materials, it will take you much longer. Therefore we recommend using:
- Plastic or aluminum profile with a width of 90,130 or 160 mm.
- Rounded and square corners for profiles.
- Thin galvanized steel, FSF plywood, rigid composite or PVC sheet for the back wall (if the box is double-sided, there will be no back wall).
- Light-diffusing acrylic.
- Modern fluorescent lamps and electronic ballasts (EPG). Some people replace them with round energy-saving lamps, but these do not last long in low temperatures.
Adding sparks
Step 1
Above the “Light Bulb 02” layer, insert a picture with fireworks, switch the layer’s blending mode to Screen (Lightening) and adjust the scale.
Step 2
Duplicate (Ctrl+J) the “Light Bulb 02” layer along with the sparks and add an extinguished light bulb on the other letters.
How to work with a 3D scene
Step 1
To have access to the parameters of 3D objects, we must open two panels: the 3D panel and the Properties (both located in the main Window ).
The 3D panel contains a list of all the scene components and if we select one of them, we can edit its parameters in the Properties . Therefore, always pay attention to whether the desired object is selected before editing it.
Step 2
If you activate the Move Tool (V), a set of special 3D modes will appear at the top of the options bar. By selecting one of them, we will be able to perform certain manipulations with the scene object (moving, rotating, scaling, etc.).
You can also use them to change the current view from the camera.
Creating 3D text
Step 1
We write any word in capital letters using the Burford Base font. Set the size to 450 pt and Tracking to -75.
Step 2
Go to 3 D – New 3D Extrusion from Selected Layer (3D – New 3D extrusion from the selected layer).
As a result, we turned regular text into an editable 3D layer.