by Alexey | Tools | Wednesday, December 15, 2021
| Follow Make-Self.net on Facebook and be the first to read our articles. |
A router is a very useful tool in woodworking. It can be used for shaping wood, drilling various holes, cutting grooves, finishing edges and much more. It's hard to imagine any complex project without it.
A router table may be the most important tool a carpenter can use.
Most people use routers as portable tools. While this is a viable option, a table-mounted router is safer to use and can perform its functions on a whole different level. If you're looking to build your own router table yourself, you've come to the right place. We've rounded up 13 of the best DIY table designs.
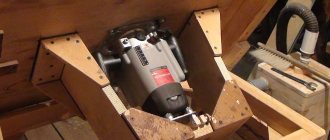
Folding milling table
This briefcase-sized design transforms into a fully functional router in minutes and folds up for storage just as quickly.
A full-size router table can be a great solution—if you have the space. But if you only use the router occasionally or need a mobile solution, this might be a good solution. This benchtop tool provides all the precision and stability you'd expect from a full-size router table.
DIY table for router and circular saw
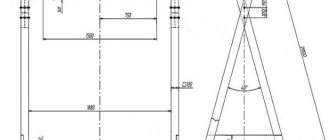
Where to start making a table? Like any other design, it must start with a working sketch. It is this document that will give a clear idea of what exactly the table will be like and what is needed to make it. The drawing is developed indicating the actual dimensions, which in the process will make it possible to calculate the required amount of materials.
Basic requirements for the working surface of joinery machines
The first thing that a milling machine and a circular saw have in common is the need for a working surface or, in other words, a table top. She must be:
- flat and smooth. Otherwise, deformation of the workpieces is possible;
- tough. Deflection of the working surface during use is not allowed. This may lead to a change in the specified processing parameters, which will lead to defective parts;
- made of material that allows you to easily install stops, clamping strips, combs, shields and guard casings to maintain safety during work;
- made in accordance with the dimensions of the workpieces intended for processing. All operations must be carried out without constraint or restrictions.
Basic requirements for table design
A standard table for a circular saw has dimensions of 1.2x1.2 meters. In certain cases, the size can be changed by the user to accommodate non-standard workpieces. The height of the working surface is 0.85 meters. It may be more or less, depending on the growth of the service personnel.
As a basis for a universal table, you can use the tabletop of a machine for a circular saw. Since the saw blade is located on the left side of the table, the router can be placed on the right. It is installed taking into account the space for the workpieces being processed. It should be remembered that the master performing the milling should be at the end on the right side of the table, and not in front of the router. This requires the installation of maximum guarding of all moving parts to prevent human contact.
Spacious milling table on wheels
If you're a fan of Ana White, then you know that she has everything you could ever want to build.
It's no surprise that she has a great plan for helping you build a great router table. It has ample storage and work space. I hope you enjoy it as much as we do.
Copy rings and templates
A copying sleeve for a router is a device with a protruding edge that slides along the template and thus sets the movement of the cutter in the required direction. Such a ring can be fixed on the base of the router in various ways: screwed with screws, screwed into a threaded hole, inserted with special tendrils into holes in the base of the tool.
Calculation of cutter offset when using a copy sleeve
The diameters of the copying ring and the tool used should have close values, but it is important that the ring does not touch the cutting part of the cutter. If the diameter of the ring exceeds the transverse size of the copy cutter, then such a template to compensate for the difference between its size and the diameter of the tool should not exceed the size of the workpiece.
A milling template, made in the form of a ring, can be fixed to a piece of wood using double-sided tape and clamps, with which both parts are pressed to the work table. After milling according to the template, you should check that the ring was pressed tightly against the edge of the template during the milling operation.
Making an oblong hole using a template and a copy ring
Milling templates can be used not only to process the entire edge of a product, but also to give its corners a rounded shape. Using such a template for a router, you can make roundings of various radii at the corners of the wood product being processed.
Templates used for working with a hand router can be equipped with a bearing or ring. In the latter case, the following conditions must be met: the ring must exactly match the diameter of the cutter, or stops must be provided in the design of the fixture that allow the template to be moved away from the edge of the workpiece and thereby eliminate the difference between the radii of the tool and the ring.
Using templates, which can be adjustable, you can not only mill the edges of the wood product being processed, but also create shaped grooves on its surface. In addition, if you make a template of the appropriate design, which is not very difficult, you can quickly and accurately cut grooves for door hinges with it.
Professional milling table at half the price
This table includes all the best features found in store bought router tables at half the price! We have had the opportunity to study and use most of the router tables available on the market. Based on this experience, we developed our own fully functional and easy to assemble desk. The detailed project can be viewed here.
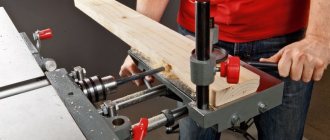
Making a carriage for a router
In order to design a CNC machine, it is necessary to use several variants of units.
Non-factory-made devices often have rails from the carriage of a printing machine, as well as a printer.
The main quality indicators irreversibly affect the processing performance and devices based on a milling machine with a tenoning carriage, so excessive savings can only do harm.
Details
Most often, polished shafts are used, which are inexpensive. Purchasing these items will not be difficult. They are subject to mounting and processing. Most often made of durable steel.
After this, the top layers are subject to induction hardening, which has a beneficial effect on the period of use and wear rate. Ideal smoothness makes it possible for the carriage to move over the polished layer extremely successfully. The shafts can be fastened at both ends with two hands without unnecessary problems.
But there are also many counterfeit elements made of low-quality metal on the market, since the likelihood of an accurate on-site inspection is zero.
Flaws:
- The base is not fixed. The shaft can only be supported by two fastening devices. This makes it possible to significantly facilitate installation by hand, but at the same time independent of the table support. Because of this, the possibility of defects during product processing increases. Over time, lathe carriage guides roll and become bent.
- There is sagging at long intervals. Due to sagging, a shaft with a length of more than 100 cm is not used when processing for a machine. The thickness and length of the gross surface also matter. The best option is 0.05, and even more profitable is 0.06 - 0.1.
Bearings in the carriage for a router
There are two types of bearings when installing guides:
- Bushings for ball elements.
- Bearings to provide a sliding surface.
Ball cylindrical fairings, as well as parts for ensuring rolling, have two significant disadvantages compared to rail carriages: an insignificant level of load capacity and a rather large backlash. To ensure weight support, the tenoning carriage is installed on a guide line with several shafts.
Disadvantages of this type of bearings:
- Withstands light load.
- Formation of high pressure due to low operating life. The need to periodically replace the shaft due to the formation of a groove.
- Sawdust and sticky dust clog the slots.
Bearings to ensure sliding on the surface are made from non-hard metals such as caprolon. If all tolerances are maintained, the load-carrying capacity and precision of the sliding bearing are quite high. However, sawdust and dirt cannot harm the unit. But this only applies to bronze parts that are well processed.
Over time, wear occurs on the product, which requires periodic adjustment to get rid of gaps. As a rule, more affordable bearings are used for making them yourself.
Shafts for splined bushings
Certain bushing balls move inside the longitudinal shaft. The design has a high level of rigidity, much stiffer than conventional shafts after grinding. They also have a longer period of use. Torsion shaft reinforcements are of additional importance. They can be very successfully installed on the shaft mounting structure.
A significant disadvantage of the spline guide is its high cost. This is the reason for the rare use of CNC in standard units.
The cylindrical design makes it possible to maintain balance along the entire length, preventing sagging elements due to the weight of the tenoning carriage.
This type of guide is also called linear support shafts. They have precise fixation along the mechanism body thanks to threaded holes.
Such guides allow you to move carriages with large weights without sagging.
Disadvantages associated with cylindrical machine tool shafts:
- Short period of operation.
- Significant backlash of rods.
If in linear bearings they interact equally with the loads of different guide vectors, then on shafts with a cylindrical cross-section the tenoning carriage is not so stable.
This is a consequence of the closed sleeve surface, which the tenoning carriage does not have. Therefore, it is necessary to take into account the fact that the CNC hardware will function less stably than a similar machine using ordinary round rail movers.
Modern cylindrical rails are produced by both well-known companies and small artisans. This affects the cost of the device and its technical components. It happens that carriages and rails from one manufacturer do not meet general standards.
This type of guides is installed in high-precision CNC metal-cutting machines.
Main varieties: with balls and rollers.
Guides with configurations
Standard guides have a track on which special carriages are installed. This makes it possible to distribute the load along the entire length of the track - the ball is attached to the rail mover along an arc with a high degree of accuracy. Heavy weight carriages do not stop moving in a straight line. They have high durability with low backlash.
Disadvantages of ball rails:
- The attachment points must be straight and without any roughness.
- Difficult process of mounting on the machine.
There are many models of carriages on the open market that are very ambiguous in terms of load capacity and tension elements. For this reason, their production is not homemade, but rather high quality market products. The best guide elements are produced under the TNK brand, as well as Khivin.
Profile guides with a roller inside
One of the best guides that has flat rocking grooves. Instead of balls, there are built-in rollers.
This affects the efficiency of the guide modules. They are best suited for stone, as well as metals such as steel and cast iron.
Rails with prismatic section
Primary installation location: manufacturing industry. The rails cannot be dismantled; they are part of the structure of the frame.
Very difficult to manufacture and repair. Cannot be dismantled by hand. Usage: CNC-based equipment for professionals.
: Precision carriage for milling table.
How to make a carriage for a router with your own hands
What can be used to make a homemade carriage or sled at home:
- corners;
- bearings;
- nuts;
- bolts.
Only steel angles are used, never aluminum. Steel or round timber can be further hardened or nothing can be changed. But be sure to polish it. For installation, you do not need to choose wide bearings; narrow ones, but with a high degree of friction, are better. The diameter of the bolts cannot be larger than the internal diameter of its roller.
Wall cabinet for router
This compact storage cabinet does double duty as a top-notch router table while also holding all your accessories.
With plenty of storage and a built-in desk, this cabinet allows you to knock two important items off your list. And here's what's interesting: it takes up very little space. The secret to its compactness is that it folds out when you need it and retracts when you're done.
Rip fence for straight and curved cuts
A rip fence for a router table or other base surface, which allows straight cuts in wood relative to these surfaces, is one of the most popular devices and is included in the standard kit of many models. Using such a device, the base element for which, in addition to the work table, can be the side of the workpiece or a guide rail, the grooves on the workpiece are processed, and its edge part is also milled.
Factory-made rip fence device
The design of the parallel stop for the router includes the following components:
- rods that are inserted into special holes in the milling cutter body;
- a locking screw, by means of which the rods are fixed in the required position;
- fine adjustment screw, which is needed in order to more accurately adjust the distance at which the cutter axis will be from the base surface;
- support pads with which the device rests on the base surface (in some models of parallel stops it is possible to change the distance between the support pads).
To prepare the router stop for work, you need to do the following:
- insert the stop rods into the holes in the base of the router and secure them in the required position with a locking screw;
- Loosen the locking screw and use the fine adjustment screw to adjust the distance between the cutter axis and the supporting surface of the fixture.
Homemade hardwood rip fence
Base drawing
Clamping bars are made from a single piece
By adding one simple part to the rip fence, you can use this device to create not only straight, but also curved cuts in wood. Such a part is a wooden block, one side of which is straight, and on the other there is a round or angular recess. It is placed between the support pads of the stop and the base surface of the processed wood workpiece, which has a curved shape.
In this case, naturally, the straight side of the block should rest against the support pads of the device, and the side with the recess should rest against the curved base surface. You should work with a parallel stop, additionally equipped with such a block, with extreme caution, since the position of the router itself in this case will be quite unstable.
Modification of the standard stop for milling roundness
Milling small parts
Several router table accessories make it easy to achieve safe and accurate results.
The problem with small workpieces is that there are large holes in the tabletop, and the stops can cause small parts to get stuck. This can ruin the project and be unsafe. This router table attachment holds small parts and allows the workpiece to be pushed past the router bit for precise and safe cutting.
Follow us on Pinterest for more interesting articles.
Useful short videos from Make-Self.net
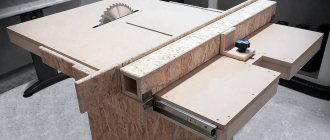
Option for making a compact table with drawers
Quite an interesting design that is easy to replicate for your own workshop.
Real view of the machine for milling blanks
Constructive development in three-dimensional display using engineering programs
| Frame made of individual parts. They are made from coniferous wood. | |
| Organization of cuts when joining frame parts in the upper part. Main dimensions shown. | |
| Organization of cuts when joining frame parts in the lower part. | |
| To install guides for drawers, you will need to glue these parts from two blanks. | |
| Assembling the table frame and installing facing side panels. | |
| The tabletop consists of two plates. They are framed by side ribs. It is required to do a miter connection. | |
| The stop is made of several parts. | |
| Large drawer design. | |
| Small drawer design. | |
| The order of installation of the elements of the front part of the box. |
| Side walls, central wall and bottom of the machine. |
To manufacture such a machine, you will need to prepare parts. Table 2 shows the configuration, workpiece dimensions and material.
Table 2: Accessories for making a table for a router
| Position on drawings | Name | Finished dimensions, final | Quantity | Material | ||
| Thickness, mm | Width, mm | Length, mm | ||||
| Frame | ||||||
| 1 | Front and rear horizontal frames | 50 | 40 | 780 | 4 | Solid pine |
| 2 | Racks | 50 | 50 | 860 | 4 | Solid pine |
| 3 | Horizontal side frames | 50 | 40 | 550 | 4 | Solid pine |
| 4 | Front and rear horizontal | 50 | 20 | 750 | 2 | Solid pine |
| 5 | Side window frame, vertical | 50 | 50 | 380 | 4 | Solid pine |
| 6 | Side window frame, horizontal | 50 | 20 | 360 | 2 | Solid pine |
| Panels | ||||||
| 7 | Side panels | 6 | 740 | 518 | 2 | Birch plywood |
| 8 | Sidebar Windows | 6 | 600 | 393 | 2 | Birch plywood |
| 9 | Lower window | 6 | 600 | 400 | 1 | Birch plywood |
| Large drawers | ||||||
| 10 | Side of the drawer | 16 | 140 | 550 | 8 | Solid pine |
| 11 | Front and back side of the drawer | 29 | 140 | 348 | 8 | Solid pine |
| 12 | Drawer front | 7 | 168 | 348 | 4 | Solid ash |
| 13 | Bottom | 6 | 138 | 570 | 4 | Birch plywood |
| Small drawers | ||||||
| 14 | Side of the drawer | 16 | 100 | 550 | 8 | Solid pine |
| 15 | Front and back side of the drawer | 29 | 100 | 138 | 8 | Solid pine |
| 16 | Drawer front | 7 | 108 | 138 | 4 | Solid ash |
| 17 | Bottom | 6 | 570 | 348 | 4 | Birch plywood |
| Tabletop | ||||||
| 18 | Upper layer | 18 | 700 | 920 | 1 | Birch plywood |
| 19 | Front and rear trim strips | 10 | 38 | 940 | 2 | Solid ash |
| 20 | Side trim strips | 10 | 38 | 720 | 2 | Solid ash |
| Emphasis | ||||||
| 21 | Stop wall | 18 | 150 | 750 | 1 | Birch plywood |
| 22 | Stop base | 18 | 150 | 640 | 1 | Birch plywood |
| 23 | Front stop bar | 10 | 90 | 380 | 2 | Solid ash |
| 24 | Top edge stop | 10 | 420 | 550 | 1 | Solid ash |
Useful tips
In order for the work to be successful and for the hand-made milling elevator to serve properly and for a long time, it is worth remembering a few useful tips:
- With homemade lifting structures, it is recommended to use manual milling cutters of medium power - from 750 to 1500 W, weighing up to 5 kg. An excessively heavy and powerful tool may break out of its mounting position during operation.
- The lift is best used with plunge-cutting machines.
- The better the materials, the more durable and durable the lifting device will be.
- It’s better to construct a homemade product in one day, without stretching it out over time.
- It is recommended to place the jack handle on the side of the frame for more convenient control.
- It is worth using a sheet of durable textolite as a support plate.
- Before manufacturing, you need to familiarize yourself with the drawings of lifting structures for milling machines, but it’s even better to make the drawing yourself.
Drawing template
If you follow these recommendations and step-by-step manufacturing instructions, a homemade lift for a router will be no less reliable than a serial analogue from a store, and will last a long time.
It is not difficult to make a lifting device with your own hands using any of the methods - with a jack, a threaded rod or a chain drive, or install a microlift.
Guide rail
Having a similar purpose to the rip fence, the tire is responsible for the accurate movement of the cutter in a straight line. The time spent on work is noticeably reduced due to the use of the tire. It also allows you to guide the tool on the table at any angle to the edge.
Some mass-produced tires include a separate component - a shoe. It is connected to the router by rods and, passing along the bus, moves the milling head along a given path.
The tire is best combined with a tool whose base stands on retractable legs. This eliminates the height difference between the guide rail and the router.
It happens that the functionality of commercially produced tires is not suitable for the user. You can always create an individual version of the router guides with your own hands. The most elementary one is a long, even beam - in other words, a ruler. The master only needs to provide it with fasteners, and the tire is essentially ready. To make a simple device, you don’t even need a drawing.
Of course, such a homemade version will not be stable. The combination of a plywood base with a board nailed to it will be more stable in operation. The edge of the router base will rest against the board, and the edge of the base will mark the processing area. This design is used when using cutters of the same diameter.
Another option works when wood cutters can be of different sizes. Here the board acting as a ruler is not nailed to the base, but is reinforced with clamps. Thanks to this, it can adjust the distance from the working area according to the diameter of the cutter.
Guide rail
use a piece of chipboard
First you need to find out the distance from the edge of the milling base to the center of rotation, and it is always the same. To do this, you need to screw a guide to the unnecessary part of the material and make a test cut. Then you should measure the gap from the edge of the cut to the tire, to which the radius of the cutter is added. As a result, it will be possible to obtain the required value. For example, it is 59 mm, and the diameter of the groove cutter is 14 mm, that is, its radius is 7 mm.
Then you should draw a line for the cut, from which we retreat a distance of 52 mm (59-7), and draw another one. We fix the guide along it and make the cut.
What to consider when choosing a lift for a router
When choosing a lift for a router, you should look, first of all, at the following parameters:
- support plate dimensions;
- type of lifting mechanism for changing the position of the router;
- lead screw parameters;
- working stroke.
- The router should move up and down freely, without braking or sudden jerks.
- The lift should be extremely easy to install so that it is not difficult to remove the milling machine if necessary.
- Resistance of the milling elevator mechanism to constant high loads.
The lift must be resistant to loads
Milling devices for processing bodies of revolution
Many accessories for manual milling machines, made by users to suit their needs, do not have serial analogues. One of these devices, the need for which arises quite often, is a device that facilitates the process of cutting grooves in rotating bodies. Using such a device, in particular, you can easily and accurately cut longitudinal grooves on posts, balusters and other wood products of a similar configuration.
Device for cutting flutes in balusters
Milling cutter and frame assembly
Router carriage
Dividing disc
The design of this device is:
- frame;
- mobile milling carriage;
- a disk used to set the rotation angle;
- screws that secure the workpiece being processed;
- locking screw
If such a device is additionally equipped with a simple drive, which can be used as a conventional drill or screwdriver, then milling on it can successfully replace processing performed on a lathe.
Tenon milling device
A tenon-cutting device for a router allows high-precision processing of parts connected using the tongue-and-groove principle. The most versatile of these devices allow you to mill various types of tenons (dovetail and straight). The operation of such a device involves a copying ring, which, moving along a groove in a special template, ensures precise movement of the cutter in a given direction. To make such a copying machine with your own hands, you must first select the groove patterns for which it will be used.
How to choose
When choosing a mass-produced elevator, you need to focus on the main technical characteristics:
- how the milling motor is raised and lowered;
- plate size;
- working stroke;
- lead screw
A good lifting device should have the following qualities:
- smooth movement during operation;
- reliability of the mechanism;
- ease of installation.
This design will really make work easier and increase production efficiency. If you can’t find a suitable model or it’s too expensive, then you can realistically make the design yourself.
Cutting round and elliptical grooves
To cut grooves in the shape of a circle or ellipse in wood with a hand router, use compass devices. The simplest compass for a router consists of a rod. One end of it is connected to the base of the router, and the other is equipped with a screw and pin. The pin is inserted into a hole that acts as the center of a circle, along the contour of which a groove is formed. To change the radius of the groove circle, for which such a compass for a router is used, it is enough to move the rod relative to the base of the router. More convenient to use are compass devices, the design of which includes two rods rather than one.
The simplest compass rod often comes complete with a router
Equipment operating on the principle of a compass is a fairly common type of device used to work with a router. With their help, it is very convenient to mill shaped grooves with different radii of curvature. As mentioned above, the typical design of such a device, which you can make yourself, includes a screw with a pin that can move along the groove of the device and thereby allows you to adjust the radius of the groove being created.
In cases where it is necessary to create a hole of small diameter with a milling cutter on wood or other material, a different type of equipment is used. A design feature of such devices, which are fixed on the bottom of the router base, is that their pin, installed in the central hole on the workpiece, is located under the base of the power tool being used, and not outside it.
Homemade compass with two guides
Base
Corner Guides
Centering pin
Compass assembly. Bottom view
Compass assembly. View from above
Using special devices, you can use a hand router to create not only round, but also oval holes in wood. The design of one of these devices includes:
- a base that can be fixed to the wood product being processed with vacuum suction cups or screws;
- two shoes that move along intersecting guides;
- two mounting rods;
- bracket connecting the base of the device to the router.
Due to special grooves in the bracket of such a device, its base plate is easily aligned in the same plane with the base of the router. If this equipment is used to perform milling along a round contour, then one shoe is used, and if along an oval contour, then both. The cut made with such a device is of higher quality than if it was made using a jigsaw or band saw. This is explained by the fact that processing with the milling cutter used in this case is carried out by a tool that rotates at high speed.
The result of working with a homemade compass is a round hole with smooth edges