Man has been cooking food since ancient times. It all started with an ordinary fire, around which stones were laid. They served as a kind of “stove” for frying meat. As society developed, new devices appeared. As a result, shish kebab began to be grilled on a grill, which became an integral part of outdoor recreation.
There are several versions of the origin of the product. According to one of them, the device was invented in the seventh century BC. e. Scythian healer and sage Anacharsis. Another insists that the brazier originated in the Ancient East. This is indirectly confirmed by the presence of a single name for the object among all eastern peoples. However, such a barbecue was a structure in the form of a copper bowl mounted on the legs. The product also had two handles for comfortable movement of the item, and a lid in the form of a hemisphere.
A short excursion into history
This word comes from the Azerbaijani or Turkish manqal - brazier. There are similar words in Arabic, Persian, Georgian, and Armenian. It was a bowl made of copper with wide horizontal brims. For ease of carrying, it was equipped with two handles and was covered with a lid in the shape of a hemisphere. For stability, supports were placed from below. Somewhat later, skewers from the Syrian peak appeared, and the self-name shashlik came from the Tatar shishlyk - fried on a spit. Now it has firmly taken its place in the national cuisine of many peoples of the world.
The fastest way
Suddenly guests arrived and offered to cook barbecue. There is nothing suitable for using your hand, but you can quickly make a simple barbecue from scrap materials. To do this, place two parallel rows of bricks on an edge on a sheet of iron.
We light a fire between them; when it burns out, we place skewers with meat on the hot coals. A way out of the situation has been found. But over time, it is better to get a specially made barbecue.
Required Tools
To work you will need:
- shovel;
- Master OK;
- a trough for mixing mortar or a concrete mixer;
- buckets;
- building level, tape measure, plumb line;
- Bulgarian;
- reinforcing mesh;
- cement, crushed stone, sand, clay;
- fireclay brick;
- boards, plywood (for formwork assembly);
- metal corners, doors, grates, grates;
- hammer;
- mallet;
- rope and pegs (for marking under the foundation).
In order to save money, it is allowed to purchase fireclay bricks only for laying the firebox. For other areas of the oven that will not be exposed to high temperatures, you can take regular brick (not necessarily new).
We will analyze step by step the process of independently erecting a small outdoor barbecue, and clarify the nuances of each action.
Schemes and drawings
The work process reflected in the drawings
is developed at the planning stage. The drawing is a visual representation on paper of the future structure, where the shape, dimensions, and cross-sectional view are clearly visible. Created on a scale with a reduction several times from the actual dimensions.
For example, when specifying a scale of 1:10, it means that the design drawing is reduced by 10 times. For every 1 mm of drawing there is 1 cm in reality.
Corner barbecue diagram
It is customary to use a thick solid line to show the outline of the product. Thinner lines indicate the sizes of the elements.
Block barbecue diagram
Conventional shading in the drawing indicates the raw materials used for construction. For example, under an ordinary red brick, hatching is drawn at an angle; fireclay (fireproof) is marked with a check.
The drawing description includes the following details:
- general view of the product;
- outside view - facade;
- structure in a vertical section, where the internal structure is visible;
- horizontal section showing the principle of masonry.
Recommended oven dimensions
The width of the grill when folded should correspond to the width of the skewers - 47-62 cm. The height of the frying platform is made slightly higher than the waist, so it will be more convenient to cook. The length of the firebox should be such as to simultaneously accommodate from 8 to 10 skewers.
Preparatory work
They consist of clearing the construction site of debris, vegetation, and marking. For the last step, rope and wooden pegs are used.
Foundation installation
A brick barbecue is a heavy structure, so it is recommended to pour a monolithic concrete slab under it.
Briefly, the procedure for constructing the foundation looks like this:
- A hole is dug with a depth of 30 cm. The dimensions should be 20 cm larger on each side than the future product.
- The bottom is carefully compacted.
- A 15 cm thick cushion is poured from layers of sand and gravel. It's being compacted. Moisturized with water.
- The formwork is assembled from boards. The knocked down frame is placed around the perimeter of the dug hole.
- The bottom of the pit is reinforced with metal mesh.
- Cement mortar is being poured. The M500 brand is best suited for cooking.
- The poured mixture is pierced with a piece of reinforcement to remove air bubbles.
- The slab should extend above the ground level.
- Curing time is up to 4 weeks.
- In dry weather, to avoid cracks, the surface is moistened with water.
The frozen slab is covered with waterproofing (dense polyethylene, roofing felt) on top.
While the foundation hardens, you need to soak the clay for the solution. The finished solution should not crack when compressed.
You can get acquainted with other types of foundations for the furnace by clicking on the link.
It is important to think through the supply of communications even before the foundation is poured.
The day before laying, the brick should also be prepared. It is thoroughly watered so that it does not absorb moisture from the solution. The adhesion to the surface will be better.
Order of brickwork
The order should be carried out in the following sequence:
- It’s better to start by laying out the first row dry. This will allow you to adjust each brick to size if you need to trim it. The gap between the elements is 1 cm. The evenness of the diagonals is checked.
- Laying facing bricks can be done using a solution of cement and sand (in a ratio of 1:3). To improve the plasticity of the mixture, you can add a little lime. The recommended seam size is from 8 to 10 mm.
- In areas where bricks pass without dressing, it is necessary to carry out reinforcement with metal wire.
- Each subsequent row is shifted by half a brick. To adjust the elements to size, use a grinder.
- Every 3 rows, compliance with the masonry level is checked, and preferably more often.
- After 8 rows you need to create jumpers for the grill and countertop. To do this, take metal corners measuring 45*45 mm and set them up like an inverted letter T. Half of the shelf is sawed off. The metal should not come into close contact with the brickwork.
- Afterwards you can start laying the firebox. Fireclay bricks are connected to each other with clay-sand mortar. The thickness of the seams is no more than 4 mm.
- Metal corners are also used to form support for the bottom.
- The second row of bricks for the firebox completely covers the first. This way the seams will not burn through. Some craftsmen replace the first two rows of masonry with a concrete slab, but the creation will cost many times more, although it will be no less reliable.
- Parallel laying of the firebox and facing bricks is allowed. But between the lining and the firebox there is always a gap of 1 cm so that they do not touch.
To improve the decorative appearance, stove makers resort to constructing a combustion arch. To do this, a wooden blank is first made in the form of a semicircle and placed in the barbecue portal. Next is the masonry. Bricks are cut to the required sizes using a grinder.
The arch made of facing bricks must be covered from the inside with a fire-resistant lintel. Placed on a metal corner.
We use old containers
If you find a 50-liter container for household gas, you can make a barbecue from a cylinder with your own hands.
For this:
- open the valve and completely bleed off the gas;
- fill with water and let sit for 24 hours to neutralize any remaining contents;
- We make a rectangular cutout on the side;
- we clean the edges and install hinges on the rivets;
- We cut off the valve, and in its place we weld a chimney pipe with a damper to adjust the draft.
In the same way, you can use steel barrels, but you also need to take “Soviet” ones with thick walls; they won’t burn out longer. With the help of decor, they can be transformed into a steam locomotive, airplane or rocket.
Many motorists have unnecessary rims, put them on a stand and you're done.
Portable or stationary
The variety of types of such simple devices is amazing. They are used in both portable and stationary versions. Different in shape and design. Starting from a simple grill grate located on bricks and ending with complex structures with intricate shapes.
Portable or in common parlance - clamshells - widely represented in retail chains, are practical, but not durable. Before use, they require modification - reinforcement of the walls with a corner or professional pipe.
- Which fireplace should you choose?
- Characteristics of Shtil saws
How to make a cold smoked smokehouse - various options and detailed instructions on how to make it yourself! (Photo and video)
If you do not have a welding machine, use self-tapping screws with a drill. If this is not done, after the first picnic it will become deformed, lose stability and it will not be possible to return it to its original state.
Stationary ones are made of thicker material. Their framing with elements of forging or cold bending serves not only as decoration, but also as stiffening ribs. The dimensions of barbecues for this type of use are not limited by the size of the car trunk.
Metal sheets
The traditional manufacturing option is to make a box in accordance with the drawing of the barbecue. The dimensions must be such as to accommodate the required number of skewers. To fix them along the length of the side, slots are made at the top.
There are holes at the bottom for ventilation. The height should be sufficient so that the food does not burn. To make cooking convenient, legs are made. For protection against corrosion and durability, it is advisable to paint it with black heat-resistant paint. It will not stand out against the background of soot.
Features and device
A barbecue is a special device for cooking over coals. You can purchase it without any problems, but inexpensive collapsible products quickly fail, burning out and deforming, while durable and high-quality ones have a high price. Therefore, the best option that meets the requirements and tastes of the owner would be a barbecue made with one’s own hands.
At first glance, the design of the product is quite simple, but upon closer examination, you will notice some features on which the quality of the prepared dishes depends:
- depth;
- holes at the bottom;
- size of the structure;
- recesses for skewers.
The correct depth allows you to place a sufficient number of coals and obtain the necessary temperature for cooking meat.
The holes in the bottom will provide the air needed to maintain the temperature of the coals. The sizes of barbecues are selected individually. They are calculated based on the number of skewers used or the size of the barbecue grate.
The product must have a width sufficient to accommodate the entire skewer, and a length that allows at least eight servings to be cooked simultaneously. Recesses for installing skewers allow you to adjust the position of the meat for even frying.
We build a barbecue from bricks
Do-it-yourself brick grill - for this we need:
- the site is leveled at the selected location and the foundation is poured;
- the first layer of bricks is laid out strictly according to the level and checking the diagonals;
- subsequent laying must be carried out with bandaging between the rows at least a quarter;
- We take fire-resistant bricks and lay reinforcement for strength.
Main types of construction
There are three groups of barbecues:
- Stationary model.
- Portable model.
- Folding model.
Each of the presented options has a number of advantages and disadvantages that should be taken into account when choosing a model for independent work.
When to combine with cooking
Instructions on how to make a grill oven:
- We select a suitable project taking into account your wishes;
- we make an additional compartment for the kitchen stove;
- we put a grate in the firebox, be sure to make a ash pan for better draft;
- cover the top with a cap with a chimney;
- We install a hob with burners; when cooking food, the mugs are removed; for better heating of the vessel, you can place a cauldron for pilaf.
Furnace configuration
In any type of stationary furnace, it is necessary to have a reliable foundation, which will ensure long service life.
You should also be responsible when choosing fuel. It is unacceptable to use firewood from coniferous trees, resinous fruit trees (plums, cherries), lumber impregnated with resin.
To ignite, take matches and a special liquid. It is prohibited to use gasoline or kerosene to create a flame. There will definitely be no benefit from adding such components to food. But it can cause harm to health after consumption.
Simple design
Such buildings are often used in summer cottages. This is the most popular option for homemade structures, as they do not require in-depth knowledge of masonry techniques.
To protect against rain, it is recommended to supplement them with a dome-shaped smoke collector. For ease of use, a medium-sized tabletop is built in. The optimal building material is fireclay brick. Fuel – charcoal, firewood.
Photo: small barbecue with a rain cover
If you follow the step-by-step masonry technique, the fire will not come into contact with metal elements, which means that the walls and bottom will not burn out and the grill will last many times longer.
Such designs do not have holes for air access, which significantly saves firewood. They do not burn out quickly, but smolder.
The finished grill will not take up much space on the estate. This is a budget stove for seasonal use.
With smokehouse
Standard factory kits of fire-resistant brick barbecue stoves do not include a smokehouse. It can be purchased additionally if the product model includes a built-in wood-burning stove.
The smokehouse is made of stainless steel sheets with a thickness of 2 mm. Inside there are 2 levels of grates on which products for smoking are placed. Equipped with a groove for a water seal. If water gets in, the tightness of the shutter prevents smoke from escaping.
Layout diagram of a compact barbecue
The smokehouse is attached to the place where there should be a stove or cauldron on top of the stove. To start the device, the VFS (built-in wood stove) is ignited. Wood shavings smolder inside the smokehouse and hot smoke begins to form.
With cauldron, stove
A cauldron with a stove can be equipped independently with a built-in wood-burning stove or be part of a barbecue complex, complemented by a countertop and sink.
A red brick grill is laid out. The side, rear and front brick walls form the oven chamber. From the outside of the structure, only the firebox door and the ash pan handle are visible. At the top of the stove there is a round hole for a cauldron or stove, at the bottom there is a grate, an ash pan that extends.
Built-in wood stove - source of heating for the cauldron and stove. For the firebox, it is better to take firewood and chipboard briquettes.
The complexes are equipped with an 8-liter cauldron, but it is possible to install containers with large dimensions up to 12 liters.
The chimney is made from a double-circuit sandwich pipe of rectangular cross-section. The upper part of the pipe is discharged into the smoke collector.
With grill, barbecue
The usual grill shape is a deep, round frying pan with a barrel-shaped lid. If the lid is closed, the food is cooked evenly on the sides, bottom, and top.
Barbecue differs from grilling in that the product is fried only from below, and not from all sides. This is due to the lack of a lid.
The inside of the device is very similar. The main detail is the gratings. Fish and meat are laid out on the top grate, fuel is placed on the bottom grate. For comfortable cooking, the upper grill can be adjusted to 3 positions.
Unlike a barbecue, the grill has openings with dampers so that air access can be regulated.
There is a retractable ash pan where ash and ash accumulate. Many factory models are equipped with a spit and folding table. There are grills with double clamping grates.
Before the first use, the grill or barbecue is thoroughly lubricated with vegetable oil, pierced and allowed to cool.
With canopy (roof)
Photo: garden barbecue with a canopy made of metal and polycarbonate.
A covered canopy is an excellent protection from precipitation, especially in winter, when the water begins to freeze and melt. It is recommended to assemble the canopy from fireproof materials - metal racks and corrugated sheets, metal tiles.
If it is not possible to build a shed, then it is necessary, at least temporarily, during the period of precipitation, to cover the grill with thick plastic film.
Precipitation falling on the structure at an angle will not cause harm.
Angular
This barbecue design is becoming increasingly popular. Placing the device along the walls, adjacent to the corner, allows you to significantly save space. This is especially true for small summer cottages and gazebos.
The requirements for materials are unchanged - moisture resistance, fire safety.
Corner placement is an excellent option for barbecue complexes, where it is convenient to place a tabletop, sink, niches for firewood and utensils on the sides.
However, such a structure cannot be built by beginners. It requires competent calculations and knowledge of masonry techniques, so it is better to invite a specialist.
Fireplace-barbecue
Interesting type of combination. The fireplace is:
- built-in;
- free-standing.
The built-in fireplace is an element of the barbecue complex. The fireplace module is installed instead of a barbecue or vice versa.
When using a fireplace insert, a large load of firewood is allowed at one time. It is carried out into the firebox. When installed indoors, the fireplace barbecue will become a source of heating in cold weather.
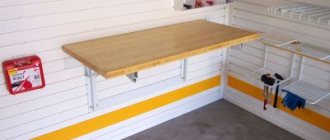
With countertop, sink
The working surface of the tabletop is built-in or can be placed separately. Collapsible models are available.
Installation is carried out on the left or right side (at the discretion of the owners).
It is necessary to determine the location at the stage of developing sketches, so that the factory can make a high-quality product that will be closely adjacent to the structure.
By adjusting the length of the tabletop, the complex can be adjusted to specific room sizes.
Equipping the complex with a sink simplifies and makes food preparation comfortable. For installation, attention is paid to the correct water supply and sewerage.
Barbecue complex
Multifunctional design. Difficult to build on your own.
It has several departments:
- built-in wood stove;
- plate;
- oven;
- barbecue;
- B-B-Q;
- smokehouse;
- cauldron;
- spit;
- tabletop.
The set of elements differs depending on the model.
It can be installed both for outdoor use and in closed buildings such as a summer kitchen or gazebo. With the right choice of material for cladding, it looks very beautiful.
Users often search for:
- How to make a patio
- Vertical barbecue grill
When it's bad weather outside
Snow, rain, and drizzle prevent you from enjoying the holiday, and they also prevent you from lighting a fire. In this case, a barbecue with a roof is required.
You can build a gazebo with a barbecue with your own hands. To do this, we choose a spacious area,
so that the wooden parts do not get hot from the heat source. We drive in the metal support posts and fasten the veins between them. We cover it with light and durable profiled sheets. They can also be secured on the sides for protection from the wind. We put a grill in the center and no vagaries of the weather are scary.
Note!
- How to make a garden (construction) wheelbarrow with your own hands: detailed instructions with description + 85 photos of fresh ideas
- How to make a bench with your own hands - 90 photos of the best ideas from the master. Review of finished drawings, diagrams and dimensions of the bench
- How to make a hot smoked smokehouse with your own hands: drawings, dimensions, choice of material, photos of finished options
Making a drawing
For a homemade barbecue, regardless of its design and material of manufacture, you need a high-quality drawing. The diagram should display the following parameters:
- Design dimensions.
- Type of assembly (welding, special groove-connectors, stone or brickwork).
- Availability of chimney and oven compartments for combined models.
- Shape and availability of connectors for mobile metal barbecues.
Note!
DIY garden decorations: 150 photos of original ideas and new products. Instructions with step-by-step guidance, diagrams and drawings
- Fast-growing climbing plants for the fence and garden ☘️. Review of perennial and annual plants. Photo + instructions with description
- Weaving willow baskets: beautiful and unusual do-it-yourself baskets. Detailed diagram of willow weaving + photo examples of finished products
The model is depicted to scale, and it is important to carry out work based on the prepared plan. For more complex types of structures, it is better to use the help of a specialist who will optimally calculate the draft force, the correct structure of the chimney and the location of the furnace compartments.
What about in a city apartment?
If you want to treat yourself to a barbecue at home. There is no need to cook it on the balcony like the hero of one famous film. Just make a sealed box with an infrared heater from an electric oven grill. Place the handles of the skewers outside and make sure that the food does not burn; turn it over in a timely manner. The most delicious kebab is guaranteed without leaving the kitchen.
These are not all ideas about devices for preparing shish kebabs and barbecues. Based on this article and examples from the Internet, you can always come up with something more original.
Choosing a suitable location on the site to install the stove
To determine the installation location, it is recommended to consider the following points:
- The structure should be located near the recreation area (gazebo, veranda, summer kitchen).
- The terrain should be smooth, without sudden changes.
- Convenient approach to the grill. If possible, one or more paths are developed.
- Communications supply. If, according to the plan, the product will be equipped with a sink, then the proximity of water pipes and sewerage will be taken into account. In winter, the access to water in garden barbecues is blocked so that the pipes crack in the cold.
- Direction of the wind. Smoke should not be directed towards the recreation area. You need to build it so that the smoke goes to another part of the yard.
- Presence of a canopy. Let’s assume the option of combining outdoor stoves with a table and chairs standing next to them.
Compliance with fire safety requirements requires that the device be located at a sufficient distance from green spaces, dry trees, and flammable outbuildings.