Plaster or alabaster
Gypsum and alabaster differ in strength and appearance. Gypsum is a more brittle material, but when it hardens, it produces a flat, smooth surface. Alabaster is more durable; after drying, its surface remains rough. You should choose the material based on the look you want to achieve from the craft and how it will be used.
It is worth noting that gypsum is sold both in craft stores and in construction supermarkets. Essentially, you buy the same powder, but it will cost you less in the construction department.
Antistatic keychain
Oh, this is a very useful thing for those who are constantly hit by static discharges. This happens mainly in winter, when the air is dry and static can easily accumulate on you. If you need to touch something metallic, an unpleasant discharge occurs. This can be avoided by using a special discharger - an antistatic key fob. It's done in a couple of minutes. We take out the paste with the cap from the pen. We saw off a piece of about 3-4 centimeters from the body. We insert a self-tapping screw on one side with the head inward and glue it evenly with hot glue. We roll a not very dense but strong ball out of foil and insert it into the inside of the tube. We glue the same self-tapping screw on the other side. The keychain is ready! Now, to check, rub a rubber ball on the wool. With our hand we hold the keychain by one screw, and with the other we touch the object from which we need to remove the charge. At this time, a ball of foil begins to run inside the keychain from cap to cap. As soon as its movement is over, the charge is released.
Garden mushrooms
Recently, it has become fashionable to decorate the courtyard of both a private and multi-story building with plaster sculptures. Crafts for the garden can be made with your own hands from plaster and scrap materials that can be found in any home.
For example, you can make funny mushrooms from a plastic bottle, deep bowl, cling film and plaster:- Dilute the gypsum solution;
- Cut off the neck of a plastic bottle;
- Pour the solution into the bottle and let it dry completely;
- Line the inside of the bowl with cling film;
- Pour the solution into a bowl;
- Remove the completely dried mushroom stem from the mold;
- When the solution in the bowl just sets, insert the stem in the center and leave until completely dry.
The finished mushroom can be painted and varnished.
Signs of drug addiction in teenagers
How to recognize a teenager who is a drug addict? If older and more experienced drug addicts try to hide the signs of use, and they often succeed in this at first, then children do not have the necessary experience. And with due attention, a caring parent can recognize alarm bells almost after 2-3 times of use.
- Teenagers are starting to ask for pocket money more often. Lies are often used - they say, you need to help someone, lend someone, need it for school or for certain things. Various pretexts are being invented. If you constantly refuse, sooner or later things will begin to disappear from the house.
- The teenager becomes inattentive, he may miss school classes, and his grades will drop. Teachers may start complaining about his behavior.
- The teenager begins to get sick often, initially with colds. This happens for a simple reason: drug use reduces the protective functions of the immune system.
- The teenager begins to blatantly lie. Often even over trifles. Mood and behavior change – aggression, depression, and withdrawal are common.
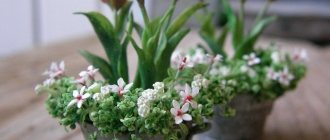
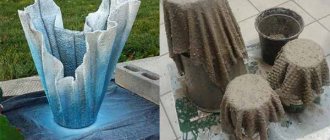
Flowerpot
With your own hands you can make perhaps the most practical garden craft - a flowerpot. For the craft you will need:
- Basin or large plastic bowl;
- Reinforcing mesh;
- Perlite (can be bought at a hardware store);
- Cling film
- Gypsum.
Gypsum or alabaster needs to be diluted to a thicker consistency, such that it can not be poured, but spread on the mold:
- Mix the prepared solution with perlite;
- Turn the basin upside down and cover it with cling film;
- Cover the form with reinforcing mesh;
- Apply a thick layer of plaster on top;
- Let the mold dry completely, this will take a few sunny days.
The finished flowerpot must be removed from the mold, sanded with sandpaper and painted or varnished.
The flowerpot will turn out to be heavy, so it is better to make it next to the place where it will stand (if you are making a large craft).
24.07.2015
How to inflate a foil balloon.
A foil balloon, unlike a latex (rubber) one, does not stretch and has an inflation valve rather than a neck.
We have already discussed the safety rules for inflating foil balloons in the article here. Today we will only talk about technology.
It happens that this film may not be detected. In this case, we simply insert the tube under the top layer of foil towards the center of the ball. Ideally, the length of the tube allows you to move it 5-10 cm inward. This must be done very carefully. The fact is that a slamming valve sometimes tends to stick together a little (during long-term storage, excessive pressure or simply high storage temperature). A sudden movement can break the ball and complicate the task.
So, having inserted the tube a little deeper into the valve, try to make a control exhalation into the ball. If air does not flow, straighten the ball or push the tube a little deeper. If it goes, then you can start inflating the balloon.
When the ball is almost strong, remember again where you are taking it and what the temperature conditions are there (see article https://posharam.blogspot.ru/2015/03/blog-post_6.html). Upon completion, you can confidently remove the tube, the valve behind it will instantly close, and the air will not escape back.
If there is doubt about the strength of the valve, the hiss of escaping air is heard, and the balloon quickly loses its elastic appearance, then it is better to inflate the balloon again and tie the balloon with a ribbon above the valve.
In general, the essence is the same, except that in this case you will have to inflate not with your mouth, but with a balloon. To inflate foil with helium, we need a nozzle for such balloons.
Source
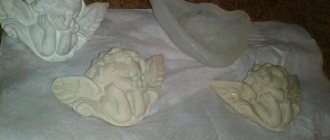
Decorative leaves
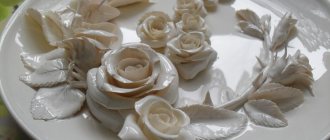
You can also make DIY crafts from alabaster. For example, decorative leaves that will benefit from a rough texture. For this craft you will need alabaster mortar and large living leaves that will serve as a stamp:
- Dilute the alabaster solution;
- Line a large flat plate or tray with cling film;
- Place the thick solution into the mold in a layer of 3-4 cm;
- Place a sheet on top of the damp solution;
- When the solution has set, use a table knife to trace the outline of the sheet so that the craft takes shape, remove the excess solution;
- When the alabaster is dry, remove the sheet.
This technique produces a straight sheet; if you dilute the solution thicker and apply it over a convex surface (a round bowl, for example), the sheet will turn out curved.
The finished alabaster craft can be painted or left in its original color. Curved leaves can be complemented with small flowers.
In the garden, you can pour some water into the leaf and decorate the mini pond with a plastic floating flower or beads at the bottom. At home, the leaves can be used as a serving dish.unconventional drawing techniques for children. draw with film
To paraphrase the great classic, we can say: “What Russian doesn’t like to pop bubbles on packaging film..” It’s a calming thing. And this film can also be used for drawing. Even children 2-3 years old can cope with such work.
For work we need:
Watercolor paper, wide brush, acrylic or gouache paints, bubble wrap.
We spread it on the table with the bubbles facing up and spread it with paint.
Then we apply it to the sheet and make prints.
We remove the film and the drawing is ready (or almost ready).
Make more prints using different colors. These prints can then be finished with paints or used as colored paper for appliqués.
Our work options.
bouquet of flowers
In the photo above you can see that in addition to the film prints, the prints were made with a bottle cap. When the paint had dried, the older children finalized these prints with a black marker. This is what happened.
bees in the hive
- In summer, bees have all day long
- Collecting nectar is not lazy.
- They'll take it back later.
- The hive has its own wonderful home.
- A bee is buzzing over a flower
- And he is in a hurry to collect nectar.
- All the nectar that he collects,
- The bee turns it into honey.
- Author V. Zubkov
our apiary
You can use this textured paper for appliques. Here, for example, is our aquarium
our fish
We made the fish for this applique from marbled paper. How to draw this, read on my blog here unusual drawing techniques for children
Or you can simply make fish out of colored paper. Here are our works:
our pond
- The fish was catching up with the fish,
- The fish wagged its tail
- Poked in the abdomen - Caught up!
-Hey, girlfriend! How are you?
Author T. Vtorova
Well, and also our applique drawing. Blooming sakura and butterflies. Butterflies are made from the same marble paper
sakura
What kind of tree is this? If it is in bloom, like a painted one... Although the fruits are inedible, But the flowers are incomparable: Delicate pink and fluffy at the same time. The leaves are also fascinating, Because they change color: So, purple in the spring (This means with redness), In the summer - the leaves are green Or with the color of red.
And in the fall - they will change color again: To lilac, violet, or brown. This tree is wonderful And the Japanese everyone knows - This is the symbol of their country... The tree of everyone who is in love.
And when it blooms, people rush to it, Not only to see it, To make a wish... This tree is beautiful - It’s sakura, it’s clear to everyone.
Author N. Samoniy
Cherry blossoms
Inspiration to you and bright creativity with children.
Source: https://babiesinspiration.ru/netraditsionnoe-risovanie-s-detmi/netradicionnye-texniki-risovaniya-dlya-detej.html
Candlesticks
From scrap materials you can make a DIY candlestick craft to decorate your home. To do this, prepare:
- Candles;
- Metal or ceramic muffin tins;
- Corrugated paper cupcake pans;
- Gypsum mortar;
- Cling film or tape.
Dilute the gypsum solution according to the instructions, then follow the instructions:
- Place the paper pan into a rigid pan;
- Pour 2-3 cm of gypsum into the mold and let it set a little;
- Wrap the bottom of the candle with film or tape;
- Place the candle in the center of the mold, press down slightly;
- Pour the remaining plaster into the mold.
When the plaster is dry, remove the candle and remove the paper form. The finished plaster craft that you made with your own hands can be colored as you wish. Such candlesticks look most impressive when combined. Make several copies of the same size at once.
Bags and cases for water bottles: 3 master classes of varying difficulty
These handbags are convenient because you can take a bottle of water with you, for example, on a walk, while your hands remain free. If you add a pocket to the case, as in the third master class, you can also put some small things in the purse, for example, keys or a few bills.
DIY glasses cases: 10 ideas with instructions
Water bottle bag in 15 minutes: master class
The case is designed for a 0.5 liter bottle of a standard shape, change the size if your bottle has a different shape or volume.
You will need:
- non-adhesive gasket (for example, thin sheet padding polyester);
- sewing machine and thread.
Step 1
— 1 piece of fabric 46x27 cm;
— 1 piece of fabric 8x120−180 cm (this is a piece of strap, determine the length you need);
— 1 piece of spacer 23x27 cm.
Step 2
Fold the bag piece in half with the wrong side inward to form a 23x27 cm rectangle, place the interfacing inside, pin all the layers and quilt horizontally at an equal distance between the lines.
Step 3
Fold the quilted piece in half lengthwise and sew along one long side and one short side. Finish the edges with a zigzag.
Step 4
Fold the strap piece in half lengthwise with the right side inward, sew with a zigzag and turn inside out using a safety pin. Iron.
Step 5
Cut the corners from the bottom as shown in the photo. Sew up the resulting holes while sewing on the strap. Unscrew the cover. Ready.
Photo and source: happyhourprojects.com
Mini format: handbag-wallet around the neck
Bag-case with lining for a bottle: master class
You will need:
- pencil or fabric marker;
— iron and ironing board;
- sewing machine and thread.
Step 1
- 2 circles of fabric with a diameter 2 cm larger than the bottom of the bottle (see first photo);
— 2 strips for the bag belt of the required length and width + 1 cm for allowances and the same 1 strip from the interlining without allowances;
— 2 rectangles, the length equal to the desired height of the bag, the width equal to the circumference of the bag + 1 cm for allowances.
Step 2
Fold the fabric and interfacing strips for the belt: interfacing strip + 2 fabric strips with right sides inward and sew along the long sides. Fold the rectangles for the bag in half lengthwise and sew as shown in the diagram.
Step 3
Turn the belt out and iron it.
Step 4
Along the belt, lay several parallel lines at equal distances from each other.
Step 5
Pin together the bag pieces as shown in the photo and sew.
Step 6
Turn the outside of the bag inside out. On both pieces, turn back and iron the seam allowances as shown in the photo.
Step 7
Place the lining part into the outer part, place the ends of the belt between them and sew. Ready.
Photo and source: mellysews.com
How to sew a belt from fabric: master class
Case with pocket for water bottle
You will need:
- fabric for finishing the cover;
- embroidery supplies, if you will be doing embroidery;
- fleece for lining;
- pencil or fabric marker;
- sewing machine and thread.
Step 1
- round piece for the bottom (template can be downloaded here) - 1 piece made of colored fabric, 1 piece made of fleece;
— rectangular piece of a bag made of colored fabric 16.5x28.5 cm;
— two pocket parts made of colored fabric, 12x11.5 cm each;
- strap detail made of colored fabric 127x6.5 cm;
- rectangle for fleece lining 16.5x28.5 cm;
- a finishing piece made of plain fabric 6.5x28.5 cm (if you do embroidery, do it first, and then cut out this rectangle).
Step 2
Fold the pocket pieces right sides together. Sew around the perimeter, leaving a 1.3 cm seam allowance and leaving one short side unsewn for turning. Cut off the corners. Press the seams.
Step 3
Turn the pocket piece inside out and iron. Find a place for the pocket (retract 2.5 cm from the bottom), pin the pocket so that the part with the hole for turning inside is at the bottom. Sew the pocket.
Step 4
Pin the trim piece to the bag piece along the top edge, face to face.
Stitch with a 1.3 cm seam allowance.
Trim the finishing piece allowance, leaving about 0.5 cm.
Step 5
Turn the seam allowances up, iron them and stitch the finishing details on the side.
Step 6
Fold the piece in half lengthwise with the right sides facing in and sew along 2 sides except the top, leaving a 1.3 cm seam allowance.
Step 7
Pin the bottom piece to the bottom, sew and finish the edge with a zigzag. Repeat steps 6 and 7 with fleece pieces.
Step 8
Iron the strap part inside out by 0.5 cm. Fold the part in half lengthwise, inside out, and iron. Fold the 0.5 cm allowances on the long sides inward and press. Sew stitches along the 2 long sides of the strap.
Step 9
Find the attachment points for the straps and sew the ends square and crosswise.
Step 10
Insert the fleece piece into the outer piece. Cut off the allowances on the top of the fleece piece, as shown in the photo, leaving 0.2-0.3 cm.
Fold the top edges under, align and pin.
Sew the lining and the outside of the bag. Ready.
Source
Plaster hands
You can use plaster palms to decorate your home and garden. To make this craft from plaster with your own hands, you will only need medical gloves, plaster, a funnel and a large round bowl.
- Dilute a thick plaster solution;
- Pour it into the gloves using a funnel. The more solution you pour, the larger your palms will be as a result;
- Place gloves with plaster of Paris in a bowl until palms are shaped like boats;
- When the plaster has hardened, cut off the gloves.
In the garden, you can place a small pot with a flower in the palm of your hand, and use it as a vase at home.
Stylish tube packaging without tedious calculations
Hello, dear readers!
Today I will show you the principle of making simple but effective packaging.
I suppose that for many craftsmen, like me, it happens that the finished products are always different in shape, weight and volume. Therefore, it is not practical to stock up on a couple of types of packaging boxes in advance. Accordingly, each time the creative satisfaction from the completed work is quickly replaced by the itching question “how to pack?”, so as to do without such dubious pleasures as measuring and drawing. No, we, of course, love drawing and are excellent at it, but all our efforts have already been invested in the packaged product
.
Improvisation helps, corrugated cardboard and craft, which should be in every decent home
.
I need a box so that the folded curtains do not dangle in it, and they do not feel cramped.
I choose the cylindrical shape as the most rational in this case. The color will be deep green. Firstly, it falls into the range of the product being packaged, and secondly, this shade of green is associated with reliability, good quality, and trust; it would be a good idea to evoke these feelings in the customer with the help of packaging in support of the main work.
So, we take a tube of designer corrugated cardboard, try on the bundle and cut the sheet so as to completely wrap the product with a slight overlap, leaving an allowance of 1-2 cm at the ends.
We measure the approximate diameter of the resulting cylinder. Mathematical precision is not needed here, because... the form is not glued and is movable, its diameter can be easily adjusted.
To reduce the time for assembling the packaging, we cut out circles with one-piece flaps for gluing, and place them on the horizontal corrugations.
Additionally, we prepare two more valves, remove the corrugation from those parts that will stick to the lids.
Glue the valves to the circles.
As a result, we have two circles with four valves ready.
Lubricate the valves with PVA glue and insert the covers into the cylinder, aligning the edges of the valves with the edges of the cylinder. To make this task easier, you can first grab the cylinder with an elastic band so that it does not unravel while manipulating it, and the gluing points can be temporarily fixed with small paper pins.
Consistently glue first one circle, then the second.
A neat, beautiful in its brevity form is obtained.
You can leave it like this, or you can play with the decor.
Red-brown sealing wax will not only be an effective compositional and color accent, but also another sign of attention to our customer, a symbol of the uniqueness of the item created especially for him.
. hrrrrus.
— now only the customer will be able to open their packaging.
There you go, everything is simple and fast!
The curtains withstood the road perfectly and immediately settled on the windows. The bows remained voluminous and even; there was no need to iron out anything.
Thank you for your attention! We wish you all professional success, creative insights and happy satisfied customers.
Source
Crayons
Stained gouache or white plaster makes excellent chalks for drawing on asphalt. To do this, you need to line the toilet paper rolls with film and tighten one of the edges with it so that the plaster does not spill out, pour the solution inside and let it harden for 24 hours.
After hardening, the shape is cut off and you can draw with crayons. The crayons can be made thinner, but for this you will need to take a narrower shape or make it yourself from thick cardboard or plastic.
Gypsum is a very plastic material; it can be used to create a wide variety of crafts for the home and garden. Ready plaster can be painted, painted, or varnished. If the craft is planned to be one-color, you can dissolve gouache of the desired color in the water in which the solution will be diluted. Then the concrete will immediately turn out colored.
Bubble film will lose its ability to burst - Community “This is interesting to know...” on DRIVE2
Packaging film with air bubbles, which many of us have burst repeatedly, may soon change significantly. Its manufacturer, Sealed Air, which has been producing film since 1960 in the form we are used to seeing it, has developed a type of packaging with non-bursting bubbles. The new material received the ironic and simple name iBubble Wrap.
Trading companies are constantly experimenting with new types of protective packaging and looking for cheaper and more reliable ways to transport cargo. Bubble wrap is still the best option for these purposes.
Sealed Air hopes that iBubble will revive the popularity of classic film, which has fallen on hard times in recent years. The company's income from packaging sales dropped sharply due to the high cost of film delivery associated with its bulk size.
Following the closure of several factories, Sealed Air management even hinted at a possible end to bubble wrap production.
The new packaging material iBubble should solve the issue of a more economical option for its implementation, as well as the efficient use of warehouse space of transport companies and carriers. The iBubble roll is a flat sheet of thin plastic.
It is filled with air not by the manufacturer, but by the companies that purchased the packaging material. This is done using a special pump, the price of which is $5,500, although Sealed Air plans to reduce its cost to $1,000 in 2022. When inflated, the bubbles look the same as before, but with one difference - they do not burst when pressed.
Despite the apparent benefits of this decision, this news seems to have caused dissatisfaction among ordinary consumers. Bubble wrap has become something of a cultural phenomenon. It is used to make clothing and is used in art and various crafts. In addition, there are communities of fans of such packaging on social networks.
However, it is the bursting of bubbles with tactile sensations and characteristic sound that brings greater pleasure. For some, this process is a kind of way to relieve psychological stress. There was even a mobile app for popping air bubbles.
Raise your hand, who has never popped these “wonderful” bubbles? ))) Everyone does this, even raccoons!
Finally, instructions for use, if anyone doesn’t know.
Source: itc.ua/
Source: https://www.drive2.ru/c/2126934/
Photos of plaster crafts
0
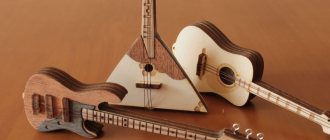
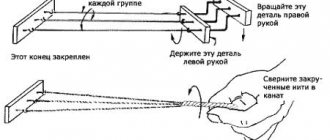
Equipment preparation
The key tools are a band saw and a drill press. You can find a machine in used condition for about 5,000-7,000 rubles. according to advertisements on the Internet. We are talking about the simplest models that can be easily fixed on the kitchen table.
A band saw for making smoking pipes is not so easy to find and the device will most likely cost more. However, if tubing is to be manufactured in the long term, such equipment will become indispensable.
The next element of the preparatory kit is a drill. For the smoke channel, models with a diameter of 4 mm are usually selected. You can find such products for machine tools in specialized stores. The best option is a drill for furniture hinges, with which repairs are made, including a wide range of options ideal for creating a tube.
If carving is intended, art kits will be required. Carving decoration is a labor-intensive process.