Good afternoon to everyone who stopped by! The works have accumulated, but for some reason there is no time to exhibit them))) I will little by little add to my collection of creativity in the Land of Masters)))) A little background. We were going to my father-in-law's birthday party. The gift was given in advance (out of urgent need), but somehow it’s inconvenient to go to the birthday itself empty-handed. Therefore, it was decided to do something creative. Our dad is a business man, has his own business, and of course the choice was made in favor of a money tap. It is original, gives positive emotions and at the same time is universal, as it will suit any interior and any occasion.
There are a great many money taps in our country, I have reviewed a lot of works. Here are links to master classes by craftswomen, which she relied on when she started working. Here is the MK on how to create a faucet, here is how to spin banknotes correctly, here is the MK of the money butterfly. Many thanks to the craftswomen for the information provided; thanks to your experience, even the most beginners can do a decent job!
My gift is not simple - I give you a golden faucet! There is no water in this tap, only men dream - a stream of money straight into their money chest! One, two, three, four, five - you will count the profit!!! The poems are not mine, they were found on the Internet))))
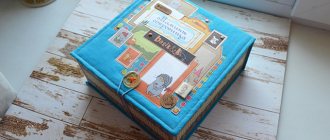
In the end, this is the faucet I got:
A closer look at the faucet itself with a fluttering butterfly
A money faucet makes a great homemade gift. It is original, gives positive emotions and at the same time is universal, as it will suit any interior and any occasion. You can give such a gift of money for a wedding, birthday, anniversary, etc. Making such a souvenir that brings financial success is not at all difficult. The main thing is accuracy and attentiveness.
Nice souvenir
You can make a money tap with your own hands as a gift to friends, relatives, colleagues, and bosses. This craft will be a wonderful gift for a birthday or wedding. In general, this souvenir can be usefully used in more than one situation. Naturally, simply giving money in an envelope is a very banal decision. The best option is to make a craft from banknotes. You can believe in the magical properties of this craft or treat it with healthy skepticism, but, be that as it may, such a decorative item can become an original decoration for any home or apartment, or serve as the main accent in the interior of a room. So, it’s time to talk in more detail about what components you can use to make a money faucet with your own hands. Next, we will tell you about the main stages of production. And you can make sure that there is nothing complicated about it.
Main components
To make a floating source we will need:
- Money can be real bills or coins or some kind of artificial paper.
- A bowl as a traditional part of a craft. The originals can replace it with an ordinary water tap.
- Metal cord, so-called wire.
- Adhesive tape and glue.
- Cardboard.
- Elastic polyurethane foam or foam rubber.
- Wooden skewers or aluminum fork.
- Golden paint.
DIY money tap
A money tap is a good gift for almost any holiday. Let's find out how you can make such a souvenir.
Tools:
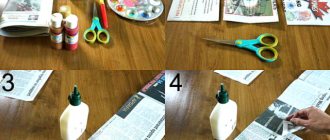
Materials: Step-by-step instructions: 1. First you need to make a holder for the tap. To do this, take six wooden skewers, stack them together, and put the wire in the middle so that its end protrudes.
2. We fasten the holder with tape, and bend the protruding end of the wire (see the picture).
3. We attach the holder to the tap.
My own master
Many owners of dachas or private houses make their own cranes. This is very convenient, since each mechanism (be it a simple motor or a full-fledged hydraulic drive) will be configured and adjusted to the person who made it. In addition, such a mechanism helps not only to carry heavy monolithic blocks, but also to deliver light loads, such as, to the top of the building.
Alas, it’s unlikely that you’ll be able to apply hydraulics to your creation. But it will be possible to replace it with an equally worthy homemade lifting machine that is not too difficult to use.
Many will probably have a completely adequate question: “Where can I get the parts?” The answer will be very short and unequivocal - at a landfill. If you push your innate disgust into the background and take a walk through many of the interesting landfills of your native land, you can find a lot of useful things at a construction site.
So, in order to create a Pioneer faucet with your own hands, the first thing you need to do is find an I-beam and a rectangular pipe. Immediately, the condition is stipulated that the I-beam must fit freely into the pipe. It is placed on sliding guides, and thus a telescopic unit is obtained.
During use, in order to reduce friction, the sliding guides must be lubricated!
In order for the crane to finally be able to function, it must be equipped with certain cables of the smallest diameter. You will have to spend money on them in a specialized hardware store (although you may also be lucky to find them in a landfill). You can use the channel as a material for welding the support and rotary frames. It is the channel that allows for good fixation of the crane on the surface. Usually, the roof of the object that is being built is this surface.
In order for work with the machine to proceed without incident, and also to protect yourself, it is necessary to weld a rectangular-shaped ballast pad.
One foundation block will be enough to lift a load weighing half a ton. To start the lifting process, you can purchase an electric motor in a special store, and then connect it to a winch from a UAZ.
Connecting electrical mechanisms
To start the lifting mechanism electrically, you will have to use the services of an electrician. The connection procedure itself is not too complicated, but still, for your own safety, you should trust a person who has experience working with electricity.
After this, the DIY Pioneer crane is ready for use.
How to give money in an unusually creative way?
It all depends on the age of the hero of the occasion and the occasion. For young people, the main thing is fun and creativity. A cake made of money is beautiful, but young people should be given money in an unusual way.
Several creative options to give money:
- Cabbage. You need to take a large head of cabbage and cut it in half. Several banknotes in cellophane are placed inside so that they do not get wet. The cabbage is wrapped in film and tied with a huge number of satin ribbons. The result will be something similar to a huge truffle. The birthday boy will be shocked when he sees cabbage
- Ice. Wrap the bills in a bag. It is necessary that the packaging does not allow water to pass through. Take a saucepan and pour water into it. Place the bag of money and freeze. Place a piece of ice in a bag and give a hammer along with this gift. The birthday boy must break the ice and get the money
- Umbrella. An unusual and creative way to present money. Just tie the days to the knitting needles by opening the umbrella. Close it and put it in the case
How to beautifully give money to your beloved: words
Along with the money, you need to say a few nice words. You should choose your words very carefully for your wife or beloved. Of course, it is better to give the woman you love some interesting gift, but it happens that the birthday girl herself asks for money to make purchases.
Poems for giving money to your beloved:
“ I am not a distant person, And my imagination is not weak, but I am a practical person, I know that you will be happy. I don’t give you a cactus, I don’t give you flowers, I give you money, Beauty Queen.
I'll give you a couple of significant bills for the holiday. May there always be time for relaxation and haute couture items.”
“ I wish you to live richly and replenish your piggy bank on yourself with love and never forget.”
“ Let the envelope help you achieve your goal. Well, most importantly, I wish you to always live happily.”
As a gift, so as not to suffer, This is the amount for your birthday! I hope you find the best use for it!
Paper tower crane with simple diagram
A simplified model for children's creativity with moving wheels and a hook. If a child figures out how to make a crane out of cardboard and makes a toy on his own, this will help him understand the principle of operation of the counterweight and the general structure of this giant of construction equipment.
Assemble a faucet from brown or orange paper, or paint the finished craft to match the real machines.
Step-by-step plan for creating a toy
- Templates of blanks are drawn on the selected paper according to the diagram presented. The size of the parts (in the diagram it is given in millimeters) can be proportionally increased or decreased depending on the desired size of the final toy.
- The valve body is assembled in the form of an inverted box.
- Wheels are cut out of cardboard, painted and attached to the body using toothpick axles. The edges of the axes are secured with beads or plasticine. You can stick foil discs on top of the painted wheels, or paint them with silver paint.
- Glue the tower in the form of a block with a beveled top and glue it to the center of the platform.
- The arrow is assembled and glued to the tower at an angle. Hold the parts with your hands until they dry.
- Assemble the back of the crane and glue it flush with the boom on the other side of the tower.
- To make the finished paper crane model stable, a counterweight is glued to it - an inverted box located behind the tower.
- Bend a hook from copper wire, foil or cut it out of cardboard.
- Attach the hook to the arrow using a thick thread.
- Use paints or felt-tip pens to add small details to the body of the toy, to your liking or according to photographs of real tower cranes.
The toy is ready. A model of a construction giant drawn and assembled from scratch with one’s own hands will be a reason for pride for a child and an opportunity to feel like a real design engineer.
The process of selecting materials for creating and finishing models and drawing drawings by hand develops the child's creativity and independence to a greater extent than assembling toys from ready-made purchased kits.
Methods for attaching a rope to a lifting mechanism
When creating complex pulley blocks, there are often situations when a cable of the required length for attaching the moving block is not at hand.
Crane for gas blocks
Methods for attaching a cable using general-purpose rigging:
- Using a cord. Using a self-tightening knot, the cord is tied to the main cable. As the load is lifted, the grappling knot moves along the main rope, thereby allowing the height of the load to be increased.
- Using clamps. In the case of using a steel cable, it is not possible to use a cord, so it is necessary to use special clamps.
How to make a faucet?
Faucet leaking is a problem familiar to many. Annoying sound from drops, rusty spots on the sink or bathtub are quite common troubles. This article is useful advice from experts on how to make a faucet and fix the leak in a timely manner. Let's look at several typical options so that you can feel comfortable and not get annoyed by such everyday little things, but quickly fix everything yourself.
How to fix a leaking old type faucet?
The most common causes of leaks are:
- Worn valve seat.
- Worn gasket on the faucet vent valve.
- Replacing the oil seal ring.
Fixing a leak as such is quite simple. It is only important to establish the correct reason for its occurrence:
Organizing your own business
Having a garage will help change your social status (agree to rent a room if you cannot organize a workshop on your own territory).
You must register as an entrepreneur. After receiving a patent or a certificate of entrepreneurial activity from a territorial government agency, you can seriously engage in business, purchase tools and metal products:
- channel;
- I-beams;
- corners;
- rods;
- profile (square) pipes;
- corrugated iron (for platform decking);
- semi-automatic welding;
- angle grinder;
- electrodes, cutting wheels, bolts and nuts of different sizes.
Helpful advice: before you start making a car lift with your own hands, visit service centers or retail outlets that sell specialized equipment for car repairs. Look with your own eyes and carefully study the design features of the mechanisms that engineers worked on in the factory.
Applications for children
Applique is an educational and exciting form of creativity for kids. The process of cutting out parts from colored paper is a pleasant activity that stimulates the visual centers, tactile sensations and fine motor skills, and assembling small elements into a whole picture delights children, at the same time teaching constructive thinking.
Volume applique
Both boys and girls enjoy making such a voluminous appliqué of a construction crane.
To create an application you will need:
Elements of the future painting are cut out from colored paper. The arrow is made from a quarter of a circle, rolled into a long narrow cone.
The platform, tower and counterweight are assembled from rectangles rolled into half-cylinders. Wheels and disks are made from flat paper circles.
Glue all the parts in the correct order onto the selected base.
It is better to choose a blue or green background for the craft, for a more realistic picture.
The application is ready, all that remains is to insert it into a frame and give it to your dad or grandfather.
Templates for cutting out or coloring
To make an applique using a ready-made template, print out the picture you like and carefully cut out all the details (you can redraw it). The resulting blanks are applied to colored paper of the chosen color, traced and cut out the elements of the future picture. When all the parts are prepared, they are laid out in the correct order to form a finished picture and glued.
Independent choice of the color of elements develops in children the ability to select harmonious colors and develops taste.
Creating a tower crane out of paper is not the easiest task, but the effort is worth it to add a model of this charming construction giant to your collection, and assembling the toy with your child will be a good opportunity to explain to him the principle of the winch, the counterweight device, and the technology of how a construction crane works. in general.
Complete assembly of volumetric model D with original photos
A realistic model of a Grove RT 1650 tower crane, assembled from thick paper using ready-made templates. Creating this construction giant with your own hands will take about 4-6 hours of quiet work, depending on the skills of the modeller.
Printable templates
The crane layout consists of 5 sheets; it is better to print the diagram on thick paper (120 - 160 g/cm) or thin cardboard. Printouts should not be rolled up; in this case, the paper will still remain slightly rounded, and this will negatively affect the final appearance of the product.
Step-by-step assembly diagram
Parts are cut out as needed and immediately signed with a simple pencil with their numbers on the reverse side. Assembly is carried out by combining numbers according to the diagram, starting with small elements, gradually moving to larger parts.
Before joining two fragments, each of them is well dried. Excessive haste can cause parts to warp and lose shape.
Step-by-step model assembly diagram.
Faucet with pouring coins
To make a money tap you will need:
- tap,
- saucer,
- strong wire,
- coins of the same denomination,
- a little styrofoam
- threads,
- moment universal glue,
- glue gun,
- a can of quick-drying gold-colored enamel,
- three decorative banknotes of any denomination,
- a small piece of satin ribbon.
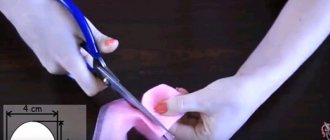
Step 1: Using pliers, bend the wire as shown in the photo. First, cut in half, and bend the ends so that they fit snugly against the saucer.
Step 2: Glue the ends of the wire to the saucer using universal moment glue.
Coins and bills
In addition, the saucer can be decorated with coins. For these purposes, ordinary pennies are suitable, which are no longer valuable to you. Also, some people use coins and tokens made from decorative materials when working on a money tap. As for banknotes, both “fake” tickets and very real money can be used.
Good afternoon to everyone who stopped by! The works have accumulated, but for some reason there is no time to exhibit them))) I will little by little add to my collection of creativity in the Land of Masters)))) A little background. We were going to my father-in-law's birthday party. The gift was given in advance (out of urgent need), but somehow it’s inconvenient to go to the birthday itself empty-handed. Therefore, it was decided to do something creative. Our dad is a business man, has his own business, and of course the choice was made in favor of a money tap. It is original, gives positive emotions and at the same time is universal, as it will suit any interior and any occasion.
There are a great many money taps in our country, I have reviewed a lot of works. Here are links to master classes by craftswomen, which she relied on when she started working. Here is the MK on how to create a faucet, here is how to spin banknotes correctly, here is the MK of the money butterfly. Many thanks to the craftswomen for the information provided; thanks to your experience, even the most beginners can do a decent job!
My gift is not simple - I give you a golden faucet! There is no water in this tap, only men dream - a stream of money straight into their money chest! One, two, three, four, five - you will count the profit!!! The poems are not mine, they were found on the Internet))))
In the end, this is the faucet I got:
A closer look at the faucet itself with a fluttering butterfly
Nowadays it has become very popular to acquire amulets and talismans.
. The most popular of them are for attracting wealth. And today we will make “”, which will be an excellent talisman for attracting money. It symbolizes endless cash flow, prosperity and abundance. In addition, such a talisman will be an excellent gift for both men and women. Materials:
- Wire (strong enough) or metal pipe
- Bookmarks “Dollar” - 15-20 pcs.
- Plastic box, jar or bowl
- Glue gun
- Gold paint
Once we have selected all the necessary materials, we can begin making a money tap. And we will start, so to speak, from the foundation of our product. We dilute the plaster with water and pour it into the chosen form. While the plaster has not yet hardened, we insert a metal tube or wire into it.
After the plaster has hardened, remove the product from the mold and check the quality of the pouring. If there are any unevenness or flaws, then we sand the workpiece a little. Next we coat the plaster with paint.
Now we glue the tap to the metal tube. We check the reliability of the design.
Let's start gluing the banknotes. First, we glue the tube itself, and then we glue the bills, having first twisted them.
To give the bills a shape, you can wrap them around a pencil. In fact, bills can be any shape you want. Some craftswomen twist them into a watering can.
Our money tap is ready! If desired, the composition can be supplemented with coins or a beautiful inscription with wishes can be made. I wish you creative inspiration and wealth!
How to get rid of computer addiction in teenagers and children: advice from a psychologist
2021-12-05 19:18:05
Congratulations on Tankman's Day: official prose and funny poems
2021-12-05 19:18:05
Spiritual and moral education of preschool children based on spiritual values and ideals. Relevance of spiritual and moral education of children.
2021-11-30 13:47:15
Tags
options for a money faucet making a money faucet Money faucet Money faucet Money faucet using a money faucet. Money taps MK money butterfly bills pasted over with banknotes now we roll up the banknotes like banknotes glue banknotes of fake banknotes With our own hands to with our own hands for lovers of handicrafts. with our own hands with our own hands Handicrafts with empty hands are inconvenient, just made by
skewers coins thank me decor faucet then after candy product surface spout more bowl can read to me and husband friend layers
Advantages of the design
A rectangular pipe is suitable for forming an external support structure and a common base. For the latter, according to experts, it will be optimal to use a channel of 200. The length of the thrust screws should be within 50 cm, due to which the crane can be mounted with its own hands on any surface, including those with a large number of irregularities. Thus, there is no need to prepare the site on which the building is being built.
Difficulties sometimes arise with the wheels, since on loose soil they can spin poorly and dig into it. Therefore, it is advisable to carry out work on hard ground. After completion of construction, the structure is disassembled into its component elements for storage.