Features of working with the material
Figures made of light plasticine attract attention, look aesthetically pleasing and picturesque, regardless of what kind of product is made. Light plasticine differs from ordinary plasticine in that the material hardens when the work is completed. If simple plasticine, which everyone is used to, can easily squeeze or break the finished product, then airy plasticine holds its shape for a long time.
Airy plasticine, regardless of shade, is a very easily soiled material. Therefore, before you start sculpting figures, you need to make sure that your hands are clean and dry.
The material dries quickly. This is worth keeping in mind after finishing work, since it may not be possible to return the remaining plasticine to the bag. In order to avoid this problem, you need to take care of an airtight storage container in advance. This can be any box or bag that does not allow air to penetrate. It should be stored in a dark and cool place so that the lightweight plasticine does not lose its properties after a long time.
This kind of work is designed for speed. This is especially important when working with small parts. Due to their small size, they dry out too quickly. Therefore, you should not hesitate to attach the parts to the base of the product, otherwise they will dry out and will not be able to attach properly.
Panda
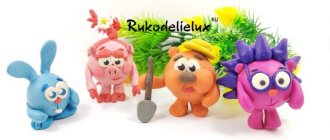
The little panda looks very neat and realistic, and making it with your own hands is as easy as shelling pears! By the way, you can use any colors and collect a whole army of colorful fantasy bears.
Photo: za.pinterest.com
DIY winter crafts for kindergarten (50 photos)
Slime made from light plasticine
Slime (lizun) is one of the popular anti-stress products at the moment. It is a jelly-like substance that does not stick to your hands. This slime has the property of stretching. Slime can often be found on store shelves, but can be made at home from light plasticine.
To make slime at home you will need:
- Air plasticine.
- Mixing container.
- Water.
- Shampoo.
- Shaving foam.
To make the finished slime even larger, you can use several packages at once. However, you should be careful when choosing a shade, since when mixed you should get a beautiful color. It is recommended to use 2 colors, for example, hot pink and pink, but a lighter shade. This way you will get an original and pleasant color for the finished slime.
- You need to mix 2 packs of light plasticine. It is necessary to achieve the effect that the color is uniform, without unmixed areas on the material.
- The mixed mass lies in the container. Warm water is added to light plasticine. Depending on the amount of material, water should make the mass more liquid. The finished plasticine is mixed with water.
- Next, add a few drops of shampoo. It doesn't matter what kind of shampoo it is. You can choose a shampoo with a certain scent so that the finished slime has a pleasant aroma in the future. After adding shampoo, the slime is mixed.
- The last step is shaving foam. This material is not worth regretting. The amount of foam should be equal to the amount of plasticine that is in the container. After the final mixing of shaving foam with plasticine, the finished slime is obtained.
The slime, made of light plasticine, does not stick to your hands. It has a pleasant texture and does not make any extraneous sounds. It feels like a slightly melted marshmallow. An anti-stress like this would be a great thing to keep your hands busy in your free time.
Cupcakes
Cupcakes can be different: the brighter the colors, the better. First, a biscuit base is created, and then everything is decorated with cream on top. In addition to the plasticine itself, you can use beads or rhinestones. They will also act as decorations.
Preparation consists of the following steps:
- To create a biscuit base, take a piece of yellow or orange plasticine, for cream - pink or purple.
- Make cups from yellow balls. To do this, just press them with your fingers on all sides. Apply longitudinal notches to the surface of these cups, giving the structure of the cake ribs.
- Roll pieces of bright flowers into thin threads.
- Twist the resulting threads into a spiral so that they are shaped like hats. For one cupcake you can use not one, but several multi-colored threads. This way the product will turn out beautiful and appetizing.
- Combine a bright hat with a yellow base. The cupcakes are ready.
If you wish, you can decorate the product with beads or rhinestones.
Clothes for dolls
One of the ways to make a toy original is to come up with clothes yourself. However, since sewing is a very complex process, a material such as air plasticine comes to the rescue.
One of the features of clothing made from such plasticine is that it is very easy to take off. Unlike ordinary plasticine, this one does not leave stains on the dolls’ bodies that cannot be washed off. So no need to worry about the condition of the doll. If you work carefully, the toy will remain in its original form.
It’s easy to make a dress for a doll from a pliable material:
- You need to sculpt clothes from top to bottom. Therefore, initially there must be a clear picture of the desired dress. You need to decide what the top will be: sleeveless, open or closed.
- Roll out 2 small circles from light plasticine: one for the front and the other for the back. Depending on the chosen style, the rolled material is attached to the doll. Do not press the plasticine close to the plastic. It is enough just to make sure that it sticks to the model.
- Until the finished top has dried completely, it’s time to decorate it. Rhinestones, beads, or simple patterns made with a special stick are perfect.
- After the top part of the clothing has completely dried, you can proceed to the skirt. If the idea is to have a full skirt, then you need to use a supporting material on top of which the skirt will be molded. Foil is perfect because it can be removed without much effort when finished.
- You can start creating the skirt. Here, just like with the top, everything depends only on imagination. For example, you can make small dots along the hem of the skirt, which will give the image more detail.
- To make your finished clothes shine with new colors, you can come up with an original belt. He will attract attention and give the image new features, distributing attention to accents. Such a belt can be of any thickness and decorated in any way you like. Everything depends only on the imagination of the creator.
These instructions can also be used to make a T-shirt and shorts for Barbie. Clothes made from air mass will look stylish not only on girl dolls, but also on boys. You can create unique pants and a t-shirt with a pattern.
To make the clothes look even more interesting, you need to detail the finished outfit.
How to diversify doll clothes made of plasticine:
| Beads and rhinestones | Perfect for a variety of outfits. Especially when it comes to evening dresses, which look so beautiful on a doll. By decorating clothes with beads and rhinestones, the outfit becomes more detailed. You can use materials of both contrasting and solid colors. Each of these options will look great on the model. |
| Glitter glue | Suitable for decorating the bottom hem of a dress. Shiny glue, unlike beads, will not be as noticeable. However, if you add it, the finished clothes will sparkle with new colors. Using glue with glitter, you can draw entire designs on a doll product. |
| Toothpicks | To give the costume an interesting texture, use toothpicks and all kinds of sticks. This number also includes caps, stacks and much more. Everything depends only on the imagination. Even with an ordinary toothpick, you can create a unique print on a doll’s outfit. |
| Dye | In order to make the costume more detailed, you can use gouache paints. Many patterns or even designs on a T-shirt or shorts for a doll will look very impressive. At such a moment, every child will feel like a great couturier. |
Festive table
A doll's life is almost always a holiday. This means that the festive table should also be set. Our selection has a wide variety of table setting options for toys.
However, the holiday table is not all variations of games with miniature plasticine food. You can play with her at a picnic, shop, cafe, or have a doll birthday party with a buffet.
Dolls can celebrate all holidays with their mistresses - Christmas, New Year, Easter, September 1, graduation and even have a wedding!
How to make food for dolls from plasticine
https://www.youtube.com/watch?v=e-yd7oJEO4c
Figures made of light plasticine look very attractive when they look in the form of some kind of food. Their sculpting will not take much time, and the result will be a pleasant decor to diversify puppet play. In addition, decorative food made from light plasticine often appears in many photographs, arranging some compositions.
Dough products
Donuts, pies, hamburgers and many other products made from dough will look attractive on a toy table.
Photo of a hamburger figurine made of light plasticine step by step
In order to prepare a plasticine donut, you need:
- Orange, white and pink airy plasticine. If desired, you can add a few more colors to make the finished donut brighter.
- Toothpick or stack.
Sculpting process:
- You need to roll out a small stick from orange plasticine. If the donut is planned to be too small, this must be done quickly, since the material dries out.
- The 2 ends of the stick need to be connected, thereby forming a hole inside.
- Use white plasticine to make the base of the filling. To do this, roll out a small cake, which is later placed on the top of the donut.
- You need to add sprinkles on top of the white filling. Multiple colors can be used. Several small sticks are made, carefully attaching them to the white filling. In addition to airy plasticine, you can add beads or sparkles.
- You can draw several strips in a stack from above and below. This will make the donut more detailed.
Candy
Figures made of light plasticine in the form of candies will look very interesting next to the doll. In order to prepare the lollipop, you need:
- red and white air plasticine. If desired, you can use other colors that suit the image more.
- Toothpick
There are no difficulties in the process of sculpting sweets:
- You need to roll 2 sticks from different colors. For example, white and red.
- 2 strips of flowers need to be connected, but not glued together.
- It is necessary to wrap the plasticine from one end so that something resembling a candy is formed. The base is ready.
- In order to make a stick, you need to break a toothpick in half. In the place where the small tip remains, stick a stick.
Fruits
Preparing the fruit won't take much time. This can be demonstrated by sculpting a watermelon.
To do this you need:
- Airy plasticine in green, white, red and black.
- Stack.
You need to start sculpting a watermelon slice with the distribution of colors. The first step is the base, that is, the green color. A small arc is made from it, which is slightly depressed.
White plasticine is added inside the green arc, which should completely enclose the green interior. Depending on the thickness of the arc, a red circle is made. This will be the pulp of the watermelon. A triangle is cut out of the circle in a stack, which should fit tightly to the white part of the watermelon.
Next, several dots are made from black plasticine, which are the bones. The most organic option is to add one bone in the middle of the red triangle, and the other two a little lower on different sides. It all depends on the imagination and the desired result.
Vegetables
Figures made of light plasticine, which represent vegetables, will look very natural. Especially if you choose natural shades. We can look at the example of carrots.
To do this you need:
- Plasticine orange and green. In order to make the vegetable more realistic, orange can be mixed with brown.
- Toothpick.
First you need to take orange plasticine. A three-dimensional stick is rolled out of it, giving the shape of a carrot. As a rule, it is a cone with rounded ends. Until the material has completely dried, you can make several lines along the radius of the carrot with a toothpick. Thanks to these simple movements, the carrots will become realistic.
Next comes the green tail of the carrot. For it you need to roll several strips of green color, and then connect them with one side of the ends. The other end should be bent in different directions. Thus, the carrot greens will acquire a lush volume. On the leaves, as well as on the carrots, you can make several movements with a toothpick. It will create the effect that the leaf has membranes and a stem.
Cake making master class
For dolls and toys, you can not only sew or create household items, but also sculpt various delicacies from plasticine. For example, cake. What can you use to make a cake?
For sculpting you will need to prepare:
| Tool, material | Description |
| Plasticine | It is necessary to prepare plasticine of different colors. Brown will play the role of the base, and blue and pink shades can be used to make a berry layer. |
| Smooth horizontal surface | The surface is needed to level the edge of the cake. |
| Special knife | It is required to remove excess parts and cut the finished product. |
| Toothpick | It will help give the dough porosity. |
How to make the base?
The base of the plasticine cake will be pieces of different colors.
It is made as follows:
- Roll the pieces of plasticine into balls, then flatten each of them. As a result, analogues of cake layers are formed from brown ones, and a berry layer is formed from other colors. For 1 cake, it is enough to make 4 pancakes - 2 brown and 2 other colors - blue and pink. To ensure their edges are even, you need to roll them out on a horizontal surface.
- Combine the resulting cakes: between the 2 brown flowers there should be a layer of a different color.
- The craft should be rolled out again on a flat surface.
- Cover the resulting multilayer product with fondant. It can be made, for example, from blue plasticine. To do this, roll out a piece very thinly and carefully wrap the cake with it.
- Remove any excess parts of the top coating that have formed on the product using a knife, and then firmly press the layers with your fingers. The base of the cake is ready.
How to decorate a finished cake?
To make the product complete and believable, you will need to work on it.
Food made from plasticine. Cake step by step.
For this:
- Take a small brown piece of plasticine and roll it into a thin thread, and then braid it. This will be an analogue of cream on the surface of the confectionery product.
- Place the resulting braid on top along the perimeter and around the bottom of the cake.
- Using a knife, cut the cake into pieces and give a porous structure to the molded cakes using many holes in the brown layer. To do this, use a toothpick.
If the cake doesn't look appetizing enough, you can top it with roses, pieces of fruit, or another layer of cream.
Animals
Animals made from airy plasticine look very interesting. Thanks to the unique texture of the material, the animals look three-dimensional. Such figures can be used as decor for a child’s room or even for games.
How to make a penguin from plasticine
To sculpt a penguin you need:
- Black, white and orange air material
- Black gel pen.
You need to start sculpting with black material. A large black oblong circle is rolled out of it. This will be the body of a penguin, so it’s worth deciding what size the craft will be ready for.
A slightly smaller white flatbread is made, but also round in shape. It can be narrowed towards the top, but this is optional. White plasticine will serve as the belly and face for the penguin. Therefore, you need to glue it on the front side of the almost finished penguin.
Use a black gel pen to place 2 dots on the head. These are the eyes of an animal. The beak is made from orange plasticine. It should be a small volumetric triangle, which is attached in the middle from the eyes. From the remains of the orange color, 2 volumetric triangles are also made, which serve as the penguin’s paws.
Ice cream
You will need: plasticine of bright colors, a spatula, a stack, a wooden skewer, beads and rhinestones.
Master Class
- Roll a ball of brown plasticine.
- Flatten the ball into a flat cake.
- Draw lines with a stack, creating a waffle texture.
- Twist the workpiece to form a cup, then secure the edges.
- Roll balls of bright colors of different sizes.
- Use a skewer to process the halves of the balls as shown in the image.
- Place the balls into a waffle cup.
- Decorate the ice cream by attaching beads and rhinestones.
- Make a cherry and attach it to the top of the ice cream.
Plasticine ice cream is ready! I recommend watching this video!
DIY Making Play Doh Ice Cream Popsicles
Figures
Making a figure from light plasticine is easier than it seems at first glance. For example, a cupcake-shaped figurine can be an excellent decor for your desktop.
For this you will need:
- Airy plasticine in beige, white and pink colors.
- Beads or other decorations
- Toothpick.
First, a cake basket is made. For now you only need beige color. A cylinder is molded from it, narrowed at the base. Using a toothpick, a relief is made along the entire diameter of the finished basket.
For a more interesting cupcake filling, mix 2 colors. For example, pink and white. It can be left unmixed, thus leaving picturesque stains of one tone in another. A long stick is rolled out from the finished mass. It is attached to the basket and twisted in a circle, thereby forming a cream.
Finally, the filling is sprinkled with beads or rhinestones. This will serve as a topping on the finished cake.
loaf
Making a loaf of bread from plasticine is easy. It is enough to take a beige piece and give it the shape of a voluminous oval, and then use a toothpick or other tool to mark diagonal notches on the surface of the workpiece. Wheat bread is ready.
If you plan to make sandwiches from this loaf, then you need to cover it with a thin layer of darker plasticine. It will act as a crispy crust.
Flowers
Sculpting flowers is not an entirely simple process. However, if you make an effort, the result will be a beautiful product made of airy plasticine that will please the eye.
To make a flower from plasticine you need:
- Airy plasticine green and red. The red color can be replaced if desired, since the color of the plant’s petals depends on it.
- Toothpick.
- Stack.
You need to start working from the bud. To do this, several round or oval parts are rolled out. In the case of flowers, accuracy is not important here. Parts can be of any size and shape. A total of 5-8 petals should come out. You need to start collecting from the smallest of them. The center of the flower is formed from them. Then, progressively, the entire flower is pasted over.
Next, all you need is green. The receptacle for the plant is made from it. To do this, you need to roll out an oval that is suitable in size, and then wrap it around the base of the petals from the bottom side.
Next, the stem is molded by rolling out green plasticine to form a stick. All that remains is to prepare the petals. To do this, several ovals are rolled out, from which, using a stack, the required petal shape is cut out. Finally, the stem and membranes of the plant are drawn on the front side of the leaf using a toothpick.
Donut
You will need: plasticine of bright colors, a stick, a plastic spatula.
Master Class
- Roll out a ball of yellow plasticine.
- Flatten the workpiece and press the center with the round tip of the stack-bulk.
- Trim off excess plasticine from the back side.
- Make a cake from pink plasticine.
- Attach the doughnut to the donut base and make a hole in the center.
- Roll plasticine flagella in bright colors.
- Place the flagella in the freezer for 5 minutes.
- Remove and cut the frozen flagella into small pieces.
- Decorate the donut by adding sprinkles.
The plasticine donut is ready!
Badges and keychains
In order to diversify your keys or bag, you don’t have to go to the store to buy a key fob. Everything can be done at home thanks to lightweight plasticine. For example, a keychain in the shape of an ice cream would look very interesting.
To sculpt it you need:
- Ring from an old keychain.
- Airy plasticine in beige, pink and blue. Pink and blue shades are used to fill the ice cream, so other colors can be used.
- Beads for decoration, optional.
- Toothpick.
Making an ice cream cone starts from the bottom, that is, from the cone itself. Beige plasticine is used for this. A cone with a pointed tip rolls out of it. Until the horn has frozen, a toothpick is used to make a horn pattern.
Incomplete mixing of pink and blue will give a new shade - lilac. This way the ice cream will come in 3 colors. A long strip is rolled out from the mixed mass, which will later need to be rolled, carefully placed on the larger part of the cone. The top is sprinkled with beads or rhinestones.
To ensure that the ice cream remains not just a figurine, but a keychain, a ring removed from the keychain is attached to the very top of the product. If the plasticine has frozen, you can use glue.
Candies
One of children's favorite treats is candy, especially chocolate. To prepare them you will need 2 pieces of plasticine. One of them is brown, it will become an analogue of chocolate, the second is white, it will be fudge.
Children like it when there is a lot of candy, so it is better to immediately divide a piece of brown plasticine into several servings. Mash each portion and then shape it into one or another candy, for example, a round elongated bar, a hemisphere or a truncated pyramid. For variety, you can make several types at once.
Notches are made on the surface of the candy using a knife, and white plasticine, acting as nougat, is placed on top in strips. You can wrap the candy in candy wrappers, then it will be impossible to distinguish them from the real thing.
School supplies decorations
At the moment, it is very popular to make “applied” caps for pens in the shape of animals.
To make a similar one in the form of a panda's head from light plasticine you will need:
- White and black air plasticine.
- The handle on which the product will be attached.
- Black gel pen.
You need to start modeling with white plasticine. A white ball rolls out of it, which will serve as the panda's head. The ears and eyes are made from the black mass. Since pandas have black circles, their eyes should be larger than usual. You can attach small parts made of white material to them, which will serve as highlights in the eyes. Use a black gel pen to draw a neat nose between the eyes.
You need to attach the product to the handle until it dries completely. You just need to pierce the head, placing it on the handle and make sure it is well fixed.
The finished figures dry in a matter of minutes. It often happens that due to leaky storage of light plasticine, the remaining mass hardens. But there is no need to rush to throw away seemingly spoiled material. In order for the light mass to acquire its former properties, it must be dipped in warm water, slightly squeezing the plasticine in the liquid. After which it will return plasticity.
Article design: Vladimir the Great
Macarons
A popular sweet called macaroons looks delicious and makes you want to enjoy this wonderful confectionery product. To make macaroons from plasticine, you will need several multi-colored pieces, as well as a toothpick.
In this example the following colors are used:
- pink;
- yellow;
- white;
- blue;
- violet.
Manufacturing stages:
- Roll into balls and press into flat cakes. Make 2 equal-sized cakes from each color. White, pink and yellow will become creamy layers.
- Connect 2 flat cakes of the same color, place cream layers between them.
- Treat the top and bottom sides with a toothpick.
- At the junction of the upper main cakes with the layer, press the plasticine several times. If necessary, you can press down on top with your palm.
Modeling food from plasticine is an excellent activity for developing a child’s fine motor skills and creative thinking, as well as introducing him to work and aesthetic perception.
Owl
When the baby has practiced making a simpler owl, it’s time to move on to a more complex pattern. Here you will need more subtle and careful work - it is very useful for both motor skills and perseverance.
Photo: vedeneevaanya.blogspot.com
Paper crafts for children: 8 simple and beautiful ideas
Octopus
One of the simplest plasticine figures is an octopus. It is made of yellow, sand or brown material. The procedure for creating crafts:
- 7-8 cylindrical flagella are rolled out. They are pointed at one end.
- The prepared “tentacles” are joined together at the top, and the pointed ends are spread to the side and curved in a characteristic way. It is not necessary to maintain the symmetry of the bends.
- A head is formed from a spherical plasticine blank. It connects to a plexus of tentacles.
- The eyes are attached to the head, and small circles are attached to the tentacles, clearly standing out against the background of the base.
Such a craft can be planted on the “bottom of the sea.” To do this, it is better to place the figurine itself on a large rounded stone, and place small pebbles around it.
What you need for the craft
The materials and tools needed for making crafts with 1st grade students differ little from those needed for other age groups:
- Plasticine.
- Work board or mat.
- Stacks.
- Paper scissors.
- Rolling pin.
- Molds for repeated production of flat shapes.
- Apron and sleeves.
There are many varieties of plasticine suitable for modeling with children 6-7 years old.
Important! Particular attention should be paid to the composition. The material must not contain substances hazardous to the body.
| A variety of plasticine | What kind of work is it suitable for? | pros | Minuses |
| Paraffin | for most jobs, this type of plasticine is most often used in modeling classes | affordable price, easy to find in stores, made from natural ingredients | quite hard, stains clothes and hands |
| Floating | — | stays on the surface of the water, soft, does not stick, does not stain hands | price |
| Wax | — | soft, flexible, easy to mix different colors, does not stick, easily washed off hands and clothes | price |
| Solidifying | ideal for crafts | plastic, suitable for sculpting figures and figurines that are preserved for a long time | price, not suitable for repeated modeling, hardens quickly |
| Ball | — | does not stick to hands and clothes, large palette of colors, easy to mix with each other | price |
| "Smart" | — | Has different consistencies, stretches easily, tears, can be magnetized, pliable | price |
Stacks are used for cutting plasticine or giving relief. They can be made of wood or plastic. Plastic ones are considered the most convenient and safe for children of any age, including first-graders.
Scissors are used to cut plasticine into pieces when a more even and clear cut is needed, which a stack cannot provide. A rolling pin is needed for rolling out layers. There is a special small rolling pin on sale.