How to make utensils such as bowls and plates from plasticine.
we already had an article three years ago with these very keywords - modeling a bowl, modeling a plate. But time passes, experience accumulates, and I decided that this experience definitely needs to be shared. Moreover, this time we will talk about modeling from large volumes of plasticine. We will not engage in the manufacture of traditional miniature “dishes” for unknown purposes, but we will develop our hands and eye by sculpting large items from life.
Yes, from nature. In order for children's products to look high-quality, you need to give not a vague topic - tableware, but real tableware for sample. And setting a goal to blind is similar. You won’t believe it, but with this approach, even five-year-olds can make quite decent plasticine bowls and bowls.
But let’s move on to the lesson in making dishes.
Original snowflake made of plasticine
You can draw any applications and paintings with plasticine flagella. And considering that New Year is coming soon, I want to create something especially festive and beautiful. A snowflake made of plasticine on cardboard is the best option; not only children in the senior and middle groups of kindergarten can make it with their own hands, this craft is also suitable for the youngest children.
In this master class you will see step by step how to make a snowflake from plasticine with your own hands. It won’t be at all difficult to make such a craft with your children. You will definitely like this kind of creativity. Traditional colors for creating all kinds of snowflakes are white, blue, blue, silver. But no one forbids you to fantasize and make snowflakes brighter, for example, like those shown in the final photo.
Snowflakes are a unique creation of nature. Of course, it is unlikely that you will be able to examine a live image under a microscope with your children, unless you have a microscope and take it outside. But you can easily find drawings and photographs of snowflakes to look at and make sure that they are all unique, have a unique pattern, but the number of rays is the same - 6 pieces. Take our tips as a basis and create your own incredible New Year's masterpieces with your children.
How to make a snowflake from plasticine on cardboard: step-by-step instructions
- Plasticine with a stack (you can use a plastic knife separately if the stacks are not included in the kit).
- Rectangular sheet of cardboard of any format.
Prepare thick paper - the basis of a three-dimensional drawing. The background color does not have to be white; any expressive shade will do. You should also buy plasticine; for very young children it is better to choose very soft one, and also make sure that there is a plastic tool in the box.
Choose 2 bright shades of plasticine and knead the pieces in your hands separately. It is necessary to achieve absolute softness and pliability of the mass.
Next, you need to stretch the plasticine into very thin threads of uniform thickness. It is more convenient to use a regular syringe for this (fill the mass inside and squeeze it out through the spout). But it will be difficult for children to independently push the plunger inside a syringe filled with plasticine, even soft ones. Therefore, just pull out the soft mass with your fingers. This is useful for fine motor skills of children's hands. Place thin threads on the board and press down on top, rolling out the sausage.
To make it easier to work with thin plasticine threads, cut them in a stack into separate segments.
To create the center of a snowflake, take one piece of plasticine and start twisting it into a flagellum.
Glue the resulting spiral into the center of the paper. Starting from this part, attach all other elements.
Make 6 branches using threads of a contrasting color.
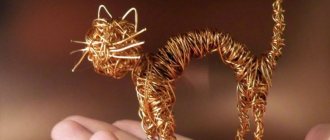
Hedgehog
Plasticine figures do not have to be complex. You can make a cute hedgehog from a large but easy-to-make number of parts. Where to start? The first step is to roll the ball. It will become the basis of the hedgehog. Now you need to make a triangular muzzle. It needs to be attached well to the body so that the gluing border is not visible. Now we make the lower legs. These will be two flattened ovals. The front legs are two balls, on which two cuts are made. Ears can be made from flattened ovals, one side of which is trimmed with a stack. Now it's time to make the pink overlays. You can mold them by hand, or you can cut them out of a layer of thinly rolled plasticine. Decorate the face with three balls. Two of them will be eyes, and the third will be a nose. All that remains is to make the needles. We take brown plasticine, heat it in our hands and begin to make cones. They can be glued not one at a time, but in whole batches.
Master class on creating snowflakes from plasticine
Marina Nasonova
Master class on creating snowflakes from plasticine
Children and adults like to sculpt from plasticine On the eve of the New Year, this is a great reason to get together with the whole family. But in order to make it as interesting as possible for your child to create decorations with his own hands, it is recommended to try making a snowflake from plasticine . This is not only an unusual and original decoration - working with plasticine helps develop fine motor skills of the baby’s hands, which, in turn, develops his brain activity. So such leisure is not only exciting, fun and interesting, but also as useful as possible. Today we will show you how to make a snowflake from plasticine with your own hands step by step. This is certainly one of the most beautiful and unique creations of nature. Everyone will have their own. Let's get started.
To create a toy, we need plasticine of only one color : white and a circle of blue cardboard.
Divide the plasticine into several pieces.
some of the plasticine into thin sausages, 4 thin and long, and attach them to a circle.
We attach short sausages to the long sausages and get small rays.
the remaining plasticine into 7 identical pieces and roll out balls.
We attach the balls along the edge of the circle.
Now your snowflake is ready . This decoration can be placed on a shelf or placed under the Christmas tree. Or you can make a hole in the cardboard and hang it like a toy on the Christmas tree or decorate the door of the room.
Also, don't forget to use your own ideas for sculpting beautiful snowflakes with your little crafters and don't be afraid to experiment and use different decor.
Master class “Colored snowflakes” Winter is a wonderful time! The snow-white beauty of winter has arrived - the favorite season of children. Sledding, skiing, skating, snow battles. Master class on making snowflakes Prepare a snowflake for the Christmas tree from pasta. We will need: - rolled and straight pasta with an oblique cut, - glue gun, - acrylic paint.
Forget-me-nots - how to make a bouquet with your own hands
We make petals from small pieces of lilac and blue plasticine. We form flowers from five leaves. Add a yellow center to the center of each forget-me-not and make a hole with a thin stick. Use the end of the stack to press indentations on each flower. We twist the pieces of wire and insert them into the pot. We make large leaves and add a green ball to the base of each flower. Insert wire and leaves into the pot. We place unopened buds at the end of each piece of wire. Add forget-me-nots along the way. It turned out to be a very tender plant.
Modeling snowflakes from plasticine
Unique snowflakes are the most popular decoration for the winter holidays. Children enjoy cutting out unusual paper products before the New Year, Christmas, and during the winter holidays. Everyone is waiting for a fairy tale, and it certainly comes in the form of beautiful snowy weather, a decorated Christmas tree and Santa Claus with gifts. We invite you to fantasize about snowflakes with plasticine and create your own unique patterns. Naturally, first of all, you will have a question: how to make a snowflake strong, because it should be weightless, and with plasticine this is not so easy to achieve. We suggest that you make applications on cardboard, then you will not have any problems with the strength of the product.
To make a snowflake you will need:
- plasticine;
- bead or rhinestone;
- cardboard and scissors.
1. The generally accepted color for creating snowflakes from paper or plasticine is white, but it can be replaced with brighter colors, because snowflakes can be fun and colorful. For example, choose orange and blue for work.
2. Cut out a square of cardboard and prepare the mass for work by kneading it in your hands.
3. Select the color of the middle of the snowflake. For example, it could be a blue cake. Attach it to the center and decorate with a bead.
4. To sculpt patterns and rays, pull the plasticine into thin threads. To do this, pinch off small portions from the soft mass and roll them out with your fingers, resting on a hard surface. Move along the sausage, evenly distributing the plates.
How to make a toy set for dolls?
You can see what kind of source material was used. You will need to carefully disconnect the small elements from the base so as not to damage them, remove the winding with your hands, slightly prying it with the tip of small scissors.
Insert a wooden rod inside such an element and saw off the excess.
Make several of these toy containers with wooden lids and write the names of the seasonings on them on small paper strips. Attach them with glue or tape.
The child will also be delighted with the kits for bulk spices; they are also quite easy to make.
Take a metal element, use a nail and a hammer to make several holes in it.
All you have to do is close the lids and admire what an interesting toy set you have created.
You will transform old capacitors beyond recognition. To do this, you first need to remove the covers from their lower parts and saw off one part in half.
Work on some other details in the same way. This is what you will get at this stage.
Go around the edges of these blanks with a file to make them even. In the same way, you need to process smaller parts, such as handles and lid opening elements. Cut these items from a tin, for example, from a can of condensed milk or stew.
Solder them into place and see what a wonderful gaming set you have.
You can make it from other materials together with your child, for example, from plasticine.
- To do this you need to knead the plasticine. To make a saucer, roll the mass into a ball, flatten it, slightly lift the edges up.
Show your child how to make a cup. To do this, you also need to first roll the ball, then press into its center with your finger, shape it into a cup.
To make a handle for it, roll a thin sausage out of plasticine, bend it slightly and attach it to the side.
- You can also make a coffee pot out of plasticine. To do this, you first need to roll this material into a pear-like shape. This is the body. To make a handle, roll a sausage out of plasticine, bend it and attach it to the side. The spout of the coffee pot is also made from a curved sausage, and its lid is made from a shape similar to a flatbread.
- acorns with caps;
- twigs;
- twigs;
- small hacksaw;
- glue gun
If you want to make a coffee pot out of paper, the following diagrams will help.
Look how delicate and beautiful it will turn out.
A set of dishes can also be made from natural materials. Just now the acorns are ripe, you can stock up on them to make crafts throughout the winter.
To make such a set, you will need:
Carefully remove the lid from the acorn, glue to it a curved twig that will become a handle and one small thin twig that needs to be turned into the spout of this teapot.
Saw off a thin circle from the branch, which will become a saucer. Place a cup on it; you need to turn the acorn cap into it. Glue a curved rod as a handle. Make another similar cup and saucer, and you can start a doll tea party.
Make children's play even more exciting by making not only dishes for dolls, but also food for them. Of course, the kids are not averse to using a real one, but this one will quickly deteriorate and is short-lived. You will show them how to make food for their charges so that they can play with it for a long time.