Page 1 of 7
I recently found a reel with a rubber band for fishing (for casting the so-called donkey) and, as usual, figured out how it could be used in aircraft modeling. Two ideas came to mind:
1) Attach the wing 2) Rubber motor
The second idea interested me more than the first. Why not try building a model with a rubber motor? Yes, there was also a competition for articles... Unfortunately, or maybe fortunately, I don’t know any calculation formulas, and I don’t need it yet - in a word, I built it by intuition.
Looking ahead, I will say that the model was not a success =( Either it turned out to be too heavy, or a special rubber band was needed, but the rubber motor did not work. The model looked kind of scanty, unfinished.
However, the plane was planning, and this forced me to still participate at my own peril and shame in the competition.
I wrote the article on making the model even before the first tests, so I didn’t yet know about my failure =)
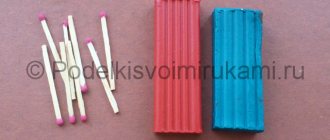
What will you need? — A sheet of ceiling paper (I lost a sheet somewhere) — A wooden ruler (consumables) — An iron ruler — A sharp knife (the ability to wield it) — The same rubber band (preferably stronger and longer) — Several paper clips — Possibly a drill — Air screw (preferably small in size with large increments) - Thin marker or gel pen - Printer for printing drawings - Possibly a clothespin - Thin aluminum plate (can be done without it or with any material with a smooth surface) - Small pliers (bend paper clips) - A couple of toothpicks - Titan glue or an analogue - Perhaps 5-minute epoxy or other epoxy resin My ceiling was 4 mm thick, so all the drawings, etc. were designed for exactly this thickness of the ceiling. Let's begin.
This is what happened when I first drew the fuselage =)) Funny =) There’s no need to laugh, it will be better later: Hmm... Not very good, but oh well. This is what happened after cutting: By the way, the ceiling has one feature: it bends in one direction better than in the other. This depends on the direction of the fibers of the sheets. The fuselage should be positioned PARALLEL to the grain, i.e. It should bend worse in length than in width. The same applies to the wing and, in general, all ceiling models!!! Kiel turned out to be simply terrible, but oh well. It is important for us to maintain the width of the fuselage throughout its entire length, so that the elastic does not fold it in half. Two stripes in the middle are where the slot for the elastic is. Next, we cut out exactly the same half of the fuselage. There is one important point here. The second part must be cut so that it is a mirror image of the first part. Let me explain. It may be that your ceiling is not perfectly level. Then one half will look like this: We need to make sure that when gluing the second part is bent in the opposite direction - this will strengthen the structure and the fuselage will be even. This is what it should look like: But I glued these halves in reverse (not like in the photo above: I glued the top half to the bottom). Pour a little glue onto one side, spread it with a toothpick, leaving a THIN layer of glue. We wait a couple of minutes and stick the other half. It is unlikely that you will be able to cut and glue everything perfectly, so after the glue has set, we take a sharp knife and trace our fuselage along the edge. IMPORTANT: Keep the knife at right angles to the fuselage surface. This is what is left of my fuse =) Previous — Next >>
Source: https://rc-aviation.ru/obzorm/699-planeri/598-planer-rezinomotor
The process of making an airplane using a rubber motor with your own hands
First about materials and tools. Everything is as accessible as possible here. So for the fuselage of an airplane, a stick for sushi, wings from a cardboard box, a pencil for component assemblies, one paper clip and one for fastening the corrugated packaging for fastening to an elastic band, a cotton swab as a bearing, an elastic band as a source of energy are suitable. Hot melt adhesive will be used to connect the parts, an ice cream stick for the propeller, as well as threads will be useful for more firmly fixing the joints.
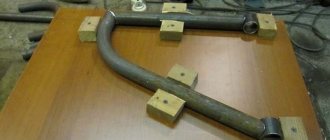
We can start making our plane using a rubber engine. The first step is the most technologically advanced operation, the manufacture of the propeller. In order to shape the curved blades, hold the stick over hot steam using pliers.
Next we bend it and cool it. The result is a propeller for our future aircraft.
Now we cut out the wings and tail from cardboard. You can choose the geometry yourself, the one that you think will most confidently keep the plane in flight.
We glue the wings and tail with glue to the sushi sticks.
It's time to think about implementing a rubber motor. For this we need a pencil. We cut off a couple of elements from the pencil, about 2-3 cm, and spread it lengthwise. We take out the stylus.
In the first one we put a paper clip from the corrugated packaging.
. and in the second a plastic tube from a cotton swab.
We first cut the tube from the central part of the stick. We put the separated halves of the pencil back together and fill the parts installed in them with hot glue. Let's start making the propeller assembly. We take a paper clip, pass it through the plastic tube in the pencil and insert it into the hole in the propeller. Next, slightly bend the edge of the paper clip and fill everything with hot glue.
Now you can install a pencil with a paper clip from a corrugated container onto the frame closer to the tail, and the propeller assembly opposite closer to the bow.
In this case, it is necessary to clearly measure how the rubber band can twist so that it does not tear, ensures optimal twisting and does not tear out the elements of the rubber motor. For reliability, it is better to attach the rubber motor units to the stick using thread. Now all that remains is to install the rubber band, twist the propeller in the desired direction, which is important, and launch the plane.
In this case, the plane will not only glide due to the initial inertia, but also due to the fact that the propeller will pull it.
This is a simple children's craft you can do with your children so that you can not only make an airplane together, but also lay the foundations for the operating principle of propeller-driven airplanes. After all, flying an airplane with and without a rubber motor will clearly show the difference in flight range. Well, in addition to popular science information for the child, we would like to wish, first of all, positive emotions during the assembly and operation of the aircraft.
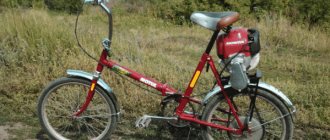
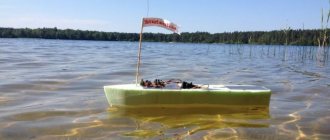
I present to your attention my simple air glider, with a rubber motor, made with my own hands from scrap materials. The guys and I actively made such gliders in my childhood, so I actually decided to repeat what had been long forgotten. It's very exciting.
What I used:
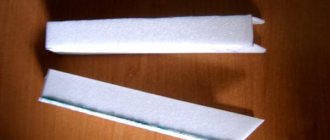
- thin strip (for old windows)
- plastic bottle
- fishing gum
- glue
- pen refill
- paper clips
Cut out blades from a plastic bottle. Next, glue them to the toothpicks.
From pieces of the lath and empty paste from the handle we form a seat for the screw. We fix it with thread. We make the blade holder from a paper clip.
Also, from a paper clip, we make a hook on the back side of the rail. We attach an elastic band to it and pull it between the screw and the end of the rail. Cut two wheels from a piece of foam padding. We also make a chassis from wire.
We also cut out the tail and wing flaps. We attach it to the glider.
The next stage is the wings. The main thing is to correctly design these moments, otherwise, in case of incorrect weight distribution, it will either fall on the tail or on the propeller. What is not good.
That's all. The glider is ready. Thank you for your attention, watch the video for more details.
Options for older children
For more experienced designers, there are options for making more complex models, but they are also more interesting in terms of aerodynamic capabilities and may have properties such as:
- Possibility of forward gliding (when the airliner is designed in such a way that it does not roll over on its side).
- Flight range (from 100m).
- Duration of stay in the air.
So, consider an airplane that can fly far. This is what this handsome guy will look like:
Further
To build a stable airplane that flies straight and fast and does not fall over on its side, use the following diagram:
Stable
An airplane with large wings, which also has sufficient flight speed and a long stay in the air, deserves special attention.
Big wings
For those who want to create a plane that is not afraid of collisions, a paper aircraft with a blunt nose has been created, which, at the same time, flies excellently.
No collisions
One of the favorite aircraft models among enthusiastic aircraft designers is the powerful and fast “Groza”, which is assembled as follows:
As a result, you get this beautiful plane:
Storm
And here are three more diverse models with excellent speed and flight range:
Three types
How to make a rubber-powered airplane in 30 minutes
Airplane on a rubber engine
Hello to all fans of making flying model airplanes! We bring to your attention instructions for making a model airplane using a rubber motor .
Materials for making an airplane
In order to make a rubber-powered airplane you will need:
- One bamboo barbecue stick.
- One toothpick.
- Three rubber bands (it is advisable to use a Hungarian rubber band, as it is more elastic).
- Two sheets of A-4 paper.
- Two paper clips.
- Scissors and pliers.
- Threads.
- Ballpoint pen refill.
- PVA glue.
We make an airplane using a rubber engine
- Make a propeller holder from paper clips
The paper clip that will hold the screw
and a hook for hooking the elastic. Tie them to the fuselage (the base of the plane - a long bamboo stick). To prevent the thread from coming undone, coat it with glue.
Paperclip tied to the fuselage
Paper clips attached to the fuselage of an airplane
Fold a sheet of paper into four
After drying, cut out an airplane wing from it (length 22 cm, width 4 cm in the middle, 1 cm at the edges).
Cut out the tail
Attach a paper clip to a toothpick
Draw the propeller blades
Glue the blades to the toothpick
Glue a piece of paper to the bottom of the wing
For a better understanding of the entire process of making an aircraft, we suggest watching the video “How to make an aircraft using a rubber motor .
We advise you to look at our other materials:
We will be grateful if you click on the social buttons!
Source
Aircraft for the pros
Some airplanes, although they are folded simply from paper without the use of any additional auxiliary means, will require a professional approach to make them. For example, for a super fighter model.
Super fighter
There are also paper airplanes that require scissors, glue, attentiveness and accuracy to make, so it is better to make them with an adult or if you already have enough experience in constructing such structures.
"Flying Wing"
First you need to bend a sheet of paper along the dotted lines (Fig. 1-5), then lift the upper part, forming a rectangle, and cut it in accordance with Fig. 6. In Fig. 8-10 shows how to make a microfuselage (also known as a stiffener); you need to hold the airplane by it during launch. The manufacture of cantilever keels is shown in Fig. 11-13.
The main thing is to make the “engines” correctly; manipulations with them are shown in Fig. 16-18 – they are made by folding and gluing paper into a “tube”. For better flight, you need to make the nose heavier - several triangles are cut out (Fig. 19), which are then glued to the leading edge of the wing (Fig. 20). The manufacture of ailerons is shown in Fig. 21.
Do-it-yourself rubber-powered airplane
The first place that novice pilots—children, that is, those who are thinking about it, but are still not sure for sure, and at that age are not yet capable of it—start their flights, with toy airplanes. The simplest option would be a paper plane, you can simply fold it and launch it, it will float in the air like a glider. We discussed this option in the article “How to fold a paper airplane.” More advanced versions are capable of slightly assisting themselves in flight. So, for example, an airplane is on a rubber tire, where the potential energy of a twisted rubber band is capable of turning the propeller, which pulls the airplane forward. This option is already known to many adults who, as children, assembled such an airplane with their parents. Now it’s your time to pass on the experience to the children, showing them how it is done and on what principle the aircraft operates on a rubber tire. And in order to make it easier for you to navigate and not really rack your brains over what to use for production, we suggest that you read our article - a cheat sheet.
Options for Beginners
There are several ways to make a paper airplane that are accessible even to children. At the same time, it will float perfectly in the air and will be able to cover a distance of up to 100 meters.
The main rule when creating even the simplest classic paper airplane is the symmetry of both sides, which will later become wings.
Classical
Piranha
The method of manufacturing such an aircraft is quite simple; no special knowledge or skills are required:
Another simple method of folding a long-flying airplane:
Fighter
Children's plane
You will need: cocktail tube, colored paper, scissors, tape with a pattern.
Master Class
- Cut 2 strips of colored paper.
- Shorten one of the strips slightly.
- Connect the ends of each strip and secure with tape. You should have 2 circles.
- Attach the circles with tape on different sides of the cocktail straw as shown in the image.
- Send the structure into flight.
A children's airplane made from paper and a cocktail tube is ready!
creative airplane
You will need: a large cardboard box, pieces of cardboard, a sharp knife, scissors, a ruler, a pencil, a plastic bottle, red spray paint, round foam rubber, tape, a black marker.
Master Class
- Draw 2 rectangles on the surface of the box, then cut them.
- Cut 2 rectangles in the same way on the other side of the box.
- Cut 3 holes in the back of the box for the tail of the plane: one hole vertically in the center, and two horizontally on the sides.
- Prepare cardboard rectangles and insert them into the tail holes.
- Cut holes horizontally on the sides of the plane for the wings.
- Prepare 2 cardboard rectangles and insert them into the side holes as wings.
- Cut a circle from the foam rubber and attach it with tape to the airplane wing as landing gear. Attach the second circle to the other wing in the same way.
- Draw 2 airplane controls on cardboard, decorate them with a marker and cut them out.
- Tape the steering wheels to the boxes as shown in the image.
- Make a screw from cardboard and a plastic bottle.
- Cut a round hole at the front of the plane and attach the screw.
- Disassemble the plane into parts.
- Spray paint the plane and all its parts.
- Wait for it to dry and assemble the plane.
The creative plane is ready! Children will really like this toy. I recommend watching this video!
Cardboard airplane
You will need: colored cardboard, a simple pencil, scissors, an empty matchbox, a ruler, PVA glue.
Master Class
- Cut a strip 21 cm long and 1.5 cm wide from colored cardboard.
- Cut 2 identical strips of cardboard measuring 17x4 cm, then round the corners.
- Fold the long strip in half and glue it exactly in the center of the matchbox.
- Apply glue to the top and bottom of the box and immediately glue the wings.
- Cut out the remaining parts: 2 strips measuring 5x1.5 cm; propeller and chassis.
- Cut and round the corners of one of the strips.
- Glue 2 strips to form the tail of the plane.
- Glue the propeller and landing gear to the plane.
Origami airplane
You will need: a white sheet of A4 paper.
Master Class
- Pay attention to the symbols in the image: the blue line shows where the fold needs to be made, the green arrow shows the direction, and the red dot indicates the place where the paper will end up after folding.
- Fold a piece of paper in half lengthwise, then unfold it.
- Fold the top corners towards the center.
- Fold the top folded part down.
- Fold the top corners into the center.
- Raise the center corners up, then lower their halves.
- Pay attention to image 7 and check that everything matches your plane.
- Fold the center corner up.
- Fold the plane in half lengthwise.
- Form the wings of the airplane as shown in the photo instructions.
The origami airplane is ready!
Paper airplane
You will need: a sheet of checkered paper, a simple pencil, a ruler, scissors, double-sided tape, a stapler.
Master Class
- Fold a piece of paper in half.
- Draw the structure of the airplane in cells, as shown in the image. Pay attention to the dotted lines, as bends will be made along them.
- Cut the workpiece without touching the base so that it turns out double.
- Make folds along the dotted lines.
- Secure with small pieces of tape where the plane separates.
- Staple the front of the plane together.
- Draw the airplane wings, then cut them out and attach them using tape.
The paper airplane is ready! I recommend watching this video!