02/27/2016 master
For any child, a children’s room represents his personal space and “fortress.” This is especially true for boys. A detail such as a chandelier can set the entire tone of the room. It is in this room that with the help of a chandelier you can display the child’s hobbies, preferences and inner world. You can already start from the chandelier in terms of selecting an interior for a children's room.
Chandelier in the nursery
The modern lighting market has a wide range of designs for chandeliers for children. If things are a little more complicated with girls, then for a boy you can choose a device much easier. It is quite easy to find a chandelier in the store, stylized as an airplane, in the shape of an animal or a soccer ball. However, such a product will cost more, since it is not a standard, but a specialized product. Many craftsmen, having found a model they like in a store, can repeat it at home, making it with their own hands. As a result, your baby will receive a beautiful chandelier, and you will save money. This article will tell you how you can make a chandelier designed to look like an airplane from scrap materials. This model is especially popular today. Having managed to make an airplane, you can show your imagination in other directions.
From improvised means
On the Internet you can find quite a wide variety of ideas from a wide variety of available materials. Many people are wondering whether it is possible to make a chandelier on their own, that is, at home. We will tell you how to make a chandelier from everything you can get your hands on.
Bottle chandelier
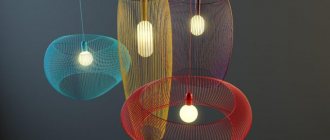
A chandelier made from ordinary glass bottles will look good above the dining table.
Idea from bottles
For production we will need:
- glass bottles (their number depends on your idea), in our case you will need 3 pieces;
- glass cutter and sandpaper;
- screwdriver and wire;
- protective equipment (mask, goggles, gloves).
Set of tools
Let's get started:
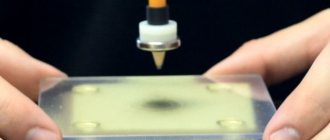
Step 1: You need to soak the bottles in water: this will allow you to easily remove all the labels and wash away all the debris that is in the bottles. After these steps you need to dry them well.
Step 2: Divide the bottles into two parts. We install the glass cutter at the required height. We cut slowly to get an even cut. We must wear protective clothing when working with a cutter.
Cut below the middle
Step 3: Now we place the bottle with the cut under the tap and alternate cold and hot water. As a result of such a temperature difference, the unnecessary piece of the bottle will disappear.
Step 4: The cut on the bottle is processed with sandpaper. It should be even and smooth.
Step 5: Carefully pull the wire through the neck of the bottle and attach the light bulb socket.
Cut processing
Inserting the wire
Step 6: Decorate the lampshades with regular wire or decorate them to your taste.
Step 7: We hang the finished lampshades, and that’s it – the work is done, you can enjoy the result.
Decor
Chandelier made of discs
Perhaps you have a large number of CDs lying around, then you can use them to make a chandelier for your home. It's not that difficult to do and you don't need a lot of tools. The simplest option is discs glued to a ball or fabric lampshade. This lamp is perfect for events, parties, etc.
Disco ball made from CDs
You can also make not one large ball, but several small ones. They will provide more light than one large one. You can also screw light bulbs of different colors into small balls; this will look very impressive at a party.
Small balls
There are many options for disk chandeliers. You can make a very simple chandelier with your own hands, like a children’s mobile: just take the disks and hang them on threads, and tie these threads to a ring, in the center of which hang a light bulb.
Garland of disks
Ideas and projects for inspiration
Interesting and functional playground “Blue Whale”: swings, ladder, climbing frame, slide and playhouse with a steering wheel.
You should choose the type of playground based on the size of the area where you intend to place it. Keep in mind that, no matter how much you would like it, it will most likely not be possible to deploy an entire complex on a 2x2 meter piece of land on the lawn under your apartment window.
It is impossible not to mention the illumination of the playing area. The site should not be placed only in the shade or only in the light; Ideally, it should be installed in such a way that one part of it is covered by shadow and the other by the sun.
Remember: the playground should not be placed near roads, electrical panels or other places that are potentially dangerous for children.
Paper airplane
For this craft you need little: a sheet of paper and a steady hand. Sometimes also a ruler.
Note! The sheet of paper from which you will make the plane must be completely flat and smooth. Any roughness and defects sharply reduce the flight qualities of the craft.
Simple paper airplane design
It doesn't require anything other than paper. The sheet should be rectangular: from a school notebook or office printer paper. Let's fly!
- Fold the sheet in half lengthwise.
- We bend the corners on both sides. They should occupy approximately one third of the sheet and be in close contact with each other like an “envelope”.
- We bend the resulting “envelope” entirely down. There is still space between his “nose” and the edge of the paper.
- We take the two upper corners of the resulting structure and bend it inward. They fit tightly to each other, from under them the “nose” of the “envelope” is visible.
- We bend the “nose” up.
- Fold the resulting workpiece in half outward. The “nose” is bent in half.
- We bend a “wing” on each side.
That's it, our simple airplane can be launched.
Let's get to work
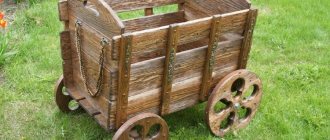
Draw a marking on any board for future cutting, and on another board you will create a silhouette of the majestic mountains.
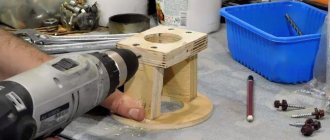
Using clamps, secure the boards directly to the table. To avoid leaving unwanted marks directly on the prepared wood, you can simply lay fabric between the clamp and the same board. Carefully cut out the “mountains” straight along the lines using a jigsaw.
Using sandpaper, sand your workpiece.
Assemble the structure and you will see that making shelves quickly enough with your own hands is more than easy. The “mountains” must be secured directly to the shelf using nails or screws that are at hand.
Paint the shelf with paint or your chosen acrylic varnish in two layers.
Secure the brackets while the wood continues to dry.
This completes the work. All that remains is to attach the workpiece directly to the selected bracket. To do this, you just need to place it carefully on the corners and screw it directly onto small screws. All that remains is to check the shelf for its reliability and place the already selected items on it.
In conclusion, it is worth noting that if you are considering the option of using shelves in a room that does not have a large area, then it is better to use wall-mounted shelves, since they significantly save free space and at the same time fit perfectly into almost any style direction.
Only with a competent approach, shelves and other furniture for a child will help achieve ideal conditions for the process of study and relaxation.
Airplane made from popsicle sticks
You will need:
- 3 wide popsicle sticks
- 5 small popsicle sticks
- 2 small cardboard pieces (~4.5 cm x 0.8 cm)
- 1 small black bead
- Scissors
- Glue
Process:
- First, glue together 5 small popsicle sticks and let them dry;
- While the sticks are drying, trim the edges of the cardboard to make them slightly round. Cardboard can be painted any color;
- Glue both pieces of cardboard together in the center to form an X-shaped propeller;
- Carefully glue the black bead on top of the X-shape propeller and let them dry;
- Take 5 glued sticks and glue 2 large sticks along their wide sides at a distance of about 1.5 cm from one end (one on each side). And let them dry.
Let kids paint the planes in their favorite colors and then decorate them with glitter, sequins or buttons.
Algorithm for creating a toy airplane
Let's look at step-by-step instructions on how to make an airplane. This will allow you to create a craft without any problems if you strictly follow the instructions for creating a toy airplane.
We take blue paint and paint the wings of the future airplane. Then we take red paint and paint the clothespins, which will later become the basis of the airplane. To create the hind wings, you need to cut the stick into two parts. Scissors must be used to round the cut edge.
The tail of the plane consists of a piece of stick. Cut a piece of 10 millimeters from the stick. To do this we use a stationery knife. The edge should not be smooth.
Next you need to draw a propeller and cut it out. We take a decorative pin, which we use as a rotating element. That's it, our plane is ready for use.
Master Pavel Zakharov
Pavel Zakharov is a person whose life and work can serve as an excellent example of full self-realization
An experienced volunteer and public figure, a jack of all trades, a son and a father - Pavel finds the strength and time to develop in several directions at once, to give his attention not only to loved ones, but also to people who need it
Pavel Zakharov is the author of many projects, including “Free Volunteer Forces” and “Workshop No. 13”. The latest project “Workshop No. 13” has existed for more than a year and since January 2014 has been delighting fans of handmade furniture with beautiful products. It is in “Workshop No. 13” that beautiful things made of wood are born that decorate children's interiors, and not only that - in addition to shelves and cabinets, Pavel Zakharov makes bird feeders, which, by the way, is where it all began.
Airplane shelf
Birdhouses
Bookshelves made by Workshop No. 13 are not ordinary pieces of furniture. Everything in a nursery should have its own spirit and mood, and Master Pasha managed to convey the elusive magic of childhood and come up with interesting things for the interior, where joy should live. One of the master’s most interesting finds is bookshelves in the shape of airplanes with propellers and stars on the fuselages. The useful surface of the shelf is the wide wings of the aircraft, and the fuselage plays a decorative role.
Airplane shelf for a children's room
The airplane shelves from Pavel Zakharov are not only original and beautiful. They are also very functional, practical and ergonomic. Their design is durable and can withstand the usual loads of bookshelves.
Another area of work of Workshop No. 13 is the creation of creativity kits that allow you to independently assemble and paint an airplane shelf. All the parts of this construction set are carefully processed and perfectly fitted, and they come with detailed instructions and a set of fasteners - even a schoolchild can assemble his own shelf! And decorated by the hand of the owner of the room, such a shelf will become a truly exclusive interior detail.
Assembly kit. Airplane indoor hanging
Pavel Zakharov regularly conducts group master classes and individual lessons for children and adults on making birdhouses, shelves, and feeders with their own hands. In such classes, children, together with their parents, master the art of manual labor, learn to use tools and work in a team.
Today “Workshop No. 13” is extremely popular among lovers of unusual decor and handmade furniture. And the master’s plans are not to stop there. In the future, Pavel Zakharov plans to expand the range of his products and begin making unusual furniture from wood for children's rooms.
Self-assembly shelf “Town”
You can get acquainted with the works of Pavel Zakharov in more detail at the Masters Fair and on the blog of Workshop No. 13.
Main features of loft style lighting
The features of the loft style are reflected in the lighting system of the premises. The industrial direction involves the use of diverse lamps to decorate a room and perform functional tasks. The devices are technologically advanced, ergonomic, and have strict geometric shapes.
The light should be diffused. Combining different types of lamps in a space is popular. Items are stylized in a retro style or made from modern materials in simple designs without fabric finishing or decorative painting.
The direction does not provide restrictions on the placement of lighting devices. Multi-format chandeliers and floor lamps are arranged randomly. Accents in the recreation area are created by devices with subdued light in a warm range. For the study area, tabletop appliances or pendant sconces with a directional light source with lamps of cool shades are used.
An industrial lighting system may include:
- hanging-type structures on cords, chains with adjustable height;
- stands on the floor with supports, sliding and freely moved around the space;
- lighting devices on slats, rough boards with many light bulbs, creating diffused light;
- compact spotlights help to zone the space;
- LED lighting, which is located in the hallway area, under the roof.
Airplane model made of plywood
Wood is an excellent material for crafts, but working with it requires much more effort, patience, skill and tools.
Scissors are not suitable, but a knife with a good blade, a bow saw, an axe, a hammer and chisels, and hand-held power tools are not a complete list of carpentry equipment.
When choosing a material for crafting a wooden airplane, you should pay attention to plywood. It has a number of design advantages: small thickness, safety margin, low density
To cut out parts from it, one tool is enough - a hand jigsaw.
The procedure may be as follows:
- Find a diagram with part templates and dimensions; diagrams are available on the Internet, in aviation magazines, in books;
- Make markings on sheets of plywood; The markings can be done first on thick paper, then cut out - this will be a template; by applying it to plywood, you can mark a larger number of identical parts;
- All parts are cut out with a mechanical jigsaw; the use of an electric jigsaw is undesirable: it breaks off the top layer of plywood and cannot handle small radius curves;
- According to the diagram, the parts are connected into one whole mechanically; the use of glue and other fastening methods is minimal;
- The model is decorated: painted in various colors, the cockpit and windows are designated, and identification marks are applied.
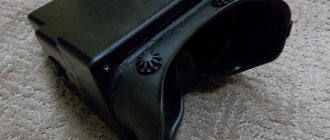
What you will need
Assembling an airplane chandelier will require the following materials:
- old or new chandelier;
- plywood, plastic;
- embroidery hoops (several pieces of different diameters);
- paints of different colors;
- fishing line;
- stencils for applying symbols;
- glue and nails.
The tools you will need are:
- drill;
- screwdriver;
- hammer;
- tape measure and pencil:
- scissors.
With such a set, anyone can cope with the job in a short period of time.
Ceiling chandelier in a children's room
First you need to decide what size the lamp will be. A small lamp is ideal for a small space, but it should not hang too low, otherwise the room will appear even smaller.
In a spacious room, a voluminous pendant lamp looks good as an accent. And for sufficient illumination during lessons, additional light sources are suitable.
The main point when choosing a chandelier for a child's room is its safety. The range of different lamps for children is now diverse, so when choosing a light source, you can combine all the necessary properties - aesthetics, safety and sufficient illumination. A chandelier in a children's room should also meet the needs of the child - what is suitable for an infant may not be suitable for a schoolchild or teenager.
When choosing a lamp for the nursery, it is recommended not to forget about the details of the chandelier itself. The bracket, lampshade and other fittings must match each other in color and style. If the choice falls on a fabric lampshade, then the chosen textile will be an assistant in finding the color - curtains, drapes and other interior details.
https://youtube.com/watch?v=WdqLNazwDg8
It is not necessary to mount the chandelier exactly in the middle of the room, especially if it is small. A logical solution would be to place a ceiling light above the area where the child spends a lot of time studying or reading. And for the rest of the room, a pendant or floor lamp will be enough. At the same time, they should create diffuse lighting and serve for reading before bed
From a psychological point of view, soft light at any time of the day gives a feeling of comfort and safety, and this is important for a child
The color of the ceiling chandelier should also be selected depending on the age of the child.
For a child's room under three years old, it is better to choose lamps made in pastel shades that will not distract attention too much.
- Brightly colored lamps with an unusual design are suitable for the bedrooms of preschool children and primary school students.
- White, blue, beige, lavender tones or acidic, bright, dark shades will fit into a teenager's room. As well as lamps made in contrasting combinations of shades.
Expert opinion
Olga Kovalenko
Since 2010 I have been engaged in interior design and architectural design.
A chandelier in a children's room should not have many decorative elements that collect dust from throughout the room.
Options for the most popular ceiling lamps for children's rooms:
- Ball chandelier. Typically this model is made of glass or plastic in bright colors. It will become a colorful decoration of the room, especially if it has a mirror surface.
- Chandelier in the shape of space. The theme of a dark sphere in the design of a nursery has always been a suitable option. In addition, such an interior solution can become a reason for a child to become interested in space. The design of this chandelier features multiple planets attached to a base near the ceiling. Celestial bodies can be included both together and separately from each other.
- Sun lamp. This lamp is suitable for a large nursery. It illuminates a spacious room thanks to the “rays” coming from the center along the entire ceiling. A universal option for both boys and girls.
Chandelier in the hall (living room)
The hall is the face of our home. A place where we receive guests, celebrate holidays, spend evenings with family and friends. Therefore, the choice of chandelier for this room should be taken very seriously.
Choosing a chandelier for the hall is not easy. Many nuances need to be taken into account
It is important that the light in the living room is bright, but warm, conducive to communication and creates comfort. If you are lucky and you are the owner of a luxurious apartment with high ceilings, then designers recommend opting for a massive pendant chandelier
It looks elegant and solemn, giving the design a unique charm. Crystal chandeliers look great in a classic interior - a symbol of prosperity and aristocracy. However, if the ceiling height is standard, then it is better to turn to a ceiling chandelier with numerous shades. Two small symmetrically located ceiling chandeliers will help to illuminate an elongated room evenly and harmoniously.
Also, when choosing a chandelier for the hall, you should give preference to specimens with several lighting modes and involving the use of energy-efficient light sources, such as LEDs.
How to choose the right table size for a child’s height?
There are several simple but usually ignored rules. Unfortunately, incorrect furniture height can lead to permanent, often irreversible degeneration of the spine. If the table is too small, the child will slouch; if it is too high, then the child will look for another comfortable position, which, of course, will gradually distort his posture.
So, what can you do to prevent spinal deformity? Use the principle of 4 right angles. When a child sits in a chair at a table, 4 places of his body should be bent at an angle of 90 °:
- elbows;
- hips;
- knees;
- feet.
Advice! If you notice any abnormalities in your child's appearance when sitting at a table, try using a temporary footrest, preferably a chair with an adjustable seat and back height.
Loft lamps in the interior of an apartment or house
The loft style is implemented in different areas of the apartment (kitchen, hallway, bedroom). The arrangement of the lighting system may vary depending on the location. In different zones, the height, power of lamps, design solutions, finishing of chandeliers and floor lamps are adjusted.
Living room and hallway
When creating a design project in the loft style, the industrial theme takes over the living room and entrance area. Significant areas are highlighted with the help of finishing materials and a specially created lighting system with directional floor lamps.
There are no partitions between the hallway and the living room; areas are zoned using lamps. The entrance part from the living room can be separated by a partition in the form of a screen. The entrance space does not require powerful lighting, so you can hang a small lampshade made of unpainted metal with 2-3 bulbs. In spacious hallways it is possible to additionally install lanterns stylized as street lights.
Loft-style living rooms have high ceilings, so it is optimal to place a chandelier hanging on chains or cords with several low-power bulbs. The lighting system is complemented by table lamps, wall structures or metal floor lamps.
Lighting in the living room should be multi-level. The overhead lighting is complemented by spotlights. Spotlights allow you to change the light accents in a room.
Bedroom
The loft style is distinguished by its clear forms, however, for a bedroom with an industrial design, the inclusion of textile elements is allowed.
Floor lamps and chandeliers can be complemented with dim fabric inserts.
In addition to overhead lighting (chandeliers with freely hanging bulbs), you can install spotlights in niches.
Bedside lamps are created from simple metal elements and are equipped with switches.
The best option for a bedroom is hanging sconces in a retro style.
Kitchen
In the kitchen area, household metal appliances are used, for which it is necessary to select lamps. Frames made of metal and wood are optimal; textiles are not recommended. It is necessary to organize overhead lighting that does not interfere with free movement around the room. It is possible to create built-in lamps on racks, shelves, and furniture.
Decorative chandeliers and sconces can be complemented by massive decorative elements in the dining area.
It is important to combine lamps with brickwork, beams, and metal structures
DIY children's wall cabinet made of wood. PHOTO + Drawing
This type of locker is perfect for saving space in the room and also for keeping school supplies in one place convenient for the child.
Let's look at the assembly process step by step
First of all, let's assemble the base. Connect the horizontal and vertical planks using grooves or wood glue
Then, using plywood, we will close the void by installing walls
The base is ready. It is necessary to assemble and attach the shelf at the selected angle
At the end, having chosen a convenient place, we attach a hook for the backpack and we can install the locker
Having completed the work, you will solve two problems: scattered school supplies and a bedside table that gets in the way
Photo source: rogueengineer.com/diy-wall-locker-plans
Read in full (link)
Chandeliers depending on age
Taking into account the age of the child is no less important when choosing a chandelier. Those products that a preschooler will like will not interest a teenager at all. Here are the basic recommendations for choosing chandeliers:
- For infants, they usually purchase lamps in muted tones - blue, beige, greenish and others that will not distract the baby from sleep. There are chandeliers with the ability to switch different effects - the night sky, changing the color of the light flux (for children closer to one year). This will serve as an additional incentive for development.
- For a boy aged 1-7 years, brightness and catchiness of details are important. The chandelier can resemble a toy; it should arouse interest in the baby.
- For a schoolchild or teenager, chandeliers are chosen based on the opinion of the child himself. It is possible to switch to adult options and such style solutions as classic, loft, hi-tech. In elementary school, a child is usually interested in certain thematic areas.
The correct light in a baby's room ensures the health of his eyes and excellent health. Therefore, you should carefully read the information, choose the right design and study lighting standards in order to buy the ideal chandelier for a boy’s bedroom.
Chandelier for the nursery
A children's room is a small world that is not intended for adult problems. There is a special atmosphere of comfort, wonderful carefreeness and fun here. And light plays an important role in creating this atmosphere. To choose the right chandelier for a nursery, you need to consider a few simple rules.
First of all, you should pay attention to its safety and practicality. It is necessary to refrain from buying a chandelier with elements made of crystal or thin glass, because if a child decides to test its strength, the fragments may cause injury to him
In this regard, the lampshade must be made of safe materials such as plastic or textiles. Designers also recommend hanging ceiling chandeliers in the nursery.
As for colors, the choice is up to you and your child. Some people prefer lamps with frosted lampshades that create soft diffused light. And some people like chandeliers with bright images of cartoon characters, spaceships or princesses.
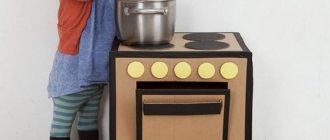
Cardboard airplane
To create this version of the airplane you will need blue cardboard, matchboxes, scissors, Moment glue, and cork.
We take a stencil and cut out all the parts of the aircraft, from which we will then create it.
We take a matchbox and glue it to the base of the plane. You need to cut out one small strip from cardboard, which you then glue to the base of the plane. Blanks of the same size are then glued on top of the matchbox on the other side.
To create a tail, you need to cut a strip measuring 50 millimeters by 10 millimeters. The edges are rounded on both sides. The resulting strip must be divided into three equal parts. Each strip should be 15 millimeters. To do this, you need to use a utility knife.
We take a wine cork. Using a utility knife, cut off a small circle. Next, apply a little glue to the surface of the cut piece of cork and glue it to the plane. Then you need to create a propeller. Its creation is described as a wooden airplane.
We take a needle that needs to be used to pierce the cork. Then we attach all the parts to the base of the plane. We create small flowers from several sheets of colored paper. To do this, you need to take a decorative hole punch. These leaves must be glued to the entire surface of the airplane.
Review of models from different manufacturers
Among the models presented on the domestic lighting equipment market, you can find wooden pendant chandeliers in the form of geometric shapes and an unusual abstract look, design developments and lamps put into mass production.
Here are some models of wooden lamps that can be purchased currently:
"VELANTE 588-706-03."
The Italian brand chandelier is produced in China, its technical characteristics:
| Number of lamps | Base type | Total permissible power, W | Height, mm | Diameter, mm | Materials used |
| 3 | E27 | 180 | 1120 | 380 | wood/metal |
The average cost of the model as of the second quarter of 2022 is 5000.0 rubles.
"Crystal Lux Sueno SP6".
The chandelier is manufactured in Spain, its technical characteristics:
| Number of lamps | Base type | Total permissible power, W | Height, mm | Diameter, mm | Materials used |
| 6 | E14 | 360 | 650 | 520 | wood/metal |
The average cost of the model as of the second quarter of 2022 is 21,000.0 rubles.
"Eurosvet Clark 70056/6".
The model is produced in Russia, its technical characteristics:
| Number of lamps | Base type | Total permissible power, W | Height, mm | Diameter, mm | Materials used |
| 6 | E27 | 240 | 260 | 610 | wood/metal |
The average cost of a lamp as of the second quarter of 2019 is 7,000.0 rubles.
"Alfa Pyramid 24533".
The model is produced in Poland, its technical characteristics:
| Number of lamps | Base type | Total permissible power, W | Height, mm | Diameter, mm | Materials used |
| 3 | GU10 | 150 | 1150 | 280 | wood/metal |
The average cost of a lamp as of the second quarter of 2019 is 7,000.0 rubles.
"Arte Lamp Villaggio A3400LM-8WH".
The chandelier is made in Italy, its technical characteristics:
| Number of lamps | Base type | Total permissible power, W | Height, mm | Diameter, mm | Materials used |
| 8 | E14 | 200 | 460 | 760 | wood/metal |
The average cost of the model as of the second quarter of 2022 is 14,000.0 rubles.
Paper airplane using origami technique in 5 minutes
For the smallest fidgets, there are, of course, simpler instructions, such souvenirs turn out just as good and they fly very well too, depending on how you launch, you may not even be able to catch up; they will fly wow 100 meters, you’ll be exhausted looking for them later).
The most important thing is that you need to make the two sides the same in a mirror image so that they turn out even and then everything will definitely work out.
On one of the forums I spotted a craft called Piranha, and does it look like it’s true? The author also chose red as the color. See how cleverly you can roll up such a miracle. No special skills are required. The most primitive option with a simple model.
It turned out to be a cool thing, my boys really liked it).
By the way, you can get a little creative and give dad a little surprise.
In general, make a craft with your child so that there is something to do with your beloved family, because such work brings you very close together.
Design, hobbies, handicrafts
- Animals
- Flowers
- People
- Fruits
- Nature
- Flowers
- Animals
- Dolls
- Comfort bunny
- Standard sets
- Premium sets
- Home >
- Children's crafts
A plastic bottle and cardboard will help you make a real airplane! But we will make not just a toy, but also a piggy bank! You will spend a few fun minutes with your beloved child while working on this model.
Children love saving coins. My son has two piggy banks: for foreign coins and for ordinary change. We bring him foreign coins from abroad and they are in a tea can. He often boasts about these coins to his friends. And he has the second jar for ordinary change. He dreams of saving up for a radio-controlled airplane, but for some reason the money is not saving up))) I saw the idea of an airplane piggy bank on one of the foreign sites and decided to make a new piggy bank with my son so that he could quickly make his dream come true. Well, of course, not without our help.
We will need:
- plastic bottle;
- pencil;
- white and blue cardboard;
- scotch;
- scissors.
Let's start by cutting a coin acceptor hole in the center of the bottle of any size.
Draw two identical shapes for the back of the plane that look like the photo. Tip: Draw on one side, then use it as a stencil to draw the second. This way both parts will be identical.
Once the two pieces have been cut out, attach them to the plastic bottle with double-sided tape.
Pay attention to where the coin acceptor is - you need to cut paper to fit the hole
Draw two identical rectangles approximately 10 cm long and 2.5 cm wide on blue cardboard. These will be turbines. Cut out rectangles and then roll into long tubes.
Tape the tubes together and then attach one on each side to the plastic bottle.
If you want your plane to stand firmly on the surface, glue the turbines as low as possible, thereby creating a support.
Draw two identical triangles with rounded ends on blue cardstock that will become your wings. Cut them out and attach the wings over the engines. Tip: fold the bookmark along the longitudinal edge to make it easier to stick to the body.
Using the bottle cap as a template, draw the plane of the propeller. We will use the cap to secure the propeller to the bottle. Cut a circle slightly smaller than the lid so that the lid covers the hole.
Now you have the basic plane, but you can add some details. Draw, cut out and glue the windows and rear fenders. The piggy bank plane is ready! Your child can now safely boast: “I myself!”
Basic rules for lighting in a nursery
For a schoolchild, the quality of artificial lighting is of great importance, and one chandelier is not enough.
To properly organize the incidence of light, in addition to the ceiling lamp, it is also important to provide peripheral light. A table lamp is an indispensable thing on a school desk
It is the main source of additional lighting in the children's room.
Important! Desk lamp for directional lighting - the best option for more precise concentration
Pay attention to the location of the desk, which should be installed so as to provide comfortable lighting for the child. The light should not be blocked by the writing hand, so the desk lamp should be placed on the left side
Of course, this rule is for right-handed people.
Note: it is very important that the brightness of the light is optimal. Excessively dim light, as well as excessively bright light, causes eye fatigue, which will lead to fatigue. . Of course, the choice of lighting fixtures for a schoolchild’s room and a child’s room will be radically different.
It should be remembered that the level of illumination should be as comfortable as possible not only when the child is playing, but also when doing homework or reading books. Daytime bright light promotes activity and wakefulness. Subdued lighting, especially yellowish warm shades, has a calming and relaxing effect. The soft, diffuse central light will not overstrain baby's sensitive eyes.
Of course, the choice of lighting fixtures for a schoolchild’s room and a child’s room will be radically different. It should be remembered that the level of illumination should be as comfortable as possible not only when the child is playing, but also when doing homework or reading books. Daytime bright light promotes activity and wakefulness. Subdued lighting, especially yellowish warm shades, has a calming and relaxing effect. The soft, diffuse central light will not overstrain your child's sensitive eyes.
Considering the circadian clock “built-in” in the human body and the fact that the baby spends most of his time in the room, it would be nice to provide dynamic lighting - the ability to change the color balance of light based on the time of day.
By the way, the light emanating from a ceiling chandelier can be divided into cold and warm. An excellent solution is to use a two-key switch: one key activates the part of the lamp with warm light lamps, the other – cold. Only in this case is it advisable to experiment with a multi-faceted chandelier or at least a two-tier one. After all, when all the lampshades or horns are arranged in one plane, and only one part shines, one gets the impression of burnt out light bulbs. And if you light everything at the same time, the idea of controlling color temperature loses all meaning.
Assembly Recommendations
Since the airplane chandelier is more suitable for a boy’s room, this greatly simplifies its manufacture. This is due to the fact that boys pay less attention to small details than girls. The essence is important to them! Therefore, when making your own lighting device in the shape of an airplane, you can adhere to the following operating principles:
- minimalism of details;
- straight lines;
- simple style;
- compactness;
- various hints of eclecticism.
Design example
In this case, the color design can be used as close as possible to the real coloring of the aircraft: blue, blue, red, white, purple. The presence of several colors will stimulate the child’s imagination, improve the emotional background of the room, and also contribute to the development of the baby’s inner world. In addition, against the background of a light ceiling, the airplane will look more realistic. When the light is on, the created model will “come to life” in the child’s imagination, and this is exactly what needs to be achieved. At the same time, it will be very important for the child that you made a chandelier for him with your own hands. Any child will appreciate this and be grateful to you.
Aircraft characteristics
Boys like all types of airplanes. They try to understand each of them. They often know all the characteristics of a particular aircraft. And they want to have such a design in their collection.
Therefore, the more types of aircraft a boy has, the more pleasure it gives him and helps him understand all the models.
We will tell you how to make airplanes that fly and become flight leaders, as well as how an airplane can become an assistant in saving pocket money or decorating a boy’s room.
Flying
To make a flying airplane, you need to take a flat piece of office paper. On a flat, hard surface, fold the sheet in half lengthwise, and fold the resulting rectangle in half widthwise. Now we will make the wings. Fold the corners so that the top corner of the rectangle overlaps the bottom corner. We also bend the second side. The resulting angles need to be folded again and straightened to form a rhombus. We bend the sheet in the center and bend the wings. Those diamonds that we got need to be bent so that they look up
This is important for airplane flight.
Now you can launch the plane while holding it in the middle.
Range Leader
An airplane made of paper with special folds flies far. You can see how to make such a plane in the drawing. It is made without a single drop of glue or weighting elements:
- Fold a sheet of paper in half.
- We bend the paper so that we get wings.
- The entire structure must be bent using a ruler to give the bends a sharp shape.
- The wings need to be tucked at the corners for the plane to fly further.
Airplane piggy bank
It is best to make a piggy bank airplane from a plastic bottle, but you can also use iron drink cans. Make a slot in the center of the bottle or jar the size of the coins.
If the child cannot do this on his own, he will need adult help. All other parts in the plane fit into slots on the sides and back of the bottle or can. The screw is glued to the front of the container or inserted under the lid.
The main thing in this design is capacity, but the aesthetic appearance is also important, because the piggy bank will serve for a long time. Therefore, it is advisable to make all details bright and conspicuous. The container itself can be left transparent so that you can see how many coins are collected in it.
Suspended aircraft
You can make such a model yourself, or you can buy a construction set from which to assemble the model.
For this craft, you can take wooden meat skewers. They are sold in stores and are made into wooden but lightweight products. Their weight allows them to be hung from the ceiling and the structures look great if they are coated with colorless varnish.
Use skewers to paste over a plastic bottle or tin can. Pieces are made from skewers, connecting them with glue.
An airplane craft can be useful for school, creative clubs, games, and creating a pleasant atmosphere in a boy’s room. After all, in their childhood they often dream of becoming pilots.
Making a toy is a great way to spend quality time with dad. Children and parents remember the creative process together for a long time.
You can take any material for crafts and try to make a unique aircraft out of it. Multi-colored paper airplanes can be an interesting decoration for a boy's birthday party if they are hung around the room along with balloons.
DIY children's wardrobe on wheels: 6 step-by-step photos
This version of a children's closet will fit perfectly into any interior, and due to the wheels it is quite mobile and easy to move, for example during cleaning.
Let's figure out how to design such comfortable children's furniture
First we will assemble the base of the cabinet by connecting the upper and lower walls
Then we’ll start assembling the shelves and compartments of our cabinet
We will install the assembled parts and secure them into the base box
When all the compartments are installed in the closet, you need to give it a pleasant appearance. To do this we paint it
The finished cabinet will be an excellent place to store children's books or toys.
Photo source: www.bunnings.com.au/diy-advice/home-improvement/shelving-and-storage/diy-cube-storage-unit
Read in full (link)
How to make a paper airplane that will fly very far, up to 10,000 meters?
In fact, there are quite a large number of different paper models of this air transport. The leaders at the moment are Hawk, Eagle Owl, Falcon and Albatross.
And that’s not all, I propose to build a powerful and beautiful airplane called Thunderstorm.
Stages of work:
1. Be sure to bend the sheet of paper symmetrically, straighten the resulting line very well with your hands, then turn it back.
2. Make a triangle at the top, as we did in the first example.
3. On both sides, bend the leaf again towards the center, you will get a sharp triangle.
4. Then bend the sheet where the bend point has formed.
5. Next, unfold and transfer the workpiece to the other side and also bend the sheet. Fold the sides back toward the center line.
6. Next, fold the triangle forward again.
7. Turn the resulting masterpiece over and bend it again.
8. Bend the plane in half. Bend the upper part of the wings slightly, as shown in the photo.
9. And then bend it so that you get real ones, like an airplane.
10. Voila, and this is what happened, it looks cool and cool, but it flies, well, it’s definitely fast and far).
Complex and fast
In this section you will learn how to make a plane that flies far. But it will take more time.
Again we make a blank that resembles a house. Turn over and fold in half. Now you need to fold the resulting triangle along the line of the rectangle.
Place it on the reverse side and bend the edges towards the center (this can be difficult). And the simplest thing is to bend the wings.
We recommend you look here
- How to make a ship - ways to easily and simply make a boat with your own hands (105 photos and videos)
- How to make a pen at home - a step-by-step master class on making ballpoint, gel and fountain pens (video and 100 photos)
- How to make headphones: tips on how to make and repair headphones with your own hands (video + 125 photos)
And this interesting model will allow you to enjoy watching a long flight:
- the edges of the A4 sheet need to be bent towards the middle (there should be 3 centimeters between them);
- Measure 2 centimeters from the top edge and fold it over;
- correct and trim everything, repeat this 10 times; fold in half and straighten the wings, leaving 3 centimeters for the body; make bends at the end.