A chandelier made by yourself has an exclusive design and a special, lively energy characteristic of homemade things. It will not cost much, it can be made from various available materials: wire, paper, cardboard, wires and light bulbs, wood or any household rubbish.
The method depends on what objects will be used in the process, and the result depends on the dexterity of your hands and the wealth of your imagination. Let's look at a few simple options for making a homemade chandelier.
Wire chandelier
For a high-tech interior, make a chandelier with a wire frame. Metal wire is a strong, durable material, but at the same time flexible, it can be easily given any shape. Take, for example, high-strength carbon wire with a diameter of 1.5 mm - it bends easily.
Use wire of different diameters and sections, aluminum or copper will do. You will need 2-3 skeins, pliers, wire cutters, and a cartridge with wiring. You can use an old lampshade or a small birdcage as a base.
- First, a frame is made, then a braid is made from thinner wire.
- You can do without a frame, then take, for example, a bucket as a basis and braid it around, and then take it out.
- To fix the cartridge, a fastening element is created from wire.
- Additionally, you can decorate the finished structure with rice paper or fabric.
The disadvantage of such a lamp is that the metal heats up quickly; you should not touch the lamp when it is on.
Flower vases
Flower vases or pots are decorated in a similar way. The whole process is similar to what was involved in the manufacture of the frame.
Considering the fact that the pots have a rounded shape, the pieces from the CDs should be cut quite finely to avoid the risk of tearing off pieces during use.
From threads
A very simple way to make a light, elegant lamp. You will need: a balloon, PVA glue, any thick threads, hand cream.
- Lubricate the top of the inflated balloon with cream.
- Tie the ball evenly with thread, leaving a space near the tail - the cartridge will be attached there.
- Generously coat the threads with glue and leave to dry for a day.
- Pierce the ball and remove it.
- The dried structure can be painted in some bright color. And you can hang it on a light bulb socket.
Instead of threads, you can use rope, twine, or yarn. If varnished, the structure will be more durable.
Napkin holder
There are two ways to make a napkin holder. For the first you will need a disk and a small piece of thick cardboard or plywood; for the second, only one disk is useful. In both the first and second cases, you need scissors and a glue gun.
First way:
- Cut the CD into two equal parts;
- We cut a piece of cardboard or plywood of the required width and length corresponding to the diameter of the disk;
- Using a glue gun, both halves of the cut drive are glued to both sides of the base.
Second way
- Two parallel lines are marked and drawn on the disk at a distance of 1.5 cm from the middle;
- According to the drawn contours, the plate is cut into three pieces;
- The semicircles are brought to the base at an angle of 90 degrees and connected using a glue gun.
Of course, you can design and color the resulting blank in any way you like.
From plastic spoons
A simple chandelier made from spoons will not require much time. To make it you will need:
- plastic disposable spoons (200 pcs.);
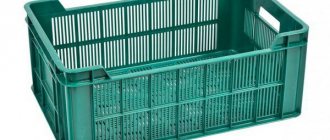
- 5 liter water bottle;
- wire cutters and stationery knife;
- glue;
- socket and light bulb.
Cut off the bottom of the bottle, and separate the holder of the spoons using wire cutters. Use spoons of one or more colors. Cover the bottle in a circle with spoon blanks, making each subsequent row offset so that the center of the next one is placed between the two spoons of the previous row.
The neck of the bottle must be closed with a ring of spoons placed horizontally inside each other.
After the glue has dried in the lampshade, install the cartridge and connect it to the power supply. Choose an LED or energy-saving light bulb so that the plastic does not melt from heating.
Manufacturing process
Once everything you need is prepared, you can begin making the table lamp.
Preparatory stage
Before starting work, you need to collect all the tools and materials in one place (for example, on a table). If something is missing, then:
- CDs can be found not only in your closet, many of your friends want to get rid of them, they will be happy to share these unnecessary items with you;
- a circle for the base can be cut from a piece of plywood or take a stand from an old lamp;
- a compass and a triangular ruler - borrow from any schoolchild or buy, because they are inexpensive;
- other materials - in a hardware store;
- You can ask your friends for tools; if that doesn’t work, you’ll also have to purchase them.
Making the bottom
To make the bottom of the lamp yourself, you need to take a round blank from fiberboard and, using a ruler and compass, divide it into 12 sectors. To do this, you need to draw 2 perpendicular lines passing through the center of the circle, and then measure the length of 1 of the radii. By placing the leg of a compass at each of the 4 points on the rim and drawing semicircles passing through it, you can get serifs. When connecting them to the center of the circle, the boundaries of 12 sectors are obtained.
In the center of the bottom you need to drill a hole for the wire through which the lamp socket will be inserted. The position of the chuck in the workpiece should be fixed using liquid silicone. You also need to make 6 holes for the steel wires on which the disks will be located. Then rubber feet are screwed to the base using bolts and a screwdriver, and the cartridge is threaded and fixed into the central hole.
We fasten the disks for the chandelier and form the frame
You need to insert 6 pieces of steel wire into the holes located along the edges of the fiberboard circle and secure them there. The length of each segment must be at least 1 m. The edges of the wire must be bent so that their upper parts are connected in the form of a hemispherical dome, and the lower halves must be raised, leaving straight. 12 pieces of 50 cm wire should rise above the base: 6 bent and 6 straight.
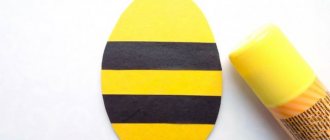
Paper butterfly chandeliers
The most popular version of a paper chandelier is that it looks impressive and is very easy to make. It will be a decoration for a child’s room; you can make it together with your child.
You will need: a rigid base (wooden or metal hoop) or a coil of wire, nylon threads or fishing line, paper and glue.
- First prepare the base. If it is not there, take the wire and make a circle out of it in 2-3 layers.
- Cut out butterflies from paper in the required quantity. Butterflies of different sizes, 3-4 different diameters, look beautiful.
- Attach the butterflies to a thread and hang them on the base.
For the main points on installing wiring in a house, see the article Features of electrical wiring in a wooden house.
Use smooth, thick paper, which will attract less dust. In addition to butterflies, you can cut out snowflakes or any other shapes.
Curtains
Such curtains look stylish and catchy. The size of the curtain itself depends on desire, imagination and the amount of consumables.
If there are scratches on the records, they should be removed using technical Vaseline. You need to apply Vaseline to the disc. After a few seconds, the disc is thoroughly wiped. Often such manipulations can remove an external defect.
The process of creating a curtain takes place in several stages:
- It is necessary to determine the size and calculate the required number of media. The diameter of the disk is 12 cm, and therefore it is not difficult to determine how many plates can be arranged in width and height;
- Next, you should arrange the disks in a certain sequence, as they will hang in the future;
- It is advisable to number the disks with a marker. During the installation process, the written numbers can be erased with ordinary alcohol or vodka;
- Using a drill, four holes are made along the edges to thread a paper clip through;
- The entire structure is assembled using ordinary paper clips;
- The resulting curtain is hung using paper clips or curtain hooks.
It is advisable to hang the curtain with the mirror part towards the room; When hit by light, they will immediately attract attention.
From paper tubes
To make such an unusual lamp you will need: sheets of paper (the quantity depends on the size and shape of the structure), PVA glue.
Roll the sheets into a tube and secure with glue. Prepare the required quantity (up to 200 pieces can be used)
Lay out the blanks in the shape of a nest: first lay out a triangle of tubes on the table and fasten them together. Place another one to create a six-pointed star shape. Continue forming, gradually fastening the tubes together.
After drying, place the tube lampshade on the lampshade with the light bulb.
Important! To prevent your paper lamp from catching fire, use energy-saving light bulbs; they are safe because they do not heat up.
How to choose a lamp?
For spider chandeliers, you can use incandescent lamps with a power of 40 to 60 W. The so-called Edison lamps, or, as they are also called, retro lamps, are magnificent.
Retro style incandescent lamp
There are advantages to using LED light sources. With their help, you can set the required color temperature for the selected room. For those who like the new design, cool LED lamps are for you. For lovers of the classics, you can use light bulbs that emit warmer tones.
In addition, LED light sources have a long service life, can last from 3 to 5 years. They are economical, their energy efficiency is five times higher than that of incandescent lamps. And if you want a classic look, we recommend using incandescent or retro LED bulbs.
LED retro lamp (thread
From cardboard
The most bizarre design for a lamp can be made from cardboard, following simple instructions:
- Prepare a stencil and cut out the necessary elements from a sheet of cardboard.
- Connect all elements using slits, glue the joints.
- To give additional rigidity, you can stitch them with wire.
- The finished structure is painted in the chosen color and hung on the ceiling using a chain.
- The socket and power cord can be painted in the color of the chandelier.
Instead of cardboard, there may be some other suitable material from which you can make a lamp according to the same principle, using this idea.
Types of construction
Spider-like devices come in two types: flexible threads and solid legs.
The structure with wire branches is equipped with an iron lampshade. Such ceiling lights are made in the form of carved iron bars or in the form of a plate. In addition, devices have been developed that have no nuances. In them, the bulbs imitate droplets of liquid on the tips of the spider's legs.
Durable foot construction
A product with solid legs, made from several table lamps, for example, uses large iron shades. This type is suitable for large rooms with high ceilings.
A common color for spider lamps is black. There are also products in white and gray colors. Sometimes teenagers and children hang multi-colored chandeliers on flexible cables.
Spider chandelier made of wires and light bulbs
The original design is easy to make with your own hands. Wires with a socket and light bulbs, equipped with simple shades or without them at all, extend from the central mount.
The number of wires can be any, from 6 to 16 pieces, but usually 8 are used, the number of legs a spider has, hence the unusual name. You can use plain or multi-colored wires and attach them at different heights.
Designers recommend supplementing the design with hemp rope or cords with knots and light bulbs without shades - the result will be a composition in a marine or industrial style.
Interior solutions
For successful interior design using a spider chandelier, designers give the following recommendations:
- Complete the modification with soft legs with hemp rope. If you tie the legs into knots, you can get an interesting combination of industrial and nautical styles. The concept expresses freedom, and lamps without metal will look modest but stylish. This design looks especially natural in the dining room or kitchen.
- Classic chandeliers with soft legs are well suited not only for kitchens, but also for living rooms or bedrooms. However, in living spaces it is better to use calmer colors, such as beige, rather than black.
- Oversized models with many legs do not always look appropriate in residential premises, but they fit perfectly with the interior of an office in an office building.
- Spider chandeliers with rigid legs are perfect for children's rooms and offices.
- Large-sized “spider” designs must be balanced with other large decorative elements.
- The appearance of the “spider” can be made more interesting by equipping the legs with tentacles or other elements.
- The lamp will be decorated with wires of different colors. This solution looks especially natural in a children's room.
When creating a spider chandelier, it is not necessary to use the models offered by experts. It is completely acceptable to be creative and create your own design. However, in addition to creative ideas, it is advisable to have at least minimal skills in working with electrical devices.
Made of wood
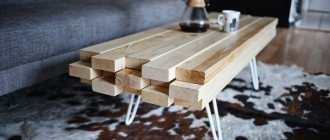
Homemade chandeliers made from natural materials - solid wood, plywood, boards and branches - are perfect for a rustic-style interior. The unusual, slightly rough shapes of these chandeliers are suitable for country houses and make you feel closer to nature.
Forms can be different, the most fantastic. Simple and popular: a wheel chandelier and a rectangular one made from a piece of board or timber with embedded lamps.
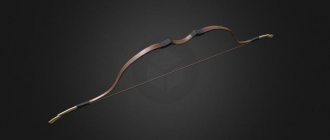
To make a chandelier in the form of a wheel, you will need 12 mm plywood, a jigsaw, a standard set of carpentry tools, a flexible wire in a non-flammable braid, ceramic lamp sockets, several repair bolts and chains for suspension.
Make a three-layer structure, tighten the sheets with self-tapping screws, mark and cut out the rim and core with a jigsaw. Buy wheel spokes at the store or make your own. Assemble the structure and treat it with a protective compound.
How to properly do the wiring yourself, see the article Do-it-yourself electrical wiring in an apartment step by step.
A rectangular lamp above the table can be made from rough-hewn timber, the lamp sockets can be mounted from below into the through holes, and the wiring can be run on top.
Having clearly seen that anyone can make lampshades and shades with their own hands, choose any of the proposed methods and feel free to make an exclusive chandelier for your interior.
Reasons for popularity
A lighting fixture that requires plastic spoons to create is the simplest and therefore very popular type of all lighting fixtures that you can make with your own hands. The reasons that gave rise to such popularity include:
- Easily accessible components that are used for production - plastic bottles and spoons;
- you don’t need to buy anything, everything in the required quantity will almost certainly be found in your apartment;
- extreme simplicity and lack of complexity in the manufacturing process;
- simple design but cute appearance. If desired, it can be decorated with various ribbons, beads, etc.;
- It will take you a minimum of time, effort and money to make such a lamp.
We should also talk about the interior. Of course, many people think that such a lampshade made from disposable spoons is only suitable for a dacha or country house. But such a hand-made lamp will fit more than well into the interior of a room made in the Provence style.
Lamp in the interior
The combination of a lampshade with the interior of the room is possible with proper decoration. You can also use parts of an old chandelier as the main elements. As a result, you will get a kind of fusion, and the room will become light and airy.
FakeHeader
Comments 124
The result is, blow your mind off, very cool.
A good idea to take note of. Well done
look at mine, it shines much better
I didn’t find where it shines better, I only saw a photo of the head when, send me the link, it’s interesting.
Hurray, my thousandth “Like”))) It shines cool!
Awesome)) You've messed up! 5+,
Pass!, 5+ for the idea, 5+ for the execution, 5+ for the uniqueness, 5+ for the simplicity. We are waiting for performance characteristics (service life). Thanks to the author, added to favorites.
I give a standing ovation! Of course, I can’t understand how it shines, but the work should be praised. Now I’ve also finished the LED headlight in the bumper-DRL+ high beam. I can’t install everything on the car!
Related article: How to seal a pipe on a metal roof
It turned out cool))) But it would be interesting if the extreme ones blinked yellow when turning (my opinion)… And that’s cool!
I used the same spots in the car. good thing. what power did you use and how much?
Cool idea. I think it would work better with these ones ru.aliexpress.com/item/Wa...9.html?recommendVersion=1 They might come in handy))) I’ll probably make them myself.
Sorry for interfering, but think carefully about whether they are suitable for you, apparently, the product (ru.aliexpress.com/item/Wa...9.html?recommendVersion=1) does not correspond to the description: emitters = 3 W, and not 10 W. as in the description, I don’t even know what will happen if you apply 3 A to it. Reviews for the product are also not very good: (Two lamps and a board arrived that organizes a police strobe alternately with one and the other diode. The housing is not sealed both around the lens and through the wire input. Measurements showed that from 12V - the real current consumption without a strobe board - 100 mA per each diode, that is, they shine a maximum of 0.8 W for both. The diodes inside were not secured and were dangling in the housing. One of the lenses was loosely secured and fell out when lightly tapped, the second one, prying with a knife, also fell out without much resistance. In general, use them without modifications are unlikely to be possible.) (the strobe is not needed, we remove the board and they shine perfectly without a strobe, you just need to connect them to 12 volts, otherwise they will burn out.) The rating of this particular seller is dangerously low. But of course it’s up to you to decide. Good luck .
Thank you) I didn’t look at the reviews. Here l...ra))) Well, that means looking for something like that.
Be sure to look at the reviews and seller rating. For myself, through trial and error, I decided not to deal with goods and sellers with a rating below 97% - it’s more expensive for myself. 4 years of purchasing experience. 300 orders.
Well, not always. I worked with a seller whose status is 20 percent. So he returned the money for a non-working product. Looks like it's just starting to develop)))
Yes, at first I ordered from them, but the question is what are you risking, 3 $ or 30 $, and you will lose time.
New Year's toys
Moving on from fairly everyday things, one cannot fail to mention the possibility of making New Year's toys. Their surface shimmering with bright colors just begs to be made into a New Year's toy.
Cutting any figure from a disk is not difficult. It is best to decorate the resulting garland with something. For example, draw something or glue a decoration.
You can glue disks pre-cut into small pieces, like fragments, onto New Year's balls.
Such crafts should be treated with varnish - such small fragments can pose a high danger to others if they come off the toy for one reason or another.
With the help of a large number of unnecessary disks and a glue gun, you can always make a Christmas tree that can attract attention no less than a real and decorated Christmas tree.
How to make a lamp with your own hands (wall, ceiling, original) - Construction
06.12.2019
Just a perfectly selected lamp design can radically change an ordinary, faceless interior into a trendy, stylish one. It may even seem like your home has been recently renovated. Our selection of amazing ideas will tell you how to achieve what you want.
- Perfect design in eco style
- Decorative chandeliers and lamps made from branches
- Extreme design “upside down”
- Blooming Planet
A lamp is just as important in interior design as a chic sofa or a beautiful blanket on it. An exclusive option on a stand made of branches gathered together with jute rope is a real highlight of the room’s design.
- Light from under the birches
- A great idea for eco-design is a lampshade frame decorated with decorative green grass.
- Soaring flower lawn
- glowing flower
- Delightful chandeliers with luxurious lampshades made of beads and stones – the undeniable chic and brilliance of interior design.
- Textile lamps
- Flower extravaganza
- Lamps with nautical decorations are the perfect touch of Mediterranean style.
- Stately vintage for traditionalists in design
- Everyday life will become even brighter and more cheerful when there are such rainbow lamps at home.
- Design for those who break the rules
- Shining hat - an illusion of magic and tricks in your home
Do you recognize this wonderful mustache and cap? Introducing a stunning bright table lamp design for true Mario fans.
Lighting wheel
Do you have an unusable bicycle wheel? We will find a use for it!
A bright accent of high-tech design is an ordinary incandescent lamp. This unobtrusive element produces a double impression: as if dissolving in space, it cleverly focuses the admiring glances of family and guests on itself.
- A delicate lace lampshade on a wooden hinge is an original combination of incongruous elements.
- These stylish concrete lamps will add an industrial touch to fashionable design.
Have you been dreaming of a pet parrot for a long time? We have a more functional, and even creative proposal: how about a lamp in the form of a cage with colorful decorative birds?
The best places, cities and favorite photos are always in sight. They do not have a unique place - a wonderful lampshade or lamp!
- Lampshades made from improvised means
- A great idea for a needlewoman’s room is to cover the lampshade with bright buttons,
- and for the writer’s room - wrap it with pages from old books or author’s manuscripts.
- And in the musician’s room, let his favorite melody always be in sight.
- “Naked” lampshade