For many children, both boys and girls, the railway is a desirable toy. And of course, you can buy this toy... and forget about it. Or you can set up a “Crazy Hands” club at home. And know that it is this “railroad” that the child will remember with a smile even as an adult.
Source: michkoff.narod.ru
Kids love to build railroad tracks, select wagons for trains, and send trains on long journeys. And there are quite a few adults who are interested in modeling railway equipment and creating station models. Let's try to make our own model of a railway - with tracks, a steam locomotive, various trains, stations. Of course, not a realistic model; no child can do that. But our railroad model will be fun, funny and perfectly suited for play!
Let's start with the landscape
Where will our railway go? In a noisy city or among fields, forests and rivers?
You will need: thick cardboard • colored paper • newspapers • PVA glue • brushes • paints (preferably acrylic, but gouache will do) • foil • plasticine • colored sand
- Think about how the paths will be located, what will be around them - hills, trees, houses - and draw a sketch. Take a large sheet of thick cardboard and paint it with paint in several layers. It is convenient to use a wide flute brush or roller. Choose a color depending on what area and what time of year you want to depict - you can create a piece of desert, a green meadow or a snowy field...
- Determine where you want to make hills. Tear the paper into small pieces. Roll a ball from a sheet of newspaper and flatten it on one side. Place flat side down on the table. Take small pieces of paper, dip them in PVA glue and glue them to the paper hemisphere, gradually forming a sharp or gentle hill. When the hill has the desired shape, set the piece aside until it dries. Then cover with acrylic paint. It could be a green grassy hill, a yellow sand dune or a white snowdrift. Glue the finished hills to the base.
- A pond will greatly decorate the landscape. Take a piece of foil, cut out a piece of any shape - it will be a lake or river. Glue it. If a body of water is in the train's path, build a bridge. Decorate the edges of the pond by smearing the shore with PVA glue and then sprinkling it with colored sand. You can cover the junction of the pond and the shore with yellow plasticine, and then lay it out with small pebbles or shells.
Source: pmnet.spb.ru
How muskrats almost ruined everything
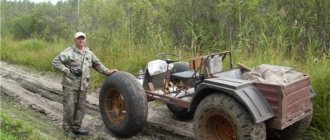
The area of the site was swampy and uneven. Active construction was going on nearby in the village; trucks were constantly removing soil from there. And I asked the drivers to bring him to me.
As a result, where there was clay, there was a layer of fertile soil enough for two shovels. I planted fruit trees and 145 pine trees there - they are already 10 meters high, and the birches grew on their own.
However, the initiative played a bad joke: behind the site there is a pond, and the place under the roots of the trees was chosen by muskrats. They dig long and winding burrows directly under the mound. This is dangerous: one of the bridges once collapsed and had to be restored. So track work has to be done constantly.
Stationmaster
What is a railway without stations, a train station and other buildings!
You will need: thick cardboard • boxes • white and colored paper • scissors • glue • acrylic paints
- For a small stationmaster's house, a square box is suitable. Cover it with colored or white paper, draw or use the appliqué technique for windows and doors. A triangular roof is easy to construct from thick cardboard. Glue the roof to the house and decorate it by drawing or gluing on details - bricks, plants climbing along the wall, tiles.
- It’s even easier to make a house with a flat roof - you only need one box, which needs to be supplemented with windows and doors.
- If you're dreaming of a log home, cover the box with popsicle sticks or matches.
- To build a station, take three matchboxes and glue them with their narrow sides together - you get a “platform”. Paint it with acrylic paint. Glue “platforms” along the paths. Place a station house near each one. Add a couple of interesting details - a large sign with the name, a large station clock, a train schedule.
Source: 1.bp.blogspot.com
How to make a durable paper bridge
Creating a durable paper bridge requires concentration, attention to detail, and a desire to learn and have fun. Many teachers ask their students to build paper bridges to teach them about the purpose and methods of building real bridges. Bridges are subject to two types of forces: compression and tension. Both are in action when any weight is placed on the bridge. Compression pushes the load onto the structure and compresses it. The tension stretches the bridge structure. The triangle is used in bridge construction because it supports compression and tension.
Rails-rails, sleepers-sleepers
Laying a railway is an interesting, but painstaking task.
You will need: pencil • cardboard • spaghetti • matches • paints • self-hardening plasticine • matchboxes and chocolate egg boxes with a surprise (for carriages)
- Mark the location of the rails with a pencil. They can be made from thick cardboard - straight or curved. For straight rails you can also use spaghetti. A circular railway is easily molded from self-hardening plasticine. Sleepers can be made from matches by attaching them to the rails (it is better to cut off the sulfur match heads). Pieces of ice cream sticks are also suitable for sleepers. Paint the finished paths.
- Trains come out great from self-hardening modeling mass or plasticine.
- Open carriages will be made from matchboxes. It is enough to glue wheels made of small buttons to them and paint them or cover them with colored paper. In such a carriage you can load “logs” - matches. Or “crushed stone” - pieces of modeling mass, small pebbles.
- The tank is a chocolate egg box with a surprise. All you have to do is stick wheels on it and write “flammable” on the side.
- Closed cars are the same matchboxes glued together. Decorate freight cars with pictures depicting the goods that are transported in them. Stick windows and doors on the passenger windows (depict passengers in the windows).
- You can connect the carriages and the train in different ways. Glue paper strips between them, or sew the entire composition through with a thick thread, “stringing” the carriages like beads, or use hook fasteners, which are usually sewn to clothes (one carriage has a hook, and the other has a loop).
All is ready? Then let's go!
Goals and objectives of our future layout
Main goal: psychomotor development of the child.
Therefore, copyability[2] , beauty (and such that you can’t touch it with your hands) and excessive complexity fade into the background. But this does not mean that we should make a “simple circle” and “stupidly drive” a train around this circle... In other words, we need to make the layout as functional and interesting as possible for the child.
Our tasks:
- development of fine motor skills: coupling and uncoupling cars, loading and unloading, building various objects on the model itself and many other small operations;
- development of thinking and problem solving: this is something like a puzzle, for example, you need to remove a carriage from the middle of the train (not just with your hands, of course, but with maneuvers) and leave it on sidings (so as not to interfere) or for loading and unloading. It seems elementary, but believe me, such a task can sometimes “strain” even an adult a little;
- interaction of a child with other players[3]: for example, a child controls a train, stops the train and asks the other player to switch the switch. Or the child drives the train exactly to the loading location, waits for another player to load the car and then transports this cargo;
- gaining knowledge: to give an understanding of various types of transport and their interaction. Transportation of various cargoes (for people we will use a passenger car, for large cargo - a platform, etc.). “Combined” transportation, for example, we will load something into a container (directly inside this container), then transport the container itself and then unload it at the place of arrival.
This list, of course, can be continued endlessly...
The basis
Let's talk very briefly about the base: rails, locomotive, cars and power supply.
The most common and convenient scale is H0 or 1:87 (∼ 90-95% of all railway models). Keep in mind that it can be written as an "H" and a zero (more correctly), but also as an "H" and an "O". The track width is 16.5 mm. Remember, the “H0 ” scale [“ash zero” or “eh zero”] - look, ask, buy only this scale!
There is one more detail. As you know, there are straight rails, and there are also curved ones. So, this “degree of curvature” is measured by radius. Those. if we assemble a circle from curved rails, we can measure the radius. If you plan to use only a small two-axle locomotive, then there is no problem. But if you use a large six-axle one (two bogies with three axles each), then it will not be able to travel with a small radius . It's like a truck with a long trailer can't drive down a road with sharp turns. I won’t bother you with this, because... Different manufacturers may have different “curvature” markings. You just need to remember this.
It’s good if you purchased a ready-made set, and from it you can assemble not just a “circle” or an “oval”, and it has arrows, dead ends... But what if you need to assemble it yourself from scratch? First, you need to decide what size the layout will be (see below). Then you need to sketch it on paper. And then the drawing can be made in full size. And if you already have rails, assemble them directly on the drawing and outline them. With this huge “picture” you can already walk around and select the missing rails, simply by applying them to the drawing! By the way, now there are flexible rails on sale, you can bend them as you wish, i.e. you can put one of these instead of 4-6 usual ones and the most important thing is that this long rail can be either straight or curved at your request, exactly repeating all your fantasies in the drawing!
The simplest and cheapest is the analog railway model. Everything is simple here: we send current along the rails (minus on one rail, plus on the other) and the locomotive moves, because it has an electric motor. They stopped supplying the current - the locomotive stopped, changed the polarity - the locomotive went in the other direction. Recently, digital control . In this case, the rails are always energized, but the peculiarity is that a command is sent to the locomotive (along the same rails) so that, for example, the engine, or lights, etc. turn on. Each locomotive is assigned its own unique code. If there are two locomotives (even next to each other), then you can control one of them, the other will not respond to these commands. In other words, different compounds can be controlled independently. Such a system is much more complex and its cost is an order of magnitude higher. For our purposes and tasks, simple, old and reliable analog control with an inexpensive power supply is more than enough.
Where can I buy
On many sites that describe the construction of a model, they offer to immediately buy a starter kit. If you “don’t have money” and you are too lazy to do something with your own hands, then this is not a problem (they will do everything for you, and by the way... what are you forgetting here?). You need to keep in mind that a child can break something during the game. In other words, the layout should not be “cheap”, but it should not be too expensive so that the child can only look at it. In addition, we don’t just need identical cars, we need variety: a platform, a car in which the door opens (for loading), a passenger car, some kind of tank, etc. Therefore, to start, I would advise looking for used sets, and then supplementing them as necessary with both new and used objects. In fact, many people have such sets lying around . In Montreal, where we live, you can buy them at Marché aux puces. There I bought a starter kit for only 20 dollars when the regular price is 100 CAD! I've also seen a lot of good deals here: kijiji.ca. But be careful, prices are often unreasonably high! Very good prices in the Udisco store (the store has ceased to exist, updated 2021-07-21). You can also buy online, such as ebay.com, but this is mainly for supplementation. By the way, when we lived in St. Petersburg, I saw a lot of things at the Juno market.
Let's go to the museum
If your child enjoys playing with the railroad, he will definitely enjoy an excursion to the railway transport museum.
- In Kharkov this is the Museum of History and Railway Equipment of the Southern Railway. Address: pl. Privokzalnaya, 1 (behind the South terminal of the Kharkov-passenger station) Tel.: Opening hours: from 9.00 to 18.00 . Closed on Monday and Tuesday.
- In Kiev this is the Museum of Railway Transport Address: Kiev, sq. Privokzalnaya, 1 Tel.: , Opening hours: 8:00-20:00 (lane - 13:00-14:00)
Cutting templates
Using templates greatly simplifies your work. Each part can be reused multiple times. The templates are provided ready-made, you just need to download and print. If the desired object is not available, then you should use a photo or picture. It is enough to transfer the schematic image onto paper, edit it, and cut it out. Then put it on a sheet of paper, copy and cut it out. For those who love design, creating your own models is more suitable. The advantage of templates is the possibility of repeated use and repeated creation of identical layouts.
Source
Painting from grains
Semaforik suggested that Arsyusha paint another locomotive. Just not with paints, but with unusual multi-colored crumbs, very pleasant to the touch. Small grains of exactly the same size easily fit into the desired parts of the picture. When the painting was finished, the train was glued with double-sided tape. The result is a very beautiful three-dimensional picture:
Books on the topic "Railroad"
The set included a book with Trains stickers . The book, in a light playful way, introduces a busy station, a freight train, and a steam locomotive. From it we learned such amazing facts as the existence of a double-decker train, what a monorail and a funicular are. There are over 50 stickers in the book, and although it is intended for children aged 6 and up, my 3 year old didn't close it until he reached the last page.
And before going to bed, we read the book “The Wonder Train Goes to Sleep” by Sherry Dusky Rinker and Tom Lichtenheld .
In a light poetic form, the wonderful train collected toys and sweets, animal helpers into its carriages and platforms and went straight to sleep. A wonderful lullaby book with soothing pictures:
Which method to choose
To make a decision, you need to consider a number of factors.
Among them are the costs of work (finance and time), noise, duration of the process, and the need for outside help. From a safety point of view, cutting with a reciprocating saw is an attractive method. From the point of view of speed - an angle grinder or a rail cutter. The last tool is expensive for most craftsmen, so it is recommended to use two methods - using a reciprocating saw (metal hacksaw) or an angle grinder with cutting discs. By being aware of how to quickly cut a rail, the user can quickly achieve the desired result.
Finally, an interesting video on the topic: