TVs are becoming more compact. TV models make it easy to mount them on walls using special brackets. Despite all the newfangled interior solutions, the TV stand does not lose its relevance.
The interior itself does not always support the possibility of wall mounting. This can be prevented by the window opening or the materials from which the walls are made, which do not allow the bracket to be secured. In addition, the functionality of the TV stand allows you to place a variety of equipment or other items on it.
Each buyer draws for himself an ideal model that will not only fit into the interior in size, but will also match it in color and style.
Not every material requires finishing.
Wooden elements can also be decorated in the form of artistic carvings on the outer walls or table top.
Tools and materials
These structures can be built from any material suitable for these purposes (wood, metal, plasterboard, chipboard, etc.).
- Drywall is a material from which you can create models of unusual configurations, but additional reinforcement of the base is required.
- Chipboard is a cheaper option that is easier to process.
- MDF is the ideal choice for this job, characterized by its environmental friendliness, durability and low weight.
- Wood is the best solution, since the stand will ultimately be of high quality, durable, aesthetically pleasing and suitable for any interior.
Having decided what the stand will be made of, you can begin selecting the tool. For this you will need:
- thick paper or cardboard for making a template;
- any writing object to complete a drawing;
- ruler or tape measure to take measurements;
- a compass or any round object for applying to the workpiece (in round versions);
- jigsaw with files of the required size;
- clamps if gluing elements is necessary;
- glue;
- strip for edging cut edges;
- fasteners – screws, self-tapping screws, ties;
- grinding machine;
- guide elements (in the case of making a bedside table with drawers).
You can do without a complete list, it all depends on the chosen model and material.
Peculiarities
The main advantages of self-made furniture include the ability to come up with a cabinet design and select building materials.
Despite the large selection of ready-made furniture in stores, consumers are often not satisfied with the dimensions of the product, its color scheme or model. You can make a cabinet yourself that will fully meet all your requirements. In addition, making furniture items yourself will cost much less than buying ready-made ones.
Important: before starting production, decide on the level of your skills. This determines what materials you can use in your work.
Varieties
Pallet cabinet
It will fit perfectly into the industrial style, will not take much time to create and will not require serious investments. To prepare the pallet for work, you need to remove excess rusty nails from it and cut the product into two equal parts using a jigsaw.
You can connect them together with self-tapping screws or use only boards to form a table, securing them on top.
The parts should be sanded with coarse sandpaper or a sander. Purchased elements or legs from old furniture are used as legs. If costs are not in your plans, use three halves of pallets fastened together. The finished stand can be painted, oiled or stained.
Cinder block construction
Remains of building materials are often used in interior and landscape design. Cinder blocks are loved by users due to their brutal appearance and versatility.
It also acts as a strong base for the TV, making the homemade stand stable.
To build a stand, you will need an even number of blocks and 2-3 boards to suit the size. You can stack them on top of each other, assembling the parts like a construction set. The middle board will serve as a shelf for devices, and the top one will serve as a tabletop.
Easel stand
This design is suitable for mounting a TV with a screen size of 40-50 inches. Thanks to a portable easel, you make the device mobile and can adjust the desired height to suit your needs. This elegant product fits perfectly into the minimalist style.
The materials used to create the stand are slats, screws and an 8-inch hinge. The base for the TV should be stronger than that of a regular art easel. As an additional fastener, use a cord stretched between the bottom bar and the rear support, or a wooden shelf.
Drawer stand
Another way to construct a TV stand is to use wooden boxes. You will need containers, drills and screws to fasten the elements together.
Even boxes stacked on top of each other will become an interesting, albeit temporary, stand, but for reliability we recommend connecting them with fasteners.
This design will not only hold the TV, but also add storage space for consoles and accessories for the room. If you want to make the cabinet more durable, attach a board over the connected drawers, which will give the furniture rigidity.
Wooden cabinet
This stand is as simple as possible to assemble, but it looks elegant and expensive: it all depends on the chosen material and the accuracy of execution. To create, you will need 4 boards - two long and two short, 4 furniture legs or 4 wheels.
Parts must be sanded and coated with a protective compound. They are assembled together using wood glue and self-tapping screws. The top board serves as a tabletop, and the bottom board serves as a storage shelf.
The thicker the boards, the longer the fasteners should be - this is the key to the strength of the finished stand.
Handmade furniture gives the interior uniqueness. It looks most advantageous against the background of plain walls or fresh renovation, fitting harmoniously into a modern interior. Using available materials, you not only create designer furniture, but also take care of the environment.
Homemade shelves in the kitchen, bathroom and other rooms
The use of plasterboard shelves in the kitchen will make it possible to replace the usual furniture, although more often such structures serve as decoration.
GCR is not famous for its durability, so heavy items should still be stored in wooden cabinets.
Video:
But you can make a built-in cabinet for storing spices or a tea set from plasterboard. As a rule, plasterboard shelves are made of small sizes and are located away from the sink.
The design of shelves can be very diverse, so in the kitchen you can place both corner shelves and built-in ones; the manufacture of pull-out shelves and drawers has become especially fashionable.
To do this, make a niche out of drywall into which the retractable mechanism is placed. Such shelves are suitable for storing cereals, vegetables or small utensils.
The retractable design will help save space, and therefore will be useful in small kitchens in Khrushchev.
For lovers of good wine, you can place a bottle holder in the kitchen to help store the drink correctly.
With the help of drywall, you can turn an ordinary kitchen into a designer one, just by showing a little imagination.
The use of moisture-resistant drywall will be appropriate in the bathroom, because there is always a large accumulation of moisture there.
In the bathroom you can make the most original devices, even make a sink and a niche for a washing machine, combining them into one continuous element.
Corner structures for a combined bathroom and bathtub will also look beautiful, which will not only help save free space, but will also become a piece of furniture.
You can place household chemicals on the corner shelves, and for plumbing fixtures or other large items it is better to make a built-in structure.
Plasterboard shelves in the bathroom are often made using lighting, which is placed at a certain angle.
You can make a frame for the mirror on the wall, and install additional lamps along the edges - this option will be useful for girls who do their hair.
Not only small shelves are suitable for the bathroom, but also entire niches that span the entire wall.
The main thing that needs to be taken into account is the presence of good ventilation in the room, which will help avoid the formation of condensation, and therefore extend the service life of the units.
The finished structure should be coated with waterproof acrylic paint with high adhesion.
Plasterboard shelves in the living room will be a good addition to the interior. Indoors, you can make a work area with a window for a TV or create a small structure for a library.
Partitions with through windows are often made to accommodate souvenirs and small items.
You can place fresh flowers or other indoor plants on a decorative partition with windows.
If there will be indoor plants on a gypsum board shelf, then it is necessary to use moisture-resistant plasterboard in the construction.
A positive quality of plasterboard products is that the structures can be manufactured after the repairs have been completed.
But if the renovation has just begun, and the walls are leveled using gypsum boards, then you can combine the structure of the wall and built-in shelves - this way you can transform your living room beyond recognition.
Video:
For an experienced person, making various shelves from plaster will be quite simple and will take one or two days, and the result will delight you for years.
What to make a nightstand from
As mentioned above, bedside tables are different and they differ not only in their shape and functionality, but also in the materials from which they are made. Let's look at the most common ones, which are the most affordable and easy to install.
- Plywood and chipboard are the most economical materials and working with them is very convenient and easy. The disadvantage is the simplicity of appearance and the fragility of the product. More suitable for making items such as a coffee table.
- MDF is a high-quality material, has good resistance to adverse conditions, products made from this material last a long time, plus it has an attractive appearance.
- Drywall is easy to work with, but the quality leaves much to be desired. Mainly used for making unusual models and is not suitable for heavy weight TVs.
- Wood is an environmentally friendly material with high strength and durability. Products made from natural wood are valued more than others. To make bedside tables, either solid wood or wooden panels or beams can be used.
Important! To obtain a quality product, before purchasing wood, you need to pay attention to its dryness. Insufficiently dried material can deform the bedside table over time.
Preparing for work
Before you begin the process of making a cabinet, you need to prepare well. You have to select the material from which it will be made and calculate the required quantity. And also decide on the design of the future product, prepare the necessary tools, consumables and accessories.
Let's look at these stages in more detail.
Material selection
When choosing a material for making a bedside table, you should focus on the optimal price-quality ratio. You should also take care of the functionality and appearance of the future product.
Frame
- The most popular today is the chipboard sheet, which is pressed chips. This material is practical, inexpensive, and comes in a variety of colors.
- MDF is also wood chips that are treated with glue. The material is more durable and resistant to moisture.
- You can also use special plywood for furniture. However, finding high-quality plywood suitable for these purposes can be difficult. Moreover, its cost is higher than that of other materials.
- A TV stand can also be made directly from wood. For this purpose, pine or oak boards are often used. However, in this case, you need to have some carpentry skills and tools.
Accessories
You should also be responsible when choosing accessories.
Depending on what material you choose, use screws, self-tapping screws or regular nails.
Important! If your cabinet model includes drawers, do not forget to purchase special rails for them, as well as handles.
Selecting a model and drawing up a drawing
When choosing a specific model of your future TV stand, focus on the interior and the size of the room in which it will stand. Consider also your own strengths and capabilities. It is better to choose a laconic model of a simple shape, not overloaded with unnecessary details.
Article on the topic: How to find out the wifi password on an LG TV
Before starting work, you should make a drawing of the future cabinet with a calculation of the dimensions of each individual part.
You can also use ready-made drawings from the Internet.
Preparing tools
For comfortable work you will need:
- electric drill with various drills;
- hacksaw;
- sandpaper;
- screws or furniture ties;
- roulette;
- pencil.
The list can be expanded depending on which model of cabinet you have chosen.
Important aspects when making a bedside table
In fact, making a bedside table with your own hands is not at all difficult, the main thing is to draw up a clear plan of action.
It is recommended to start with simple models; due to their simplicity, anyone can make a bedside table, even if they have not previously held a tool in their hands.
If you nevertheless decide to make a bedside table of a non-standard type, with many shelves and sections, then you need to carefully consider the drawing of such a product and, when preparing the parts, strictly comply with all measurements.
Immediately think about the mechanisms responsible for pulling out the drawers and opening the doors.
In order to decide on the size of the cabinet, you need to think about what it will be used for, other than as a TV stand. What accessories do you plan to store in the nightstand, for example, a tuner, set-top box, discs, etc.
The color of the product should be combined with the interior of the room and the rest of the furniture in the room.
When choosing a material, you should consider where the bedside table will be placed, the weight of the TV and other equipment, and the model itself. Especially if you plan to mount the bedside table on plasterboard walls. Plus, we also don’t forget about the service life; when making a product with your own hands, you want it to last as long as possible.
- Before cutting some parts, it is necessary to drill holes for self-tapping screws, since after this they may split, especially if they are small in size.
- When making a bedside table, it is necessary to take into account the wires coming from the TV and other video equipment so that they do not hang haphazardly, but are complete and, if possible, hidden from view. And also take into account the location of the wiring in the house and drill a hole in the nightstand close to the outlet.
- If wood is used to make the cabinet, it is recommended to open it with varnish to preserve the quality of the resulting product and make it easy to care for.
- It is recommended to install stiffening ribs every 40 cm of the length of the bedside table, especially if the TV is heavy. Fulfilling this requirement will prevent the canvas from deflecting and will prevent the sash from skewing, which in turn prevents them from opening. It is also advisable to make a small gap between the lid and the doors, literally a few mm.
- If the weight of the video equipment is too heavy, it is better to abandon the legs. In this case, it is best to install the cabinet directly on the floor, on a flat surface, having first laid a rug or a piece of linoleum.
Where is the best place to install
A bad solution would be to simply attach a shelf anywhere in an apartment or house. Therefore, when choosing a suitable location, you need to consider several rules and recommendations. For example, it is strictly not recommended to install a shelf close to heating devices (for example, a stove), on a wall with a fireplace, or in a confined space. One of the most popular places with enclosed space in an apartment is a niche.
Old TV on a shelf
To ensure that the installed TV does not harm your eyesight or pose a threat to the health of family members, you need to ensure that the distance from the floor to the shelf board is at least 100 cm. Also, the TV must be at a decent distance from the eyes. We are talking about four TV diagonal sizes.
Triplex does not break, it only cracks. This is what is used to make bulletproof glass. Suitable for large TV
On a note! When installing a wall shelf, you need to take into account the location of the sofa or bed in the room, which should be at right angles to the TV. A small deviation is allowed, but no more than 30%.
Drawing of a bookshelf with indicated dimensions
I would like to invite you to create a very nice piece of furniture, stylish in appearance, a large shelf or cabinet that will fit perfectly into the interior of a large house. Below I attach a drawing of a bookshelf with the indicated dimensions, as well as a list of materials necessary for the work. Maybe it will be useful to someone?
This version of the bookshelf will fit especially well into the interior of a home decorated in a rustic or vintage style. If there are travelers among you, then they have probably seen this type of bulky “antique” shelves in the interiors of Western European homes, where they most prefer to surround themselves with antique furniture and antiques.
What materials are needed to make a bookshelf? It is simply impossible to answer this question unambiguously.
The need for certain materials for the manufacture of bookshelves depends solely on their design and purpose.
To create a wooden shelf or TV stand you will need:
- several boards of different sizes;
- electric jigsaw or saw;
- screws,
- bolts, screws, nails, etc.;
- screwdriver; glue;
- sanding machine or sandpaper;
- means for treating wooden surfaces.
Having decided on the size and design, you need to prepare all the elements for assembly. To do this, we cut out parts of the required sizes from wooden boards using an electric jigsaw or saw, treat them with a sanding machine and a wood preservative. When the parts have dried, we assemble the structure using nails or screws. The finished shelf can be painted or left in natural colors, it all depends on the interior design.
You will need wood materials (dimensions below are in inches):
- 2" x 12" x 20" (x1)
- 2" x 4" x 8' (x3)
- 1" x 4" x 12" (x1)
Element edging
To make the ends of the cabinet itself look attractive and unique, it is recommended to trim all parts before assembly. For this purpose, it is considered optimal to use a special edge made of PVC or other material. PVC edging is considered inexpensive and easy to use, so the work is accessible even to beginners.
PVC edging can be embedded or glued to the edges of existing parts, and the choice of method depends on the wishes and skills of the person creating the structure.
A wooden cabinet can be edged in different areas, but most often this process is performed for those places where there is a high probability of damage during operation of the product. The entire process of edging parts is divided into stages:
- The cutter is correctly positioned in the center of the end;
- the edges of the parts are polished, and it is important to ensure that chips or other problems do not appear that are almost impossible to eliminate;
- various grooves are carefully milled;
- Next, the edge is stuffed carefully, for which you need to use a rubber mallet, and during work you need to ensure that impacts do not lead to damage to the integrity of the parts;
- the ends of the edging are cut off from the ends, after which the elements are ground flush.
Article on the topic: Bravis TVs who is the manufacturer
A design made with such edging will look really attractive and modern, so there will be no unsightly and untreated areas.
Fastening the edging
Manufacturing methods
There are different ways to make TV stands depending on the material and design chosen, so they may work differently from each other. Let's look at how you can make this design with your own hands.
The floor-standing option allows you to place not only a TV on the surface, but also related equipment and various small items. The design of the room should be taken into account so that the design looks good in the interior. The material from which the stand will be made depends on the choice of the future owner.
A classic product is a straight configuration, made of wood, chipboard, and plasterboard.
Here are step-by-step instructions for making a wood base:
- you need to draw up a drawing and calculate the required amount of material;
- prepare the necessary tools and materials;
- cut out the parts according to the pattern and process the edges (sand);
- drill holes in the places of future connections;
- fold the structure;
- clean debris from the workpiece and coat it with varnish;
- secure the fittings.
If you choose plywood material, the work procedure will be as follows:
- transfer the sample to plywood and cut it out, and sand the edge;
- fix the edges (plastic or wooden) alternately on the ends of the shelves, the front side of the structure and the table top using glue or nails for finishing, then sand;
- Depending on the chosen model, assemble the frame parts with fasteners. following the diagram, drill holes;
- assembly should begin with the tabletop: it must be secured to the sides or legs, then install the bottom shelf, then the remaining parts;
- shelves inside the structure must be installed on special holders (if installation of drawers is provided, then guides must be attached to the side part and the partition);
- you need to assemble the drawers, fix the fittings, screw in legs or rollers at the bottom of the model;
- the finished structure can be coated with 2-3 layers of varnish to preserve the shade of the wood; you can also use stain or special paint.
The most commonly used material for creating tabletop and floor-mounted TV stands is chipboard. The procedure and processing method are similar to the previous ones.
Glass is also used in the production of this furniture, but it must be tempered and at least 8 mm thick.
To cut this material, you will need a glass cutter and certain fittings - special hinges for glass sashes.
Having certain skills, it is possible to make complex and expensive options from high-quality material.
Design options
Let's take a closer look at the most fashionable interior styles and their characteristic properties of the corresponding pieces of furniture.
Classic examples of bedside tables for a television receiver stand out for their aristocracy, sophistication and exquisite wealth.
The material for creating a structure for a television receiver in a classic style is, as a rule, natural wood. However, there are products of artificial origin that are no worse in external indicators.
Such a bedside table can be decorated with wood carvings or filigree components made by forging. A classic-style TV stand should appear heavy and have soft and calm colors.
TV stands in country and Provence styles are also often made from wood. They also have forged components and threads. The fundamental difference between classic furniture and Provence furniture is the presence of abrasions on individual parts of the bedside table, which classifies the pieces of furniture as rustic in style.
Modifications of cabinets with curved outlines will fit perfectly into the interior design of the Art Nouveau direction. Trapezoidal nightstands with rounded corners are a favorite option in many modern guest room interiors. Equally in the Art Nouveau style, you can find a stand for a television receiver made of glass on a metal frame.
Modern interiors are imbued with a minimalist spirit in every way. Their key goal is to bring practicality and simplicity of design. Bedside tables for a TV receiver in a minimalist style attract with their uncomplicated and laconic forms. This is a fairly light product with glass shelves and chrome-plated legs.
Modern high-tech style is characterized by precise geometric proportionality of the entire area. This should also be taken into account when choosing a stand for a TV receiver in this style. The materials from which the bedside table should be made are glass, steel or plastic. The structure of this product must be original. For example, in the form of a glass ball fixed on a metal stand. A very popular option is a long bedside table complete with vertical wall cabinets. The dominant principle of such furniture is to create it from any material other than natural. If you still choose a wood base, then its design should be entirely hidden under paint or acrylic in rich shades.
For an industrial loft, a rough metal flooring product for a TV set or a structure made of wood combined with iron, which looks like an old chest, is selected. In addition, various non-standard solutions are easily used here, for example, a bedside table can be replaced with mobile pallets on wheels or a wooden box.
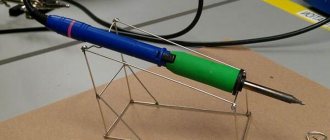
TV stand made of PVC pipes
This TV stand is very easy to make. This kind of stand can be assembled in a couple of hours, to the size of almost any flat-screen TV. For this particular project, I will be installing a 32-inch flat screen TV. The stand will be high enough to make it comfortable to watch TV from the bed.
If you decide to replicate my design, please note that larger or heavier TVs may require larger diameter pipes and wider long legs.
Briefly about the main thing
A TV shelf can act not only as a monitor support, but also as a decorative element.
The most common are cast and frame TV shelves. Molded molds are more suitable for modern style.
The TV can be placed on a special partition. This helps to beat the TV zone and get rid of monotony.
The shelf can be hung on the wall, on the ceiling, on a pole, placed in a corner or in the partition between the windows.
There are certain interior design styles, but to create an individual home, they can be combined and complemented.
There are certain advantages to using a backlit TV shelf.
Dimensions of the stand stand
This stand is approximately 160 cm high and holds a 32-inch flat screen TV weighing approximately 14 kg. The legs are about 50 cm long and spaced 81 cm apart.
- The pipes have a diameter of 1.5 inches and a wall thickness of 40.
- Fittings: 4 pieces T-bar, 2 pieces 90-degree elbows, 4 pieces leg couplings.
- Pipe lengths: 2 – 20 cm, 2 – 30 cm, 2 – 71 cm, 4 – 73 cm.
All pipes were cut using special shears for cutting PVC pipes, but if you don't have one, you can cut them with a hand saw for wood or metal. Be careful not to split the pipes.
Recommendations for placing a bedside table with a TV in the interior of a room
The main rule is proper centering of the bedside table. A modern flat-screen TV can easily be classified as a key element of the living room. All glass models fit perfectly with them. But, the placement of the bedside table must first of all guarantee an excellent real view of the screen. Without piling up around massive furniture.
A low coffee table placed opposite the bedside table looks beautiful. It will also be great if they are created in the same style. In general, glass furniture does not particularly like solitude. Add decorative elements to her shelves in the form of vases, glass trinkets or dishes. The overall appearance of the bedside table in the interior will play with new colors.
Place additional lighting fixtures on the sides. In order not to ruin your TV viewing, choose medium-sized wall-type sconces. Place them below the center of the TV screen. From a similar position, they will not spoil your color, but will help the glass to reveal itself in all its glory.
Side symmetrical narrow pencil cases look very good. This is especially true for models with a partially glazed facade (type of shop windows). Choose the right color palette and you will have a magnificent stylistic complex.
Assembling the stand
Once all the pipes are cut, we begin to assemble:
- Assembly can begin with the legs. Assembling each side separately, and finally connecting them. Or start from the top and finish by assembling the legs of the stand.
- After assembly, make sure that the stand stands firmly and stable on a flat surface, without unnecessary rolling or tilting.
- My structure is held tightly with screws for easy dismantling, but you can permanently glue the pieces together into a whole structure. If you are going to use screws, it is recommended to drill holes before drilling with screws.
- The wooden board that will hold the TV on the stand is a piece of 1/2″ plywood. If cooling holes are needed, it can be cut so that it is cooled by natural ventilation. In my case, I cut out a groove to connect the wires.
Before attaching the board to the stand, drill all the holes for attaching to the stand, as well as the holes for mounting the TV itself.
Next, drill mounting holes in the PVC pipes. You do this very carefully. And tighten the fastening bolts even more carefully so that the pipes do not crack.
Once the stand is mounted, install the TV. That's all. Install the stand in a place convenient for you, connect the wires and use it to your health. I personally made such a stand in order to watch TV from the bed, and since there is no wall next to the bed, there is nowhere to hang the TV except on its own stand. Of course, there was an option to put the TV on a stand like a bedside table, but this option is too bulky. Moreover, the bedside table is low, so it’s not the same at all.
What you need to consider when choosing TV stands - the main rules for selection and placement
To choose the right corner TV stand, you should consider the following points:
Correct distance from seat to screen
This is important not only from a comfort point of view. All unpleasant sensations in the form of pain and stinging in the eyes affect health
If you do not want to get glasses, then place the screen at a distance of 3, or preferably 4, of its diagonals. So, with a screen width of 42 inches, there should be at least 2.4 meters from the sofa. Accordingly, a diagonal of 50 inches is 2.8 m, 60 is 3.4 m, 71 is 3.8 m; Correct turning angle. The most comfortable view is considered to be with the ability to turn your head 35° in both directions. Since corner placement limits this point a little, purchase a TV with a movable leg; No windows on the side or opposite. Only the most modern models with OLED technology do not react to bright sunlight with color changes. Other TVs will respond with an incorrect color scheme with a blown-out effect. It also negatively affects vision. As a last resort, get thick curtains; Installation height. The standard height is 1.2 meters from the center of the screen to the floor. But, since everyone’s height is different, focus on yourself. The top third of the TV should be at eye level when sitting. The narrower the screen, the higher the cabinet you will need. Low ones (without an external side) are suitable for larger equipment; Required cabinet width. Ideally, it should exceed the width of the equipment by 35%. Anything wider will waste your free space. Narrower models will risk the TV falling; Correct countertop depth. With enough volume, it will allow you to move the TV closer or further. This way you can adjust the position that is most comfortable for viewing.
How to assemble a wooden TV stand
At the first stages, a wooden stand is created in the same way; the changes consist only in assembling the frame. For production, timber of sizes 50x50 mm and 20x20 mm is used.
In addition to the main parts of the frame, it is necessary to create crossbars, and if the length of the cabinet exceeds 1.2 m, crosses will have to be made.
The crossbars and crosspiece give the cabinet rigidity and are made of 20x20 timber. The dimensions must correspond to the internal width of the cabinet. The crossbars are screwed in increments of 20 cm, the crosspiece is mounted along the entire length. For convenience, the height can be adjusted so that the upper shelf can be placed on spacers.
Important! When working with wood, be sure to make the holes in advance. If this rule is neglected, the canvas may crack during the assembly process.
To cover wooden furniture, use varnish, paint, stain and similar materials.
With a drawing and the necessary materials, creating a TV stand with your own hands is not difficult. You will receive a unique and practical element in your interior, which will delight the whole family for many years.
Which profile to choose
Before purchasing profiles, it is worth assessing the shape of the structure. The larger the diagonal of the TV, the larger the profiles should be. If you plan to install a large-depth housing, then purchase twice as many profiles. One is attached directly to the wall, and the second is attached to retaining plates placed perpendicularly, which gives rigidity to the structure.
STAND SEPARATOR
A popular design technique for decorating a large room is dividing it into zones. A simple but original TV stand can serve as such a separator. The secret of this product lies in its L-shape, which provides not only a place to place equipment, but also a vertical surface on which you can hang a small panel, or simply use it as a fence.
WHAT WILL BE NEEDED TO IMPLEMENT THE PROJECT
Boards (for example, thick plywood):
- 10.5x1x4 inches;
- 5x1x4 inches;
- 5x1x6 inches;
- 15 fence boards of varying widths should be cut to 5 inches in length;
- 4 square bars 1x1x5 inches;
- flat metal staples – 3 straight, 3 angular;
- 1/2" screws for installing metal brackets;
- screws;
- electric drill;
- screwdriver;
- 1.5 inch flat nails;
- glue that is suitable for working with wood;
- spade drill;
- Heavy Duty Velcro;
- white paint, roller, brush;
- extension wire;
- ceiling lamp sockets;
- LED bulbs.
If the parameters of the TV stand in this project do not suit you, you should take individual measurements at the beginning of work. Then recalculate the parameters of the components, namely: height, width, depth. The structure of the shelf is simple, so no drawings are needed.
OPERATING INSTRUCTIONS
- First of all, we assemble the side and middle L-shaped posts (3 identical ones) using metal corners and strips, as shown in the photo. We additionally lubricate the joints of wooden parts with glue. Protruding excess should be removed immediately.
- We attach a wide strip to the lower base of the L-shaped posts, which will be installed on the floor. We prepare the holes, connect them with nails and screws. During operation, we control the connection angle at 90 degrees.
- Assembling the front part of the back of the stand. First, we attach wide boards: one at the top, the second at the bottom. Then we select 1 narrow strip at a time. We install the remaining wide ones between them. We use glue and screws.
- We place the stand-bedside table in a vertical position, lay the boards on a horizontal plane-table top.
- We install the product in order to make the back part. Use boxes or other objects to avoid damaging the stand. We attach only wide planks to nails. In the lower part, you can not install the last board or prepare large holes in it for the wires. You can also make this part removable using Heavy Duty Velcro.
- Attach the strip at the top of the structure. The L-shaped bedside table is almost ready.
- Drill a hole on the front for the wires after you decide where exactly the TV panel will be installed.
- All that remains is to do the finishing coat. Take safety measures and cover the product with white (or other paint of your choice). Let the nightstand dry.
- If desired, you can install colored lamps in the niches of the stand. They will provide soft light and a pleasant atmosphere in the dark.
TV panel
This panel, made of strong plywood, will become a real decoration of the room.
The parts are marked using a pencil and an aluminum ruler.
Then, after determining the dimensions, they are cut at home using a circular saw.
- A - 2 elements 600×1000 cm;
- B - 4 elements 564×1000 cm;
- C - 2 elements 564×200 cm;
- D - 2 elements 100×1000 cm;
- E - 2 elements 600×1000 cm.
Step 1: Pieces (E) are connected to two pieces (D) and two pieces (B) using 10 angles. The structure is reinforced with four brackets.
Step 2. 4 legs 250x25 cm are attached to the structure.
Step 3. Elements (E) are connected to two sheets of plywood (A) and two elements (C) using 10 angles. To strengthen the structure, brackets and brackets are used.
Step 4. 2 legs 300x25 cm are attached to the finished “box”.
Step 5. The assembled parts are fastened together with screws. The wood is then treated, varnished or painted.
SPACE FOR TV FROM PALLET
Want the most inexpensive and least labor-intensive way to make a modern mobile TV stand? Find a whole pallet. It takes very little effort to make furniture from natural wood.
PREPARE TOOLS AND MATERIALS
- 1 pallet;
- several additional boards;
- 4 large roller wheels;
- drill, screws;
- sandpaper;
- glue;
- varnish or paint (optional).
PROCEED IN ORDER
- Clean the pan, remove burrs and roughness with sandpaper.
- If necessary, cut out the middle boards - you will get a cavity-shelf for magazines, newspapers, and a TV remote control.
- Attach the resulting and additional boards with self-tapping screws (through pre-prepared holes), applying a little glue to the surface, in the lower part. This way you will get rid of large gaps.
- Varnish or paint the nightstand.
- Attach roller wheels to the corners of the bottom of the pallet. Attention! The fastening will be reliable if the screws go into the wood of the thick middle posts of the pallet.
Now your bedside table is ready to decorate not only a student’s room, but also come in handy at the dacha, in a loft apartment, and become an original art object.
Feasibility
To make an “intricate” shelf you need to purchase additional tools
If everything is clear regarding the material of the shelves and other classifications, then some difficulties may arise with the tools. Therefore, to make something extravagant, you will need to visit the construction market to purchase a tool.
The modern construction market is not only about building materials and tools. This is still an extensive service sector. Therefore, if the cost of the service is significantly less than the price of the tool, it is worth thinking about this factor and making the right, appropriate decision.
Another aspect of difficulty lies in personal skills. Of course, you can cut a wooden or plastic shelf with a regular hacksaw without buying a jigsaw. But not every craftsman can make a high-quality radius glass shelf on his own; Even gluing edges to a sheet of chipboard can be difficult.
Based on the feasibility and personal experience in the manufacture of products from selected materials, you should know that the construction market is ready to perform a number of works for little money. These are: cutting sheets of MDF, chipboard, wood, plastic, radius and straight cutting of glass, drilling holes according to customer drawings, cutting metal along the contour and others.
Understanding well what needs to be done, what to make it from, taking into account the interior of the room, you just need to approach this issue expediently and not clutter up the space with unnecessary tools. But further production and additions to the interior can be done independently by purchasing the necessary material.
How to make a dog house with your own hands: arrangement of housing in the yard and in the apartment. Drawings, dimensions and original ideas (55+ Photos & Videos) + Reviews
What to finish with?
The finishing work is quite simple; you can do it yourself. The difficulty lies in finishing the end edges. The material may crack in the future and begin to crumble. To avoid this, the joints and ends of the sheets are trimmed with aluminum and plastic corners. Semicircular models can be finished with mounting tape. It’s better not to skimp on it; you need to fix everything carefully.
The joints can be reinforced with reinforcing mesh. It is glued in fragments on top. The heads of the screws should not stick out; they are sealed with starting putty. After processing the joints and ends, finishing putty is applied to the entire structure.
Drywall can be decorated with almost any decorative material. This could be wallpaper, plaster, various types of paints. The structure can be finished with the same material as the walls. Then the shelves will look like part of the wall. You can highlight them with material and color to make a bright accent in the interior, visually divide or adjust the space.
If you plan to paint the structure with colored paint, it is recommended to make the niche lighter. It will be shaded anyway. To do this, you can dilute some of the paint from white of the same brand. Alternatively, you can decorate individual shelves or structural elements. For finishing you should use stone, mirrors, colored glass or plastic, imitation stained glass and much more.
The choice of decorative finishing material can also be approached from a practical point of view. A lot depends on the frequency of cleaning. If the shelves are covered with wallpaper, they can quickly become unusable. In this case, the external vertical surfaces can be covered with wallpaper to match the walls, and the horizontal shelves can be painted.
If the shelves are purely decorative and require infrequent cleaning with a vacuum cleaner or a special brush, they can be completely covered.
For example, you can paint them with paint. You can choose a practical color.