When repairing a car, it is important that it cannot roll away anywhere. Unauthorized rolling of the machine can lead to serious injury, damage to equipment or the vehicle itself.
Therefore, you need to use special car stands. You can buy them or make them yourself. A homemade support will save money and may turn out to be no worse than a purchased one.
What can you use to make a car stand with your own hands?
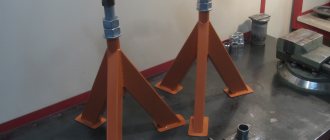
A do-it-yourself car stand is made from metal water pipes and other pipes. It is very reliable and allows you to adjust the height.
When repairing a car yourself, it is important that it does not roll away, because this can lead to serious injuries, damage to equipment or the vehicle itself. Therefore, supports are used for many repair work. And an inexpensive solution would be to make your own car stand.
Slipway
The slipway is designed to restore the geometry of the body.
When a car collides or hits an obstacle, various violations of the body geometry may occur. They require competent editing - a car with incorrect geometry is difficult to control, and there is a high risk of a new emergency situation.
Floor-standing slipway Blackhawk Korek
There are the following types of slipways:
- floor - the cheapest variety. It consists of rails mounted into the floor, anchors and racks. Allows you to use the occupied space for other tasks when it is not needed;
- platform is an overpass with an entry ramp and rails. It can be used for the most complex types of editing, but it requires a large area in the room;
- frame - very convenient for correcting simple defects. Doesn't take up much space and is very effective.
Design
A do-it-yourself or purchased car stand has a simple design. It is equipped with a tripod for installation on the floor, a mount that holds the car by the sills. Sometimes equipped with a height adjustment mechanism. But this lift is not used instead of a jack. Therefore, the car is first lifted with a jack, and then supports are used.
DIY car stand
What does a stand for painting parts look like?
A do-it-yourself or purchased stand for painting doors and other car body parts usually looks like a vertical inclined stand with fasteners for metal elements. It can sometimes be moved, and the body panels themselves can be rotated for painting or drying, as well as applying primer and putty. Racks can be stationary or rotating. There are products for painting bumpers on which plastic elements are hung perpendicularly. The parts are attached to them with special fasteners. Sometimes stands have additional functions.
Types of stands
Do-it-yourself car safety stands come in several types. They are divided into regulated and unregulated. The supports differ in the material from which they are made.
Car safety stands
A DIY wooden stand for a car is the simplest type of tripod. It is usually unregulated, but has sufficient reliability. Metal supports are often made or purchased. They are usually adjustable and fit both cars and trucks.
Unregulated
Non-adjustable tripods are cheap. This DIY wooden car stand is very quick to make. They are also made from other materials.
Adjustable
Adjustable stands for the car, purchased or made by yourself, are equipped with a mechanism that allows you to change the lifting height. It is very convenient to use. But ready-made devices are expensive. And making them is more difficult than ordinary supports. Metal or iron and wood are used for manufacturing.
Adjustable car stands
Such supports are used in garage auto repair shops. You can also use them to repair your car if the work is complex.
Which stand is better to choose?
If you plan to paint your car very rarely, then you don’t need to buy anything. You can make a crossbar with hooks. It will be enough for occasional touch-ups of car doors, bumpers or fenders.
If serious body repairs are planned or a person regularly paints large parts for his friends and acquaintances, you can make a more complex design or buy an inexpensive stationary stand.
When you plan to open a garage service or provide ongoing services for car body restoration, you should think about purchasing a rotating stand. There is no need to purchase expensive equipment right away. You can choose cheaper models.
DIY stand - ready-made diagrams
You can make a car stand with your own hands. Drawings and diagrams are available online. But you can draw the layout yourself.
As you can see from the photo of do-it-yourself car stands, they usually create simple tripods made of wood without adjustment. They are used for repair and maintenance of passenger cars. The supports are light but durable.
But there are also schemes of more complex structures that allow you to adjust the height. Their creation usually requires experience working with metal and takes a little longer. But this DIY car stand is suitable for complex repairs and heavy vehicles.
Communities › Kulibin Club › Blog › automobile “goats”
Hello everyone, guys, help me out on how to weld the support trestles for the car, you need to hang all the wheels, but the option is to just weld the trestles, but I can’t find the drawings
Comments 48
put it on stumps, tested by a two-ton car))
If I were the moderators, I would delete such posts without explanation.
If I were the moderators, I would delete such posts without explanation.
Why is a person asking for advice? If you don’t like something, don’t read it
If I were the moderators, I would delete such posts without explanation.
I would rather pay attention to purchases and sales, those need to be deleted, but here I am asking for advice.
I would have put it on the bricks and not bothered.
The car cannot be placed on bricks, and it cannot be placed under a jack. Any brick can crumble. Only a tree.
Nothing will fall apart, you lay it out in a masonry pattern, that is, in 2 bricks, so that the top ones overlap the bottom ones. The top layer is planks, so as not to break the metal. And nothing will happen. Unless, of course, you're going to display an ancient one on a red brick.
weld car goats? What a radical measure :)))
Repair of walker. a friend calls them goats, so that’s what I wrote, I don’t know what they’re called, I’ve never seen them
weld car goats? What a radical measure :)))
weld car goats? What a radical measure :)))
I really want it :(
Wouldn’t it be easier for you to make 4 stumps from 200x200 timber with a height of 300? I just use these - everything is very stable
Very reliable and cheap.
What is this banter?! what nafik drawings, why?!
is this about those who are driving?
I saw toilet paper with instructions))
Now you have seen everything in this life))) If only you could read the instructions, it would be interesting what is stated there)))
Google it) such a paper actually exists, I held it in my hands)
bm.img.com.ua/nxs/img/pri…ages/large/1/0/136501.jpg that’s a joke, it was a joke here in Transnistria, now it’s disappeared from the display cases, I had to save it for posterity)))
Frenzy! Thank you! Saved the picture)))
bm.img.com.ua/nxs/img/pri…ages/large/1/0/136501.jpg that’s a joke, it was a joke here in Transnistria, now it’s disappeared from the display cases, I had to save it for posterity)))
Well, why was this done?! I'm talking about posting instructions! Now I have a lot of questions on the topic. - how to fold it, into an accordion or into a button accordion? — is 700 mm enough? - Can you carry a small mirror with you in order to better assess the quality of cleaning? - what will happen to the children if I don’t keep the paper from them? etc. and so on.
Manufacturing instructions
A do-it-yourself car stand is made from metal water pipes and other pipes. It is very reliable and allows you to adjust the height. For manufacturing you will need the following materials:
Manufacturing instructions
Do-it-yourself car stand like this:
After assembly, the support can be painted or covered with other materials. It can easily support a passenger car and a small truck or SUV.
Source
Safety stand made of wheel rims for cars
Hello everyone, in this article I want to tell you how you can make a useful craft, namely a safety stand for a car from a simple, unnecessary wheel rim. So, we take a car rim and cut off the front edge with a grinder; from the photo I think it will be more clear which one it is))).
We also need a square profile measuring 60x60 and 50x50. We cut 25 cm from one and the other profile, then you need to drill holes.
In a 60x60 profile, we retreat 2 - 3 centimeters from the edge and drill a hole with a diameter of 15 mm, I selected the diameter of the hole for the bolt, almost any bolt will do, the main thing is that the length is more than 6 cm.
In a 50x50 profile, we drill holes every 3 cm, more often, less often, there is no particular connection to the size, but we drill as it will be more convenient for you.
Now we need to make a square hole in our disk in the middle, to fit the size of our profile 60x60. We apply, mark and cut out with a grinder.
Next, we insert our profile into the cut-out square hole, insert it until it rests against the table, it will be clearer in the photo, and only after that we scald it around.
On one side of the 50x50 profile I welded a pulley to provide a platform for supporting the car.
I welded a chain to the bolt, and screwed the chain itself to the disk, this is so that the bolt does not go anywhere))).
To give the stand the appearance of spray painting it, first, of course, primed it.
This turned out to be a useful, and most importantly necessary, fake. Now you can crawl under the car without fear.
All the best to you and good luck to everyone.
Author; Glavnyiy-Mehanik Sumy, Ukraine
The simplest devices for recharging the battery
Having a full-fledged car charger is good, but sometimes it’s quite expensive, especially since cheaper devices can also perform its function. So, a laptop charger can handle a full charge of a car battery with a capacity of up to 75 ampere-hours.
Moreover, there is no need to make any alterations, but simply plug in a 12-volt 55-watt car lamp into the circuit and periodically monitor the battery charge level with a multimeter.
When the indicator reaches 13 - 13.5V, you should stop charging - the battery is fully charged. In addition, it is extremely important not to confuse the polarity. This use of the adapter does not harm it at all.
In general, without any modifications, chargers for 12-volt cordless power tools handle the recharging function quite well, and most of them also have LEDs indicating that the battery is fully charged.
An old computer power supply can also slightly recharge a dead battery to a level sufficient to start the car. It has an output voltage of 12V, and to fully charge it needs to be up to 14V, but minor modifications can provide this voltage.
Do-it-yourself homemade safety stand for a car from a wheel rim
You insert them into each other, then into a vice. Drill holes approximately every 3 cm to insert the bolt. Clean the disc and pipe blanks from rust using sandpaper or a drill attachment. We place the pipe in a standing position in the center of the disk, mark a square mark, and cut it out with a grinder. We insert a 6x6 pipe into the center of the disk (into the sawn hole) and weld it to the disk. We insert a 5x5 cm pipe inside, place a roller on top of the pipe and weld it. We paint all our parts and dry them. We weld a piece of chain to the bolt on one side, and screw the other side to the hole in the disk with any bolt. Our entire design is ready, we can begin testing.
This post may contain affiliate links. This means I earn a small commission from links used at no additional cost to you. See my privacy policy for more information.
How cars are dismantled: algorithm of actions
It may be necessary to disassemble a car in two cases: during a major overhaul and for the purpose of disassembling for spare parts. Our company specializes in the sale of auto parts; we accept vehicles of various brands and carefully disassemble them into units, components, and parts. As a result, we receive an assortment of ready-to-use spare parts, which are necessarily checked for damage or lack thereof.
Let's look at the car disassembly process in more detail.
Stage 1. Preparation
Before disassembling the car, you need to prepare the place for work, as well as the car itself - namely, thoroughly wash the body. After the workers have washed the car, it is delivered to the dismantling site, which is suitably equipped. There must be a reliable device for lifting a multi-kilogram structure. The work site also has direct access to power and is well lit.
Stage 2. Dismantling of electrical equipment
When everything is ready for disassembly, the craftsmen begin by dismantling the electrical equipment. As a rule, it is this that is removed from the car first, since it can be damaged during further disassembly activities. The removed electrical equipment is purged, wiped and carefully laid out in a specially designated area on the rack.
Stage 3. Body dismantling
Now it's time to remove the body parts. Bumpers, hood, doors, trunk lid, and so on, including car windows, are removed from the car in sequence. In addition, significant interior parts are also dismantled and sorted (for example, seats). All auto parts received during disassembly are marked and placed on a rack.
Stage 4. Draining technical fluids
Waste liquids are drained into prepared containers. Workers remove oil from the engine, gearbox, and gearboxes. Fuel is drained from the gas tank.
Stage 5. Equipment dismantling
When all fluids have been successfully removed, the technicians disconnect the gearbox from the axle, turn off the heating and cooling radiators, remove the fuel and exhaust pipes, and also remove all kinds of levers and cables.
Stage 6. Removing the power unit
The car engine is disconnected from the frame (body) and carefully removed out using a lift. It is usually placed directly into a technical container, where it is washed and then disassembled into parts.
Stage 7. Dismantling of bridges
Workers remove the shock absorber and suspension mounting elements, after which the axles are disconnected from the frame (body). This completes the car disassembly.
Stage 8. Inspection and evaluation of spare parts
At the end of the disassembly, the craftsmen check each part for damage. If a defect is found, it is described and then entered into the electronic catalog, where all auto parts from Zapcar disassembly are presented. Next, the parts are assessed by specialists according to their condition, and if there is significant wear, they are rejected.
This is just a schematic description of the car disassembly process. In practice, dismantling activities may differ in certain nuances. However, what remains unchanged is careful inspection and accurate evaluation of spare parts.
Types of stands
Do-it-yourself car safety stands come in several types. They are divided into regulated and unregulated. The supports differ in the material from which they are made.
Car safety stands
A DIY wooden stand for a car is the simplest type of tripod. It is usually unregulated, but has sufficient reliability. Metal supports are often made or purchased. They are usually adjustable and fit both cars and trucks.
Unregulated
Non-adjustable tripods are cheap. This DIY wooden car stand is very quick to make. They are also made from other materials.
Adjustable
Adjustable stands for the car, purchased or made by yourself, are equipped with a mechanism that allows you to change the lifting height. It is very convenient to use. But ready-made devices are expensive. And making them is more difficult than ordinary supports. Metal or iron and wood are used for manufacturing.
Adjustable car stands
Such supports are used in garage auto repair shops. You can also use them to repair your car if the work is complex.
Deathforest › Blog › Homemade folding goats.
Good afternoon, comrades. Congratulations on Victory Day over the fascist occupiers.
I'm tired of, you know, climbing on all fours when cleaning, sanding, cutting, etc. or put anything under the workpiece. I decided to cook myself Kozly borscht. Yes, not simple ones, but folding ones, because... There is, as always, a catastrophic lack of space. It's decided. I climbed into my magical attic: corner, pipe, prof. pipe, etc. One is a pity, another is for business, the third is for something else... But he who seeks will always find! I found legs from school desks that had been lying around for a long time, just 4 pieces, just right!
I found piano hinges in the bins, and away we go...
By the way, welding was not needed, and its eternal companion, the grinder, was needed only once, to shorten the hinges. I tried on the hinges, as they say, “by eye,” cut off the excess and screwed it onto the roofing screws with a screwdriver.
Next, I roughly determined the required distance between the goat’s legs, and, focusing on the factory holes (fortunately, there are plenty of them), measured the required length of the chain. At first I wanted to make a limiter from a cable, but it, or rather its fastening, is needed for something else... And with a chain it’s somehow simpler.
The sawhorses turned out to be a little low, but this still cannot be compared with placing everything that falls under the material being processed.
Also, as a bonus, the factory height adjustment of the legs has been preserved; it is adjustable in only three steps, visible in the photo; for quick adjustment, I replaced the nuts with wings.
If you have to adjust frequently, you can replace the bolts with “fingers” on cables.
Initially I wanted to weld the hinges so that the surface would be smoother, I also had thoughts of inserting the hinges inside, then it would be generally smooth, but after weighing all the options, I settled on self-tapping screws, because their heads will serve as a kind of stopper when working with a pipe, and the rest this will only benefit long-length people.
I changed my mind about cutting off the lower amplifier (or whatever it is), because... it will serve as a second shelf. This can be clearly seen in the photo.
These are the goats that came out of unnecessary trash.
Source
DIY stand - ready-made diagrams
You can make a car stand with your own hands. Drawings and diagrams are available online. But you can draw the layout yourself.
As you can see from the photo of do-it-yourself car stands, they usually create simple tripods made of wood without adjustment. They are used for repair and maintenance of passenger cars. The supports are light but durable.
But there are also schemes of more complex structures that allow you to adjust the height. Their creation usually requires experience working with metal and takes a little longer. But this DIY car stand is suitable for complex repairs and heavy vehicles.
What is necessary?
Equipment for truck service centers is almost identical to equipment for repairing passenger cars. It has only one significant difference - all units are much larger and more powerful. And accordingly, their price is several times higher. Below is a list of required equipment with costs:
- Lifting devices. Their function is obvious from the name. They differ in maximum load capacity and manufacturer. Price – 800 thousand-2 million rubles
.
Installing a lift for a car service center will cost another 4-5 thousand rubles
.
- Tire fitting equipment. This includes tire changing machines (price - 400 thousand-1 million rubles
), balancing stands (price -
30-400 thousand rubles
) and various auxiliary tools (set price - about
70 thousand rubles
). The equipment differs mainly in its functionality and manufacturer.
- Stands for adjusting wheel alignment. They differ in functionality (from the simplest, in which all measurements are taken by a person, to fully automated models) and manufacturers. Price – 120-480 thousand rubles
.
- Stands for checking the brake system. They are used to diagnose the car’s brake system in order to optimally configure it. They vary in manufacturer and feature set. Price – 460-770 thousand rubles
.
- Diagnostic equipment. Used to check the functional condition of all systems, components and assemblies of the car. They differ in manufacturer and technical capabilities. Price – 120-240 thousand rubles
.
In addition to the main equipment, you will also need a large number of auxiliary tools and consumables.
Safety stand for a car. With your own hands
This safety stand is needed in order to leave the car in a raised state after you have raised it with a jack.
For this device you will need:
First of all, cut two pieces of pipe equal in length.
Next, in a pipe with a larger diameter, use a drill to drill a hole near the end of the pipe.
It is necessary to attach a corner piece to the smaller of the pipe pieces. For ease of fastening, we suggest making a recess at the end of the pipe. It is convenient to make the recess using an angle grinder. Try to make the cut approximately in the middle of the edge.
We attach the corner piece to the pipe by welding.
Next, we place a smaller piece of pipe into a larger pipe and drill holes in 2 cm increments. These holes should coincide with each other in both pipes. To do this, fix the pipes relative to each other.
Now all that remains is to attach the larger piece of pipe with its end to the metal plate. The plate will act as a support for the entire safety post.
Thus, we have a telescopic retractable rack for fixing the car in a raised state. All that remains is to paint this homemade product and try it out.
Main stages of work
First, we make a U-shaped support “heel” of the stand for the lower control arm of the car - to do this, use a grinder to cut along a piece of thick-walled pipe of a suitable diameter. We drill six through holes in the profile pipes. We cut two pieces from a steel bar and bend them into hooks.
These hooks will fix the height of the homemade stand-stand. Then we weld a larger-diameter profile pipe to a metal plate—the “bottom” of the structure. Next, on one side of the profile you need to weld a steel rod at an angle, and on the other - a short profile of 20x20 mm and a piece of round pipe.
The U-shaped support “heel” is welded to the second profile pipe, which is movable. Then we clean all the parts from rust and slag, paint and assemble the car rack. It is installed under the bottom at a slight angle, and in order to lift the car, you just need to drive over it.
DIY car stand
Greetings, Samodelkins!
Many of you probably have a personal car and you most likely had to independently repair your iron horse, little by little, so to speak, without fanaticism. The author of the YouTube channel “TeraFox” is no exception.
Safety precautions for hanging wheels include installing a support under the car. This rule should not be neglected in any way, and the simplest, most accessible and most importantly free method is a tree stump.
But after all, we live in the 21st century, we want something more modern, functional and no less reliable. After quite a long period of thought, the master realized that everything had long been invented before him. All you have to do is go online and choose the most suitable option.
The choice was made, the material was purchased. For this homemade product we will need two square pipes 30 by 30 and 40 by 40, wall thickness 3mm. Since there are no specific sizes, the author decides to do everything approximately, by eye, so to speak. The first step is to mark the fortieth pipe. Then we will cut off the required total length for two pieces, which in turn will also have to be cut at an angle, but closer to the edge. The parts are ready and absolutely symmetrical to each other. And now it’s the turn of the 30th pipe. It fits and exits perfectly into the fortieth pipe, therefore, the fortieth pipe can be used as a template for marking the thirtieth pipe and trim off the excess using a grinder. Out of 30 pipes we also received 2 parts. Now let's return to the 40th pipe. We need one more piece with angled edges. This is what we have at this stage. It turns out to be a kind of house; the crossbar will need to be welded to the upper sections along the edges. This is what we will do now. And everything would be fine, but there is a very small nuance in the form of a 4mm gap between the pipes. This is too much, 2mm everywhere, we need to fix it. The author found a 2 mm metal plate. It was decided to make spacers in the form of strips from it. This is the only way to reduce the gap, although if we initially took pipes 40 and 35 with a wall thickness of 2 mm, then this point could be eliminated. But still, the 35th pipe is more difficult to buy, they don’t sell it everywhere, plus a 3mm wall is still more impressive than 2mm, so that’s how it is. The gap is reduced, the movement is free, that's what we needed to get. Next, the strips must be carefully welded at points to the pipes. Using a core, we mark future holes along the edges and drill, starting with a small diameter. To make the holes coincide with each other, we hold the pipe in the pipe. We finish drilling with the tenth diameter of the drill. A bolt test shows that the idea was a success, a clear match. Using exactly the same principle, you need to make holes in the rack. And on the opposite counter there are absolutely the same manipulations. So far everything is going according to plan. Next, we disassemble the workpieces into parts and begin marking on the internal guide posts, starting from the top hole by 30mm and then repeating. A total of 4 such holes need to be drilled. So, the main part is ready, of course the stops are missing. The remainder of the 30th pipe will be used for these purposes. The parts are welded, the only thing is that we leave untouched those areas where the strut reinforcements will be located, in simple terms, gussets. Next we need a piece of 4 mm sheet. All that remains is to mark it and cut out the missing parts. The scarves are ready, positioned along the posts with an inclination relative to the surface. We immediately weld everything into place. In front of you is an old broken jack: The teeth at the base could not stand it, the lead screw was severely deformed. The reason for this breakdown was that once the author of today's homemade product raised the car too high, and it simply slid to the side, jumping off the jack and thereby damaging it. But at the moment we only need the rubber band from the top of the jack. Under the elastic band, I need to make a special base with sides. A 50 x 20mm profile pipe is perfect for this. This is what happened in the end. Now you need to make a hole in the crossbar for this base. You also need to drill a hole in the center of the base itself. And now, all the parts are ready. It's time to start assembling. And the same pin from the jack will also come into use, we’ll just correct the chamfer a little. Next, the lower part of the cross member must be strengthened using a thrust plate. To do this, we mark the same remainder of the 4 mm plate, cut it out, and then weld it. But this is not the final element of our design. Now let's put everything together and see what we ended up with. There are 4 holes in the stand and of course there are not enough latches. You can, of course, come up with something out of bolts, but perhaps not this time. We protect the tenth round timber from corrosion, cut it into 60mm pieces in the required quantity, core it and straight to the machine. And now the 4 studs are ready, all that remains is to make a chamfer. Now we need rings from cheap Chinese keychains. They are great for a new task. And how is this not a harsh keychain for a locksmith? And finally the production approached the final stage - painting. The paint is completely dry, then assembly follows. This is such an unusual stand. And of course it needs to be tested in operation. To do this, you need to move to the garage. We start by removing the cross member and placing it between the jack and the fulcrum on the stiffener, like this: Then we thread the posts through and secure them with studs. That's it, you can lower it, the stand works. Now let's raise the car higher by increasing the height of the pillars. Once secured, lower the jack. At the same time, the author noticed a displacement of the stands relative to the floor due to the support rubber. When you lift the car, it moves a little, as if sliding on an elastic band. This requires a specific clamp. Let's make a new stop with pieces of round timber on the plate.
Communities › Garage Equipment and Tools › Blog › Homemade folding sawhorses.
Good morning, comrades.
I'm tired of, you know, climbing on all fours when cleaning, sanding, cutting, etc. or put anything under the workpiece. I decided to cook myself Kozly borscht. Yes, not simple ones, but folding ones, because... There is, as always, a catastrophic lack of space. It's decided. I climbed into my magical attic: corner, pipe, prof. pipe, etc. One is a pity, another is for business, the third is for something else... But he who seeks will always find! I found legs from school desks that had been lying around for a long time, just 4 pieces, just right! I found piano hinges in the bins, and away we go...
By the way, welding was not needed, and its eternal companion, the grinder, was needed only once, to shorten the hinges. I tried on the hinges, as they say, “by eye,” cut off the excess and screwed it onto the roofing screws with a screwdriver.
Next, I approximately determined the required distance between the legs of the goat,
and focusing on the factory holes (fortunately, there are plenty of them)
I measured the required chain length. At first I wanted to make a limiter from a cable, but it, or rather its fastening, is needed for something else... And with a chain it’s somehow simpler.
The sawhorses turned out to be a little low, but this still cannot be compared with placing everything that falls under the material being processed.
Also, as a bonus, the factory height adjustment of the legs has been preserved; it is adjustable in only three steps, visible in the photo,
For quick adjustment, I replaced the nuts with wings.
Initially I wanted to weld the hinges so that the surface would be smoother, I also had thoughts of inserting the hinges inside, then it would be generally smooth, but after weighing all the options, I settled on self-tapping screws, because their heads will serve as a kind of stopper when working with a pipe, and the rest this will only benefit long-length people.
Source
Wooden stands instead of a pit in the garage
brazh
Regular participant
Often there is a need to crawl under the car. For example, to change the oil. But not everyone has a hole in their garage. I don't have it either. Therefore, you must use a safe way to lift the car and secure it in this position. Climbing under a car that is only supported by jacks is very dangerous! Most often, people use special stands, as in the figure below.
The following ramps are also popular (at least in America):
But it seemed to me safer to make wooden stands for the wheels. I found the most information on this topic, again, on American sites. At the end of this post I have provided links to the most interesting articles.
Advantages of wooden stands: 1) Safety. Some people use bricks, which is not recommended at all, because... At any moment, the brick can crumble and you will merge with your favorite car. The tree, before breaking, will begin to crunch. Those. More often than not, there will be some indication that something is wrong. The likelihood that the car will slide off such stands is very low (if you follow safety precautions). 2) Easy to make stands. 3) The relative cheapness of this option.
But there are also some disadvantages: 1) You cannot remove the wheels. 2) Wooden stands take up quite a lot of space in the garage.
It is interesting to note the fact that American firefighters use approximately the same stands when they need to fix a heavy object (for example, a car). Only firefighters use separate blocks (wood cribbing) so that they can build various stands:
My version of wooden coasters looks like this:
On top I screwed 2 sheets of plywood, each 10mm thick (I had unnecessary pieces in the garage). I inserted scraps from the boards into the holes in the top of this entire structure for additional strength of the top layer. I screwed all the boards together with self-tapping screws.
The car is placed on stands like this: first the front is placed, and then the rear of the car (or vice versa). Many cars have points where you can jack up the entire front or rear at once. There are no such points on my Passat, so I first lift the front on the right side, and then on the left. The same is done with the rear. When I lift the right side, and then start to lift the left, the car’s suspension tries to “bring together” the wheels. For this reason, the stand on the side opposite to the rise begins to tilt and may tip over. Is it dangerous! Be careful and control this situation! After this, you have to return to the left side again and adjust the stand:
Be sure to use wheel chocks when lifting the car!
This is what the Passat looks like with the front end raised on stands. There is enough space to work. It's not scary to crawl under such a car.
Tire mounting and balancing - homemade products for the home craftsman
Creating devices for independent tire mounting and balancing in your garage is realistic, and will allow you to constantly save quite a lot of money. And you don’t need a lot of equipment for this:
- universal machine for tire mounting;
- balancing device.
Some craftsmen take apart the functional parts of a tire changing machine, but in a garage it is better to combine them, on the contrary.
You will need a paw with a lever for tearing the tire off the rim and a stationary stand with holes for mounting the rim and a central stop pin. Mounting the disk can be done in various ways, but since you most often have 1-2 cars for personal use, it makes sense to make the mounts for specific wheels. The easiest way would be to drill holes for the bolts locally. The number of levers for removing and installing a tire on a disk can be large, or you can get by with just one – double-sided.