The topic of storing things is becoming increasingly relevant. There are even books and articles about the scientific approach to space allocation. In fact, all this is very exciting - once you start, you won’t even notice how everything in your home will be properly organized. That is why we have prepared many different ideas on how to make an organizer with your own hands.
For the office
Don't want to waste time looking for an eraser or raking mountains of pencils? We suggest making a convenient stationery organizer with your own hands. Nothing else will get lost, order will settle on the table.
What you will need:
- cans;
- rope, jute thread, any ribbon;
- glue, scissors;
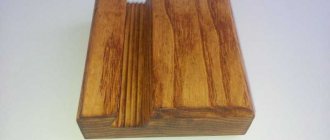
- thick cardboard for the handle;
- spray paint.
Do organizers help you in your work?
Not really
Manufacturing instructions:
- Cut out a handle from thick cardboard. You can use a thin sheet of fiberboard or plastic. For beauty we wrap it with rope and ribbon.
- Next, we peel off the labels from the cans, clean them, and paint them. Or cover it with decorative paper.
- We insert the handle between the cans.
- For fixation and beauty, we tie it around with a rope.
You can make your own home office organizer in a similar way from toilet paper rolls, plastic cups, and small containers. Multi-level structures with compartments of different heights look impressive.
It’s easy to build an organizer for clothes, documents, cosmetics, headphones, books, and any other items with your own hands. The accessory is made from fabric, cardboard, paper, wood, and cans.
Plastic storage system
Make a model from office paper trays. The multi-tiered option will allow you to accommodate a lot of cosmetics.
Finding the right product will take a minimum of time if transparent plastic containers were used for the product. They are purchased at office supply stores.
For documents
Any documents require careful handling. We suggest making a simple organizer with your own hands. It will take up space on your desktop, shelf, or closet. It is advisable to choose dense boxes that do not bend under weight.
What you will need:
- 3 tall, narrow boxes;
- scissors;
- paints;
- pencil;
- ruler;
- glue.
Manufacturing instructions:
- Measure the desired height of the organizer. Let's make the front part lower. Using a pencil and ruler, draw cutting lines.
- Cut off the excess parts. We shorten the remaining boxes in the same way. For beauty, you can cut out small windows in the front.
- We paint it, you can paste it over.
- We connect with each other. Fix with glue.
When making a document organizer with your own hands, take into account the sizes of folders and files. They should fit easily, but not dangle. We choose the number of compartments at our discretion. If you glue Velcro to the side parts, you get a mobile design. It’s easy to add or remove sections at any time.
Homemade boxes
All tools, except paper, scissors and tape, can be put aside, because you won’t need them.
There are a lot of videos on the Internet that teach you how to make paper crafts. One of these crafts is a miniature box, but for the organizer you will need as many as six of them.
It is enough to wrap the made boxes with tape - this is where the craft ends.
Advice! Use interesting paper with prints or at least colored paper, this will make the product much more attractive and interesting.
For cosmetics
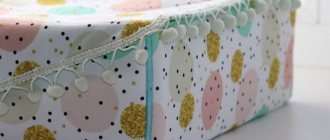
Cosmetics are often stored in ordinary desktop organizers, like those for office supplies. But we suggest making a travel version with your own hands. The fabric accessory will not take up much space and will keep tubes and bottles intact.
What you will need:
- a piece of dense matter;
- threads, needle;
- scissors;
- ruler, pencil.
Manufacturing instructions:
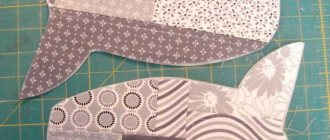
- Let's make a pattern. We sew any size at your discretion. The main thing is to cut out a rectangle. Cut it out right away.
- Seal the edges by machine or by hand. Sometimes it is enough to process it over fire. Depends on the type of matter. Bias tape is often sewn on. We choose a convenient option.
- Make a pattern for a long pocket. Sew to the main rectangle. Place seams to separate pockets. We choose the quantity and size ourselves. In addition to cosmetics, such organizers are convenient for storing medicines.
- All that remains is to fold the organizer, tucking both sides inward.
To secure the folding accessory when closed, we recommend sewing on a button, button, or ribbon. Sometimes a rubber band is pulled on.
Board with clothespins
It may not be in the form of a canvas, but look like a horizontal strip of plastic, metal or even bamboo sticks (for eco-friendly interiors). Clothespins are glued to it at the top and bottom so that the clamping mechanism is not disturbed. This is a convenient, compact and minimalist option.
Board option with clothespins
Metal note board
Pink note board
For books
Storing books is a science. It is important to properly maintain printed materials. Readable copies and textbooks do not have to be put away in the closet every time. For them, we recommend making a simple accessory with your own hands. It is convenient to use and will be useful for students for school supplies.
The technique is similar to making a document organizer. It is not necessary to make many compartments. Sometimes it is enough to simply cut off a Leroy Merlin box or similar box.
How to decorate:
- adhesive tape, film;
- textile;
- beads;
- braid.
The only point is to use strong boxes. Books are quite heavy. Thin cardboard is easily deformed.
What are they needed for
It is difficult to neatly arrange a large amount of small cosmetics. A mess will involuntarily form and you will have to clean up frequently. Organizers differ from ordinary containers and containers by the presence of small “windows”. Thanks to the divisions, pencils and all kinds of tubes are convenient to hold in a vertical position. Nothing gets mixed up, it’s easy to sort - one compartment is for lipsticks, in the second we will store concealers, foundations, then a compartment for mascaras and eyebrows.
The second point is accuracy. Often the appearance of the packaging suffers and abrasions form. Using tattered powder or scratched lipstick is unpleasant. It is inconvenient to take such cosmetics on vacation, to work, or to use with friends. The organizer helps maintain an attractive appearance due to the static position of objects. Nothing rolls up or rubs.
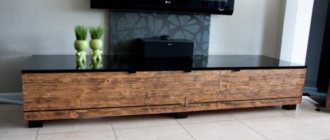
For clothes
The easiest way is to make organizers with your own hands using ready-made boxes and baskets. The only important thing is to find the right size. For reliability, the bottom is additionally reinforced with cardboard.
What you will need:
- box;
- textile;
- glue;
- needle;
- thread.
Instructions for making an accessory with your own hands:
- Trim the box to the desired height.
- Cover the outside with fabric, tucking some inside. If desired, we sew a lining.
- We fold two strips of fabric and sew handles.
- We sew handles to the sides of the homemade organizer.
To store socks and underwear, we recommend inserting cardboard dividers inside.
Wall
You can make a hanging or wall organizer for threads and other accessories with your own hands in half an hour. For the base you will need plywood. We allow you to replace it with a sheet of fiberboard or thick cardboard, whatever is available.
What you will need:
- plywood;
- fabric, paper;
- rubber;
- glue.
Manufacturing instructions:
- Cover the plywood with fabric. Or glue paper.
- Pull the elastic bands. The direction and quantity are arbitrary. Arrange diagonally, rhombuses, squares, make weaving. At your own discretion.
- Secure the edges of the elastic bands with glue.
- Let it dry.
- Time to hang it on the wall!
Wall accessories are convenient to use for notes, calendars, and photographs. They become an original decorative element; it is only important to choose the right color scheme.
Slate
This is a black canvas on which you can draw and write with crayons. If you frame it in a delicate shade (you can paste it with old wallpaper) and make decorations in the form of small flowers, such a board will fit into the Provence style. But a “bare” black board or framed with wood will fit perfectly into a loft. This option is often used by modern establishments decorated in an industrial style.
Black board for notes
Board covering the entire wall in a loft interior. Drawing on such canvases is done using chalk or chalk markers.
Note board made from old wine corks
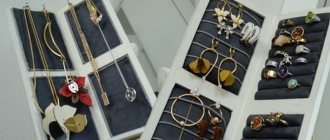
How to sew from fabric
Jewelry, combs, hairpins, keys, and other small items are stored in such organizers. The purpose depends on the place of use. It is convenient to hang wall accessories from children's cribs. We suggest sewing it yourself.
What you will need:
- a piece of fabric;
- buttons, loops;
- scissors;
- thread, needle;
- braid, beads, ribbons for decoration.
DIY instructions:
- Make a piece of fabric. To obtain a dense base, it is possible to sew several layers together and use a spacer. Fold over and trim edges.
- Cut out pocket blanks. Any quantity, size at your discretion.
- Sew to the base.
- We make loops for mounting on the wall. Rings will do.
- We decorate the pockets. We decorate at our discretion with buttons, ribbons, perhaps buy something from a craft store.
For fabric models it is convenient to use a sewing machine. It saves time and produces perfect stitches.
DIY cardboard organizer: master class with patterns
There are a lot of amazing things around us, at the first glance of which no delight arises. And only upon closer examination does one realize that before one’s eyes is a masterpiece! One of such masterfully executed works is a DIY cardboard organizer.
Here are some examples of how a recycled product can be turned into a functional, useful and beautiful product:
These things are not only beautiful and exclusive, but also bring comfort, order and individual flavor to the house.
Having set the task of making something similar in a home, everyone wonders where to get the required amount of starting material. After all, cardboard for children's creativity is not suitable for these purposes. Flexible thin material is produced for schoolchildren.
There is not much of it in sets, and besides, it is limited in size and will not work for large products. The way out of the situation is to go to the nearest store, or rather, to the warehouse of the nearest store. There you can always find an abundance of empty packaging containers for fruits, groceries and similar goods.
Also, thick boxes made from large household appliances are suitable for crafts of this kind.
Once the basis for the future product has been found, we begin work. Let's look at a few ideas for creating different types of cardboard storage.
For cosmetics
The simplest type of craft that even beginners can do is presented below.
To work you will need:
- Cardboard box;
- Decorative paper for decoration;
- Glue;
- Stationery knife;
- A simple pencil.
The basis of the organizer will be the box. For these purposes, it is better to choose packaging without a removable lid. The best option would be an empty container from a laptop or tablet.
We cover the box with paper and decorate it to your taste. Let it dry well. Next, use a stationery knife to cut holes that fit the size of the existing cosmetics. The stand for cosmetics is ready. It is convenient because it can be placed on any table or bedside table.
Let's consider another version of such an organizer.
This product has a more complex and impressive design and is made in the form of a small chest of drawers. But thanks to the pattern presented below, making it will not be difficult. The dimensions for the chest of drawers are shown in the image.
The video tutorial explains how to cut and assemble all the parts correctly:
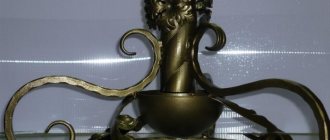
A product with a masculine character
Not only women love order in everything. Most men are zealous about their belongings and cannot stand it when they are moved to other places. This is understandable: clarity and accuracy are the two main traits of successful people. Therefore, any representative of the stronger sex will love a cardboard organizer for office supplies.
A master class on making this masterpiece will help you complete the job with ease and get a brilliant result.
The entire structure is collapsible and consists of individual elements. They are covered with kraft paper and vintage decorative paper.
The books in this organizer are removable. This is a more convenient option for use.
Decorating materials can be purchased at specialized stores that sell scrapbooking products.
Let's move on to the manufacturing process. Let's make books first. To do this, we will transfer the diagram with the dimensions of future folders onto cardboard and cut it out.
Next, the blanks need to be covered with paper. To ensure that it fits evenly to the parts and does not form bubbles, use double-sided tape and a glue stick for gluing.
- After this, we assemble a book from the covers, gluing the flyleaf to it.
- We strengthen the spines of the books for rigidity.
- Let it dry thoroughly and begin making the closed side panel.
The result was separate blanks for the covers and ends of the books. Let's put them together.
- Next, we make the base on which the folders will stand, according to the diagram:
We cover each individual element with decorative paper. This type of paper with an aging effect is easy to make yourself, rather than buying it in a store. To do this, soak ordinary office sheets in tea leaves or infusion of onion peels and dry them. After pasting, we assemble the structure.
Finally, we make a retractable drawer. We also paste it over and decorate it with paper.
- We assemble all the parts into the finished product.
- The nuances of making such an organizer can be seen in a detailed video tutorial that will answer your questions.
- Real men will highly appreciate the effort spent on making such a useful desktop accessory.
Video on the topic of the article
You can make not only an organizer from cardboard, but also many other useful things. You can find even more ideas on using this material in creativity in the videos below.
Source: https://DekorMyHome.ru/rukodelie/organaizer-iz-kartona-svoimi-rykami-master-klass-s-vykroikami.html
From paper for various things
You don't always need high-quality, durable organizers. You can quickly and easily make a temporary paper version for various things with your own hands. Suitable for stationery, storing cosmetic brushes, and other small items, such as wires and phone chargers.
What you will need:
- paper;
- glue;
- cardboard;
- paints, decorative tape;
- scissors.
Manufacturing instructions:
- Twist tubes from paper sheets. We remember labor lessons, make cubes and bars if desired.
- Decorate with decorative tape. Or paint or draw patterns.
- Glue the products to the cardboard base.
Based on this method, it is easy to build more durable models with your own hands. We just use flexible cardboard instead of paper.
The advantages of such an organizer:
- cheap;
- fast and simple;
- even a child can handle it.
Minuses:
- looks primitive;
- short-lived;
- for light items.
Fabric board
To make a fabric stand at home, just cover it with a sheet of plywood or the same balsa wood (gluing hardboard to the back). You can use polystyrene foam for this purpose, but it crumbles a lot and will quickly become unusable. Fabric boards can look like a real work of art: they are decorated with ribbons, rhinestones, beads, decorated with seashells and even soft toys.
Wooden note board
Any board must have a strong fastening so that it does not fall off the wall
Note board with decor
Marker board for notes
Organizer for children
Cleaning a child's room is rarely fun. Proper organization of small details will help solve the problem. They are the ones who often get lost, lie around, and create chaos. We offer the simplest accessory that you can easily build with your own hands in 5-15 minutes.
What you will need:
- rail with hooks;
- colorful buckets;
- nails, hammer.
DIY organizer for children
Manufacturing instructions:
- Nail the strip to the wall. Secure the hooks. Or take a ready-made railing.
- Paint the buckets, decorate them, dry them.
- Hang on hooks.
It’s even easier to make a children’s organizer with your own hands from satin ribbon and disposable cups. The accessory is used for light, small toys and various competitions.
Board with screed
This product is easy to make from a cutting board with ties. It will fit into a loft or eco interior. A slate cloth is usually glued to the board so that wooden strips remain along the perimeter, and a chalk stand is mounted underneath.
Note board made from frames
Note board with clothespins
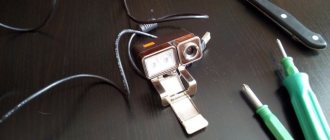
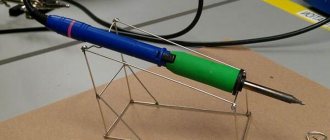
Headphone organizer
The simplest device will help you keep your headphones in order and prevent wires from getting tangled. Easy to make with your own hands from scrap materials.
What you will need:
- glue;
- a couple of pictures;
- paper;
- scissors;
- double-sided adhesive tape, tape.
Options for making a headphone organizer
Manufacturing instructions:
- Take scissors and cut out pictures of the same size. It is allowed to use different images.
- Take the paper, bend it in the middle, and glue it to each side of the image.
- Secure the inside with tape. Ready!
An organizer made of fabric or felt with a button is more reliable. The headphones will definitely not get tangled in it.
Marker board
Since the marker can be easily erased from a smooth surface, a glass coating is best for making. For example, an A3 photo frame. If you plan to decorate it to your own taste, choose a product framed in a neutral color. To make a writing board, you need to take out the glass and paint it on the inside with white or another light-colored paint (so that the dark marker inscriptions can be seen). After the composition has dried, the frame can be put back together. If you don’t want to fuss too much with paint, you can simply insert a white sheet of paper instead of a layer. The finished board can be placed in the hallway above the pouf to leave reminders about evening activities or simply write nice words to loved ones. You can take a small photo frame and make a mini tabletop board out of it.
It is advisable that there is always a marker near the finished product, for example: you can screw a stand for a glass in which stationery will stand to a large board.
Note board in the hallway
This option is suitable for those who do not like sticking pieces of paper and fiddling with them.
Note board in the kitchen