MesterulManole
3067 0 1
MesterulManole November 29, 2018Specialization: many years of experience in finishing work for residential and office premises, country houses, country cottages, etc. Hobby: cycling in all its forms
Cable spools are made from wooden planks that are so easy to cut, plane and sand
Do you have a wooden cable spool and don't know how to use it around the house? Try to make a beautiful and durable table. Such furniture is guaranteed to fit into the design of the garden and plot or into the interior of a country house. I offer simple options for making tables and many interesting examples of their decorative design.
Stripper designs and sequence of their operation
The structure of the machine for cutting wire products consists of two moving units enclosed in a massive body.
The lower assembly is two bevel gears on an axle. The rollers face each other with narrowed tops in the form of a Y-shaped opening. The roller axis is connected directly or through a drive belt to the electric motor shaft. The end of the cable is laid on the cones of the lower node.
In the upper part of the machine, a frame with a circular knife moves along vertical guides on a horizontal axis. Using the adjusting screw, the knife is pressed against the cable so that it enters the wire only to a depth equal to the thickness of the insulating coating.
Once the cable is installed, the bevel gears are driven. The knife cuts the insulation along the wire. All that remains is to wind the bare wires into a compact coil or twist them into a convenient bundle.
Lifehack 2: ottoman and bench made from cable reel
The best option would be a wooden reel. By adding a piece of plywood and a pallet, you can make a set of bench and ottoman for the garden.
Step-by-step instructions for making an ottoman
To make an ottoman you will need the following materials:
- 1 wooden spool;
- pieces of plywood 12–14 mm thick;
- 1 pallet;
- sandpaper;
- stain;
- varnish;
- wood glue;
Procedure:
- Secure the central part with adhesive tape or wire so that it remains in its original form.
- Disassemble the coil and fold the core boards separately.
- Measure the diameter of the outer and inner circumference of the core (along the grooves on the disk).
- From plywood, cut 1 circle along the diameter of the outer ring of the coil, 3 circles along the diameter of the inner one.
- Make a ring from a circle of larger diameter.
- Cut the boards that made up the core to the desired length.
- Lay a circle with a smaller diameter, put a ring on it and use a pneumatic gun to nail the boards to the ring in a circle, from the inside, glue the junction of the circle with the boards with additional glue.
- Turn the cylinder over, nail the bottom on which the ring was lying to the boards, and screw the legs.
- Sand the cylinder, coat it with antiseptic and stain.
- Apply 2 layers of varnish.
- Place padding polyester or other soft material on top of a circle of larger diameter, cover it with velor or other fabric, stretch it, and fasten it to the plywood with a stapler on the back side (you get a soft seat).
- Coat the wrong side of the seat with glue and glue a third cut circle of smaller diameter, press down with a weight until the glue dries.
The result is a neat ottoman with a removable soft top. It is not only comfortable to sit on, but you can also put various things inside (books, magazines, threads). Look at the photo of the cable reel ottoman.
Step-by-step instructions for making a bench
Now let's see how easy it is to make a bench from a reel.
Procedure:
- Trim both bases of the coil from the bottom to create a flat edge (this part of the bench stand will rest on the ground).
- In the upper part, draw the border of the armrest, cut along the contour.
- Sand the resulting bench posts well, coat them with antiseptic and stain.
- Cut the pallet in half.
- On both racks, fasten with self-tapping screws 2 support bars in pairs horizontally (the seat will rest on them) and 2 at an angle of 45° (to fix the backrest).
- Fill the seat and backrest from the pallet with planks tightly cut to the same size.
- Sand, coat with antiseptic and stain.
- In the racks, using the bars as a guide, drill holes for the bolts. Screw the seat and backrest to one post, then, placing the post with the backrest and seat vertically, screw the second post.
- At the same time, secure the seat to the horizontal bars with self-tapping screws, and the back to the bars at an angle.
- For reliability, the seat and backrest can be tightened together with corners.
The bench is ready, all that remains is to paint it with varnish or paint. On the seat you can put soft pillows made from the same fabric as the top of the ottoman. This set will be an excellent decoration for the summer area of your summer cottage.
Life hack 4: flower stand
For this purpose, the best starting material is plastic cable reels. They are absolutely not afraid of moisture, are easy to clean and feel good outdoors. The most important thing is that you don’t have to do anything.
The coil is placed on one of the bases. Flowers in pots can be placed on the top and bottom. White plastic reels installed on both sides of the entrance to a country house can be an alternative to a flower bed. Line both bases of the coils with indoor plants with large green foliage for a neat flower bed. The lower base can be placed on legs. This will further give the reel the appearance of a stand.
A cable reel makes a good TV stand, bedside table or drink bar. If you place a sun umbrella in the center of the coil, you will get an excellent option for a summer table. With your imagination, you can find many options for using these products. The only thing left to do is find a cable reel somewhere and bring your creative ideas to life.
How to decorate a tabletop
The simplest option is to varnish or paint the same color. You can use different colors for the top, counter and base, or divide the tabletop into several sectors and paint them alternating 2 or more colors. More complex options:
- hand painting;
- drawing a picture with a sponge through a stencil. You can buy a ready-made stencil or make it yourself by sticking several strips of masking tape on the table and carefully cutting out the design with a stationery knife;
- mosaic decoration;
- finishing using decoupage technique.
If the fasteners connecting the parts of the coil are not hidden from view, you can play with it and make it an element of the design that is applied to the tabletop.
If the parts are connected in secret, but there are holes left from the old fasteners, they can be closed with decorative plugs or expanded and installed in them are vases with flowers and napkin cups. The central hole is often used to install a beach umbrella.
Soft bun
It’s easy to make such a toy - just using yellow threads (preferably knitting), a balloon and glue.
- Liquid wallpaper. What do they need?
- Nickel-cadmium batteries. What do you need to know about them?
- Bathroom tiles. What is it like?
First, you need to wrap the inflated balloon with threads, after passing them through a jar of glue.
After the glue has dried, pierce the ball with a needle and pull out the remains from the inside. Additionally, glue the necessary parts of the face Kolobok - eyes, mouth and nose.
That's all, the craft from knitting threads is ready.
Coil processing
The wood from which the cable reel is made may be dirty, damaged, or rough. First of all, you need to eliminate all these defects; to do this, it is more convenient to disassemble the reel, unscrew the nuts and remove the studs with which the sidewalls are connected to the drum. Wipe off dust and dirt with a rag, or use a vacuum cleaner. If you have a grinder, all parts are processed using it. If you don't have a tool, you'll have to tinker with sanding the wood by hand.
Large chips and dents that cannot be removed by sanding are best repaired with wood putty. Treating the wood with a protective impregnation - antiseptic, fire retardant - will not harm the wood. After preliminary measures, the parts are painted, stained or varnished. Now you can collect the parts and stop there. But if you want to make your table original, exclusive, you can give free rein to your imagination and work a little more.
If your interior is designed in a rustic or loft style, cracks, chips, and roughness do not need to be removed, just clean the coil of dirt. Studs and nuts peeking out from the tabletop would also be quite appropriate in this case.
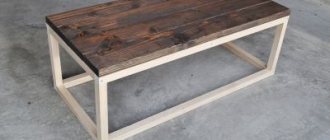
Table made from cable reels or handmade and no fraud
Wooden drums intended for transporting electrical cables and wires have been produced in our country according to GOST since back in 1979, many of us were not yet involved in the project. For the manufacture of these devices, coniferous and deciduous wood of not the lowest grade is used, and the diameter of the drum cheeks varies from 50 cm to 3 m. Agree, these are useful on the farm. Of course, finding an ownerless reel is a great success, but if you are lucky enough, do not pass by, it will definitely come in handy if you are the happy owner of a country house or have a dacha. We'll tell you how to make a great table from a cable reel, and also share some interesting ideas for decorating it.
The process of making a table with your own hands
In principle, you don’t need to do anything, just place the cable transporter on one cheek and the table is ready. However, such a piece of furniture is not suitable for use at home, and on the open terrace by next summer it will look very deplorable, because it is made of natural untreated wood.
In order for a table made from a cable reel to fit perfectly into the interior of your home, have a bright personality and delight you and your guests for a long time, you need to work a little.
To create a table you will need to do the following:
- Use a stiff-bristled brush to remove dirt and debris from the surface.
- Disassemble the coil into individual boards. Internal surfaces also need to be treated, thus preventing the wood from rotting and being damaged by insects.
- Sand each board thoroughly with a sander or sandpaper.
- Treat the material with a special antiseptic impregnation. Modern means make it possible to extend the life of wooden products for quite a long time.
- Apply the stain of your desired shade. This will give the wood a richer color, emphasize its structure and create the effect of noble wood. Instead of stain, you can apply paint if the interior of the future location of the reel table requires it.
- After the stain has dried, coat the boards with varnish. It is advisable to apply 2 layers.
- Reassemble the structure to its original form.
- To make it easier to move such a table, you can screw several wheels for furniture or even for carts from below (they are stronger and can withstand more weight than furniture ones).
Advice! If desired, the lower cheek of the reel can be slightly modified.
Now the table is definitely ready. It’s no longer a shame to show such a piece of furniture to friends by placing it in the very center of the living room. What if you decorate it a little or even modify it?
Decor options
The first thing that comes to mind to decorate such a table is to use a simple jute rope to tightly wrap the base of the reel.
It is possible to mount several metal rods between the inner surfaces of the drum cheeks. Kitchen rails, which are attached using flange holders, can act as rods. Such accessories can be purchased at any hardware store.
If you decide to use such a table outdoors, then simply install a large umbrella in the central hole of the coil and you already have a summer barbecue area; all that remains is to add suitable seating areas to the area. It would be good if they were made from similar materials.
The table surface can be covered with a glass lid. This tabletop can be made to order. It will protect delicate wood from damage and will certainly decorate your table. Perhaps a huge number of options from simple transparent to glass decorated with incredible sandblasted designs and stained glass.
And the reel base can also be put to good use. For example, to organize a minibar to store a bottle of your favorite wine. Or maybe just your hiding place.
So, now you know how to turn a table from a simple cable reel (which is usually disposed of as unnecessary) with your own hands into a source of pride for the owner and a central element of the interior of your home. By the way, from a cable reel you can make not only a table, but also many other equally useful and beautiful things.
Bedroom table
- Select cable bay without damage
- Cut off the edges of the round cheeks with a jigsaw, give the shape of a rectangle, polyhedron, in other words, asymmetric
- Sand and smooth out dents and scratches using corrective furniture wax
- Repeat sanding in anticipation of a flawless surface with a pronounced wood grain
- Tint with stain of any color or paint it differently
- If you need to keep the surface matte, as it is also called, apply several layers of varnish
- Close the holes with decorative plugs or expand them for a flower vase, a night light, as it is also called, built-in LED lighting
A low side at the base and 3-4 partitions will allow you to place several bottles and glasses at the bottom of the book.
Stripper manufacturing procedure
A small semicircular recess is marked on one of the bars and then cut out with a jigsaw.
Then the wooden blocks are glued together so that there are pre-prepared wooden spacers between them.
On the outside, all edges of the wooden block are sanded so that they are free from chips, splinters and burrs.
A hole is drilled on one side of the glued block. The blade of the knife is inserted into the gap between the bars so that the hole on it coincides with the hole drilled in the wood. After this, it is secured inside the wooden part using a regular screw and nut.
At the other end of the wooden block, a hole is drilled for a rivet, which should be installed so that it prevents the blade from completely sinking into the internal cavity of the future tool.
On the second block, on which there is no notch, holes of various diameters are first marked and then drilled.
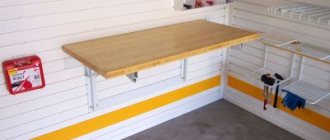
Lifehack 3: drum for storing a watering hose
Along with wooden reels, cable manufacturers also use metal analogues. A metal cable reel can be an excellent device for storing a watering hose.
Storage space can be organized in two ways:
- Place the metal coil on the support.
- Hang it on one of the walls of the utility room.
This device will ensure the safety of the hose and extend its service life.
What will you need for the job?
The coil design is practically finished furniture. But, of course, it needs to be supplemented and decorated.
The presented project uses the following:
- thick, smooth, durable boards to create a tabletop;
- tin ceiling tiles with a convex pattern;
- wood glue;
- staples and staple gun;
- electric jigsaw;
- router;
- tinting impregnation;
- chalk paint;
- polyacrylic varnish;
- stencils for applying inscriptions.
Also in the presented project, the table was supplemented with a homemade wooden holder for a wine bottle. This addition looks very original, but there is no particular need for its implementation. Even without such a holder, the table looks luxurious.
Coil processing
The cable coils themselves are durable and do not have serious mechanical damage after use. Some defects can be removed using a sander.
When preparing the coil, pay attention to the vertical post. Winding the cable tightly may leave imprints on the wooden surface, which will also have to be removed with a sander.
What can you do with the base?
Depending on the condition of the boards, the reel for assembling the table can be used entirely or in parts. For example, from the upper or lower circle, as shown in the photo, you can get good furniture, just screw several stable supports around the perimeter.
If the reel is in generally good condition and the structure is stable, it can be used entirely without disassembling it. That is, it is enough to sink the mounting bolts into the wood, grind the parts and apply a paint coating that will give the product a finished look.
How to decorate a tabletop
The appearance of finished furniture largely depends on the manufacturing technology and the finishing method. Despite the simplicity, utilitarianism and external similarity of tables made from cable coils, there are many options for their decorative design. Along with simple finishing options that involve regular painting, there are design ideas that can literally transform furniture, making it a piece of art.
| Illustrations | Design option and description |
| Coloring . Simply paint the reel in one or more colors with oil paint or enamel. This design option is modest, but simple and cheap to implement. | |
| Wrapping with decorative cord . Simply wrap a cord around the vertical stand and an unusual decorative effect will be achieved. | |
| Table top designed to look like brickwork . Board fragments of equal length and width are nailed to the base of the bay. To make it more similar to brickwork, the wooden rectangles are mounted with some offset relative to each other. | |
| Imitation of parquet boards . As in the previous example, here the tabletop decor is made with rectangular fragments of lumber. In this case, plywood rectangles placed in a spaced pattern are used for decoration. | |
| Imitation of parquet laid in a herringbone pattern . The surface of the table top is divided in half and the planks are laid in a herringbone pattern along the center line. | |
| Mosaic . The surface of wooden furniture can be finished with mosaic tiles, especially since the range of such materials in hardware stores is wide. | |
| Application from wood slices . If you are a gardener or summer resident, do not rush to throw away tree branches after pruning. By cutting branches into 10 mm thick disks, you can prepare original and free material for decoration. Prepared wooden disks are attached in an orderly or random manner with glue across the entire tabletop. Next, the surface is leveled. The prepared countertop is filled with epoxy resin. | |
| Hand clock . And finally, if there is a base of the bay, but you don’t know what to do with it, try building a clock. The hands and mechanism can be removed from ordinary inexpensive watches, but the numbers will have to be cut out of plywood. If you do not use the second hand, the tabletop can be used for its intended purpose, that is, as a small coffee table with a constant reminder of the transience of time. |
Original options for using the table
How and where to use furniture made from wooden coils? Many believe that the only area of application for such crafts is a place to relax in a garden plot. In fact, this is not so, and a properly made and decorated table can be used not only in the country, but also in the interior of a city apartment.
I suggest you familiarize yourself with interesting options for using homemade tables.
Description of materials
They are used depending on the location and shape of the table.
Plywood, chipboard, MDF
This sheet material is used in the manufacture of countertops. Integrity is the main advantage of the material. Using a jigsaw, you can cut out a tabletop that is ready for use. Only on the cut edges you need to stick a special tape. A table made from this material is light in weight, which allows the tabletop to easily recline.
When choosing one of these materials, plywood deserves more consideration. Especially laminated and moisture resistant. It has a long service life compared to others.
Natural wood
This is an environmentally friendly, elegant, stylish, fairly durable material. When using it to make a table, two conditions must be met:
- the right type of wood
- the presence of special equipment due to complex manufacturing technology.
These factors affect the cost of the product, even if you make it yourself. If you have your own hand router, or at least a jigsaw and a wooden board, you can easily build a wall-mounted kitchen table.
Glass
Thick tempered glass is used for tabletops.
This type of countertops must be ordered separately, since this material will not be cut at home. It is used extremely rarely.
The choice of material is influenced by the location where the built-in table will be installed. Made from wood or glass, it will look different when installed separately from other pieces of furniture. MDF, chipboard and plywood are considered universal materials.
The shapes of countertops can be very diverse, but the most popular are square, rectangular, round and semicircular.
An electric jigsaw is used to cut the selected material into the required shape. The edges are processed with a sanding machine and covered with a special tape to give it a marketable appearance.
DIY cable reel table: step-by-step assembly
A table made from a reel looks very beautiful and stylish. Moreover, this design requires a minimum of tools and materials. You can also save time and effort.
Several constructive ideas under the motto “We will not allow littering of our native spaces!”
DIY table and benches for your garden
Basic principles for converting cable reels:
- Disassemble the reel, clean it from dust with a brush or vacuum cleaner
- Sand the faces with sandpaper or a sander
- Before painting, treat garden furniture with impregnation to prevent moisture, mold and insects.
- Replace damaged parts
- Assembly is carried out using wooden and metal fasteners
Features of a DIY reel table
The peculiarity of this design is that you do not have to create a preliminary design and cut out parts from the material. This will save a lot of time. There are several ways to make a table based on a coil:
- Place the reel on the floor. First, the room is cleared of dirt and debris. There is no need to do any additional steps. The design will look a little rough (due to the presence of cracks and scratches on the surface). But it will fit well into the interior of the room.
- You can also paint and varnish such a table. We do the same as in the previous step, having first painted the structure. Then it needs to be varnished. This will give a new and aesthetic appearance.
- Cover the table with mosaics or do decoupage. These types of decorations will make the table very beautiful. Anything is suitable for mosaic and decoupage, depending on your imagination.
- You can make a tabletop. This method requires more steps. It is necessary to cut out the top part of the coil. This will be our tabletop. Then the legs are attached to it. You can place round glass on the tabletop (its size is equal to the size of the tabletop). It looks very nice.
- If the coil has a small height but a large width, this is an ideal basis for creating a book or coffee table. Books can be stored between the top and bottom. And on the top part put items needed in everyday life. Very often, wheels are mounted on such a structure so that it can be moved.
- Table-sink for a summer residence. Another great idea is to make a sink. To do this, you need to run a water supply to the coil, and cut out places for the tap and sink. Such tables are good for washing vegetables and fruits, but you can also wash your hands.
Reference! You can make a table for changing baby's diapers. The process of changing diapers will be carried out on the surface, and diapers can be stored between the bottom and top.
Round table made from cable drum step by step
See how to make a stylish round cable spool table with our step-by-step instructions.
STEP I - Preparing the cable reel:
The coil must be sanded and finished to a smooth surface. You can do this with sandpaper or a sander.
STEP II - Painting the garden table:
After sanding, you can coat the spool with acrylic paint or varnish.
STEP III - Installing the rollers on the table from the bobbin:
Turn the reel upside down and install four furniture wheels with locks. Now the large round table will be easier to move. And the locks on the wheels will allow you to fix it in a stationary position.
Final result for the round table presentation:
Here's the final result. Feel free to invite friends to drink cool lemonade in the shade under an umbrella at a round table.
Other cable drum garden furniture ideas:
Wooden cable drum in a household plot:
Garden rocking chair made from cable reel:
Visual overview of 3D sectional models of houses and cottages to analyze the layout of rooms.
Decoupage table top
Paint the lid strictly along the perimeter, without affecting the top plane, or make an edge from cord, veneer, or metal.
Degrease the surface of the tabletop, apply decoupage glue or PVA and apply cut-out decor from fabric or thin paper with a pattern. Smooth out, expelling air bubbles.
This way you can refine the item as a whole. Metal or wooden legs will add lightness to the table.
Original options for using the table
A table made from a reel with your own hands can be supplemented with a number of parts and used for various purposes. Options:
- mini bar;
- barbecue;
- computer desk;
- table with sink.
You can cut out part of the drum and hang it on hinges, turning it into a door, and keep bottles inside. Another option is to widen the central hole so that an ice bucket fits into it, and place the bulk of the bottles on the lower base. To use it as a barbecue, just cut a hole of a suitable diameter in the center of the tabletop and install the barbecue bowl in it. Treating wood with fire retardants is mandatory!
To work at a computer, just screw a couple of boards with guides to the bottom of the table top and install a shelf under the keyboard. And if you cut the coil into segments and additionally use timber, you can make a more complex multi-tiered structure, as in the photo.
The most difficult option is a table with a sink. It’s easy to embed a small sink into a table top; it’s more difficult to connect a flexible hose to the tap for water supply, or mount a drain pipe under the sink. But if you have experience organizing water supply and sanitation at your dacha, this is not a problem. It is better to hide communications inside the drum as much as possible. Under the table cover, not far from the sink, you can attach a towel holder, and on top make room for a soap dish and other hygiene items.
Tables and tables are made from coils of different diameters, so you can get a small coffee table, a flower stand, a full-fledged dining table and many other products. If the table will be used indoors, you can attach furniture casters to the bottom to make it easier to move. In general, the possibilities of using old wooden spools are not limited to making tables. If you have many reels of different sizes at your disposal, the round table can be equipped with original chairs.
From a large reel of cables you can make an original and interesting table with a designer print on the tabletop. How exactly, watch and read in the given master class.
Materials
To make a table from a cable reel with your own hands, prepare:
- the coil itself;
- rope;
- oil for wooden products;
- rags;
- paint;
- wood varnish, transparent;
- pencil;
- brushes;
- roulette;
- ruler;
- jigsaw;
- drill;
- stationery knife;
- saw, jigsaw or other tool for cutting wood.
Step 1
. We will make the base of the table from a coil in the shape of a cross. To do this, you should draw the expected shape on one of its sides. Be sure to check the accuracy of the calculations and make sure the proportions of the resulting base template are correct.
Step 2
. Trim off any excess on the base of the future table, following the outlined lines.
Step 3. Prepare sandpaper or sanding attachments of different grits. Sand all surfaces of the reel. You can treat the base with rough paper, but you will need to work more carefully with the tabletop. First, use 80-grit paper to process it, then change it to copies with lower grain, up to 240
This is important, since the surface must be perfectly smooth, but the texture of the wood must be preserved
Step 4
. Wipe the entire reel completely with a dry cloth, clearing it of working dust and debris. Afterwards, cover its lower part and tabletop with a transparent special oil for wood. Rub everything and leave everything until the surface is completely dry.
Step 5
. Drill a hole in the reel stand at the very base of the tabletop for the rope. Thread it in, bring it out through the hole at the top and, after tying a knot, pull the rope back.
Wrap it around the counter. Make the turns tight. Slightly short of the base, fix the rope in the same way.
Step 6
. If you also want to print on the tabletop, use a stencil for painting. You can buy it ready-made, order it, or make it yourself. In this case, it was made by hand. To do this, the tabletop was sealed with strips of masking tape. Afterwards, an outline drawing was drawn on it. Cutting it out is not an easy task. To do this, you need a utility knife, care not to damage the tabletop, and patience.
Step 7
. Paint the tabletop using a stencil. Apply matching paint to the table leg.
New Year decoration
On the eve of the New Year, everyone buys a bunch of decorations for their home. To save money, make them yourself.
A small Christmas tree made of woolen threads is well suited for a child's room. Just take some construction paper and roll it into a cone shape. Cover with glue and wrap tightly with yarn. Attach buttons, sequins, etc. as decoration.