If you have just recently purchased your first tablet in your life, then of course you will encounter a number of difficulties. To sit down, pick up a stylus and immediately create a masterpiece is unrealistic for a beginner. It takes practice, a lot of practice.
Below we have prepared exercises for you that will speed up your hand getting used to the graphics tablet. Some of the tasks are meditative in nature, which has a beneficial effect on the brain, allowing it to relax and relieve stress.
For your convenience, we have placed png files (size - 5000x3000 pixels) of the exercises themselves, which you can download and practice. And also examples that you can rely on.
Exercise No. 2
Draw horizontal lines:
- without shape dynamics and without shift
- with shape dynamics and without shift
The first two tasks are standard and quite simple at first glance. But in reality it is not so easy to draw a straight line. And working with the dynamics of shape is even more difficult. Try to create a line so that it is as thin as possible at one end and as thick as possible at the other.
Making a tablet from a laptop
Making a tablet out of a laptop has been my long-time desire. Inspired by the materials I dug up online, I got to work. Let’s find out what came out of this idea under the cut. If you want, we can make one for ourselves. I immediately apologize for the low quality of some photos - I forgot to take them during work, I had to be content with what I had.
At that time, it was absolutely impossible to bring my idea to life - laptops cost a lot of money, and no one would let me take them apart. Now it’s easier with this, I’ve been fiddling with iron to one degree or another for many years and somehow a very decent amount has accumulated around it, there’s plenty to choose from.
In general, I perfectly understood that this would be a device for home use, because such a brick box in a bag is not very easy to carry around with you. In principle, this was not required, because An additional incentive to create this tablet was my mother's need for a large touch screen for her drawing preparation work.
About touch screens (Touch screens)
At the moment, there are mainly three types of touch screens available to the average user: resistive, infrared and capacitive. You can search on foreign sites using the queries “USB touchscreen kit”. However, such screens can also be purchased from our offices that supply spare parts for terminals. For those interested in technical details, click here.
- Resistive screens
consist of two conductive layers, insulated from each other by microscopic dielectric balls. When you press on the screen, the top layer is pressed through and is point-locked to the bottom layer. Based on the resulting electrical resistance, the controller calculates the coordinates of the press. This type of screen is the cheapest and is available as an inexpensive option for experimentation. The downside is that a relatively strong pressure is required for the click to be registered. It is quite possible to work with your finger, but to increase the accuracy of the hit, it is still better to use some kind of stylus. - Infrared screens
are a frame with infrared LEDs fixed in it on one side and phototransistors on the opposite side. When an object touches the screen, it blocks the LED beam for the corresponding phototransistor and the controller calculates the coordinates of the click. This allows the screen to be completely indifferent to what is being pressed - a stylus, a hand, a pencil, anything, as long as it is thick enough to block the LED beam. The advantages are high transparency and durability. The disadvantages are sensitivity to dirt, and slightly worse accuracy in determining coordinates. The cost is average. - Capacitive screens
are based on measuring the amount of current leakage when touched by a finger or other conductive object. The downside is the need to use conductive objects to work with such a screen. They are very convenient to work with, but the cost of such screens is high, and, in my opinion, they are not very suitable for our low-budget experiments.
Choosing a victim
In fact, the model of the original laptop does not really matter, except for a couple of points.
Firstly, the aspect ratio and dimensions of the screen must correspond to the touch glass models available in your city, which were described above. Secondly, it’s better to take something other than the same old stuff that I took for the experiment - then you can also work on what you get. Initially, the donor was supposed to be a Samsung laptop found at work. After I took it apart to estimate its appearance, it turned out that it couldn’t see the USB point-blank – the south bridge had died. Well, this is my own fault - it would be nice to check this before disassembling. The photographs were not preserved in their original form, so here is a photo in the form of a sandwich:
The first donor for the future tablet
After this unfortunate discovery, a battered old Acer Aspire 3610 laptop, bought for pennies somewhere in the dark catacombs of the Mitinsky radio market, was taken as the basis. Like all models in this series, by that time it had “wonderful” broken hinges of the top cover, filled with a thick layer of epoxy resin by the previous owner and broken again.
View of the laptop before work began
Changing the filling
Some configurations of this model are equipped with a Wi-Fi module, but in my case it was not there, and with a clear conscience I twisted the adapter from the above-described Samsung along with the antennas. The antennas were placed on the right side inside the case, and the wires to them were routed directly along the laptop board and glued with double-sided tape in several places so as not to interfere with assembly.
Installed Wi-Fi adapter
My kit included a Bluetooth adapter, but it was immediately mercilessly thrown away as it was completely unnecessary. In this model, it is possible to increase the processor clock frequency by inserting a jumper into its socket, but I decided not to tempt fate and not conduct such experiments. I didn’t want to buy a third laptop for this purpose. The DVD drive along with the PCMCIA slot housing was removed as unnecessary and in order to lighten the weight of the structure.
Modifying the motherboard
Initially, I wanted to move the buttons and indicators to the end of the tablet, and even made a board and adapter for all this stuff, but in the process of working on the walls of the case, I realized that this would unnecessarily complicate the assembly process, and decided not to stretch the already lengthy experiment. It was decided to throw away the Bluetooth adapter and use its power button to control the tablet's power. In fact, the changes are not at all difficult, and for this model this can be done by a person with at least some soldering skills. At the bottom of the board there are Bluetooth and WiFi control buttons. We select the button labeled “blue2” or similar, and mercilessly cut this path. It is quite simple to determine: the button has four legs, three of them are connected to the “ground”, i.e. with a large solid area on the board, and one with this very track.
Disabling the Bluetooth button
Next we need to connect the standard power button with our new button. Determining the required contact is also easy: two of the four contacts are connected to ground, and the two opposite ones are connected to another track. We take any thin wire and solder its ends to the found contacts on both buttons.
Standard power button
New power button
We solder the touch screen controller cable to any unnecessary USB port. They will have to sacrifice and seal it on the outside with epoxy. You can unsolder one of the connectors, or you can simply solder to its contacts. I warn you right away: it is not recommended to desolder the connector without experience in such an action - it is quite difficult and there is a chance of damaging nearby elements of the motherboard. It is much easier to solder to the contacts. By the way, you can solder not the controller cable, but a small USB hub and plug the controller into it. We'll get several additional ports inside the laptop.
Body work
This is, without a doubt, the most tedious and dirty part of the job. All that was left of the entire case was the back cover, the inner frame of the display and a piece of the upper inner cover (the one in which the keyboard is attached).
Leave only a small piece of the lid
The walls were drawn out manually using epoxy plasticine. Like this:
Epoxy plasticine
Working with it is very simple: cut off a piece and knead it thoroughly with gloved fingers moistened with water. It is important to mix it thoroughly until the color is uniform. Plasticine heats up quickly and remains very plastic for some time. I recommend not cutting off a piece more than 2cm long, since this amount may be too much for one wall, and hastily molding it somewhere so as not to spoil is not a good idea. It’s better not to rush - the quality will be better.
The general technology for forming walls is as follows: we take a fairly long plate (for example, a ruler), cover it with wide tape so that the plasticine does not stick to it, and form a flat wall in the desired location of the body. Once the plasticine has hardened, the ruler is easily separated from the epoxy and leaves an excellent, smooth surface.
Body wall made of epoxy plasticine, view of the internal rough side.
Please note: in order to get an even line between the top and bottom covers, I traced the side walls on the already assembled tablet, and then sawed it lengthwise with a thin circular saw on a drill. The result was a thin, neat gap, like on factory plastic.
To attach the lid, I used a trick - I made new mounting legs to fit my holes. The technology is as follows: we take a sheet of paper, fold it on a pencil, cut it to the desired length, fill it with liquid two-component epoxy, and press it to the desired location. This results in a column like this:
Blank for display mounting leg
After curing, we drill into the top of the post and glue (with the same liquid epoxy) into it the nut that was broken out of the lid or body fastening. Actually, all the screws are wrapped in such nuts; they can be picked out a lot from the original case.
Display mounting leg with embedded nut
The display is attached to the frame using the same technology, only the nuts are glued directly onto the display frame. The display module is now a frame-touchscreen-display stack. Those. We simply place the touchscreen close to the display and tighten it to the frame with screws using the standard fasteners.
Attaching the display to the frame
We lay Wi-Fi antennas as free space allows. I didn't bother too much with the placement of the antennas, but the signal quality did not deteriorate. It’s the same with the touchscreen control unit – it doesn’t care where it’s located.
Mounting a Wi-Fi antenna and a view of an epoxy plasticine wall
The cable and inverter can be routed like this, you don’t have to solder them and nothing gets in the way anywhere:
New cable and inverter gasket
Touch Screen Controller
Let's shine
Sanding all this stuff was a hassle and brought a lot of acrylic dust into my room, but it was worth it. I used regular acrylic putty (even on wood, in my opinion) in white and simple matte black paint from a spray can. The work is not very difficult, but it requires accuracy and some patience. I had so much fun the first time and everything went well. I don’t have any photographs of the process, since there was no way to take pictures with dirty hands, and somehow I didn’t think of asking someone in the heat of the battle with putty.
We strive for excellence
The scope for imagination is limited only by your perseverance and budget. Of course, it was possible to find a faster processor, since the socket allows it, and insert a small SSD drive to speed up the system, but the tablet turned out to be quite pleasant anyway. A capacitive touchscreen would have made working with the tablet even more enjoyable, but its price put me off right away.
operating system
I immediately chose Windows XP Tablet Edition as the operating system, so as not to think about specific tablet features and not experience performance problems. You can install Windows 7 on this platform, but it will be very, very slow. By the way, I successfully installed xUbuntu and even Android from the Android x86 project on it! Tablet drivers for Linux and Windows (and even MacOS, it seems) are included on the disc included with the touchscreen.
results
A little TV
They even made a report about my tablet on the Podmoskovye channel. Of course, there are plenty of blunders like “threw away the motherboard,” but this is not a technical program, but an entertaining one, so I think the editors can forgive them (the blunders).
Exercise #4
Drawing geometric shapes:
- square (rectangle)
- circle (ellipse)
- triangle (trapezoid)
Another basic useful exercise. It's no secret that all the objects around us consist of geometric bodies. If you practice drawing them from time to time, this will have a beneficial effect on your future skills.
Usage
As for the application, it is clear that the ideal “information carrier” is a sheet with a drawing on only one side:
Examples of brightness gradation (from lowest to highest):
The important point, of course, is how well the sheet is pressed to the board and the “carrier”:
There is more than enough brightness, even to highlight images painted with paint (for example, gouache, which is quite saturated and “heavy” in light):
And, also, thick paper advertising brochures:
But with sheets with a double-sided pattern it’s more difficult; here you need to turn on the H-factor, and also “play” with brightness in order to separate the flies from the cutlets, the image of the outside of the sheet from what’s on the back side:
The thickness of the board (thin) allows it to be used with book sheets:
By adjusting the brightness of the backlight, you can achieve a clearer illumination of the “upper” pattern:
Transfer process:
“Arts” (mine):
Exercise #5
Drawing wavy lines:
- without shape dynamics and without opacity enabled
- with shape dynamics and without opacity enabled
- without shape dynamics and with opacity enabled
- with shape dynamics and opacity enabled
As a rule, trainees like training with wavy lines more than with straight ones. And it is an excellent way to practice both the dynamics of the shape and the pressure of the pen.
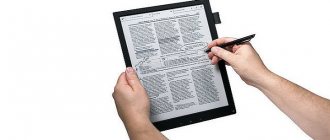
Stylus
The tablet's flat touchpad is pressure sensitive. Control is carried out using a stylus (digital pen), which will allow you to draw even the smallest details with high precision. Modern digital pens are mainly produced in a wireless version. They are easy to use and have higher sensitivity.
The digital pen is equipped with advanced functionality:
- pressure sensitivity to vary line thickness or color density;
- electronic eraser;
- programmable buttons with different modes.
We've sorted out the outer shell and tools, now let's look at some of the characteristics of the device.
Exercise #6
Hatching inside the figure:
- from right to left from top to bottom (without shape dynamics)
- from left to right from top to bottom (without shape dynamics)
- cross (without shape dynamics)
- from right to left from top to bottom (with shape dynamics enabled)
- from left to right from top to bottom (with shape dynamics enabled)
- cross (with shape dynamics enabled)
This exercise is similar to the first two, but the only difference is that now the line must be drawn at an angle.
Connect and test your Raspberry Pi Touchscreen
Connecting your Raspberry Pi 3 to an official touchscreen is surprisingly easy.
The video above illustrates the basic connection process. It's worth checking this out before you assemble the tablet so you're familiar with it. You may even want to take the time to install one of the Android versions first, just to make sure everything works.
Take a moment to turn off and disconnect the Pi and its display before proceeding.
Exercise No. 7
Working with filling out the form:
- bubbles
- waves
- curls
- lightning
- converging and diverging lines
- continuous line
This exercise is perfect after a hard day at work. It will not only relax you, but will also greatly improve your skills.
Two Android options on Raspberry Pi 3
While you can run multiple versions of Android on your Raspberry Pi, you'll need one that's touchscreen compatible. There are two key Android builds worth considering.
LineageOS 8
The best option for this project is Raspberry Pi version LineageOS 15.1. Based on Android 8.1.0, it is not the latest version, but it has better support for the official Raspberry Pi touchscreen.
LineageOS 8 is an open source project that offers a good Android experience. Note that it does have some drawbacks: Bluetooth doesn't work on 3B+ and you may have problems with Netflix. Most games should work, but not at 1080p.
Download: LineageOS 8
EmteriaOS
Surprisingly, there are other versions of Android available for Raspberry Pi. One that you might consider is EmteriaOS. It's available for free or with a single device license for €19. If that sounds good, note that the free option has pop-ups and a forced reboot every eight hours.
EmteriaOS comes with its own installation tool.
Download: EmteriaOS (registration required)
Exercise #9
Ruled training
A graphics tablet is created not only for drawing on it. You can also use it for writing.
Writing by hand itself is very useful: we develop motor skills, remember information better and develop thinking.
Writing on a graphics tablet is also useful because you quickly get used to this “scary” device. After all, now you are performing your usual actions, which means there is nothing to be afraid of. Get into the habit of writing, for example, a quatrain on your tablet once a day.
How to stretch paper onto a tablet using PVA glue
To attach the paper canvas to the frame you will need PVA glue, a glass of water and a sheet of paper of a suitable size and quality. To paint with honey paints, buy special watercolor canvases. For pencil drawing, use regular Whatman paper.
Important! When planning to stretch the paper when using PVA glue, under no circumstances coat the entire surface of the tablet with it. Glue is applied only to the wooden frame, otherwise both the stand and the paper will be damaged.