To decorate your own garden, you can make a wooden wheel with your own hands. In this publication, I will tell you how, without much difficulty and a large amount of materials, you can achieve a beautiful homemade product that will become one of the main components of the flower bed on the site.
Source drive2.ru
DIY WOODEN WHEEL
Let's start with making the hub.
This is the most complex element of the product. Only a very experienced master can do it at home. We took a simple route: we took a wooden block measuring 10 by 10 cm, 60 cm long, and went to a turner. It’s good that there are still people with this profession. From this block we turned out 6 round blanks, similar to hockey pucks, with a diameter of 9.5 cm and a width of 8 cm. A hole with a diameter of 5 cm was drilled inside - the hub is ready. Of course, this is just a decorative hub - in order to put it on the axle, you would have to grind out special protrusions. But there was no such goal; the wooden wheel was needed to decorate the site. At the next stage, we made a life-size drawing of a wooden wheel. The size of the hub was transferred to graph paper, the diameter of the product was determined to be 60 cm, the number of knitting needles was chosen to be 8. We drew everything on paper and measured the dimensions of the resulting parts.
Let's start making knitting needles. In the drawing they turned out to be equal to 19 cm. Let's take a wooden block measuring 5 by 5 cm and cut 8 pieces of 23 cm long from it. We will leave two cm on each side for dowels, with the help of which we will connect the spoke to the hub and jamb of the wheel. We process the bars with a plane, giving them a marketable appearance.
Now let's make dowels on the knitting needles. On each side of the block, mark 2 cm and use a hacksaw to make 1.5 cm cuts. Using a sharp knife, cut off the excess wood and form cylindrical protrusions with a diameter of 2 cm.
To give the wooden wheel at least some design, we will process the spokes with a milling machine. Secure the block to the stool using a clamp and cut off the edges on four sides.
The next step is the manufacture of the so-called wooden wheel jambs. According to the drawing, we will have 8 of them. Take a white sheet of paper and transfer the drawing of one joint onto it. This will be the template.
Let's select a board 5 cm thick. The width of the board should be no less than the length of the jamb. We attach the sheet with the drawing to the board and trace the drawing with a pencil, applying a little force. You can use carbon paper, but in our case we did without it. Having removed the piece of paper, we trace the outline of the jamb imprinted on the board. Using a jigsaw, carefully cut out 8 pieces and sand them with a grinder.
The jambs have a complex geometric shape; the quality of their manufacture directly affects the appearance of the wooden wheel. Ideally, all 8 pieces should be identical.
Now you need to prepare the jambs for connection with the knitting needles. To do this, in the lower plane of the product, in the center of the intersection of two diagonals, we drill a hole with a diameter of 2 cm and a depth of also 2 cm.
Using a protractor, mark the hub into 8 equal parts and also drill 8 holes with a diameter of 2 cm.
Next we try on the wooden wheel. We insert the spoke into the jamb, then into the hub and connect all the parts together. By swapping elements, you need to ensure that the product looks even and all the parts fit together. At this stage, we carry out the final fine-tuning of the elements: sharpening, filing, drilling.
After making sure that all the parts fit together, we number them so as not to confuse them, and begin assembly. We connect the elements using furniture glue.
To make the wheel strong, we secure the jambs together using furniture dowels. To do this, drill holes in the side edges, insert a dowel into them and connect the parts together.
Slowly, we assemble the wooden wheel. Unfortunately, the lack of experience affected the assembly - the jambs did not close the circle, 2 cm was not enough. Still, when cutting them out, you need to be more precise. I had to cut a wooden wedge to size, coat it with furniture glue and secure it with a clamp for a day.
Next, use a grinding machine to remove all the bulges and make the cart wheel even and smooth. The cracks can be sealed with wood sealant.
The wooden wheel is ready for painting. We first treated our product with black stain, aging it, and finally covered it with two layers of colorless varnish.
To prevent the wheel from drying out over time, we secure it with tin tape, screwing it onto self-tapping screws.
The wooden cart wheel is ready. Let's put it next to the decorative fence. Taking into account the mistakes made, over time you can make a few more pieces with your own hands - there will always be a place for use for them. If you liked the article, share it on social networks.
How to make a wheel with your own hands? Wooden wheel
Modern people who own country houses or summer cottages strive to create a cozy atmosphere in the area adjacent to the house. Personal space is used in different ways: for arranging a garden, flower garden, beds, gazebos. In any case, landscaping the area involves the use of various decorative elements. Such items do not necessarily need to be purchased in a specialty store. You can make a wooden wheel and use it to create a composition.
Such a decoration element can be made not only from wood, but the material can easily be replaced with plastic or iron. It will turn out interesting and extravagant. Read how to make a cart wheel step by step.
Types of decorative carts and their sizes
Decorative carts are divided into three main types depending on dimensions:
- Small ones, no more than a meter long, are suitable for decorating lawns.
- Medium ones, 2–3 meters long, two-, three-, four-wheeled, are installed near a country house, fences, winter gardens, greenhouses, gazebos.
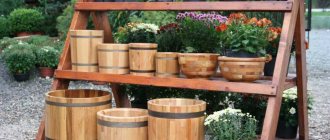
- Large floats starting from three meters in length are suitable for decorating open and prominent places closer to the center of the site. Used as a stationary flower bed. Flowerbed-cart on a summer cottage
Tools and material for making a wheel.
Tools: - Screwdriver or shaped screwdriver - Construction tape (meter) - Circular saw, or jigsaw, or wood saw - Construction angle 90 degrees - Pencil or ballpoint pen - Protractor, regular school one
Material: - Wooden beam - Half sheet of plywood - White wood screws
As you probably understood, in the tool you can use, ideally a circular saw, if not, then a jigsaw, but if you don’t have that, then you can use a hacksaw for wood, it will take a long time, but it’s possible.
Wooden wheel drawing
I hope you don’t have any questions based on the drawing; along the perimeter, all the bars are 37 cm, and the inner spokes of the wheel are 39 cm. During assembly, you may have to shorten the spokes a little, but this is not a fact.
Stages of making a wheel with your own hands
First stage So, the first stage will be to purchase the necessary timber, there are two options, either you buy a ready-made timber of the required size, or you process the timber using a circular saw. In our case, we purchased a ready-made timber measuring 3 meters long, 9 cm wide and 4.5 cm thick; this timber, if cut correctly, is enough for two wheels. Second stage The second stage will be the production of blanks for the wheel body and spokes, let's start with the body, a total of 8 blanks are needed, they must be adjusted to the size - 37 cm long, 4 cm wide and 2 cm
thickness, pay special attention to trimming (sawing off) the lengths, they must be perfect, otherwise the future structure simply will not come together.
We make knitting needles
Now we need to make knitting needles, as you already understood, there should also be 8 pieces, only the size is slightly different - 39 cm long, 2 cm wide and 2 cm thick. You can do one trick with the knitting needles, since they will close and connect into one whole, and then center themselves, then you can cut four knitting needles to 39 cm each, and the remaining four to 37 cm each. This will make it easier to connect.
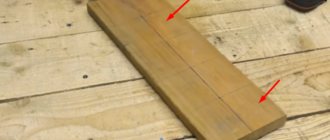
Now we need to cut off the ends of the body for further joining, be careful at this stage. Take one blank and place a mark at one end exactly 1.7 cm (17 mm.)
Do the same procedure on the other side of the workpiece and draw a line from the mark to the corner, it should look like in the photo.
Carefully cut the corners along the marked line, just take your time, these cuts determine how smoothly the workpieces will fit together. We make fasteners We put all the processed parts aside for now and start making fasteners, the material in our case will be a plywood sheet, but you can also use the remains of a wooden beam. In total, you need to make 8 parts for fastening the body, 8 parts for the wheel spokes and one centering part (fasteners for the spokes in the center). The size of the body fastening part is 7 cm on the outer sides and 5 cm on the inner sides, and the cutting angle is exactly 45 degrees. The size of the spoke fastening part is 8 cm long, 2.5 cm wide, look at the photo to see what you should get.
We will do the centering for the spokes by outlining a can of putty in a circle.
We cut it in a circle with a jigsaw and it turns out to be such a beauty. Assembling the body and spokes Now we need to return to the body parts, prepare a flat surface and place all the parts next to each other, corner to corner, if you did everything correctly, then you should end up with a wheel edging like this. If everything fits together, then take the fastening blanks for the body and fasten them with white self-tapping screws.
We screw it around the entire perimeter one by one, preferably clockwise, so as not to get confused.
We divide each part of the body in half and apply it to the middle of the knitting needle, it should turn out like this.
We fasten the knitting needles with fasteners. Well, the final touch will be to tighten the centering to the spokes, thereby securing the entire structure as a whole. We hope that it was not difficult for you to make a wooden wheel with your own hands using these instructions. You can treat the finished surface with varnish, paint, stain, wax or any other method you wish. Photo of the finished product And now you can admire the final photo by capturing the top view.
New life for an old chandelier
Once upon a time we had a chandelier in the kitchen, the most ordinary, unremarkable. When we changed it, my husband put it in his supplies in the hope that someday he would need it again. And this day has come. He used elements from an old ceiling light for a new unusual chandelier. Mounting to the ceiling, a chain as a suspension - everything went into use. My husband disassembled the old chandelier, cleaned the necessary parts and used them in his work.
Making joints
To build a wheel circle, you need to cut out eight arched blanks - jambs. To do this, a paper mock-up is made according to the drawing, and then it is transferred to the workpiece. Parts are cut out according to the marks, which should be equal in shape and size. In their lower part (the inner surface of the future wheel), sockets for spokes are drilled in the center. The diameter and depth of the holes are 20 mm. The nests must be located at the intersection of the diagonals.
Similar sockets are made on the hub along the marks using a protractor. Their number must match, and the size must also be 20 mm.
Caution in operation
- The hygroscopicity of wooden appliances leads to changes in shape and cracking of the surface when exposed to a humid environment. Therefore, it is not recommended to install wooden chandeliers in damp rooms with high humidity, for example, bathrooms and basements.
- The flammability and fire hazard of wooden lamps makes it necessary to provide additional safety measures against fire.
Step-by-step production of a trolley
To make a garden cart at home, you need to prepare the following parts and tools:
- The main material is plastic, wood, sheet iron.
- Fastening mechanisms.
- Wheel pairs.
- Wheel mounting axles.
- Auxiliary accessories: handle, guide structures, stop.
You should also stock up on ready-made drawings, but the design of the device will depend on the chosen model. The entire construction process can be divided into several stages:
- Selecting dimensions and creating a drawing.
- Arrangement of frame installation.
- Chassis installation.
- Handle attachment.
- Arrangement of the main building.
Each stage is performed sequentially, and with reference to the instruction diagram. As a master class, it is worth considering the instructions for creating a wooden cart for gardening.
Dimensions and drawing for trolley
Its stability in further operation depends on the size and shape of the trolley. The wheelbarrow has standard dimensions with the following parameters:
- The diameter should not exceed 60 cm.
- The maximum length of the frame installation is 100-110 cm.
- The height of the body is in the range of 55-60 cm.
Arrangement of frame installation
Previously, wooden blanks are subjected to special treatment: impregnated with antipyretic, antiseptic and antifungal solutions. This step will significantly extend the life of the structure, increase resistance to moisture, and protect against pests. The surfaces can also be further sanded using sandpaper. To fasten the frame, the bars are connected at the joints, using screws and metal corners to further strengthen the installation.
If it is planned to make a frame from metal pipes, you should use a grinder to cut parts and welding to connect the frame. Before further assembly, it is best to coat the product with water-based paint to prevent possible corrosion.
Chassis installation
Rails for bearings are mounted on the lower surface of the future trolley. The rack for one wheel is located along the vertical axis, centering the weight.
For 2 or 4 wheels, parallel wooden strips are used on which the fittings are attached. You can also use a ready-made axle from an old cart. At the same stage, the wheels are attached and the wheelbarrow is tested for troubleshooting.
Handle installation
According to the advice of experts, the handle should be made of a strong iron rod. Experts advise using a bicycle handlebar or a mount from an old scooter. In the technology of the fastening mechanism, the choice remains with the master: to make the handle fixed or foldable on hinges.
Arrangement of the main building
The body is made of durable material that is sufficiently resistant to moisture and mechanical damage. This material is most often a metal sheet. To work, you will need to prepare sheet iron, welding and a grinder.
According to preliminary calculations, metal blanks are cut out, the sharp edges are scalded or ground off. The housing is secured using screws and metal rivets. It is desirable that the case be as sealed as possible, especially if bulk cargo is intended to be transported.
How to treat wood?
According to experts, it is necessary to use only natural compounds, since they evaporate under the influence of heat. The simplest option is to use homemade peppermint oil.
The ingredients are as follows:
- Purified linseed oil - 1 l.
- Mint - 1 glass.
Application:
- Mix the ingredients and leave for 14 days in a dark place, shaking every day.
- Add natural beeswax to the resulting mixture (proportions 1:3, 1:4 or 1:5 are possible) and you will get an excellent mastic for wood made from natural materials.
Important! A less labor-intensive and cheaper option is to use a solution of potassium permanganate as a stain.
How to make a wooden cart wheel with your own hands?
The manufacture of a wheel begins with calculations and a drawing, which can subsequently be cut into patterns, as can be seen in the illustration.
It is necessary to make four identical semicircle patterns and transfer them to a board with a thickness of at least 50 mm.
Next, use a jigsaw to cut out four identical wheel parts.
If there is a need for this, then these parts can be immediately processed on a jointer. This will make it easier to sand the product later.
The next step is to fasten four semicircles into a wheel. To do this, you can use metal beacons and screws. Using metal scissors, you need to cut out several 10 cm rectangles and fasten the semicircles with them. This will be a temporary mount.
Next, you can select the sockets for the spokes. You can also use our drawing to select nests at equal distances from each other. By applying the wheel, we mark this distance. You can select nests with a feather drill of the appropriate diameter, and then trim them with a chisel and mallet. There should be a total of eight nests at the same distance.
Then you can start making the inner circles. They should have the same diameter, but different thicknesses of 30 and 50 mm. You can choose the diameter yourself. To do this, draw a circle on the board with a compass, after which you cut out the parts with a jigsaw.
For wheel spokes, you can use slats 10 mm thick and up to 40 mm wide. Based on the dimensions of the racks, it is necessary to select sockets in the inner part of the wheel.
Gradually unscrewing each of the four semicircles (fastening made of metal beacons), wooden slats are attached to the sockets. They can be immediately placed on glue. The length of the racks will depend on the size of the wheel. The second side of the slats is attached with self-tapping screws to a cut out circle 30 mm thick.
When all eight spokes are fixed, a second circle with a thickness of 50 mm is attached. In the middle of the wheel, a through hole is made in the inner circle - supposedly for the axle. This will add naturalness. The hole can be made using a drill and a 20-25 mm drill bit.
It is important to consider that when unscrewing the metal beacons while attaching the knitting needles, the semicircles are also glued together with PVA glue. After applying glue, you need to temporarily fix the semicircles again with a beacon and self-tapping screws until the glue dries
You can also use clamps for better fastening of parts.
The next stage is polishing the product. Before proceeding to this stage, it is necessary to use small sawdust and glue or wood putty to seal the small gaps between the fasteners. Next you can sand. It is worth noting that not all parts of the wheel can be sanded with a grinder. Some elements will have to be sanded down manually with sandpaper. However, our goal is to eliminate all obvious irregularities. There is no need to thoroughly polish the wheel. This is a garden decoration that will be located outside. Some parts of the wheel can be processed with a milling cutter. For example, the corners of an inner circle of 50 mm can be cut with a shaped cutter attachment.
Next, the wheel is treated with stain. It will be better to use a stain that has special properties against pests so that some insects do not start eating your wheel. Although in some cases this can also bring an aesthetic effect and naturalness. Then the product is varnished, preferably in several layers, for more thorough protection from moisture. The most suitable varnish for this is ship's varnish.
We can immediately say that making this jewelry requires certain skills and the availability of the appropriate tools. However, if you have both, you can not only save a considerable amount of money, but also brag to your friends that you did the job yourself.
You can be sure that this element will perfectly decorate the territory of your summer cottage. He will be able to add zest to the landscape design, especially if it is made in country style. Each of your guests will want to take a photo in front of it. A wooden cart wheel will look great against the background of decorative stone, flower pots or a wicker fence.
What rooms are they suitable for?
Such design solutions will be a great addition to any interior. They will fit well into a decor in the style of classic and avant-garde, loft and country. By the way, wheel-shaped chandeliers are successfully used not only for city apartments and country houses.
Very often they become decorations and functional devices for cafes, bars and restaurants. Owners of establishments with a medieval theme will especially appreciate such products.
However, the interior does not have to be classic or aged. A wheel-shaped chandelier is also perfect for modern, stylish rooms. It emphasizes the originality of the interior and the originality of the owner of the house or establishment.
If you want to add a special touch to your space, be sure to take a closer look at these lighting fixtures.
Of course, you should still take into account the style of the room. Try to understand which lamp is best suited in a particular case. If you have any difficulties with the choice, you can contact professional designers. They will be able to choose exactly what seems ideal to you.
Do it yourself
To make a decorative cart, you need a high-quality drawing and functional tools. All parts of the future wooden cart must have the correct dimensional ratio.
Wheel assembly
Effective assembly of decorative cart wheels involves their manufacture according to the intended drawings.
Making a homemade wooden wheel is easy if you prepare a round craft from plywood and drill a hole in the center for the future cart axle. Or make 2 wooden semicircular elements and combine them.
The most beautiful variation is considered to be decorative wheels equipped with spokes. To make wooden parts, future dimensions of the wheel are marked on a plywood sheet. The middle of the craft is marked with a pencil and a nail is hammered into it.
Then they find a thin wooden strip, which is not inferior in length to the radius of the workpiece, and make 2 cuts in it. A nail is inserted into the central clearing, 5 mm in diameter, and a pencil is inserted into the second, 8 mm in diameter. Using a pencil attached to the rail, draw a circle so that the cart wheel has a natural diameter. The circle is divided into 8 segments.
To make the rim, you need to select wooden blocks that are placed around the circumference. They are connected end to end in the shape of a wheel. To create a smooth transition, you can saw down the blocks placed on the plywood sheet.
When making an axle for a cart, a thick block should be used, on which a circle is drawn and the axle craft is cut out. Now they select the material for the wheel spokes. Knitting needles are easy to make, but can be purchased at a hardware store. The length of the homemade spokes should match the diameter between the rim and the axle of the cart wheel.
The knitting needles are installed in prepared holes with a diameter equal to the diameter of the cuttings. The cuttings are tightly connected to the holes and placed at equal distances.
After manufacturing, the wheel is assembled:
- the handles for the knitting needles are placed with one edge into the drilled holes in the axle;
- the other edge of the spokes is inserted into the holes in the rim;
- the wheel rim segments are lubricated with glue, joined and tightened with a tight belt;
- A press is placed on the cart wheel to prevent the glue from coming apart.
After drying the wheel, complex elements are cleaned with emery.
CART WHEEL | Wooden wheel making DIY
Body
In the question of how to make a trolley as original as possible on your own, the creation of a decorative body plays an important role. Here you need to correctly build the blocks for arranging the cart frame and lay the boards for the body.
To make a decorative chaise frame, a complex drawing is required. After its creation, they are engaged in placing the bottom of the cart. It is formed from beautiful boards, which are secured with blocks with a diameter of 0.5 by 0.5 cm. The blocks are placed tightly to each other and connected with fasteners. To build a homemade decorative cart frame, glue can be used.
Afterwards, the decorative blank is placed on a flat area of the garden and covered with boards of beautiful colors. For the antique design of the future cart, a varnish coating can be used.
Putting on wheels
To put a decorative cart on wheels, you need to use cuttings from gardening tools. The cuttings sit perfectly on the axis if they are cut into several decorative parts.
To keep the wheels of the chaise in balance, you can use long wooden blocks that are nailed to the sides of the cart. The wheels are placed on the resulting chocks so that they are clearly on the sides of the haystack.
The more wheels a haystack truck has, the more firmly the chocks are installed. If the placed elements of the cart axle are loose, they are additionally secured with adhesive.
We decorate a house or cottage with our own hands - a cart as a bench or as a mobile flowerbed
Rating of the best models according to the editors
Now a few words about the models that especially impressed the editors.
1. Lamp with forged edge.
Stylized candlesticks on a forged edge
| Number of shades | eight | Lamp power (W) | 60 ÷ 100 |
| Suspense | Metal chains | Total Power (W) | 480 ÷ 800 |
| Height (cm) | 60 | Rim | Metal |
| Diameter(cm) | 50 | Wheel | Wood |
It impresses with its solemn simplicity, massive chains and an edge on which 8 candlesticks are placed. Forging was used to make them. Such designs are produced by the DLAN company, and can also produce an exclusive lamp according to your sketches on its official website.
2. Lamp with matte wick N&B Light Tavern 9407/1.
Frosted wick lamps on wooden edge
| Number of shades | 7 | Lamp power (W) | 60 |
| Suspense | Metal chains | Total Power (W) | 420 |
| Height (cm) | 50 | Rim | Metal |
| Diameter(cm) | 40 | Wheel | Wood |
Looking at this lamp, for some reason we remembered Pushkin’s lines: “Are you burning, our lamp, Friend of vigils and feasts?” Of course, it's not exactly an iconic lamp, but because it was inspired, it was very inspired.
3. With shades of wood.
Chandelier with wooden lampshades
| Number of shades | 6 | Lamp power (W) | 60 |
| Suspense | Ropes | Total Power (W) | 360 |
| Height (cm) | 40 | Rim | No |
| Diameter(cm) | 50 | Rotation and shadows | Wood |
This carpentry work was captivating due to the complete absence of metal and the stained edges under the dark oak.
4. Main chandelier
Simple but tasteful chandelier
| Number of shades | 4 | Lamp power (W) | 60 |
| Suspense | Metal chains | Total Power (W) | 240 |
| Height (cm) | 60 | Rim | Metal |
| Diameter(cm) | 40 | Rotation and shadows | Wood |
I liked this model for its simplicity, which does not harm its functionality. There is everything you need, no frills. This model is a work of art and you can find it in online stores under the name “Trolley-chandelier-wheel with hanging lampshades art.88A”.
5. Heavy tank chandelier
Heavy wagon wheel on the ceiling
| Number of shades | 5 | Lamp power (W) | 60 |
| Suspense | Metal chains | Total Power (W) | 300 |
| Height (cm) | 50 | Rim | No |
| Diameter(cm) | 40 | Rotation and shadows | Wood |
The appearance of this chandelier gives the impression of something massive, reliable and at the same time beautiful. Lighting option for serious people.
Rules for the production of wooden wheels
GOST, it must be admitted, was tough, clearly limiting the following dimensions: outer (including tire thickness) diameters of wheels for one-horse carts: front 630 and 720 mm, rear - 900 mm; for double windows: front 900 mm and rear 1080 mm.
A wooden cart wheel, usually intended for horse-drawn carts. And it consisted of a one-piece, one-piece rim (the rim was made of one wooden block). Or assembled from sections, so-called jamb wheels (wheels whose rim consists of several parts - jambs). As well as solid wood spokes and hubs, with a bronze bushing, for mileage.
In addition, our craftsmen reinforced the wooden wheel for a horse-drawn cart with metal forgings to give it strength.
Throughout the country, wheels were made in simple wheel shops. Where, as a rule, three or four people worked.
The manufacturing process of wooden wheels consists of the following operations: preparation of blanks and their processing, assembly and forging of the wheel.
In the Moscow province, the blank for the wheel was usually a 70-year-old dense maple tree. The tree was felled, then cut into logs from 30 centimeters to 2 meters long. In this form, the blanks were allowed to dry, then they were chopped into jambs with an ax or cut with a two-handed saw.
The simplest option
One easy option is to repurpose the base of an old baby stroller into a cart. Although the design may seem flimsy, it can be used to transport oversized items for several years.
This do-it-yourself version of a two-wheeled cart for transporting goods can be a good alternative to purchased options.
Making knitting needles
The knitting needles were made from hard deciduous wood. The blanks were sawed into logs of the required length, planed or hewn with an ax. According to the standards, the spoke blanks had the following dimensions: thickness 45 mm, width 65 mm and length 320, 360, 450 and 540 mm.
The spokes are attached with one side in the hub sockets, and the other in the rim. The part of the spoke that is fixed in the rim is called a strig, and in the hub it is called a vad. The spikes of the spokes must be made such that their ends do not reach the outer surface of the rim by a couple of millimeters, and by 12-13 mm from the hub bushing. At the rear, the spoke should be thicker, since this is where the greatest forces occur. Undoubtedly, it is better to prevent a disease than to subsequently treat complications caused by the disease.
Knitting needle sizes:
- Near the embedment in the rim - no less than 50 mm
- Near the embedment in the hub - no less than 55 mm
- The diameter of the stud in the rim is at least 24 mm
- The thickness of the stud in the hub is not less than 17 mm
- The cross section along the middle part on the minor axis is not less than 35 mm
The sizes and shape of the knitting needles were checked using a special template.
Making a drawing
Creating a detailed drawing is considered a difficult step. During the construction process, it is necessary to take into account the presence of decorative details, the size of the wheels and the height of the side walls. The final result depends on this.
When and how to prune roses in autumn for winter: tips and step-by-step instructions- A beautiful decorative mill is a way to decorate your site in an original way without much effort, see how to make a mill with your own hands!
- Creating a rock garden - features of application in landscape design. 145 photos of the most beautiful design elements
The drawing should contain not only diagrams and technical images, but also a layout of the finished product.
It is recommended to pay special attention to the exact dimensions. This criterion will allow you to have a clear idea of the dimensions of the decoration.
Hub processing
Each wooden cart wheel had a hub. The hub is the central part of the wheel, connected through spokes to the rim. Its length is 280 mm, diameter 167 and 190 mm as shown in the drawing below.
The hubs were processed in foot-operated homemade lathes. This happened very effectively: with one foot, the working artisan constantly swung the pendulum, at which time the workpiece rotated at a speed of 30 - 40 revolutions per minute. And the cutter was a long device in the shape of a spatula, which cut the boiled wood, the future hub of a wooden wheel.
Hubs were made from ridges of hard hardwood with a diameter of 20-26 cm. The ridges were sawn into lengths equal to the length of the hub. The diameter of the workpieces is from 200 to 250 mm with gradation every 10 mm. Blanks with a diameter of 200 and 210 mm were intended for hubs with a diameter of 167 mm, the rest - for hubs with a diameter of 190 mm. The blanks were first rough cut with an ax, then finally processed on lathes.
After turning the hub, a hole was drilled in the center along the longitudinal axis for fitting onto the axle of the cart. And in the middle, thickened part, sockets for knitting needles were hollowed out around the circumference: 10-11 pcs. for the front wheel, 11-12 pcs. for the rear. The nests were previously marked with a compass or using a metal template with holes.
After this, four metal hoops (rings) were placed on the hub of the wooden wheel: one on the thick end, the other on the thinner end.
Spoke processing
The spokes were secured with one end in the hub sockets, and the other in the rim sockets. The end of the spoke, fixed in the hub, is called a vsad, the end, fixed in the rim, is called a zashrig (round spike). The spikes of the spokes were made of such a length that their ends did not reach the hub bushing by 12-13 mm, and in the rim - by 2-3 mm from its outer surface (tire part).
When the wheel is in operation, the greatest forces occur in the part of the spoke located at the hub, so the spoke is made thicker at the rear.
Normal dimensions of a spoke: width at the point where it is embedded in the hub - not less than 55 mm, at the point where it is embedded in the rim - not less than 50 mm, thickness of the stud embedded in the hub is not less than 17 mm, diameter of the stud embedded in the rim - not less than 24 mm, the cross-section in the middle part along the minor axis is at least 35 mm.
Knitting needles were made from hard hardwood by splitting or sawing ridges. The sawn blanks were planed, the split ones were first trimmed with an ax and then planed. The sizes and shapes of the knitting needles were checked using the template.
Blanks for the spokes of a wooden wheel, single-horse and double-horse carts have the following dimensions: length 320, 360, 450 and 540 mm, thickness 45 mm, width 65 mm.
Wooden wheel assembly
The first operation when assembling a wheel is assembling the burr, driving the spokes into the sockets of the hub (a burr is a hub with the spokes attached to it). After assembling the burr, mark the length of the knitting needle and the place where the upper round tenon will be cut. Each knitting needle is trimmed to the required length, then the tenon is cut with a bow saw.
The last operation is the attachment of the rim, which in the workshops was carried out in special workbenches - wheels as in the following drawing.
The chariot is a table, in the lid of which a round hole is cut, bound with strip iron. The hole communicates with a longitudinal slot cut in the table top, into which several wooden spacers are inserted. The burrs are placed in the chariot in such a way that the hub is in the round hole of the table cover, and one of the spokes is located above the longitudinal slot. A rim is placed on the burdock, one of the sockets of which should be located against the back, located above the table slot. By hammering wooden wedges between the spacers, they placed the rim socket onto the back tenon.
Having completed this operation, the burdock with the rim was turned until the moment when the next knitting needle was above the slot of the table cover, the rim socket was placed on its tenon and. etc.
Wooden wheel frame
The outer side of the wheel was covered with a metal tire 8-12 mm thick and 45-60 mm wide, then bolted to the rim in three or four places, and iron clips were placed at its joints.
To prevent the rim from cracking and fraying, its side cheeks are riveted on both sides of the spokes. A cast iron or bronze bushing was driven into a hole drilled in the hub.
Balancing for Harmony
According to the husband’s idea, the lamp for his room above the garage should have been very unusual, reminiscent of ancient lamps in a knight’s castle, when torches were placed in a wheel, and then the entire structure rose to the ceiling. So my husband decided to use an old bicycle wheel to make his lamp so brutal. My husband cleaned the wheel from years of dirt and polished every detail. Then there was the painstaking work of balancing the entire structure, since the five bottles prepared as shades had to be evenly placed around the circumference of the wheel.
My husband managed to level the wheel suspension by adjusting the height of each bottle. This process took him quite a lot of time, since he had to verify the placement of each lamp with absolute precision. One of the bottles, which was much taller than the others, had to be cut down again by my husband to normalize its weight.
DIY WOODEN WHEEL
Let's start with making the hub. This is the most complex element of the product. Only a very experienced master can do it at home. We took a simple route: we took a wooden block measuring 10 by 10 cm, 60 cm long, and went to a turner. It’s good that there are still people with this profession. From this block we machined 6 round blanks, similar to hockey pucks, with a diameter of 9.5 cm and a width of 8 cm. Inside, with a diameter of 5 cm, the hub is ready. Of course, this is just a decorative hub - in order to put it on the axle, you would have to grind out special protrusions. But there was no such goal, a wooden wheel is needed for...
At the next stage, we made a life-size drawing of a wooden wheel. The size of the hub was transferred to graph paper, the diameter of the product was determined to be 60 cm, the number of knitting needles was chosen to be 8. We drew everything on paper and measured the dimensions of the resulting parts.
Let's start making knitting needles. In the drawing they turned out to be equal to 19 cm. Let's take a wooden block measuring 5 by 5 cm and cut 8 pieces of 23 cm long from it. We will leave two cm on each side for dowels, with the help of which we will connect the spoke to the hub and jamb of the wheel. We process the bars with a plane, giving them a marketable appearance.
Now let's make dowels on the knitting needles. On each side of the block, mark 2 cm and use a hacksaw to make 1.5 cm cuts. Using a sharp knife, cut off the excess wood and form cylindrical protrusions with a diameter of 2 cm.
To give the wooden wheel at least some design, we will process the spokes with a milling machine. Secure the block to the stool using a clamp and cut off the edges on four sides.
The next step is the manufacture of the so-called wooden wheel jambs. According to the drawing, we will have 8 of them. Take a white sheet of paper and transfer the drawing of one joint onto it. This will be the template.
Let's select a board 5 cm thick. The width of the board should be no less than the length of the jamb. We attach the sheet with the drawing to the board and trace the drawing with a pencil, applying a little force. You can use carbon paper, but in our case we did without it. Having removed the piece of paper, we trace the outline of the jamb imprinted on the board. Using a jigsaw, carefully cut out 8 pieces and sand them with a grinder.
The jambs have a complex geometric shape; the quality of their manufacture directly affects the appearance of the wooden wheel. Ideally, all 8 pieces should be identical.
Now you need to prepare the jambs for connection with the knitting needles. To do this, in the lower plane of the product, in the center of the intersection of two diagonals, we drill a hole with a diameter of 2 cm and a depth of also 2 cm.
Using a protractor, mark the hub into 8 equal parts and also drill 8 holes with a diameter of 2 cm.
Next we try on the wooden wheel. We insert the spoke into the jamb, then into the hub and connect all the parts together. By swapping elements, you need to ensure that the product looks even and all the parts fit together. At this stage, we carry out the final fine-tuning of the elements: sharpening, filing, drilling.
After making sure that all the parts fit together, we number them so as not to confuse them, and begin assembly. We connect the elements using furniture glue.
To make the wheel strong, we secure the jambs together using furniture dowels. To do this, drill holes in the side edges, insert a dowel into them and connect the parts together.
Slowly, we assemble the wooden wheel. Unfortunately, the lack of experience affected the assembly - the jambs did not close the circle, 2 cm was not enough. Still, when cutting them out, you need to be more precise. I had to cut a wooden wedge to size, coat it with furniture glue and secure it with a clamp for a day.
Advantages of round structures
A wheel-shaped chandelier has many practical advantages. Let's look at some of them:
- Round-shaped lighting fixtures are capable of creating diffused light. This results in uniform lighting that affects the entire space, even its most remote corners.
- With the help of a “wheel” chandelier it is easy to completely illuminate fairly spacious rooms. Modern stores offer a wide range of designs of different sizes. With their help, you can easily provide enough light to even a very large space.
- If you install one or more round ceiling chandeliers in your home, you can easily create the necessary accents with the help of light. In a similar way, it will also be possible to divide the space into several separate zones.
One of the most important features of such products is their presentable appearance. A stylish and luxurious wheel-shaped chandelier will fit perfectly into absolutely any interior. At the same time, it will certainly add luxury and originality to the atmosphere. If you like stylish and unusual things, be sure to take a closer look at this product.