A headband with flowers adds femininity and tenderness to the look. A girl with such a headband will look natural and graceful.
A headband with flowers with your own hands is suitable for photography, because it can turn a girl into a forest nymph or fairy, or allow a girl to emphasize her individuality by decorating her hair with such a beautiful decoration.
A hairstyle with such a headband will add fabulousness and originality to the image.
You can also find models wearing such jewelry in fashion magazines.
Accessories made from artificial flowers
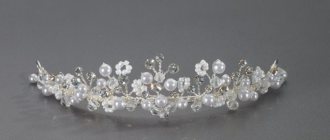
For such headbands, artificial flowers are often used because this is the most practical option, since real flowers cannot be used more than once.
A wreath of artificial flowers is not difficult to make yourself. All you need is glue and flowers. To create a wreath, you need to paste over the rim, taking into account the color scheme.
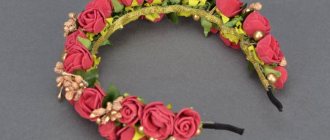
The most successful decoration is considered to be one made from large flowers, such as roses. This option is suitable for a wedding, birthday, and will create an original look for a long-awaited event, but it is unlikely that it is appropriate for daily wear.
If the buds on the headband are smaller, it is appropriate to wear it daily. This headband is also suitable for the bride.
Making such a wreath will not be difficult even for novice craftswomen. Using your imagination, you can easily make such a wreath at home.
Beginning of work.
We need a base. They come in plastic and iron. Plastic headbands are wider, iron ones are thin and invisible in the hair. They bend and are suitable for both a child and a woman. I prefer iron bases. The price of such products is relatively low. If you want to save even more, you can weave a base from wire yourself by wrapping it with tape. Then our decoration will turn into a hair wreath.
For decoration we will need artificial flowers or roses made of foamiran, lace or some suitable fabric, a glue gun, and scissors. Secondary glue is also allowed. As you can see, no special tools are required.
Accessories made from fresh flowers
For a wedding arrangement, it is better to use real flowers, because live buds will be the best option for such an event. When choosing flowers, you must take into account the fact that they fade quickly, and this decoration will not last more than a few hours.
In order for the wreath to last at least one day, you need to choose flowers that do not dry quickly and spray them with a special solution. Then the accessory can last the entire event.
Large rosebuds will help create a memorable image, and wildflowers will surprise guests at the wedding and give the bride’s style an unusual look. Chamomiles, cornflowers or dandelions will add even more charm to the image, and will not spoil it in any way. Roses attached to a thin elastic band will create the image of a sophisticated and elegant bride. Such an accessory can only be limited by the color scheme and your imagination.
You can add beads and various types of berries to the headband. It is also simple to do: all the selected components are glued to the base, which will add a piquant look to the image.
Option 2
Rose hairstyles can be made using openwork weaving. This is a simplified version that you can create with your own hands.
So, if you're ready to channel all the majesty of a garden queen into your hairstyle, let's get started!
Floral braids on blonde hair
- Before making a rose out of your hair, wash your hair and dry your curls. If you have straight hair that falls apart when doing your hair, apply a modeling cream based on liquid silicone. Covering each hair with the thinnest film, it makes the curls heavy and obedient.
- To weave a braid, you can use the entire mass of hair or separate a small part in the temporal area.
- Divide your curls into three strands and start weaving a classic braid. Please note that the weaving should be loose, allowing you to further pull out the side strands.
- Hold the braided block with your left hand, and with your right hand, slightly pull one strand out of the weave so that it resembles a loop that has fallen out of the knitting. For this purpose, professionals prefer to pull out the strands using the thin tip of a comb.
- Similar actions are performed along the entire length of the braid. It is important that all the loops are on the same side.
- Secure the tip with a miniature silicone rubber band. Roll the braid in a spiral so that the openwork edge is on the outside. Secure the center of the flower with a hairpin.
A rose can be a full-fledged hairstyle or its separate element
Trend of the season
The first place is occupied by long thick flowing hair and a headband with large flowers in addition. You can use this decoration for every day and combine it with bright accessories.
A braid braided on one side with a rim of large flowers will look beautiful. Or a retro hairstyle with an accessory of medium-sized flowers.
Hairstyle options with roses
Romantic hairstyle
- Using a horizontal parting, divide the entire mass of hair into two parts so that the top is slightly smaller than the bottom.
- Divide the upper separated strands into two parts. Form one in the form of a French braid, picking up the strands only from above. In the process of weaving hairstyles, pull out the side parts to obtain an openwork effect.
- When completing the braid, secure it with an elastic band and curl it into a flower shape.
- A similar flower is formed from the second top strand; place the rose slightly lower than the first.
- Loose French braids with an upper grip are woven from the lower right and left parts.
- From the middle of the braids, connect them into one and braid them to the end.
Photo of creating a rose using a braid
Themselves with a mustache
The hair rose hairstyle is quite simple and can be done on your own hair. Don't believe me? And we will prove it by offering a simple master class.
| Necessary materials | elastic band, varnish, comb, hairpins |
| Difficulty level | easy |
| Time | 10 minutes |
Weaving instructions:
- Divide well-combed hair into upper and lower parts.
- Form the upper strands into a loose fishtail, carefully releasing the outer edge of the braid.
- Gather the remaining curls and braid into a ponytail and divide into 2 equal parts. Weave an openwork braid from each part, releasing the outer strands.
- When forming roses, lay the right braid counterclockwise, the left braid clockwise.
- Secure your hair with hairpins and strong hold hairspray.
Selecting a base
It is better to choose classic shades (black or white) for the base-rim. These colors will harmoniously combine with this or that clothing. Decorating in classic shades is appropriate to go to a party or to work. For older women, wide, plain headbands are suitable.
Also, the color of the decoration depends on the choice of event or weather conditions. It is better that the color scheme matches the bag or shoes.
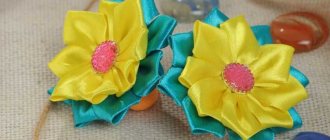
Japanese motifs - kanzashi style
The kanzashi style originated in Japan more than 400 years ago, and kanzashi products are still traditional Japanese jewelry along with kimonos. Each season and month corresponds to a certain style of kanzashi products that should be worn at that particular time.
To make this decoration yourself, you will need:
- Wide satin ribbon (from 5 centimeters wide) - 40 centimeters per 1 flower.
- Two narrow satin ribbons (0.5 - 1 cm wide) for braiding the headband. The length of the ribbons is approximately 130 - 150 cm.
- Rhinestones or beads for the flower core.
- Base: headband or large hairpin.
- Scissors, tweezers, pencil, file for processing the surface of the rim, lighter, superglue, ruler.
- Scissors and needle.
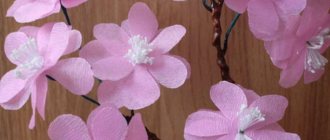
Corrugated paper flowers
Corrugated paper is a budget-friendly material for creating jewelry.
It’s not difficult to create such an accessory; you will need:
- Paper of different shades.
- Headband.
- Toothpicks.
- Scissors.
- Threads.
- Glue.
Cut out rectangles from paper, then cut out petals from these rectangles. Wrap the petals around a toothpick and secure with thread. This is the fastest way to create buds. When you have the required number, you can start attaching them to the headband.
You can create beautiful headbands with available materials at home. Such decorations definitely have a right to exist.
Conclusion
Openwork weaving flowers from hair is a truly exciting activity for those who love sophistication. We are sure that after trying an interesting hobby, you will look for more and more new horizons for creativity, and the video in this article will help you with this.
Did you like the article? Subscribe to our Yandex.Zen channel
Text \ Photo Victoria BOLSHOVA Posted 10/02/2015
0
share:
To favorites
To print
If you want to thank, add clarification or objection to the author - add a comment!
Currently being discussed:
- Lyubov Burkina
20.08.2018
What hair color should I choose? Please give me some advice. I don't know which one I have...
- I
19.08.2018
I had eyelash extensions for 6 months and took a break. After 3 months I increased it again...
- Vasilisa
18.08.2018
Cool hairstyle
18.08.2018
Hi, can I dye my bleached hair (currently red) bright purple...
16.08.2018
Hello! I am a dark girl with black eyes. I want to dye my hair dark...
15.08.2018
The photo shows young beauties. Can older ladies have their eyebrows done? Age...
Comments »
Satin ribbon accessories
To create such a decoration you will need:
- Satin ribbon.
- Headband.
- Threads.
- Matches.
- Glue.
Cut off part of the ribbon and singe the ends to prevent it from unraveling. Sew the ribbon along one of the edges using regular stitches and tighten the thread. One of the flowers is ready.
When you have the required number of flowers, you can start gluing them. You can cut out leaves from green ribbon and start gluing them.
We braid the headband
- At the ends of two green satin ribbons we form loops using glue. The width of the loop should be such that another ribbon can easily fit into it and you can braid it. We insert one ribbon into the second loop.
- Next, at the very fastening of these two blanks, we bend the tape and insert it into the free loop, slightly stretching the tip.
- Thus, we continue the checkerboard weaving, alternating dark and light ribbons.
- When the braid is of sufficient length, insert the opposite ribbon into the last loop without forming a new loop.
Clay buds
For this decoration you will need:
- Clay.
- Toothpicks.
- Headband.
- Glue gun.
Progress:
- Mix clay with water until a thick mass is obtained.
- Form petals from the resulting mass.
- Make leaves from green material.
- Glue the flowers and leaves with glue and cover them with varnish.
- Glue two ribbons crosswise to the headband and wrap them around it.
- Trim the tails of both ribbons and secure them. The color of the ribbons must match the color of the hair, otherwise the image may be ruined.
The final stage.
We have a base and glued flowers and leaves separated from the branches. You won’t be able to just stick them onto the workpiece; for better adhesion, we recommend wrapping the rim with fabric, lace or tape. This will add additional charm and zest. When using lace, a special shade of shabby appears. First we select the decor of the headband. You can combine the composition with leaves and berries, it all depends on the idea. It is better to glue from the center, moving to the edges, and the second option is from the edges to the center. If you are planning a symmetrical pattern, make sure you have enough materials.
Flowers from foamiran
There are many instructions for creating headbands with flowers from foamiran with your own hands. To create such a decoration you need:
- Foamiran of different shades.
- Mold.
- Headband.
- Glue.
- Scissors.
- Wire for beads.
- Beads.
- Satin ribbon.
- Foil.
For roses you need to take pink and red material. You don't need patterns.
- Cut into 2*2cm squares. – 15 pcs. and 3*3cm. – 20pcs of pink material.
- Cut into squares 2*2cm – 5 pcs. - made of red material.
- You need to cut out the petals from them.
- Petals, size 3*3cm. heat with an iron.
- When the petals are heated, you need to twist them, make small indentations with your fingers, twist the edges in different directions, giving them shape.
- Petals 2*2cm. also heat at the same temperature, fold like an accordion and make indentations.
- Make four bases for future roses from foil. Glue the petals to the resulting base to form buds.
- Make buds in the amount of three pink, one red.
- Glue together two pieces of 3*3cm petals.
- Insert a bud into a pair of such petals, attach a second such pair to one third of the petal, to one second of the previous pair, then glue another pair.
- Thus, a closed pink rose and an open one are assembled.
- For a blossoming flower: cut the red material into pieces 3*2.5 cm. – 20 pcs. Cut out petal droplets.
- As before, heat the petals and form them into a shape with a depression.
- Next, you need to make a base for the flower: twist the petal, paste it with other petals.
- Cover the base with four petals, which should be at the same level.
- Glue the next five pieces in a checkerboard pattern, and glue the last five overlapping.
- Cut out the sepals, also iron them, and give them the appropriate appearance and glue them to the base of the flowers.
- Cut out the leaves, iron them, and form them onto the mold. You can tint them with pastels to give them a darker shade.
- When everything is ready, you need to take the headband and satin ribbon. Wrap the tape around the rim and glue it.
- In the final stages, first attach the leaves to the rim. Make small branches from wire and beads.
- Attach the resulting twigs, leaves and roses to the rim.
- To hide the defects, cut grass from the material and glue it between the buds, flowers and leaves. The work is completed.
If it is not possible to make a headband yourself, then such a decoration can easily be found in online stores, a shopping center, or in a regular department for craftswomen. Or make such an accessory to order. There are many needlewomen who can make a headband of flowers with their own hands, taking into account all your wishes.
Making roses
- To create roses, cut 133 pieces (length 6 cm) from a pink ribbon, the width of which is 2.5 cm. One rose - 7 petals.
- In order to get petals from the pieces of tape, we bend the upper side corners of the rectangles down, placing them horizontally. The result will be triangles, they should be located with the front side, and the middle - with the wrong side.
- Next, in the resulting blanks we bend the sharp corners vertically, making sure that the ends are connected to the place where the corners of the rectangle are attached. In this way we prepare all the pieces of pink satin ribbon.
- We twist the first petal into a tube and glue it together, forming the middle of the bud.
- On the resulting tube-like center we glue the remaining six petals one by one, forming a rose.
- We form the required number of buds.
- Next, we prepare 19 pieces of green tape, 2.5 cm wide. For sepals, their length is 10 cm. We bend each piece in half and pass the tip of a heated burner diagonally. Divide each bent ribbon into two right-angled triangles.
- For the sepals we will use the part of the tape where there was a fold. We will open the resulting corner; its shape should be in the form of a paper bag for sweets.
- We make 19 green blanks, the number of buds will be the same.
- We place the roses in the open green petals, after dripping glue on them.
- Glue the braid onto the headband.
- After the glue has dried and the braid is firmly attached to the headband, we glue our roses onto the braid, arranging the parts in a herringbone pattern.
- We place all the details along the rim. If you want the bouquet to be denser, increase the number of roses to 21 pieces.
Our beautiful, romantic hairband with delicate roses is ready. It's not difficult to do. All you need is a headband, roses, ribbons and a little patience.
Who is it suitable for?
The rose hairstyle is considered universal. The variation is easy to choose for everyone, taking into account external data, age, hair structure, and occasion. The styling can delight with originality in a minimalist or pompous design.
A flower made from strands of hair is not bound by age restrictions. This option will equally decorate the head of a little girl, a modern girl, or a mature, respectable lady. You can wear this hairstyle every day or create an unforgettable, charismatic look for a special occasion.