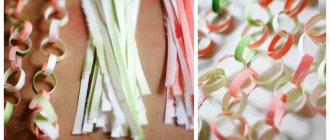
In this article we will look at 8 ways to use protective masks at home. We decided to cover this particular topic because people have literally become addicted to masks lately. The conditions created by the pandemic force all people to use masks almost everywhere, outside the home. So: Crafts from disposable medical masks.
Masks are considered disposable and should be changed preferably every two hours. Where do we put unnecessary masks? That's right, we throw them away. To avoid this action, the article will discuss DIY crafts from medical masks
So what kinds of things can be made? Agree that you yourself might not have come to these wonderful solutions. Although, with a little imagination, you can find other ways to use protective masks.
Disinfection before reuse
Before you use your imagination to create new useful things, you need to prepare a mask.
Disinfection is necessary, and it is a two-stage process. Regardless of whether it was worn by a sick person or a healthy one.
First, we need to thoroughly wash the mask by hand using soap or another cleaning agent. Next, we load it into boiling water for a few seconds. You can do this several times for better effect.
This way, all bacteria, good and bad, will be removed and the mask will be ready to be turned into new household items.
Fish and owl
The fish is a symbol of fulfillment of desires, and the owl is a symbol of wisdom. Need to find such a souvenir? You don’t have to look for it, but make it yourself from scrap materials.
How to make a fish from a dropper: step-by-step instructions
The technique is simple, not time-consuming, and does not require special skills or tools. At hand should be a hose and wheels from the system's dispenser reels, scissors, a dropper with a filter, and hot water.
We cut off the dropper and needle from the hose, measure two pieces 20 cm long and one 5 cm long, one 1.5 cm long (for eyelashes). Remove the wheel from the dispenser. We turn the remaining hose into a strip - cut it lengthwise and smooth it out as much as possible.
We put the 20-centimeter pieces together and wrap them with tape. Then we slightly move them apart and begin to wrap them with the same tape according to the figure eight principle. There will be 6-7 revolutions.
We connect the tubes - we hook them onto each other and tuck them in. There should be a loop for the eye between them. We fix the ends of the tubes with tape, secure it and cut it.
We shape the eyelashes, glue them onto the wheel and wrap the workpiece with the remnants of the tape from the dropper. The diameter of the eye should be such that it fits firmly into the eyelet.
We put the eye in place, cut the fins and tail into small ribbons, immerse them in hot water to curl them.
Case for glasses made from a medical mask
You will get an excellent decorative case, created by yourself. Moreover, you won’t spend a lot of money on its creation. So, we start by sewing two masks together. You can, of course, glue them together, but it will be stronger if you use a thread and a needle.
The next step is to decorate the case. To do this, you need to select a begging and sew/glue it on the cover.
This design will prevent dust from getting on the glasses.
Crafts based on the cross knot
Such cute souvenirs can be given as a gift or placed in the interior, and their production takes a minimum of time. After 2-3 crafts, experience will appear; the work will take 20-30 minutes.
Devil
It is important to understand that such a toy is not suitable for children. It contains many small parts that a child can swallow, and the head is attached to the body with a needle for “systems”.
We begin the work by creating the arms, legs and tail of the devil. For them, we cut pieces of tubes of the required length with our own hands. They can be longer than the body, so the figure will turn out to be original, mischievous.
The limbs will be movable. To do this, cut the tubes into spirals using sharp scissors with thin blades. We do not cut the ends; we insert plugs into them. We stretch the workpieces slightly. On the part of the ponytail, fluff up the tip - cut it into thin strips and slightly twist it with your fingers or dip it in boiling water.
We weave the body and head from 4 tubes using a cross knot. The body is 3-4 times longer than the head. You can weave them as one piece, highlighting the torso with handles. We weave the arms and legs into the workpiece.
If the head is made as a separate element, then we connect the parts, highlighting the neck - with a needle with a plastic adapter put on it.
We start weaving from the bottom, immediately fix the legs and tail - put their tips between the layers of the knot. This principle allows you to create horns on the devil’s head from the ends of the IV tubes. There is no exact diagram of the face - the eyes can be decorated using beads and plastic parts from the “system”.
We attach a ribbon or strings to the head of the craft - such a devil can be hung. In the 90s, they often hung in the cabs of trucks and cars and swayed funny, waving their arms and legs in time with the movement.
Pen
A simple ball-shaped rod braided from a medical dropper was once a real masterpiece, a school accessory that was not available to everyone.
Making such a craft is even faster than the devil. We simply braid the refill of a ballpoint pen with tubes, preferably multi-colored ones, according to the “cross” knot pattern, and fix the ends. The rare pen is ready.
Using the same principle, you can make your own keychain for keys or a backpack - cheerful, colorful, voluminous. The keys will definitely not be lost if you fix the bells on the tip of the keychain.
Heart
Such a figure is more complex than a devil or a pen. The photo clearly shows that you will need to make a loop in the center of the heart.
You will need 4 “systems”, preferably new ones. You can paint them in any color, you can start working after the workpieces have completely dried.
Master Class:
- on all 4 blanks we find the middle and fix them together with a needle;
- we separate 4 tubes in different directions, tie one of the sides so that the parts do not interfere;
- We begin to weave the second side with a cross knot, remove the needle when the length of the workpiece is at least 4 cm;
- remove the needle, untie the knot;
- fold the loop, overlap the loose tubes, weave the sides of the heart;
- both “braids” must be the same length;
- bend them in the shape of a heart, attaching the ends to each other.
Christmas tree
A charming mini version of the Christmas tree will decorate your workplace and will be a wonderful souvenir for colleagues or loved ones on the eve of the New Year.
It’s easy and quick to do if you’ve mastered the basics of weaving, or more precisely, the cross knot. The work will take a maximum of 20 minutes; you should have nail scissors, a sharp thin nail or pin, yellow and green tubes from the “system” on hand.
Step-by-step instruction:
- Divide the yellow workpiece in half, cut the green one into short pieces;
- we find the middle of the yellow tubes and “seat” them on a nail, begin to weave a “cross”;
- We place green pieces in the spaces between the rows;
- in this way we “knit” a few centimeters, then fix the workpiece;
- cut the green parts so that they form a cone;
- We cut the ends of the green tubes into thin strips and slightly twist them.
The green Christmas tree from a medical dropper is ready.
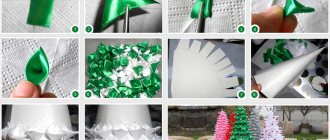
DIY flowers from medical masks
In this master class, we will tell you about an unusual way to use disposable medical masks, namely, we will make flowers from medical masks with our own hands. Compared to a mask, this product is more durable! Read the whole article...
What to do with an old key? Friends, today we looked at the question: DIY crafts from disposable medical masks. What did I forget? Maybe you have some ideas. Comment and subscribe. I will add the best ideas to the article and indicate your authorship. Have a good mood.
Technologies
You can make anything from a dropper - the material is accessible, pliable, there are many diagrams and instructions for working with it. The principle of operation is similar to the principle of weaving macrame or creating toys with your own hands from so-called newspaper sticks. The crafts turn out to be durable, and even if it is a children's toy, it will last a very long time.
If you use material that was used for its intended purpose - in a hospital, it should be thoroughly washed and treated with any antiseptic. Some antiseptics may stain transparent tubes.
Coloring
Needlewomen use all the components of the “system” - elastic tubes through which medicine is supplied, clamps, units for administering drugs, adapters. As a rule, they are either transparent or yellowish. Often you want to make a fun, colorful craft from them, and craftswomen paint the materials with their own hands.
For painting, you can use products that are available in every home:
- ballpoint pen ink;
- potassium permanganate (potassium permanganate);
- brilliant green (brilliant green solution);
- iodine or fucorcin.
The principle of coloring a dropper can be considered using the example of using ink from ballpoint pens. The place where the work will be performed must be well protected so as not to get dirty, and gloves must be worn on your hands.
In addition to the ink itself, you will need pure alcohol or alcohol with a concentration of at least 40%. In a container, mix 2 caps of an alcohol-containing solution and ink from two refills. By the way, the ink can be not only blue, but also green, red and any other color. We fill the tubes with the resulting composition and leave for 1-2 minutes, then pour the contents out of them and wait for them to dry.
Photo:
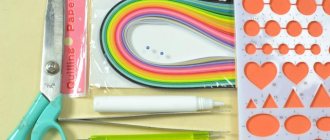
How to weave
To create most crafts from medical droppers with your own hands, it is enough to know the principle of designing a “cross” knot. It is the basis of such weaving, it is tied from two tube threads, it is simple to perform, gives a voluminous figure, and bends easily.
This weaving of multi-colored “systems” looks original. The principle can be used to create figures of devils, a cross, a heart, a keychain, and a braid for a pen.
Cross knot diagram:
For flat figures, for example, bracelets, you can use another technique:
Experienced craftswomen can work on the principle of weaving macrame, tying knots of any type from elastic blanks, but for beginners it is better to “get their hands on” using the simple patterns shown above.
What do you need for work?
It is important to understand that plastic is not thread or yarn, and the technology for working with it is different. In addition to the droppers themselves, you should have sharp scissors with thin long blades on hand, thin nails with hats or tailor's pins, and instant glue (it can be useful for fixing the ends).
Sometimes it will be necessary to secure the ends of the tubes with pins or nails, and the work surface will need to be protected. You can attach a wooden or thick, dense textile fabric to it, into which it is easy to stick pins and nails.