An electric shock device (taser), abbreviated as ESD, is a publicly available special means of protection against offenders and an effective means of repelling and protecting against attacks by animals, such as dogs.
There is a wide range of shockers on the market, but the operating principle of all models is the same. They differ from each other only in the voltage on the electrodes, arc power, reliability and the presence of additional services, such as a flashlight and built-in charger and others.
The main consumer parameters of any shocker are the no-load voltage on the spark gap electrodes and the arc power. According to GOST R 50940-96 “Electroshock devices. General technical conditions." According to the voltage on the electrodes, shockers are divided into five groups. The first - from 70 to 90 kV, the second from 45 to 70 kV, the third from 20 to 45 kV, the fourth from 12 to 20 kV and the fifth up to 12 kV inclusive. And according to the power of the arc, there are three types. The first - from 2 to 3 W, the second - from 1 to 2 W and the third, from 0.3 to 1 W.
Classification of stun guns
Depending on the combination of type and group that a particular stun gun model has, it can be classified into one of five classes according to GOST R 50940-96. It is easy to find out which class the stun gun belongs to from the table below. For example, a stun gun of the second type of the third group belongs to the third class.
| Classification of electroshock devices according to impact effectiveness according to GOST R 50940-96 | |||||
| Arc power type, W | Voltage group at working electrodes, kV | ||||
| First 70–90 | Second 45-70 | Third 20-45 | Fourth 12-20 | Fifth to 12 | |
| First – from 2 to 3 | 1 | 2 | 3 | 4 | 5 |
| Second – from 1 to 2 | 2 | 2 | 3 | 4 | 5 |
| Third – from 0.3 to 1 | 3 | 3 | 3 | 4 | 5 |
First class stun guns are very powerful and expensive; these are weapons for special forces. For personal protection, a second or third class shocker is quite suitable. Stun guns of the fourth and fifth classes are more suitable for intimidating an attacker than for real protection.
Attention, if you decide to buy a stun gun, then consider the following. To temporarily paralyze the physical strength of the attacker, the time of continuous exposure of the shocker discharge to his body should be about 3 seconds. With a shorter exposure time, you will only anger the offender and then it is quite possible that you yourself will fall under the influence of your own shocker. It is permissible to use a shocker only if you are confident that you can hold the shocker pressed by the electrodes to the enemy’s body for three seconds.
The final stage of production
After checking the operation of the stun gun and the tightness of the entire system, you can begin to fill the device with epoxy resin. After this you need to wait 6-7 hours. At this stage, you can cut off the excess parts and give it a convenient shape before the epoxy hardens too much. You can sand the device and then coat the finished body with varnish. The operating instructions for the stun gun do not require any special explanation. This device is used for self-defense, does not cause much harm to health and does not require a license.
Electrical circuit of a stun gun, principle of operation
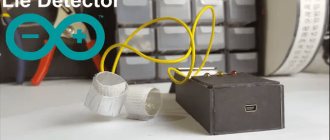
I had to repair a JSJ-704 type stun gun with a flashlight. The appearance of this shocker is shown in the photo above. According to external signs, the shocker was in good working order, the LED indicating the battery charge was lit when the shocker was connected to the network. The flashlight worked, the discharge readiness LED also glowed, but when I pressed the discharge button, nothing happened. It became obvious that the fault lies in the high-voltage converter circuit.
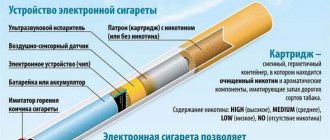
All stun guns, regardless of model and manufacturer, work on the same principle. The voltage from the battery or batteries is supplied to a high-frequency generator, which converts DC voltage into AC voltage. Alternating voltage is supplied to a step-up high-voltage transformer, the secondary winding of which is connected directly or through a voltage multiplier to the external electrodes of the shocker. When the stun gun is turned on, a powerful electric arc occurs between the electrodes.
The photograph shows the electrical circuit diagram of the stun gun model JSJ-704.
The circuit consists of several functional units. The battery charger GB1 is assembled on capacitor C1 and diode bridge VD1. C1 limits the charge current to 80 mA, the diode bridge rectifies the voltage. Resistor R1 serves to discharge capacitor C1 through it after disconnecting the shocker from the mains voltage to prevent discharge of the capacitor through the human body in case of accidental contact with the plug terminals.
LED HL1 serves to indicate the connection of the shocker to a 220 V electrical network, R2 serves to limit the current flow through HL1. This part of the circuit is not directly involved in the operation of the shocker and serves only to charge the battery and may not be present in models of other shockers. Charging time for a completely discharged battery is 15 hours.
LED HL2 with current-limiting resistor R3 is a flashlight. The flashlight turns on when the S1 switch slider is moved to the middle position. The flashlight is placed between the shocker discharger and is convenient in the dark. Some models may not have shockers.
The HL3 LED with current-limiting resistor R4 serves to indicate that the shocker is in ready-to-use mode. To prevent accidental activation of the discharge mode, triple protection is provided in the form of three switches. In order for a discharge to appear between the electrodes, you must first move the slide switch S1 (located next to the round button) to the extreme right position, then the second slide switch S2 (located next to the connector for connecting the shocker to the charging network) to the right position, after which the HL3 LED will light up, informing that the shocker is ready to be discharged. And only after this, when you press the round pusher of the return button S3 “Start”, a discharge in the form of a blue arc will appear between the electrodes.
Charging the device
The igniting condenser is charged through the bridge, and the combat one is charged through additional diodes. Thanks to this, one circuit is not created. Any transistor can be used; there are also no special requirements for the resistor. The capacitor provides inrush current limitation and serves to protect the converter. If the stun gun assembly circuit involves installing a powerful transistor, then the capacitor does not need to be used.
AA size batteries are installed in the amount of 6 pieces. Transistors are mounted on a radiator. It is desirable that it have insulating gaskets. We install all prepared parts. The most important thing is that you need to fix the HV pins, the distance between which should be more than 15 mm. Otherwise, the stun gun has every chance of quickly burning out.
How to disassemble a stun gun
Due to the fact that the halves of the shocker body were fastened together using four self-tapping screws, disassembling it was not difficult.
The heads of three screws were clearly visible in the secret holes, and the fourth was covered with a label. After unscrewing all the screws, the halves came apart easily.
After removing the cover, the following picture was revealed. As you can see in the photo, the installation of the stun gun parts is carried out using a hinged method; there is no printed circuit board. The high-voltage converter is filled with compound. This is good, since it is protected from moisture and therefore more reliable, but the bad thing is that the converter is not repairable. It should be noted that although the shocker is made in China, all soldering is done with high quality and reliability.
Second phase
So, we continue to consider how to make a stun gun with your own hands. For subsequent work, you will need a wire with a diameter of 0.2 mm. It must be wound around all sections of the frame, but it should not go beyond the frame. For more convenient work, it is advisable to solder the beginning of the wire or secure it well with glue; leave the end free.
A ferrite rod with a diameter of 10 mm and a length of 50 mm must be processed using an emery wheel. The result should be a round part. The ferrite rod must be wrapped with electrical tape and 20 turns made on top. You need to use the same wire as for the first transformer, that is, 0.8 mm. Be sure to wind in the same direction, after which you need to insulate the wire in several layers.
Stun gun repair
Attention, when repairing a stun gun, care must be taken not to accidentally touch the discharge electrodes while the stun gun is operating.
Otherwise, you may get unpleasant sensations.
Repairing any electronic device begins with checking the power supply. Therefore, the first thing you need to do is check the performance of the battery or batteries. The test can be done using a multimeter. If the shocker is powered by batteries, then in addition to their serviceability, you need to check the condition of the contacts in the battery compartment. It happens that they oxidize or their springy properties weaken.
When the “Start” button was pressed while the “Ready” indicator was on, no discharge occurred, but the voltage at the battery terminals, equal to 7.2 V, did not drop. Therefore, it's not the battery. I checked the voltage when pressing the “Start” button on the input terminals of the High Voltage Converter, it dropped to several volts. This voltage was enough to light up the HL3 LED, but not enough to operate the converter.
Therefore, the fault was in poor contact of one of the switches, S1, S2 or S3. I shorted the S2 terminals with a jumper and the stun gun started working. To restore the functionality of the shocker, you need to clean or replace the faulty switch.
If the stun gun has not been turned on for a long time, then in some types of switches the contacts oxidize and often to restore their functionality it is enough to turn it on and off twenty times. Then the oxide will be erased and the switch will work again.
But since the shocker was open and there was access to the contacts in the faulty switch, the wires were unsoldered from the switch and the contacts were cleaned with a brush moistened with alcohol. During the time when the contacts were wet with alcohol, the switch was switched intensively. After soldering the wires back to the terminals, the operation of the shocker was restored. As you can see, I managed to repair the stun gun with my own hands, spending very little time.
Total views: 39542
Here is a video demonstrating the operation of the stun gun after repair. As you can see, a fairly powerful arc appears between the electrodes, accompanied by a strong sound of a wide spectrum. Animals do not like this sound, especially dogs; they run away with their tails between their legs.
Charge frequency
Whether to use a charger for a stun gun or not depends on the desire of the owner. Batteries are best for power supply. The stun gun does not require any specific settings; it should work immediately. If you use these batteries, the discharge frequency should be close to 35 Hertz. If this value is lower, the transformer may be incorrectly or poorly wound, or other transistors should be selected. You need to experimentally select the frequency of discharges. This is done by routing contacts. The discharge frequency must be tested for 5 seconds. The distance should not be as wide as possible, otherwise the stun gun may burn out at one point. Note that air breakdown is affected by pressure, humidity and other external conditions.
DOMOSTROYPlumbing and construction
A stun gun is, without a doubt, a useful device, which today is often purchased in order to protect against the actions of aggressive animals and intruders. Having such a device makes the user feel safer and more confident. But what to do if the stun gun stops working? It is unlikely that a simple amateur will be able to cope with the breakdown of such a device, especially since there are many reasons why malfunctions may occur, and first it is necessary to identify them.
Handle shocker | DIY master class
A stun gun is a great way to prank a friend. Imagine your friend asks you for a ballpoint pen. You give him a spare. And as soon as he presses the paste eject button, he will be hit by a small electric shock. You can also leave the pen unattended and whoever wants to take it without asking will get theirs.
To make a shocker pen we need
- Lighter with piezoelectric element.
- Ball pen.
- Hot glue.
- Wooden stick.
Tools:
pliers, stationery knife.
Making a shocker pen
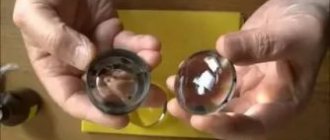
So, let's disassemble the lighter and take out the piezoelectric element.
This is what it looks like. The wire is an electrode. And the second electrode is a round piece of iron on the body.
Remove some of the insulation from the wire with pliers.
We take the handle and unscrew it. Using a hot needle, awl or paper clip, make a hole in the side of the handle.
Cut off the influx of plastic with a utility knife. Which was formed as a result of melting.
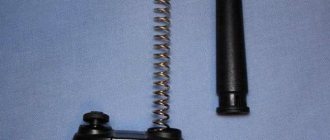
Now we need a wooden stick of a certain length. I took chopsticks from the sushi set.
We insert it into the handle. It will act as a lever that will transmit pressure from the button to the piezoelectric element.
We insert the piezoelectric element so that the bare end of the wire comes out into the hole on the side.
If the stick fits, fix it with superglue or hot glue.
Next, cut off part of the cap to hide the entire filling. We collect the entire handle. You can put all the parts on glue. We check and experience electric shocks on ourselves) Be that as it may, you need to be able to act out, without any fanaticism. Consider the state of the person with whom you are going to joke - what if he has a bad heart or he may not understand everything correctly and may not react adequately. In any case, all responsibility falls on you and only you.