Modern man is constantly immersed in things that are sometimes difficult to remember. In addition to diaries and reminders in your phone, a board is great for posting a list of goals for the day, month, and near future. The advantage of such a product is that it can be made original, harmoniously fitting into the overall interior of the apartment. The board for notes can be wall or floor, you can write on the surface with chalk or stick stickers to it - all this is at the discretion of the owner of the house.
Chalk board for notes
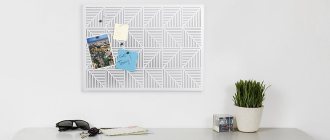
Minimalist style note board
Foam board for notes
What types of note boards can there be?
Products vary depending on the material used and decorative elements. You can buy them in the store, or you can make them yourself, decorating the board to your taste. As a rule, they are located in an office, nursery or teenager’s room above the desk, less often in the living room, bedroom or kitchen. When choosing or making a product, you need to think through the design in advance so that the board fits into the interior of the room.
Note board with shelf
Note board above the table
Retro style note board
Cork board
The most budget option is a brown rectangular canvas. This board is made from the bark of the cork oak tree. It can be of different sizes and shapes, but most often it is rectangular. You can easily attach various notes, pieces of paper, photographs, drawings to the panel using buttons. It can serve as both a place for a collage and a dynamic organizer. Advantages of the material:
- moisture resistant,
- elastic;
- not susceptible to mold and insects;
- after a puncture, it quickly restores its original appearance;
- does not change due to temperature changes;
- serves for a long time.
Gold note board
A child can hang memorable photos on such a board.
Black and white board for notes
Fabric note board
Slate note board
Note board with hooks
All this allows you to hang cork in the kitchen to pin recipes or cooking notes on it. An alternative to a store-bought product will be a homemade product, made taking into account tastes and preferences. A DIY cork board is made from:
- cork oak sheet of the required size;
- hardboard sheets of the same size as an oak sheet;
- framework;
- materials for decoration.
Textile note board
Cork note board
Rectangular note board
You will also need wood glue. First, the hardboard sheet needs to be glued to the back of the cork. After this, the board is placed in a frame, and the product is checked for reliability. If all is well, the board can be decorated in an original way to your taste.
For example, it can be covered with fabric, and a composition can be beautifully placed on the surface.
Unusual note board
Cork note board
Team
This method suggests combining a frame made of cardboard and a photo frame made with your own hands from paper. You should use cardboard as a base, and paper only as decoration. You can cut out various patterns from it and stick it on top.
If you choose dark cardboard, white paper will look great against its background.
Note!
- DIY satin ribbon bows: photos of original design ideas, step-by-step DIY master class
DIY hair bands - ideas for decorating homemade rubber bands + step-by-step instructions for making them yourself
DIY shadow theater: step by step how to do it at home! 175 real photos
Magnetic board
It differs from the previous type in that you cannot pin notes or pieces of paper on it. This has a plus: the needles will not be lost, but there is also a minus - the board itself, like the magnets, will be more expensive (when compared with similar-sized products made from cork). Usually it is hung on the wall in the room, a calendar with a daily to-do list, tables and other important things are placed on it.
Textile note board
Note board in Provence style
Note board in Provence style
This alternative to a wooden product will fit into a minimalist interior design.
Board for notes in the interior of the apartment
Burlap note board
Consolidate the result
- Pull the fabric taut and start pinning it in the middle along the long side of the board. Start at one end and gradually move towards the other. As you work, check from time to time to make sure the fabric has not moved. Repeat on the other side and then move to the short 60cm edge.
- To get a flat surface, act as if you were wrapping a Christmas present - simply fold the fabric into a triangle and pin it in place, then use a stapler. Make sure there is not too much fabric, otherwise the board will hang unevenly on the wall.
After that, I measured and marked 2.5 cm from each corner so that I knew where to put the screws when I hung the board on the wall. I used self-tapping screws with flat washers. The board is light enough that you won't need anything larger to hold it against the wall. But be careful not to drive the screws too far into the foam. Flat washers will help limit movement in soft materials.
Correct geometry: classic dresses of the year that perfectly style your figure
How to Make Dehydrated Lemon Zest: An Easy Method
BTS Named World's Best Selling Artists Of 2022 In The Music Industry
Slate
This is a black canvas on which you can draw and write with crayons. If you frame it in a delicate shade (you can paste it with old wallpaper) and make decorations in the form of small flowers, such a board will fit into the Provence style. But a “bare” black board or framed with wood will fit perfectly into a loft. This option is often used by modern establishments decorated in an industrial style.
Black board for notes
Board covering the entire wall in a loft interior. Drawing on such canvases is done using chalk or chalk markers.
Note board made from old wine corks
Fabric board
To make a fabric stand at home, just cover it with a sheet of plywood or the same balsa wood (gluing hardboard to the back). You can use polystyrene foam for this purpose, but it crumbles a lot and will quickly become unusable. Fabric boards can look like a real work of art: they are decorated with ribbons, rhinestones, beads, decorated with seashells and even soft toys.
Wooden note board
Any board must have a strong fastening so that it does not fall off the wall
Note board with decor
Marker board for notes
Carousel
The carousel is a structure made from natural materials. These are sticks, branches and thin ropes. It is necessary to create a structure similar to a children's carousel in a stroller.
Note!
- DIY bird feeder - interesting ideas on how to make it quickly and easily from scrap materials
- Do-it-yourself cold porcelain: the best options for porcelain products, step-by-step instructions and recipes for making it yourself (photo + video)
DIY curtains - types of curtains, choice of materials for sewing and design + step-by-step instructions and simple patterns for beginners
Just instead of toys on pendants, place photo frames made with your own hands from scrap materials. To make one, just tie a few thin branches around the edges; it will be very attractive and atmospheric.
The photographs inside are also placed on ropes. In the photographs, on the sides, you must first make holes for the rope. A “carousel” suspended in this state will be able to please the home’s inhabitants for a long time.
How to make a note board with your own hands
In addition to cork, there are also products that can be made at home. For example, if you want to hang a chalkboard in your hallway to write reminders on, you can easily make one from inexpensive materials.
Board for notes in the living room interior
Note board made from an old sieve
Framed note board
Manufacturing process
- Select the size of your bulletin board. I chose 90*120 because I needed a larger surface area. Take cardboard and cut two identical pieces out of it. Starting with the shorter sides, cut the tape and begin joining them together, pulling the tape tight. Pay special attention to the corners.
- Choose your fabric. Make sure you like the shade and pattern and fit into the interior. The cut should be approximately 3 cm longer on all sides than the size of the boards.
- Place the cardboard on the board and secure the fabric by pulling it tightly over the edges. It's best to start from the corners.
I am sure that from all these ideas you will be able to choose a project that suits your liking.
Found a violation? Report content
Marker board
Since the marker can be easily erased from a smooth surface, a glass coating is best for making. For example, an A3 photo frame. If you plan to decorate it to your own taste, choose a product framed in a neutral color. To make a writing board, you need to take out the glass and paint it on the inside with white or another light-colored paint (so that the dark marker inscriptions can be seen). After the composition has dried, the frame can be put back together. If you don’t want to fuss too much with paint, you can simply insert a white sheet of paper instead of a layer. The finished board can be placed in the hallway above the pouf to leave reminders about evening activities or simply write nice words to loved ones. You can take a small photo frame and make a mini tabletop board out of it.
It is advisable that there is always a marker near the finished product, for example: you can screw a stand for a glass in which stationery will stand to a large board.
Note board in the hallway
This option is suitable for those who do not like sticking pieces of paper and fiddling with them.
Note board in the kitchen
Required tools and materials
If you're not a designer or decorator, then you can still use this board for bulletin boards or to pin your photos, daily reminders, and inspirational messages.
Here's what you'll need:
- Glue gun and sticks for it.
- Construction stapler. MDF board 60*120 cm.
- Cork covering 60*60 cm.
- Fabric 140 sq.cm.
Organizer board
This is an option for business people who like to organize their space. This distribution of documents, papers and office supplies is convenient because the table can always remain clean. An organizing board usually has a surface for writing and compartments for necessary things. It may be a single piece or consist of several parts.
Workspace organization option
Magnetic note board
Wicker note board
Round note board
Generator testing stand
A stand designed for troubleshooting generators. To assemble such a stand you will need to connect in the given order:
- Voltmeter
- Switch off
- Ammeter
- Battery
- Rheostat
- Generator
Principle of operation
The electric motor is connected, the voltage is adjusted to 14V (at the generator output). The rotor operates at a frequency of up to 5000 rpm. The generator runs for 2 minutes, after which the current output is measured. The generator requires repair if its recoil force is less than 44A.
This stand is more suitable for training, as it has errors in operation. Modern professional options do this job much better.
Cork board
An interesting homemade option for creative people. All you need to make is a base, glue and a lot of wine corks. They can be arranged in different ways: horizontally, vertically, in squares and circles. On such a board it is convenient to attach photographs and notes on push pins.
Vertical arrangement of plugs
If you glue materials in this way, you will get a surface with circles
Blue note board
Board made of mesh or fabric
To make a fabric product you will need a base, fabric and tools to secure it. This board differs from the French one in that you do not have to drill holes and cover the fabric with tapes.
To make a place for notes from a grid, just take a metal sheet of any size. Papers and photos are attached to it with stationery clips or magnets.
The grid is the basis for the “moodboard”
Note board gray
Soft board for notes
Manufacturing instructions
- First you need to attach the cork to the MDF sheet. Use a glue gun to apply the material. Make sure all edges are well sealed before placing the panel on top. Use clamps or a heavy object to secure the material. If you don't have a glue gun, you can use spray glue or any other glue you have on hand. Just make sure the wood and cork are secured together tightly enough before wrapping your board in fabric.
- Once the panels are glued together, set them aside and take the fabric. It is best to use muslin or any other fairly dense and heavy material that you can find for the board. Remember that needles will be constantly stuck into it, so it must be durable.
- Lay the fabric down and smooth it out. After this, place the board on top so that the part with MDF faces up.
I used the Arrow Fastener Cordless Stapler. Of course, you can use a manual stapler, but an automatic one is much more convenient. Make sure you don't use staples that are too long so they won't go through the material. 0.6 cm paper clips are ideal.
A Russian woman played at a landfill at -30 to urge people to save nature
Trendy shade of spring 2022: ideas for fashionable coloring in “rose gold”
Environmental mission: famous hockey player Vyacheslav Fetisov heads VOOP
Board with clothespins
It may not be in the form of a canvas, but look like a horizontal strip of plastic, metal or even bamboo sticks (for eco-friendly interiors). Clothespins are glued to it at the top and bottom so that the clamping mechanism is not disturbed. This is a convenient, compact and minimalist option.
Board option with clothespins
Metal note board
Pink note board
Master class “Desktop note holder”
Marina Topychkanova
Master class “Desktop note holder”
New Year 2015 is coming soon (Aries)
.
On the eve of the holiday, exciting troubles
begin I want to offer an idea for making a gift with your own hands. I think it’s practical, useful and pleasant to give your creativity. Let's make a small, kind, soft talisman for next year.
Material we need:
- beads for eyes, bell, ribbon, bow.
1. Draw the body (2 parts)
and the head
(1 part)
of our lamb.
2. Take cotton swabs and cut off the cotton base from the stick.
3. Next we glue them along the contour of the body (2 parts)
and heads.
4. When the parts are pasted over, we glue the head to the body, using beads and black threads, cotton wool, for making ears - we add the features of our lamb.
5. Then glue the legs (clothespins)
our crafts.
6. And now all the parts are glued, the work is dry, you can decorate it - glue a bow and hang a bell.
This is the kind of note holder I made .
I wish you creative success!
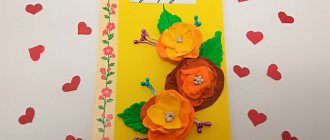
Master class “Easter cake and greeting card” Easter week is coming soon, everyone is preparing for it. So I decided to cook something interesting. Actually, I spied the Easter cake recipe. Spring flowers using the plasticine technique The cold winds are still blowing And the morning frosts are still causing frosts, Early flowers have just appeared in the thawed patches of spring, As if from something wonderful.
Source
Board with screed
This product is easy to make from a cutting board with ties. It will fit into a loft or eco interior. A slate cloth is usually glued to the board so that wooden strips remain along the perimeter, and a chalk stand is mounted underneath.
Note board made from frames
Note board with clothespins