We make a simple and very powerful homemade blender from a drill.
We decided to make squash caviar. The question arose: how to chop zucchini?
Blender
too small and weak for such tasks, and the meat grinder is not able to grind into a homogeneous paste.
Small lumps remain, and the caviar turns out to be grainy. Therefore, I decided to make a large and powerful blender from a drill, which every homemade person has.
The design turned out to be so simple that it does not require any drawings and is literally done “on the knee”.
Large powerful drill blender
Authorization on the site
We make a simple and very powerful homemade blender from a drill.
We decided to make squash caviar. The question arose: how to chop zucchini?
Blender
too small and weak for such tasks, and the meat grinder is not able to grind into a homogeneous paste.
Small lumps remain, and the caviar turns out to be grainy. Therefore, I decided to make a large and powerful blender from a drill, which every homemade person has.
The design turned out to be so simple that it does not require any drawings and is literally done “on the knee”.
Robot made from cans
A beautiful robot is made from tin cans. You need to insert one can into another. Make arms and legs from metal caps that cover half-liter glass bottles with drinks. Having drilled a hole in the center of each cap, they need to be pulled together with wire, securing the ends. Bolt two similar caps to the front of the robot body.
Cut a hole on the top can - the mouth, screw two bolts - the eyes. And make the ears from circles of foil, securing them to the sides so that they stick out in different directions.
Don’t forget to take a photo of your work step by step and post it on your social network page. Let your visitors envy your skills, and maybe even learn from your extraordinary experience.
https://youtube.com/watch?v=MZsCP3sr8KE
Materials and tools
- Drill. (every DIYer has one);
- PVC pipe 50 mm (plumbing store);
- PVC pipe plug 50 mm. (ibid.)
- Metal chrome tube with a diameter of 16 mm (furniture fittings store);
- Plastic dowels 14 and 8 mm. (building materials store);
- Self-tapping screws 16 mm with a wide head (ibid.);
- Screws M8 and M6. (ibid.);
- Blades for mounting knife (household goods);
- 50 mm clamp (ibid.);
- Empty tin can (trash can)
Making a blender
The blender consists of 3 nodes.
1 - drive, 2 - housing, 3 - blade shaft.
Since the drive is an ordinary drill, we will consider the remaining 2 nodes.
Making a knife shaft
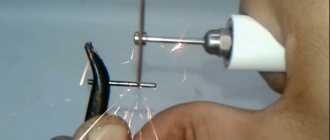
Since the knife shaft is the most labor-intensive, we’ll start with it.
The most optimal solution is to cut an M6 internal thread at one end of a rod with a diameter of 9 mm to a depth of 20 mm. Unfortunately, not everyone has access to a lathe (it can be done without a lathe, but it’s troublesome), so there is a second, very technologically advanced option. At the end of a steel tube with a diameter of 10 mm. hammer in a plastic dowel with a diameter of 8 mm. And screw an M6 screw with knives into it. But I have never seen steel tubes with a diameter of 10 mm on sale anywhere. Therefore, those for whom the first and second options are unacceptable choose the third. This is using a 16 mm tube, which can be purchased at any furniture hardware store. You should buy the one with the thickest walls. Because they are different.
A 14 mm dowel is driven into one end of this tube. and the next dowel is hammered into this dowel 8 mm and into the dowel 8 mm. The M6 screw is screwed in. Since it is impossible to clamp a 16 mm tube directly into the chuck of an ordinary drill, we also hammer a 14 mm dowel into which an M8 screw is screwed into the opposite end. Leave 30 mm of protruding screw for clamping in the drill chuck, cut off the rest. Only in this option, you need to take into account that the optimal length of the knife shaft (without knives and the part that is clamped in the chuck) is 100 mm, and the length of the 14 mm dowel is 80 mm.
it makes sense to shorten the dowels to 50 mm.
We've sorted out the tube, now we've got to attach the knives. On an M6 screw with a wide flat head, we put 4 blades for the mounting knife, broken off to the required length, through washers (I used 2 washers between each knives). We arrange the knives crosswise and tighten them with a nut. We screw this screw with knives into the 8 mm dowel. It screws in quite tightly, but holds securely. So, the knife shaft is ready.
Case manufacturing
The body is made from a PVC pipe with a diameter of 50 mm, a plug for this pipe, and a tin can. And another clamp.
We cut off the thickening for the rubber cuff from the pipe socket, since it will not be needed.
Next, take a suitable shallow empty tin can and drill a 1-2 mm hole in the center of the bottom. greater than the diameter of the knife shaft. We drill the same hole in the center of the plug. Along the perimeter of the can we drill several holes with a diameter of 10 - 12 mm to allow the ground mass to exit (It is much more convenient to drill holes in a can using feather drills for wood). We combine the tin can with the plug and secure it with self-tapping screws.
We place a pipe on the plug and also secure it with self-tapping screws. To ensure that the pipe fits tightly onto the plug, several turns of electrical tape should be wound around the plug.
We measure the length of the knife shaft fixed in the chuck and adjust the body to this size. In the upper part we make 2 slots 30 mm deep.
Since the internal diameter of the pipe is slightly larger than the diameter of the drill neck, we need a gasket, which we will make from the remainder of the same pipe. We cut a ring 20 mm high and cut out a 15 mm section from this ring. We glue the ring on the inside of the extension so that it does not get lost.
We glue it to one point so that it can be compressed. Next, we attach the extension to the neck of the drill (or simply measure it with a ruler, which is somewhat more accurate:), mark the location of the key hole on it, and drill it with a 20 mm drill.
By the way, I forgot to write. If you do not have a suitable empty tin can at home, you can replace it with any suitable lid, or use a plug for a 100 mm pipe. Which will look much more “branded” :)
We put the body on the drill, without securing it completely yet, insert the knife shaft into the previously spread cams, turn the body until the hole for the key on the body coincides with the socket on the chuck, tighten the shaft with a key, and finally secure the body with a clamp.
All. As they say, the design does not require adjustment and starts working immediately when turned on.
Source
Method number 3 – Antiperspirant idea
Well, the last version of a homemade mini drill, which we would like to provide to the readers of Sam Electric - using a cassette motor and an antiperspirant container. The advantage of this model is that it is controlled by a separate on/off button and has a convenient housing. Such a homemade product will be powered by a conventional power supply, which must be selected based on the characteristics of the motor.
So, first you will need to prepare the following materials:
- motor from a tape recorder;
- suitable collet with drill;
- used antiperspirant;
- RCA socket for connecting power and a mating part for it;
- power unit;
- switch from an old carrier.
The first step is to make a mini drill according to the instructions provided at the very beginning: place the collet on the shaft and secure it with bolts. Next, the motor housing is installed in the antiperspirant. As you can see from the photo, the dimensions are ideal for installing the part. If the motor has free movement inside the housing, secure it with electrical tape and hot glue.
After this, you need to drill a hole in the top cover for the exit of the collet or the drill itself. At the same time, you need to make a hole in the bottom for the power connector. Using a utility knife, you also need to cut out a window for the switch, then solder all the elements of the circuit in series and install them in a place convenient for you.
The advantage of this version of a homemade mini drill is its convenient operation, small size and stylish appearance. We recommend doing this particular option at home, because it is the most convenient, safe and at the same time affordable.
Review of various creation ideas
What you will need
In fact, the simplest hand (immersion) blender is not as complicated as it seems. In fact, it is just a motor with a button, speed switches and various attachments for chopping food. That's all! Making such a device with your own hands is not at all difficult, provided you have the appropriate parts and a minimum set of tools.
For this we need:
- Small electric motor.
- Container with a plastic lid.
- Plastic bottle 0.5 l.
- Switch with wires.
- Connector for power supply.
- Ball pen.
- Power unit.
Set of tools and materials:
- Stationery knife.
- Soldering iron.
- Super glue.
- File.
- Metal scissors.
- Tin plate.
- Solder.
- Aluminum wire.
- Marker or felt-tip pen.
Robot made from plastic bottles
You can make a robot from the simplest material – plastic bottles. For the craft, prepare:
- an opaque cola bottle;
- a toy bucket from a set of children's dishes;
- two forks;
- three caps from plastic bottles;
- two wheels from a toy car connected by a chassis.
We make two holes on the bottom sides of the bottle, through which we thread the chassis and screw on the wheels. We bend two forks - these are the arms - and attach them to the body from the back with bolts. We put a bucket on the head, to which we attach two larger lids - these are the eyes, and one smaller one in the middle - this is the mouth. We decorate the robot as your imagination dictates.
Step-by-step instruction
Of all of the above, the most difficult thing is to get an electric motor and an AC adapter with suitable current and voltage characteristics. A battery-powered motor from children's toys will not work here, as it does not have enough power. But an electric motor from an old cassette recorder or a broken music center is quite suitable.
The body of the blender, in which all the parts will be attached, will be a plastic bottle, which we will cut off from the bottom so that the motor fits completely into it. Next, we solder two wires to the electric motor terminals and pass them into the neck of the bottle through the hole in its lid made to install the switch.
We cut the motor wires so that they fit into the free space of the bottle after installing the switch in the hole in the cork, and solder their ends to the switch. We also connect the terminals of the switch and the power supply connector with wires. Then we make a small hole in the bottle for the power supply connector and insert the connector into it. We screw the plug with the switch onto the neck.
Method number 3 – Antiperspirant idea
Well, the last version of a homemade mini drill, which we would like to provide to the readers of Sam Electric - using a cassette motor and an antiperspirant container. The advantage of this model is that it is controlled by a separate on/off button and has a convenient housing. Such a homemade product will be powered by a conventional power supply, which must be selected based on the characteristics of the motor.
So, first you will need to prepare the following materials:
- motor from a tape recorder;
- suitable collet with drill;
- used antiperspirant;
- RCA socket for connecting power and a mating part for it;
- power unit;
- switch from an old carrier.
The first step is to make a mini drill according to the instructions provided at the very beginning: place the collet on the shaft and secure it with bolts. Next, the motor housing is installed in the antiperspirant. As you can see from the photo, the dimensions are ideal for installing the part. If the motor has free movement inside the housing, secure it with electrical tape and hot glue.
After this, you need to drill a hole in the top cover for the exit of the collet or the drill itself. At the same time, you need to make a hole in the bottom for the power connector. Using a utility knife, you also need to cut out a window for the switch, then solder all the elements of the circuit in series and install them in a place convenient for you.
The advantage of this version of a homemade mini drill is its convenient operation, small size and stylish appearance. We recommend doing this particular option at home, because it is the most convenient, safe and at the same time affordable.
Review of various creation ideas
DIY hand blender. Large powerful drill blender
In this video you will see how an old blender can make a decent engraver, drill or hand drill machine. As shown, the motor is powerful enough to handle wood, plastic and soft metal. RPM figures are nothing short of good... Budilov
The blender is a motor equipped with an attachment. Nothing complicated. The bowl with the knife is placed on the output shaft of the electric motor, and the engine lock is switched off. The assembled device is started by the power button in cruising or pulse mode. The process is helped by a speed regulator, a cord with a plug, and less often a fuse. It is not difficult to disassemble the blender, the main thing is to reassemble it later. Can you handle it? Those who doubt it, read on to learn how to repair a blender with your own hands. We recommend avoiding jumping through sections.
Drill with fishing reel
This do-it-yourself manual micro-drill can be called the simplest and most effective. If you do it, then you won't have any problems making a hole. A do-it-yourself drill of this type can easily be called the best; if something goes wrong, you can easily fix it.
What do we need:
- The reel is inertialess.
- A collet or an old drill chuck.
- Hot melt adhesive.
- Small drill.
The process of assembling a homemade drill from a coil can be divided into two main stages?
- First of all, we must dismantle the spool with fishing line, and cut off the axis that we do not need. This is what it looks like in the photo.
- Glue the cartridge or scurvy onto the remaining rod. You can use hot glue, but it will be more effective to do everything using cold welding.
When everything dries, we check how our mini drill works with our own hands. We found this video for you on the Internet, here each stage is described in more detail.
DIY mini drill examples and videos
Why do you need a speed controller and soft start?
When power is supplied to the grinder motor, the speed increases abruptly
from zero to ten thousand no more. Those who have worked with an angle grinder know well that it is sometimes difficult to hold it in the palm of your hand when starting, especially if it is installed.
It is precisely because of such abrupt increases in engine speed that the mechanics of the device burn out.
Also, during startup, a huge load is applied to the rotor winding and not the stator winding of the electric motor. Since a commutator motor is installed in the grinder, it starts working in the mode: the electromagnetic field is already “trying” to turn the rotor, but it remains motionless for a couple of months, since the force of inertia does not allow this to be done. As a result, the starting current in the motor coils sharply increases. Despite the fact that the manufacturer has invested a certain safety margin for the coils, taking into account overloads at start, sooner or later the insulation cannot withstand it, which leads to an interturn short circuit.
In addition to problems with starting, the absence causes some discomfort. Nettle, grinder speed regulator can be useful for certain types of work
- when grinding, as it is also called, polishing any surfaces;
- for installing large diameter tools;
- for cutting certain materials.
Today, with brushes, there is a high probability of the wire jamming in any gap. If the spindle speed was high, then the angle grinder may simply be torn out of your hands.
If you connect a power (speed) regulator with a soft start module to the angle grinder, then the problems described above will disappear, the size of the device will not increase, and the safety of its use will not increase.
Simple mini drills
Many people who do not want to shell out a significant amount of money for a ready-made tool often ask how to make a mini drill with their own hands.
You can make your own small mechanical drill using an old fishing rod reel.
To do this, you need to remove the spool from the reel (the core in the form of a cylinder on which the fishing line is wound) and cut the protruding metal axle to the desired size. Then you need to glue an old cartridge from a conventional drill or collet to the protruding rod.
Video:
A collet is a device for clamping round-shaped parts in a small chuck; in this case, you will need to clamp a drill.
You can attach the collet to the spool axis using cold welding or hot glue. After the glue or weld has dried, you can insert a small drill into the collet and get to work.
By twisting the reel handle, the mechanism rotates the collet with the drill, thereby creating holes in the desired material.
It is necessary to take into account that the resulting mini-drill must be held strictly perpendicular to the surface being drilled, otherwise there is a risk of breaking the drill. It is also not recommended to press hard on the instrument.
You can also make a mini drill with your own hands using an old motor from a CD player.
To start the engine, you need either a suitable power supply or a battery (or several smaller ones). The collet must be attached to the motor shaft using cold welding or glue.
It should be noted that the diameter of the motor shaft is usually 1.5 millimeters. Sometimes there are motors with a shaft diameter of 2.3 millimeters.
This size must be taken into account when choosing a collet, since the shaft must fit into the hole tightly, without gaps. Otherwise, there will be vibrations during drilling, which will sooner or later damage the mechanism.
After the collet is placed on the shaft, you need to attach the wires to the motor that will go to the voltage source. It is best to solder the wires, which will improve the strength of the fastening.
Then you can insert the drill into the collet and start working. The motor may start to spin in the opposite direction (not the one needed), in this case it is necessary to swap the wires, otherwise there will be no drilling.
Using the same principle, you can assemble a mini-drill with your own hands, using motors from other electrical appliances.
When using a motor from a small washing machine, the mini-drill will be more powerful, and drills of larger diameter can be inserted into it.
Another good option would be a motor from an electric razor, faulty screwdriver, printer or fan.
You can leave the mini-drill as is, and it will cope with its functions, or you can place the motor and collet in a plastic case, this way it will be much more convenient to hold the tool.
Types of devices and their differences
Existing types of blenders:
A stationary blender is a device that consists of a technical unit and a mixing glass with knives at the bottom.
The advantage of this type of device is that, unlike an immersion blender, you do not need to constantly hold the device in your hands to grind food.
The disadvantage of a stationary blender is that you can only mix the ingredients in the bowl supplied. But it is great for making various cocktails and smoothies.
An immersion blender differs from a stationary blender in having wider functionality. The device consists of two parts: a hardware unit and an attachment, while the number and functionality of attachments may vary.
Pros of an immersion blender:
- You can grind products in any container that is resistant to mechanical stress, which allows you to work with any volume of ingredients
- A large number of attachments that expand functionality (whisk, chopper, etc.)
- It doesn't take up much space in the kitchen
Flaws:
- You must always hold the device in your hands
- Not suitable for preparing liquid foods
Blender bowls and containers can be made of plastic, glass and metal. At the same time, glass, if handled carefully, is the most durable and environmentally friendly. Nozzles are made of stainless steel or plastic.
Professional blenders are a special type of device. They have large bowl capacity, power and high reliability, but their price is much higher. Also, as you can already understand from the name, such devices can be not only for home use, but also for commercial use.
As a result, the difference between devices for grinding products lies in their different purposes. The stationary one is better at mixing and whipping liquid mixtures, and the submersible one is better at slicing and grinding harder products.
Disassemble and understand
The design of the blender may be different, but you still have to disassemble it. Sometimes to do this you need to find a special plug, pry or press on it a little, and the plastic case, not restrained by anything else, breaks into two halves right in your hands.
Other models are held together with screws. Several rotational movements with a screwdriver in the places of the cross-shaped recesses remove the fastening elements, and the parts of the frame are undocked.
Now you need to understand what can be done to restore the life of the device.
How to make a BLENDER with your own hands
The processes described above occur in periods that become shorter each time. Therefore, the voltage supplied to the motor windings does not increase abruptly, but slowly, resulting in a smooth start of the angle grinder.
The time it takes for the electric motor to reach full speed depends on the capacitance of capacitor C2. The capacitor capacity of forty seven microfarads allows you to start the engine in two seconds.
When the angle grinder is turned off, capacitor C1 is discharged using sixty kOhm resistor R1 for three seconds, after which this electronic module is again ready to start.
If resistor R1 is replaced with a variable one, then you will get a speed controller that will allow you to reduce engine speed.
It is important that triac VS1 has the following characteristics:
- the minimum current for which it is designed should be twenty five A;
- The triac must be designed for a maximum voltage of four hundred V.
This circuit and the regulators made according to it have been repeatedly tested by many craftsmen using grinders with a power of up to two thousand watts
. It is worth noting that this device, thanks to the KR118PM1 microcircuit, is designed for power up to five thousand W. So he has a considerable margin of safety.
Connecting equipment to pedal control
It is not always convenient to select and manually control the operating speed of new equipment. You can add a pedal to your grinding machine as follows:
- disassemble the body;
- disconnect the electronic control;
- connect the motor directly and make the connection to the pedal.
However, you need to know that not every model is suitable for connecting to a new device. Incorrectly selected equipment will lead to engine overheating and failure. All this can end in a short circuit. It is not difficult to calculate the required power; each product has a label indicating the nominal parameters.
To calculate the optimal pedal load current, you need to divide the mixer motor power by the network voltage. In our case it is:
- 700 watts / 220 volts = 3 amps.
If the pedal has a factory rated load current higher than 3 amperes, it is quite possible to make such a connection.
This device is suitable for sharpening household knives, meat grinder knives, household tools, and can be used for polishing wooden, plastic or metal objects.
Figure 4 Foot pedal motor control frees your hands
Homemade kitchen mixer
Quite by ourselves. For this you will need:
- First of all, you need to get a motor. It should be powerful enough to cope with egg whites; we won’t talk about products with a harder consistency for now. A suitable motor can be obtained from an old cassette player, for example.
- Tin. Everything is simpler here, you can cut a piece from a can of any drink.
- Plastic lid from a jar.
- A pair of plastic cups.
- You will also need a switch.
- The power supply is selected depending on the power of the motor.
- And of course, all this will be done using a regular screwdriver.
One of the motor options
Capacity and drive
It's time to take action. We start with a glass in which we need to make a small hole. To do this, heat the metal end of the screwdriver using matches or a lighter, then use the heated tip to make a hole right in the center of the bottom of the cup.
Next, place the motor in the center of the glass and trace its edges with a marker, thus marking where it will be located. While the engine is moved to the side and manipulations with the glass continue. That is, it is clear that the mixer body is assembled first.
Now you need to cut a hole using a stationery knife at the bottom of the glass along the lines marked with a marker, into which the motor will be placed. The motor should fit snugly in the hole and not fall out of it, so the size of the hole should be slightly smaller than the motor.
This motor will be more than enough
Power and communications
Now you need to prepare a place for the switch and wiring. If the power supply has two wires, then one is attached to the switch and the other to the motor. Then the switch and gearbox are connected to each other using a piece of copper wire.
This creates a kind of mixer body. In order not to worry that the structure will fall apart, you can secure the motor and switch with superglue.
Let's move on to the second step. A tin can is needed to make a screw. To do this, fold a thin piece cut from a jar into a ring, and wrap a second similar piece in the middle of the resulting ring, so that you end up with a figure resembling a butterfly. We received the screw, now we attach a silicone nozzle to it with glue, which will be put on the pin.
For now, set the tin aside until the glue dries. Let's return again to the body with the motor. Place the glass cut side down. Here you will need a second glass, in which a hole has already been made in advance using a screwdriver. It needs to be installed on top of the motor. The result is a design in the form of a cup on a stand. In the center of the cup there is a pin, about a centimeter long, pre-glued to the motor.
During this time, the glue on the screw should have completely dried. We attach it to the pin. Done, now you can try. Place the required ingredients in a glass with a screw, cover with a plastic lid for mixing without splashing, and turn on the mixer.
Boring machine from a working old mixer
The engine in the old mixer has good power, its performance has been tested by time. You can make a drilling machine useful for everyday use with your own hands; for this you will additionally only need a motor from a portable mixer, 2 jars: coffee and freshener, the diameter of one should be slightly larger, and a small piece of decorative leather.
The step-by-step remodeling process is as follows.
Figure 5 Motor from a conventional mixer
- Disassemble the mixer body and remove the 220 volt motor.
- The fan must be moved as close to the engine as possible; to do this, you will need to remove all unnecessary elements that are attached from the base of the fan to the shaft housing. They do not bear any functional load on the future product. After this, you need to screw the fan to the end of the shaft leg.
- Next, you need to cut off the top from the air freshener can to the beginning of the narrowing point.
- The cut top should fit perfectly into the hole of the second coffee can. For reliability, it can be secured by cold welding and wait until it hardens completely. You first need to make small holes in a circle at a distance of 2-3 mm from the edge, which will serve for additional air exchange while the fan is operating.
- After the weld has hardened, it is necessary to insert an empty bearing of a similar size into the remaining hole for future fixation of the bur, then carefully press the hole with a hammer. After this, cover all voids from the inside with epoxy resin.
- Cut a rectangular hole in the jar to connect the control to the outside. Then insert the engine inside the housing and fix it on a metal frame, which should be pre-welded or used from improvised means.
- To close the bottom, you can use a metal drain from the sink; the holes will serve for additional air exchange. It should be welded using liquid welding.
- After assembling the equipment, its body should be refined with a piece of leather.
In the finished bur, you need to place a washer on the attachment to the shaft or tighten any fastener. With your own hands and zero investment, you have created a universal device with which you can create real masterpieces in your home.
Figure 6 You can find many options for using a drill in everyday life
How to use the attachments
Attachments allow you to diversify the number of functions of the blender. To change the attachment, you must first turn off the blender. Then remove the previous nozzle. And finally, just install a new one. Attachments that are common among housewives:
- whisk This assistant perfectly beats milk and eggs until fluffy. It requires careful handling. Although the whisk is metal, its rotating tip can easily be damaged if used for other purposes;
- attachment for making puree. It has very durable and sharp blades. However, you can puree foods only by boiling them first;
- chopper This attachment copes with very hard products (cheese, nuts, chocolate, onions, etc.);
- hook attachments. They are designed for kneading dough. But, as a rule, manufacturers warn that a blender will not be able to handle excessively stiff dough.
Flaws
Despite most of the advantages, there are several disadvantages to using a beauty blender:
- The cost of the original beautyblender device can reach more than $20, which is not affordable for everyone.
- The shelf life of the instrument, subject to storage and care rules, is no more than 6 months.
- The instrument requires high-quality care, otherwise its service life will be significantly reduced.
- When applying creamy products, their consumption may increase significantly.
- Using a sponge, only liquid products are applied, preferably of the same shade and texture. Mixing them can give ambiguous results.
It is worth noting that the defining functionality of using a beauty blender is only in wet form. The more it is saturated with water, the more economical the product is used. It is water, filling it from the inside, that prevents excessive absorption of the cosmetic product.
Don't miss the most popular article in the section: Fashionable haircut for short hair. Photo, front and back views.
Homemade doll mixer
Every child enters the age when he wants to be like an adult, necessary, responsible, to do the same things as adults; girls during this period more often copy the behavior of their mothers, and boys of their fathers. The child shows interest in household chores, including trying to help parents in the kitchen. However, not all household appliances can be used by children. For example, a mixer is not a safe toy at all and improper use can lead to tragic consequences.
You can get out of this situation so that the child remains happy and the parents calm. Namely, build your own mixer for him. For this you will need:
- Plastic tube.
- Electric motor.
- Any two wires.
- Batteries or portable power supply.
- USB cable
- Small switch.
Making such a simple device will not be difficult, and the child will be satisfied not only with the result, but also with the assembly process itself. And an adult will enjoy creating something with his own hands from available materials; you can feel like the host of the “Crazy Hands” program.
So, we start by gluing the switch using a silicone gun or superglue to the motor. Next, take a USB cable, cut off one side of it to free the wiring, and remove the rubberized base from the wiring by about two centimeters. There should be two wires. We connect one to the motor, the other to the switch. After which, the switch and the motor are connected to each other with copper wire. It is better to secure the wires with a soldering iron, but if you don’t have one at hand, you can simply tighten them properly.
Children love it when something is made especially for them; they will appreciate this more than the most expensive toy.
Now it’s time for the drinking straw, cut it into two pieces 6 centimeters long. Glue them together well lengthwise. A motor is attached to the lower part of the connected tubes. While the glue dries, take hold of the stirring element. To do this you will need a simple lollipop stick. A quarter of the stick needs to be bent in such a way that the letter “G” is formed from the stick. Using the straight tip, attach the stick to the pin at the base of the mixer. Ready. We connect the USB cable to a portable battery or any other energy source and press the switch. This miniature mixer will cope with mixing tea or eggs, and the child’s delight will know no bounds.
Mini drill attachments
A cutter made from a wheel from a lighter. Ordinary drills may not be enough if you are not a radio amateur, but are engaged in model making or other types of creativity that require the use of a mini drill or drill. Some attachments are easy to make yourself:
- Milling cutter. You can use a spinning drum from a lighter. Place it on a suitable size bolt and secure with a nut.
- Grinding head. A small nail will do. Place a cork champagne cork on it or wrap a cylinder of electrical tape around it. Cut a rectangle out of sandpaper of the required grit and glue it around the circumference of the head cylinder. To process different materials, you will need several of these heads.
- A circular saw. The upper or lower part of a C-size battery – the so-called “barrel” – is suitable for manufacturing. The battery material is strong enough to make a compass disk. To mark, use a compass to mark the hole in the center. The oblique teeth must be the same size to avoid runout during operation. To fix it in the drill chuck, use a bolt and secure the disc to it with nuts. As you can see, it’s not difficult to make a mini drill with your own hands from a motor if you are full of enthusiasm. Many scrap materials that you most often throw away will work. The only thing you will have to spend money on is a collet: making it yourself is extremely difficult.
DIY construction mixer
The repair process is very labor-intensive and sometimes you can’t keep track of everything. For example, you need to mix a concrete solution, everything has already been purchased and ready, when suddenly it turns out that the construction mixer is out of order or is not there at all. What to do in such a situation? Run to the store? But extra expenses cannot always be foreseen and there may simply not be funds for such a purchase. You can get out of this situation by making a concrete mixer yourself. For this mixer you will need:
- Drill.
- Hairpin 8, 40 cm long.
- Four metal plates.
- Nuts and washers.
So, the work begins with the hairpin. It needs to be sharpened in such a way that it is convenient to screw on the nut. On the other hand, you need to grind down the pin for the triangle. This is necessary in order to properly attach it to the drill.
Next we get to work on the plates. Using an 8 mm drill, you need to make one more hole from the edge on each. Now you can proceed to assembling the mixer. A nut, a washer, and then a plate are installed along the length of the stud. The distance should be at least three centimeters. The top and bottom plates need to be bent according to the principle of blades.
It should look something like this
The second end of the pin is attached to the drill, that's it, the construction mixer is ready. However, this type of homemade construction mixers will only handle small volumes of mortar.
Such a mixer will not cope with large volumes of work.
For mixing more liquid substances, for example, paint, this option is also suitable
For a large amount of mortar, you will need a concrete mixer, which you can also make yourself, but this will require much more time and materials, so it will be easier to borrow from friends or use rental services. Moreover, such a device brings more benefits when it is completely independent than when it requires constant supervision. In this case, it is better to choose the gravitational method of mixing the solution.
An example of a self-made concrete mixer
The main thing to remember is that when assembling any mixer, you must follow safety precautions, and if you do not have confidence in your abilities, then it is better not to take on such painstaking work, but to go to the store and buy a decent product.
We decided to make squash caviar. The question arose: how to chop zucchini?
too small and weak for such tasks, and the meat grinder is not able to grind into a homogeneous paste.
Small lumps remain, and the caviar turns out to be grainy. Therefore, I decided to make a large and powerful blender from a drill, which every homemade person has.
The design turned out to be so simple that it does not require any drawings and is literally done “on the knee”.
Scanning and repotology
UV unwrapping itself is a simple process if you prepare the mesh properly. At this point, unnecessary geometry that will not be visible to the camera, such as inward-facing faces created by the Solidify modifier, has already been removed. They take up a lot of wasted UV space, so it's worth taking the time to mesh carefully. If the pieces of clothing are arranged as I described above, then unfolding them will be a piece of cake, since they will be flat surfaces curved into their shape. This means the reverse process is just as simple! Overall, the auto-sweep feature gets the job done, and you probably won't even have to adjust anything.
For organic and solid parts, everything is as usual. We identify the parts where more than two surfaces intersect and place the seams accordingly. A little tedious, but fortunately not very difficult.
This model will be high resolution with movie-quality detail, so I wasn't worried about too many polygons or too many texture sets. I created one 4k set for the head, four 4k sets for the chest and right arm, two 8k sets for the lower body and one 8k set for the left cyberpunk arm. This is more than enough for the detail I wanted.
I used the free UV Packer addon for Blender, which saved me the chore of packing each individual UV layer. He did great.
As for retopology, I didn’t have to do it. As I said, everything (except the head) was modeled in regular SubD using Multires. All that's left to do is bake the higher SubDivision levels in Normal to the lower levels in Blender, which is quickly done using Multires.
What can you grind in a blender?
You can grind many ingredients in a blender.
The most popular of them are:
- Vegetables, fruits and berries - cucumbers, tomatoes, carrots, cabbage, eggplants, zucchini, onions, pumpkin, apples, bananas, pears, etc. Almost any berries can be chopped. It is important to mention that when mashing boiled potatoes with a blender, it becomes more viscous and dense due to starch and this consistency will not be to everyone’s taste. You should also refrain from blending apples with metal attachments, since when it comes into contact with metal, the apple oxidizes and changes its taste.
- Various greens - parsley, dill, green onions.
- Nuts - peanuts, walnuts, cashews, almonds and others. At the same time, they can be ground into a paste.
- Meat - beef, pork, veal, lamb. The resulting minced meat has a slightly different, denser consistency, which makes the cooked meat more uniform, but less juicy.
- The blender can also be used as a coffee grinder - grind coffee and crush ice if you have a special grinder.
For better processing, it is recommended to pre-cut all products into pieces, and boil especially hard ones.
What not to do
How to use a Brown, Electrolux, Bosch blender, submersible or stationary, was described earlier, now let’s look at what not to do during operation.
Remember that you cannot connect wet attachments to the device, as this may cause the gadget to malfunction. The case is best cleaned with a soft, slightly damp cloth. Children should not operate the device; they are allowed only with the presence and supervision of adults.
How to use the bowl of an immersion blender? Here it is prohibited to immerse large pieces of ingredients that have not been cleared of seeds, stalks, and seeds. Such large particles can reboot the engine, which will cause a breakdown.
Please note that a small portion of food in a stationary device can also cause overload of the motor. Do not operate at maximum power for long periods of time
Take breaks. It is prohibited to activate the device with wet hands, and the device should not run idle. Knives should not be held in your hands; you need to control the depth of immersion of the leg.
Materials and tools
- Drill. (every DIYer has one);
- PVC pipe 50 mm (plumbing store);
- PVC pipe plug 50 mm. (ibid.)
- Metal chrome tube with a diameter of 16 mm (furniture fittings store);
- Plastic dowels 14 and 8 mm. (building materials store);
- Self-tapping screws 16 mm with a wide head (ibid.);
- Screws M8 and M6. (ibid.);
- Blades for mounting knife (household goods);
- 50 mm clamp (ibid.);
- Empty tin can (trash can)
Making a blender
The blender consists of 3 nodes. 1 - drive, 2 - housing, 3 - blade shaft.
Since the drive is an ordinary drill, we will consider the remaining 2 nodes.
Making a knife shaft
Since the knife shaft is the most labor-intensive, we’ll start with it. The most optimal solution is to cut an M6 internal thread at one end of a rod with a diameter of 9 mm to a depth of 20 mm. Unfortunately, not everyone has access to a lathe (it can be done without a lathe, but it’s troublesome), so there is a second, very technologically advanced option. At the end of a steel tube with a diameter of 10 mm. hammer in a plastic dowel with a diameter of 8 mm. And screw an M6 screw with knives into it. But I have never seen steel tubes with a diameter of 10 mm on sale anywhere. Therefore, those for whom the first and second options are unacceptable choose the third. This is using a 16 mm tube, which can be purchased at any furniture hardware store. You should buy the one with the thickest walls. Because they are different... A 14 mm dowel is driven into one end of this tube. and the next dowel is hammered into this dowel 8 mm and into the dowel 8 mm. The M6 screw is screwed in. Since it is impossible to clamp a 16 mm tube directly into the chuck of an ordinary drill, we also hammer a 14 mm dowel into which an M8 screw is screwed into the opposite end. Leave 30 mm of protruding screw for clamping in the drill chuck, cut off the rest. Only in this option, you need to take into account that the optimal length of the knife shaft (without knives and the part that is clamped in the chuck) is 100 mm, and the length of the 14 mm dowel is 80 mm. it makes sense to shorten the dowels to 50 mm.
We've sorted out the tube, now we've got to attach the knives. On an M6 screw with a wide flat head, we put 4 blades for the mounting knife, broken off to the required length, through washers (I used 2 washers between each knives). We arrange the knives crosswise and tighten them with a nut. We screw this screw with knives into the 8 mm dowel. It screws in quite tightly, but holds securely. So, the knife shaft is ready.
Source
Homemade collet coupling of the simplest design
The simplest collet, operating on the principle of a coupling, can be made of steel wire with a diameter of 1 mm. It should be borne in mind that the collet of the proposed design is not a universal clamping device and can only be used for drills of the same diameter
It is important that the transverse size of the drills used corresponds as closely as possible to the diameter of the output shaft of the drive motor. In addition, it is important to consider that such a collet can only be used when drilling materials with low viscosity
Homemade wire clamp
To manufacture a collet coupling of the proposed design, the following consumables, fixtures and tools will be required:
- a cylindrical metal blank, the diameter of which corresponds to the diameters of the output shaft of the electric motor and drill;
- steel wire;
- electric soldering iron;
- soldering flux.