Since I study at the institute, and sometimes I go to classes for the whole day, in such cases I always take a thermos with me. And there is green tea in the thermos. Of course, the institute has a canteen where you can buy yourself some tea. But it’s there in bags!
I used to always carry my thermos in my bag, along with my notebooks and a sandwich. And now that I made myself a bag from old jeans (you can read about it here https://prettyhandmade.ru/?p=36), I felt sorry for putting everything in it, including a thermos. I kept thinking about how to make it so that I could wear it on the same shoulder, but separately. And I came up with an idea!
I decided to crochet a thermos case. I had never seen anything like this before, and I didn’t even think to look at what was on this topic on the Internet. I just took some wool yarn out of the closet and immediately got to work.
The volume of my thermos is 0.5 liters. For the cover, I took approximately 130 grams of 100% sheep wool, the thickness of the thread was 50 g per 50 m, and I crocheted number 3.
Want more details? Well, sit down comfortably, let's begin.
So, master class. Crochet a cover for a thermos
Step 1. First we knit the bottom for the cover.
To do this, we knit a chain of four to five air loops and close it into a ring. Then we knit a row of single crochets into this ring. And we continue to knit single crochets in a spiral, making additions of one single crochet after about one. I'm not following strict rules for adding here, I'm just making sure that the circle stays flat, that is, it doesn't curve into a cup shape or become wavy around the edge.
Step 2. As soon as the bottom for the thermos is connected, and in size it has already become slightly larger than the bottom of the thermos itself, we stop adding. Due to this, our knitting will take the shape of a cylinder, which is what we need. We knit 2-3 centimeters of the cylinder still with single crochets so that the bottom is as dense as possible and not loose.
Step 3. Now you can relax and knit with single crochets.
We continue to knit the same cylinder until we reach approximately the middle of the thermos lid. In this part I worked a couple of rows with single crochets to secure the stitch.
Step 4. The cover itself is ready, let's move on to knitting the handle. My handle width is 6 centimeters. We knit the handle in single crochet stitches so that it stretches out less later. To do this, simply turn the knitting and knit in the opposite direction. We knit as many loops as will be sufficient for the width of the handle of the case, and turn again. Don't forget about the lifting loop at every turn.
We knit this way until the handle reaches the desired length. Mine is 68 centimeters long.
Step 5. Sew the free end of the handle to the opposite side of the case, in its upper part.
Step 6. To make the edge of the handle look more neat, we tie it on both sides.
Crochet accessories
Often knitted quickly, you will need one or two evenings to knit our cover.
That's it, the thermos case is ready!
Decorative design
A phone case should not only perform its direct protective function, but also provide aesthetic pleasure to its owner. Absolutely any model can be decorated independently using almost improvised means.
Decorative ornaments can be bought ready-made in specialized stores or made by yourself. If you apply a little imagination and ingenuity, the result will be a unique and original case that no one else will have.
Materials for decorations
A wide variety of decor can be used to decorate cases. Embroidery, rhinestones and ribbons are used in delicate themes. For extravagant and bright options, craftswomen select decorative stones, leather, beads and other materials.
List of elements for decorative decorations:
- ribbons, braid, border, nylon, bows, lace;
- beads, rhinestones, beads;
- decorative stones, elements made of natural and artificial leather, buttons.
The material is very diverse and its choice depends on the imagination and model of the product. Craftswomen do not always buy decorative jewelry in stores and very often they make it themselves. For example, you can use finely ground glass Christmas tree decorations. These grains are added to transparent nail polish and coated with it on dense surfaces, resulting in decorative glitter.
Or another option. You can make beautiful stones yourself. To do this, you need to add gypsum to the water and knead it into a dense mass. If multi-colored elements are needed, then dyes are immediately poured during mixing. You can also make them white and then paint them with nail polish.
While the plaster is soft, a large needle or awl is used to poke a hole for future fastening, if required. And then you need to wait for the stones to dry and treat them with transparent or colored varnish. You can use homemade decorative glitter.
On a note:
In the case, the tea in the thermos stays hot longer.
A knitted cover for a thermos made of pure wool is a great winter accessory.
No. 1 Do not knit a cover for a thermos with a volume larger than 0.5 liters. During wear, crochet will most likely stretch out, unless you use some particularly coarse threads and knit very tightly.
#2 Check or ask the seller if the yarn you are knitting with is intended for felting. If this is the case, then first you need to understand how much the item will shrink when washed. Knit a sample of 15 by 15 centimeters and measure it, write down the data. Then wash the sample with other items at 40 degrees. You can put it in a separate bag so that the fibers are not dispersed throughout the car. After the sample has dried, measure it again and calculate the percentage of shrinkage. And knit a thermos cover based on these data, that is, with a small allowance.
№3 Crochet accessories
require careful treatment of them. If you wash them by hand and at a temperature not exceeding 40 degrees, they will serve you for a long time and will retain their shape and color.
Posted from: 2-22-2016
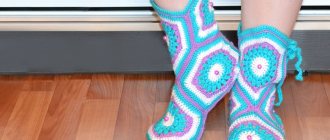
Last week we took a week-long road trip through the mountainous regions of Northern Thailand. We spent a lot of time on the road and I decided to put it to good use. In the process, this thermos case was born, which I crocheted. I knitted it first for myself, then I decided to knit another little case for my friends - so that I could give it to them along with a thermos upon my return.
The idea of a case with handles and ties like these was born completely spontaneously! It turned out that carrying a thermos by these handles is very convenient. To be honest, the thermos just didn’t come across very well - it got very hot from the outside and quickly lost heat. At first I hid it in a blanket, but then I decided that it wouldn’t be easier to knit a cover for the thermos, especially since I took the yarn and crochet with me and had a lot of free time on the road. So I decided to kill two birds with one stone - to make the thermos more heat-retaining and to keep myself occupied. And in general, it’s nice when you’re driving for a long time to do something with your hands along the way, it seems like your time isn’t wasted.
I used two types of yarn - thick green wool, and thinner melange in light green shades.
I started knitting the cover from the bottom. I knitted the bottom like this - I closed 5 chain stitches in a ring, then knitted 12 double crochets into this ring. I made an increase in the next row - two double crochets in the loop, two double crochets in the next one with a chain loop in the middle, then again 2 double crochets, then two double crochets with a chain loop between them.
And a photo for clarity:
After that, I knitted double crochets behind the back wall without any additions - these are the walls of the thermos. I knitted 6 rows with green thick yarn (at the beginning of each row there are 3 air lifting loops), then switched to melange thread. Melangeva knitted 9 rows with single crochets behind the back wall to create relief stripes. After that, I again switched to double crochets with thick green yarn. I knitted 7 rows and realized that the desired height had already been achieved.
Now we will knit another row with double crochets using melange yarn (we will thread the “handles” into this row. For the handles, I tied a lace with a double melange thread, leaving longer threads at both ends - so that later I could string the beads. I threaded the cord into the top row (on the sides, where handles, I didn’t pull 8 stitches each).
This rabbit, roaming freely in the National Park, also liked my thermos. Maybe because it's green, like grass?)))
I really liked knitting covers for thermoses and I immediately decided to knit the same one for my friends - only with a slightly different design.
I knitted the cover in two threads - to make it warmer and faster))) In this cover I made small “grooves” from thin gray yarn, which I then decorated with beads. Well, I made and decorated the handle ties using the same principle.
Greetings to all who stopped by. Sometimes you have to sew something urgently. Like, for example, recently - my husband is going on a business trip tomorrow, and today he decides to take a thermos with him and wants a new cover for it. Moreover, he probably considers his wife, that is, me, to be a sorceress. After all, in order to sew something I need to walk around, sit, think, count, draw. In general, you need to mature. And then take it and sew it and it only takes 2-3 hours for everything.
The requirements were:
- so that it is not easily soiled; - necessarily with a handle in which you can adjust the length. — it was dense and retained heat in the cold. (I went to Yamal, and it’s so cold there) This is what I took into account, I also asked that there be a zipper across the entire cover, from the bottom to the bottom. But I persuaded him that there was no point and that this would make him cool down faster.
Sewn from the remainder of raincoat fabric from. lining - black fleece. Inside there is a double layer of cotton filler. I simply quilted it with diamonds. It closes with a drawstring with a fastener through the eyelets. The handle-belt was taken from an old bag. The husband was pleased.
It’s also very convenient that you don’t need to take the entire thermos out of the case when using it, it won’t get cold. I pulled off the case a little, poured some tea and put it back on)))). Even on the same day, a case or bag, I don’t even know what to call it, was sewn for work ID documents. But I couldn’t take a photo. I let my husband evaluate the work, he tried on the contents and packed it in his bag. Then he refused to take it out. Made from the same raincoat fabric. Maybe I'll show you someday. That's all for today. See you soon.
Added 11/22/2016: Lately, many people have been asking me to tell me in detail how to sew a cover. At first I thought of making a master class on sewing a cover for a thermos, but on the Internet I found a very detailed one that might be useful to you -
When going winter fishing, hiking, or going for a long walk, take warm drinks and food with you. Learn how to make a thermos, wood chip stove.
Interesting purchasing options
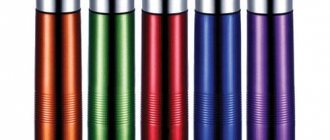
You don’t always have the ideas, time and desire to make a case yourself. The result may not be to your liking or suitable, and the time spent may not be returned. It is for this reason that you can choose a case made at the factory. Such accessories have increased protection against falls and an insulated structure, which does not allow the thermos to cool down for several hours longer.
Often, the thermos manufacturer itself supplies a case with the company logo along with its product. Such accessories most often do not have thermal insulation properties, but can serve as protection against damage and breakage of the thermos.
Whether to use an official case or not is up to each user to decide for himself.
To learn how to make a thermos cover with your own hands, see below.
Source
How to make a thermos?
If you are going for a walk in nature in winter, take some hot tea with you. If you don’t have anything to pour it into, see how you can make such a vessel from available materials. You can use what is available, using plastic or glass bottles as a basis.
If you like this thermos, then you will need:
- two plastic bottles of different sizes;
- foam;
- foil;
- scissors;
- scotch;
- yarn;
- hook.
Wrap the small bottle in foil.
This material has a glossy and matte side. We wrap the foil so that the glossy one is inside, this will help retain heat better. Cut off the neck and bottom of a large bottle. Wrap the small one with foam rubber, insert it into the larger one through the lower hole of the one. Attach the cut bottom of the larger container to its place, attach with tape. Now you need to wrap foil on top of this structure. Knit a piece of thread to the size of the decorated large bottle. Tie at the top with the attached cord. If you don't know how to knit, sew on a piece of thick fabric. How to knit and sew a cover for a thermos will be described below. And this is far from the only way that will tell you how to make a thermos from plastic bottles.
To implement the second idea, you will need:
- 2 bottles - with a capacity of 1 and 0.5 liters;
- foil;
- polyurethane foam;
- scotch;
We also start by wrapping a small bottle with several layers of foil, the shiny side inward.
After cutting off the bottom of a large bottle, place a small one in it, place the bottom in place, and secure with tape. This must be done carefully so that when you fill the space between two bottles with polyurethane through the upper part, the mass does not flow out of the lower hole. Don't apply too much polyurethane. After squeezing out a certain amount from the plastic nozzle placed on the can, wait, as the mass will increase in volume.
Let the composition dry, then trim off the excess at the top with a knife. The thermos is ready.
For the third idea, in addition to two bottles of different sizes, foil, and tape, you will also need foam rubber.
Like the first two containers, it can be used not only to maintain an elevated temperature of the drink, but also for chilled liquids. This thermos is indispensable in the summer.
Cut a large bottle into 3 parts, as shown in the photo. Wrap the small one first with foil, then with foam rubber, and again with foil on top. Place the bottom and then the middle part of a large bottle on it. Connect the container elements with tape.
Now check out how to make a good thermos from a glass bottle. But you will need ones with screw caps. You can buy juice in such a container and use it a second time.
DIY homemade thermos from glass containers
To make one, take:
- glass bottle with screw cap;
- kitchen towels;
- scotch;
- electrical tape;
- scissors.
Wrap the bottle in 3-5 layers of paper kitchen towel. To make this easier, secure it with tape. Trim the edge and secure it with a piece of tape. But don't cut it, wrap this black electrical tape around the entire bottle. The next layer will consist of foil. Screw the electrical tape over it so that each lower turn overlaps the upper one a little. Here's another way to make a good thermos. Take:
- a glass bottle and a slightly larger plastic bottle;
- foil;
- black electrical tape;
- scissors;
- cotton wool;
- cotton fabric.
Cut off the neck of a large plastic bottle; it will not be needed.
Next, this container needs to be divided almost in half with scissors. Cover sharp edges with electrical tape to avoid cutting yourself while working. Wrap two parts of a plastic bottle with foil, and a small glass bottle with cotton cloth. Secure materials using electrical tape. Place the small bottle blank in the bottom of a plastic container wrapped in foil. Between these two containers, using a wooden skewer, place cotton wool.
Place the top of a plastic bottle with foil on the structure and wrap the outside of the thermos tightly with tape.
Infrared dryer
The second method of making a dehydrator is even simpler. Here, instead of a fan heater, you will need infrared film.
This is exactly what is used for electric heated floors.
Moreover, in this case you don’t even need to build a bulky cabinet. It is enough to make long shelves. But first things first.
Heating infrared film is a roll material and is sold by the meter. The width can be different - 50,80,100 cm.
Since we are planning to make a unit for serious volumes, and not an analogue of a small saucepan, then choose a width closer to 100cm.
What power should I choose? For good performance, buy models with a power of 220W per 1m2. With an average shelf size of 20*100cm, one tier will consume about 55W/hour or 1.32kW per day.
Multiply this power by the number of shelves and get the energy consumption of your dryer.
Next, this film will need to be cut in strictly defined places (where the scissors icon is).
How to keep heat in a food container?
Those who love winter fishing know how good it is, when hungry, to get hot sandwiches and warm hot dogs to enjoy on a snow-covered reservoir. It is not difficult to construct a container that retains heat. Do this if you have:
- a piece of polyurethane foil insulation;
- plastic jar with a lid of the required size;
- scotch;
- scissors.
Cut a rectangle from the insulation and cover the sides of the jar with it. Place it on the remaining polyurethane foil sheet and outline the bottom. Cut out this circle. Attach it from the bottom to the sides with tape. Do not cut this tape. Apply tape over the entire surface of the insulating layer. To keep the food hot as long as possible, attach the lid to the insulation, outline it, and cut it out with a margin. Then it will be possible to cover the sides of the lid with this material and secure it with tape. Before you put food in the container, wrap it in foil.
Connecting wires and temperature sensor
If you are not familiar with electrical circuits, you can adjust the heat and temperature using the built-in thermostat on the heater itself by turning the knob to the minimum and maximum positions.
But it can be made much more convenient and functional. Buy an external temperature sensor and an external thermostat at your local electronics store or in China.
Drill two holes approximately in the middle of the back wall and insert control sensors there.
The wires are soldered in place of the heater's built-in thermostat, and a digital thermometer is brought out.
You set the drying temperature yourself depending on the product - vegetables, fruits, meat, fish, etc.
For plants and berries, such a fan in the first position optimally increases the temperature to 40C. At the same time, try to open the cabinet door as little as possible.
For other products, switch the heating to position II.
A remote thermostat with wires is good, but not everyone can figure out the connection diagram. If you have problems with this, but you still want to control the drying in this way, use a socket thermostat.
You insert it into the nearest socket, place the sensor inside the cabinet and program the upper and lower temperature thresholds.
More details
In this case, the fan heater plug is simply stuck into the thermostat itself. It looks like a socket-in-socket design.
You don't need to do anything fancy with the electrical circuit. The temperature inside the dryer reached 40C, the fan turned off. It cooled down to 38C - it turned on.
If you want to automate all this and set the specified drying time so as not to spoil the food, timer sockets (mechanical or electronic) are at your service.
This is especially important when drying fish, when the technology requires a certain pause after continuous operation of the unit for many hours.
How to sew or knit a thermos case?
The time has come to reveal the secret of this. If you go for a walk with your child in the cold season, make a thermos with a dispenser, as described above. Then the drink will be warm and will remain at this temperature for a long time. But it is necessary to tie a cover on the vessel.
For it you will need:
- dark and light threads;
- hook;
- scissors.
Cast on 5 air loops, connect them into a ring, making another loop.
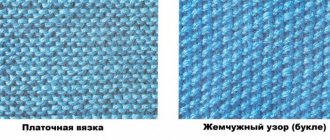
Tie this blank with single crochets, you will get 9 of them - this is the first row. The next row will alternate between one single crochet and one increase stitch. The third is done in the same way, but two single crochets and one increase are knitted. In each subsequent row you need to increase the number of single crochets by one loop, the increase also remains in the amount of 1 piece. This way you will knit 7 rows. To finish the bottom, work the 8th row in single crochets without adding a stitch. In this case, the hook must be inserted into the back wall of the loop from the previous row. Also, without adding loops, you need to crochet the cover further. To do this, we use the “front relief column” pattern, alternating with the “wrong column”. We use single crochets and perform 10 rows like this. Now you need to change the dark thread to a light one, perform 6 rows with single crochets. Take the dark yarn again and use it to knit 7 rows of embossed double crochets. Then work six rows with a light thread in single crochets. Next, there are 7 rows of embossed double crochets using dark thread. It remains to complete two rows with single crochet and one with double crochet, using light yarn. Tie a chain with a blue thread and pass it through the top between the posts.
Now you need to put the crocheted cover on the bottle, tighten the lacing, and decorate it with ties. See how to sew a cover on a bottle so that it turns into a thermos. It is very convenient for keeping baby food warm. But you can sew one onto a regular glass or plastic container, thereby turning it into a thermos. To work you will need:
- felt;
- cotton fabric;
- scissors;
- needle;
- threads;
- rags;
- polyethylene;
- felt.
The fabric structure will be four-layer, so you need to cut blanks of the same shape from felt;
polyethylene; rags; cotton fabrics. They will be rectangular. The size of these parts is easy to determine; to do this, just measure the distance from the cap to the bottom of the bottle, add 1–2 cm. Reduce the layers of polyethylene and rags on two opposite sides by 1 cm. Also cut out 4 circular parts that correspond to the bottom of the bottle. It is better to immediately iron the edges of the workpieces to make it easier to stitch the layers together. Which is what you will do.
Sew a zipper on one and the other side of the four-layer fabric. This can be done either on a typewriter or by hand. Sew the bottom on one and the other side of the resulting tube. You can decorate the cover with felt, sewing, cut out butterflies or other figures.
Manufacturing of drying trays
Inside the cabinet, homemade nets are placed on the guides.
They are also assembled from wooden planks connected with construction angles.
Just don’t glue the pieces of wood together!
When heated, the glue will release toxic fumes. Therefore, only corners or a stapler.
It is better to choose a metal mesh made from food-grade stainless steel on which the products will be placed. It will not release any chemicals when heated.
Beekeepers filter honey through this. The only problem is to find it.
Many people advise not to bother and take the reinforcing material that goes under the plaster. It supposedly contains only fiberglass and nothing more.
However, do not forget that there is also a binding element - an epoxy compound. It is also not recommended to use a mosquito net.
It contains plastic and toxic paint. With such trays, after just a few years of abundant absorption of “healthy” dried fruits, oncology will definitely await you.
You shoot the mesh onto the bar with a stapler along the entire perimeter.
Such pallets are made in just a few hours. For the above cabinet sizes, the optimal number of nets inside is 4 pcs.
The dimensions of the mesh tray should be 5 cm narrower than the depth of the cabinet.
This is necessary so that warm air can circulate freely from both the back and front.
It is better to place the pallets themselves in such a way that the first is located close to the door, and the second to the back wall, etc.
With such a checkerboard layout, the warm flow will consistently blow tier after tier.
The tray is pushed in or placed on guide bars. They are made either wood or aluminum.
In this case, aluminum releases heat faster after heating. However, the question of its environmental friendliness and toxicity always remains open. Wood is still safer.
What it is?
A refrigerator bag is an item that will help keep food fresh for 12 hours. Externally, the bag is no different from its other “brothers”. However, this product still has a little trick.
Decorative design
A phone case should not only perform its direct protective function, but also provide aesthetic pleasure to its owner. Absolutely any model can be decorated independently using almost improvised means.
Decorative ornaments can be bought ready-made in specialized stores or made by yourself. If you apply a little imagination and ingenuity, the result will be a unique and original case that no one else will have.
Materials for decorations
A wide variety of decor can be used to decorate cases. Embroidery, rhinestones and ribbons are used in delicate themes. For extravagant and bright options, craftswomen select decorative stones, leather, beads and other materials.
List of elements for decorative decorations:
- ribbons, braid, border, nylon, bows, lace;
- beads, rhinestones, beads;
- decorative stones, elements made of natural and artificial leather, buttons.
The material is very diverse and its choice depends on the imagination and model of the product. Craftswomen do not always buy decorative jewelry in stores and very often they make it themselves. For example, you can use finely ground glass Christmas tree decorations. These grains are added to transparent nail polish and coated with it on dense surfaces, resulting in decorative glitter.
Or another option. You can make beautiful stones yourself. To do this, you need to add gypsum to the water and knead it into a dense mass. If multi-colored elements are needed, then dyes are immediately poured during mixing. You can also make them white and then paint them with nail polish.
While the plaster is soft, a large needle or awl is used to poke a hole for future fastening, if required. And then you need to wait for the stones to dry and treat them with transparent or colored varnish. You can use homemade decorative glitter.
Cold accumulator
For many people, at the mere mention of the phrase “cold accumulator”, one picture appears in their head: they need a special device that will perform the function of generating frost.
However, a cold accumulator can be made from scrap materials that are found in all homes.
Ice bags
To get it, you need to pour water into ice molds and put them in the freezer. Once the water has hardened, you can start making ice packs.
Place ice cubes in a zip-lock bag and close the bag. The second bag will serve as protection against leakage, so the first bag will have to be placed in another one.
Ice bottles
To make them you will need the following:
- empty containers
containing carbonated drinks; - water
(the amount of liquid depends on the size of the bottle); - salt
(6 tablespoons per 1 liter of water).
You need to make a strong solution with salt. The salt must be dissolved in water, after which the resulting solution should be frozen. Salt will prevent the ice from melting quickly. This means that the bag will retain the cold much longer.
Diapers and battery
This method of creating a refrigeration unit is recommended for families with small children.
You need to pour water into the inside of the diaper. You should wait until the liquid is well absorbed into the diaper itself. The baby hygiene product will need to be cut. The gel mass should be placed in a plastic bag with a zipper and placed in a second bag. After this, send the finished package for freezing.
Gel battery
It is created on the basis of saline solution. The solution must be concentrated, which will subsequently allow its volume to be increased to 3 liters. Add wallpaper glue or gelatin to the diluted 3-liter liquid. Place the gel mass in the prepared container and put it in the freezer. Gel battery melts much longer than regular ice.
Based on ammonium nitrate
Knowledgeable summer residents use this product as a fertilizer in their suburban areas. It’s easy to get a high-quality cooling element from such an assistant in the country.
Nitrate can cause the air temperature to drop by twenty-three degrees.
The two ingredients (water and ammonium nitrate) are taken in equal proportions. You need to pour fertilizer into the prepared bottle and dilute it with water. The refrigeration accumulator is ready.
There is a second option for creating this cooling element. Saltpeter is added to frozen water. The cooling effect of the fertilizer battery will thus increase several times in time.
Foamed foil polyethylene
Chilled foods won't stay warm in a foil-lined bag, and hot snacks won't cool down. Any building materials store always has it in its assortment.
Aluminum or metallized foil and keeps the temperature in the bag. This polyethylene is available with one-sided or double-sided coating. Double-sided foil polyethylene has the best characteristics.
Based on the listed refrigeration tools, you can make a portable refrigeration chamber.
Increasing efficiency
However, few people know how to multiply the efficiency of a portable refrigerator:
- The first tip will be useful for those who travel a lot by car. The blanket will be an excellent helper in maintaining the desired temperature in the bag. Just wrap your portable cooler in it.
- Direct sunlight will reduce the effectiveness of the bag. It should be kept away from sunlight.
- The best place for batteries is the bottom of the bag. If, with this position of the batteries, the food does not fit into the bag, then there is a backup option: you can surround the food with it.
- It’s great if the products are chilled.
- The closer the food is placed to each other, the slower the temperature inside the refrigerator will rise. The empty space in the bag should be filled with any container of water or a folded blanket.
- Before arriving at your holiday destination, it is better not to open your bag often (if this is not possible, then this should be done as rarely as possible).
Necessary materials
The hook is usually selected for certain threads. Everything is simple here - the size of the recommended hook is already written on the threads. If you take 100% cotton knitting material, the finished product will not stretch. Synthetic threads will retain color for a long time. The thicker they are, the easier and faster it is to knit the required height.
Thin threads are not suitable for openwork knitting, although they look airy and impressive, but the main task of the case is to protect the iPhone or any other smartphone from bumps and scratches.
It is best to take thick acrylic from three hundred meters per 100 g. Cotton from two hundred meters per 100 g is also suitable, different variations with some impurities. A budget option is microfiber, which can also make a nice product.
Tips to help craftswomen quickly decide on the model of the future case
Before you sit down to knit, you should choose the appropriate threads. The most important role in needlework is played by the materials from which the yarn is made, as well as its thickness. It is worth choosing threads that contain:
- Cotton.
- Acrylic.
- Wool.
- Various impurities.
If you take thin threads, the case will look beautiful, but it will not protect against scratches. Once the choice of yarn has been made, you should start choosing a hook. On the label of the knitting threads you can see the number of the hook that will fit these threads.
A craftswoman who decides to knit a cover for a child can opt for a model in the form of his favorite cartoon character or fairy tale. And if you choose funny decorations, you can surprise even the most popular and capricious child.
A cover that will be intended for a man should definitely be knitted with dark threads. You need to choose models that resonate with your profession or hobby.
You shouldn’t add any decorations there, everything should be discreet, elegant and at the same time beautiful, it is important to take into account the preferences of your loved one
For girls, it is preferable to stick to light colors. If you make a clasp, it should be very easy to use. Even if a fashionista is in a hurry, a convenient clasp will help you easily get the phone and will not cause discomfort.