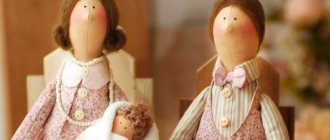
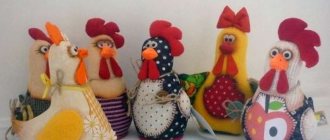
The fashion for the Tilda elk toy came to us from cold Norway, where craftswoman Toni Finanger breathed the atmosphere of her wonderful country into her dolls. They are all so different: angels, little animals, princesses, Scops Owls - it’s simply impossible not to fall in love with such charmers. Dolls are suitable for both play and fun interior decoration. Today we will offer you a master class on sewing a tilde elk doll. This animal is a symbol of Norway and conveys the cheerful character of the people living there.
Well, let's get started! To make a moose calf, you need to stock up on pieces of fabric of various colors, threads, safety pins with heads, filler, etc.
How to sew a tilde-elk
The pattern is the main thing in creating a moose based on the tilde. You can use a ready-made one offered by the designer in your magazines, or draw it yourself. The main rule and difference between the tilde moose and all others is the long, elongated legs and head, as well as the presence of only eyes on the muzzle.
By the way, this is the main highlight of all tildas - despite the fact that their faces only have eyes, their images are very expressive, and each tilda is different from the other. The costume carries the main meaning, so the tilde moose can be dressed up in pants and a knitted sweater or shorts and a shirt, or you can make it New Year’s and sew a Santa suit for it - everything is limited only by your imagination.
Snowman
What would the New Year and Christmas holidays be without a snowman? This character is an integral part of the interior during the holidays. The toy will decorate the table, the Christmas tree, and will keep company with other fairy-tale characters on the windowsill.
Making a snowman is very simple, and the materials for it can be found in any home.
For production you will need:
- white fleece or jersey;
- brightly colored knitwear for a scarf;
- satin ribbon;
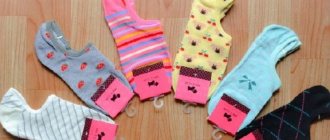
- wide golden lace for legs;
- black beads for the eyes and orange for the nose;
- buttons;
- knitted hat;
- filler;
- scissors;
- needle and thread.
Having prepared everything you need, you can start working.
Execution order
Cut two even circles of different diameters from white fabric. Sew each of them along the edges and gather them with thread, leaving a hole for stuffing.
Fill the resulting bags with filler, for example, holofiber. Then use a thread to tighten the holes and sew them up. Sew two bags together.
The main part is completed. Now the snowman needs to be decorated. A knitted cap is suitable as a headdress. You can knit it yourself using woolen threads.
Cut a small strip of knitted fabric along the edges, imitating fringe. It will serve as a scarf for the snowman. On the head of the toy, outline the eyes, nose and mouth. Sew black beads in place for the eyes, use 2-3 orange beads for the nose, and the mouth can be sewn with black thread.
You need to sew two large brightly colored buttons onto your tummy. The legs will be a golden lace. Cut it into two identical parts and sew each one to the bottom of the snowman. For boots, you can use white fur or blanks made of white material stuffed with filler.
What you will need
To create a toy you will need the following materials:
- The fabric for the body is beige, light gray or light brown, however, your tilde moose can be any other color or even made from fabric with a small print. For the body, thick cotton, linen or calico is best, but you can sew from thin felt or fleece. By the way, for the horns it is better to take a different fabric, for example dark brown, but you can make them to match the tone of the entire toy.
- Fabric for clothes - you can take whatever you like - cotton, corduroy, denim, knitwear, linen, cambric, or you can even knit an outfit in which your tilde moose will wear.
- Pattern.
- Material for stuffing the body, the easiest way to find is padding polyester.
- Threads to match the fabric.
- Wooden stick.
- You may also need tracing paper (any other pattern paper can replace it), a felt-tip pen or chalk for cutting, zigzag scissors (or regular ones), a sewing machine or sewing needles, and pins.
Moose tilde: master class on creating a toy
To begin, draw, translate or print a pattern for your future moose. Don't make the parts too small - the smaller the toy, the more difficult it will be to twist long and thin arms, legs and necks.
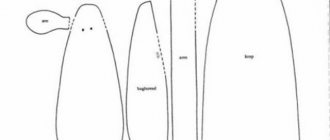
Carefully cut out all the pattern pieces, fold the body fabric in half, wrong side out, and pin the paper pieces to the fabric. Translate all parts, note that you should get:
- 3 head parts (1 muzzle and 2 side rear parts);
- 4 parts for ears;
- 8 parts for arms and legs;
- 2 body parts;
- 2 horn parts.
Trace each piece on the wrong side of the fabric and cut it out, leaving 1 cm on each side for seam allowance.
Scandinavian gnome
The Scandinavian-style gnome is the most popular toy with long legs. According to legend, a funny old gnome with a beard protects the house, the family hearth, and is the main assistant of Santa Claus. Small figurines of gnomes are placed on shelves, a New Year tree, and candlesticks, where they live throughout the holidays with their legs dangling.
When choosing fabrics for sewing a gnome, it is advisable to pay attention to New Year's shades: red, blue, light blue, and it is also important to use golden and silver colors and details. They should choose threads to match.
Felt, thick fleece, plush, and soft drape are ideal for the toy. For the beard you will need fur, padding polyester or white wool, and for the legs - knitted fabric.
The base will consist of a frame. It can be made from flexible cardboard or foamiran. You need to prepare accessories in advance, for example, a beautiful button, a bead, some kind of wooden part, but a small metal bell will look more harmonious on a gnome.
Algorithm for sewing a felt gnome
For sewing, it is recommended to use a pattern. You should decide in advance on the size of the toy. It is advisable to print the pattern and enlarge it to the required size.
Cut out the paper parts and lay them out on the fabric. When cutting them out of fabric, you need to take into account seam allowances. 5–7 mm is enough. Make tassels at the ends of the cap by cutting the felt into thin strips.
Fold the parts of the cap and body in half. Sew each one individually with a decorative buttonhole stitch along the side line.
Sew the bottom of the body to the bottom of one half and fill it with filler. For convenience, you can use a pencil. Cut long legs from knitted fabric, sew each one in the form of a tube, and then turn it inside out.
Tie on one side and fill with filling, but not very tightly. Next you need to sew each one to the lower part of the body. You should also sew the handles and stuff them with padding polyester.
Sew a beard to the upper part of the body and straighten it beautifully. After this, you can complement the gnome’s face with beaded eyes, a nose, and a mouth. Glue the cap with a hot gun to the upper part of the body, pulling it deeper.
In conclusion, you need to think about the gnome’s outfit. Shoes and cuffs on the sleeves can be knitted, the cap and body can be embroidered with beads, lace or decorated with decorative fur.
It's time to pick up the needle
So, all the details are cut out, it’s time to sew them. You can sew either on a machine with a regular straight stitch, or by hand with a stitch forward with a needle. If the toy is small, then it is better to sew it by hand, since the appearance of your toy depends on the accuracy and precision of all the curves and details of the pattern.
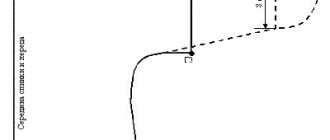
When sewing the parts, do not forget to leave unsewn holes for turning and stuffing the toy. On the pattern these places are indicated by a dotted line. When you sew the body of the elk, note that the neck needs to be sewn up and the bottom left open.
Pay special attention to your head. Sew the back pieces together first, leaving an open hole at the top. Then sew the details of the ears, attach them to the front of the head, placing them down and inward. So, after turning out, the ears will be symmetrically located on the head. Then assemble the entire head by stitching around the circumference.
Some tips
In the future, to protect the horns from external influences, microbes and time, treat them with stain. If you wish, you can apply a couple of layers of varnish on them - this will give your trophy shine.
If you think that the horns are too light, you can darken them by rubbing a walnut shell with a solution of potassium permanganate or an alcohol solution. In order not to spoil the skull, wrap it in a plastic bag, and do not get carried away with potassium permanganate, so as not to spoil the material. If desired, go over the ends of the horns with fine sandpaper.
Treat your trophies and stands with the utmost care and attention. The appearance of your room and trophies can say a lot about its owner. In addition, the moral satisfaction from quality work is worth it.
Assembling a toy
To begin, turn all the pieces right side out. To carefully turn out the thin and long parts of the arms and legs, as well as the neck, use a thin wooden stick, such as a sushi stick or a kebab skewer. In this case, the pencil will be too thick, and the knitting needle will be too thin and may pierce the fabric.
After turning all the parts, iron them with an iron and start stuffing. Take your time and fill the parts of the head, horns and body tightly, without gaps and so that the toy turns out smooth, without waves or bumps. To ensure that your tilde elk holds his head well on his long thin neck, use one trick - grease a small piece of wooden stick with PVA glue and wrap it with padding polyester. Insert it into the neck from the inside and then stuff it tightly into the body.
Stuff your legs only up to the knee, not too tightly, so that your tilde-elk can sit. Having stuffed the legs to the knee, sew them in this place with a simple straight stitch to give the legs the opportunity to bend at the knee. Stuff your arms completely, but not too tightly, so that they lie along the body and do not puff up on the sides.
After stuffing, sew up the open holes on the head, horns and arms using neat over-the-edge stitches. Fold the open cut on the body inward, insert the legs into it and stitch. First, pin the arms to the body with pins, and only after making sure that they are symmetrical, sew them to the body. Sew the horns to the head from the back between the ears, and the head itself to the neck. It remains to make a couple of stitches at the ends of the arms to make it look like a hoof, and your tilde-moose doll is ready. It's time to give it some personality.
Adding details
To give your toy character, it will need a face and a costume or a couple of accessories. Start with the muzzle. As we have already noted, tildes and their friends only have eyes on their faces. Traditionally, they are made using the French knot technique, but you can draw them with a felt-tip pen or sew on beads. Mark the nostrils with a couple of stitches, where the patterns suggest. The New Year's tilde moose can also be decorated with blush. It is usually done with dry pastel or regular blush and a dry brush.
To dress up the toy, use whatever you have on hand. Sew simple shorts from scrap fabric and sew them directly to the body. Cover the seam with a sweater that is easy to put on top, and if you don’t know how to knit, sew a sweater from any knitwear. The jacket is sewn as simply as the trousers. Using the approximate measurements of the entire moose, draw on paper the outline of a sweater with a one-piece sleeve (letter T).
Fold the fabric in half and place the pattern on the edge of the fold, so you will cut out a solid piece for the front and back. Make a round hole in the middle for the collar and sew the side seams and sleeves - a simple blouse is ready.
The look can be completed with scarves and hats, boots made of felt, bags and bouquets of flowers in your paws, in general, everything that your imagination tells you.