- December 1, 2018
- Needlework
- Irina Kotova
A children's book made of felt is a unique toy that develops a child's horizons and also develops fine motor skills. In everyday life, such a thing is called a busy or quiet book, and all because it can interest the baby for a long time. An educational book can be purchased at any children's store, or you can create it yourself to suit your baby's taste. In this article we will tell you how to make a book out of felt.
Necessary materials
To create a book, you can use not only felt fabric, but also any other. One of the main advantages of felt is the lack of edge processing.
The basic list of materials needed to create a book includes:
- Felt fabric. Remember that high-quality felt should not crumble and keep its shape perfectly.
- Cotton fabric. It is often used as a basis for pages.
- Faux leather, faux fur or fleece. These types of fabric are usually used to imitate various surfaces. For example, a tree trunk can be made from brown faux leather.
- Doublerin. Necessary for compacting pages. Thanks to this material, the educational book will not change shape. You should not replace it with cardboard, as the product will not be able to be washed in the future.
- Glue web. Used for fixing various parts.
- Sintepon. It is placed between pages to add volume.
- Velcro fabric. In simple words, this is the soft part of the Velcro to which various parts can be easily attached. This fabric has two varieties: with and without adhesive.
How to work with this fabric when creating educational books is described in the following video:
- Contact tape. With its help, you can attach removable parts to the pages of an educational book.
- Waxed thread, rapeseed tape, as well as laces and hat elastics. You should not use satin ribbons, as Velcro will quickly cause them to lose their appearance.
- Decorative elements. You can use various buttons, beads, beads, rhinestones and much more.
- Threads. Both floss, monofilament, and ordinary sewing threads of various shades are suitable.
- Hooks, buttons, neodymium magnets. They are used to secure removable parts in the book.
This list can be supplemented by any other materials, because each book is unique and you can use whatever you consider necessary to make it.
A sea of ideas
Don't know where to start? A variety of patterns will prompt creative ideas.
Related article: DIY satin ribbon brooch with photos and videos
Types of assembling ready-made pages for educational books
Developmental books come in the following types:
- With removable pages. There are two options for assembling a book: using eyelets or buttons.
- Binding with permanent pages. A common option for fabric books.
An interesting option is to assemble the book onto plastic or iron rings. The range of colors is quite large. The main selection criterion is their diameter.
It will look original and beautiful if you attach the pages using ribbons and thread beads on them. Thus, you will get a kind of handle by which the child can carry the book.
Features of creation
The basis for creating a felt book is a single sewing principle:
- We trace the elements on felt, cut them out and sew them onto the page.
- We sew two finished sheets together, hiding the wrong side.
- In order to give a book a special look, you also need to pay attention to the seams. There are several types of them that are used to create educational toys. For removable elements, use the first option shown in the picture. The second method is used for sewing elements. Finally, the buttonhole stitch is used to finish the pages.
- We attach the pages together in any way we like.
- The processed edges with curly scissors will give a beautiful overall look. If you use tarpaulin fabric between two sheets of felt, the leaves will become stiffer, and if padding polyester, then softer.
LiveInternetLiveInternet
The term "tactile book"
appeared not so long ago and means a SPECIAL book for a SPECIAL child. These books have the unique ability to give a child not only vivid emotional experiences, but also wonderful tactile sensations. By actively interacting with the characters in a tactile book, the child learns to feel this world most fully, with all the senses given to him by nature.
The use of a tactile book will make it possible to change the methods of transmitting information to children for memorization, and will increase the effectiveness of the level of speech development (coherence, consistency, development of speech utterance) of preschool children with speech development disorders. Tactile books arouse children's genuine interest, which means there is no need to force the child to study. He does this himself, and various pleasant tactile sensations are a fairly strong incentive to practice. At first, the child strives not to read or hear, but to TOUCH!
Today, to create such a “touching” book, we need:
1. Wool for felting (we will use it as stuffing material)
2. Decorative felt (for making fairy tale characters)
3. Patchwork fabric
4. Decorative elements “Berries” (cherries on the tree)
5. Plush fabric (for making a cat)
6. Faux suede fabric (for making a dog)
7. Velcro textile tape
8. Materials for decorating and creating a landscape - wooden sticks, buttons, ribbons, etc.
Steps to make a tactile book
1. Let's start by making the characters of our fairy tale.
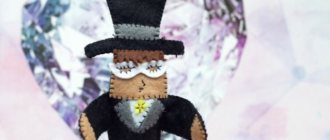
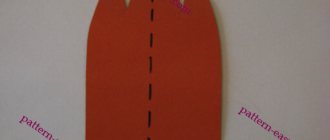
To do this, transfer the details to a sheet of felt and cut them out. We stitch the cut parts in a way convenient for you. To give our characters volume, you can use felting wool or any other printed material. We will make a grandfather, grandmother, granddaughter, turnip and mouse from felt. For a better tactile experience, grandfather and grandmother’s beard and, accordingly, hair can also be made from wool. We make the cat from plush, in our case it will be red) And we make the dog from artificial suede.
The image shows the step-by-step production of the “grandfather” character; the rest of the fairy tale characters can be made by analogy.
2. The next stage of our work will be the creation of the fairy tale spread itself.
First, we will transfer the pattern measuring 18*18 cm onto the fabric - we will need 2 blue parts (inner part of the book = sky), 2 purple parts (outer part of the book = cover); We will also need to cut out green fabric = earth - 2 pcs. Then we sew together all the cut out parts, as shown in the figure below. Between the inside and outside of the book, it is advisable to insert a cardboard square (also cut out in advance to the same dimensions of 18*18 cm), and fill the page on both sides with wool - the book will become soft and pleasant to the touch. In the middle of the opposite sides of the resulting parts of the book we sew a ribbon - these are our future ties.
After both of our parts of the book are ready, we can begin filling in the landscape of the fairy tale. We also cut out and glue trees and bushes from felt. The fence can be made from wooden coffee sticks (you can use ice cream sticks or any other wood material). The cherries on the tree were made using decorative elements, and the flowers were made from buttons. When both halves of the book are done, you need to glue one piece of Velcro tape in the middle. The second part is glued to the back of the characters. So, in the case of adults acting out fairy tales together with a child, the characters will appear as the plot develops and will be held firmly in place with the help of Velcro tape.
We sew the two halves of the book together and VOW! WE ARE GREAT GUYS! Since our wonderful book is ready!
Now you can safely not only tell your child the fairy tale “Turnip”, but also give him the opportunity to touch and get to know each character on his own.
Working with a child’s speech based on interaction with a tactile book:
Stage 1 of work: articulation gymnastics.
One morning my grandfather woke up ( we give the child a figurine of his grandfather
), opened the window
(exercise “Window”) and began to do exercises (exercise “Swing”).
Then the grandfather drank a cup of tea
(exercise “Cup”)
with jam
(exercise “Tasty Jam”).
The grandfather went out into the garden -
we attach the figure of the grandfather to the tactile book
, where there is a smooth and beautiful fence
(exercise “Fence”, we draw the child’s attention to the fence made in the tactile book)
and decided to plant a turnip (
we give the child a turnip figure in his hands
), the grandfather began dig a hole
(exercise “Shovel”).
The turnip began to grow
(exercise “Sail”) - attach the turnip to the tactile book.
Stage 2 of work: an adult tells the fairy tale “Turnip”.
An adult tells a fairy tale to a child out loud, letting him get to know each character. At this moment, the child touches the characters in the book, attaches them and unsticks them - performs various actions with them. This relieves the child’s stress associated with the complexity of the task of retelling the story on his own; entering an imaginary situation awakens the desire to talk about what he saw in the future.
Stage 3 of work: practicing the pronunciation of individual words.
The adult dwells in more detail on the pronunciation of those words that, in the process of interaction with the child, seemed difficult to the child, or are new to the child, or the tactile images of these words aroused special interest in the child.
Stage 4 of work: joint telling of a fairy tale by an adult and a child.
The adult re-tells the fairy tale, making gaps in the text, inviting the child to insert the words himself. For example, my grandfather planted ..... and grew ..... big, very big. Grandfather called.....etc.
Stage 5 of work: reproduction of a fairy tale by a child.
The child independently tells the fairy tale “Turnip”.
We hope our master class was enjoyable and, most importantly, USEFUL for you!!
Step-by-step guide to creating a book
To make a developmental book, you need:
- Decide on the topic of the book. It is important that it corresponds to the age of the child.
- Choose templates for educational books made from felt.
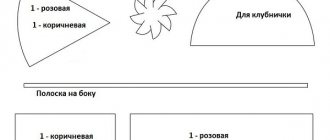
- Select the page size of the future product. The standard size is 20*20 cm. For the smallest ones, pages measuring 15*15 cm can be made.
- Prepare the pages. For convenience, you can make a template from cardboard in the following sizes: 20*20 and 19.5*19.5 cm. Next, we place the 20*20 cm blank on felt fabric and cut it out according to the template. We cut out a 19.5*19.5 square from dublerin.
- Then apply the dublerin with the adhesive side to the felt fabric and iron it with an iron. If the dublerin is not dense enough, the page can be made of two layers.
- Proceed to the design of the pages and cover: we create appliqués from felt in accordance with your idea.
- If you decide to make a book with permanent pages, then at this stage we sew the sheets together so that the wrong side is hidden, and then we attach various accessories and ribbons.
The process of sewing a permanent cover is approximately the same. The only difference is that for the spine you need to leave a small piece of felt, the size of which depends on the thickness of the sheets. It is worth considering that the cover of the book should be much denser than the pages.
Employees
The team of the “Little Book” project includes five seamstresses. Zhenya found almost all of them through an ad on the Superjob website.
When hiring new employees, Zhenya signs an agreement with them on non-disclosure of trade secrets and production technology. All seamstresses are selected. At the start, our heroine offers the most difficult task - sewing on small parts or making a border for a book. Based on the results, he looks at the quality of the stitching, hidden threads and other technical issues. Even those with extensive work experience are tested. Zhenya prefers self-taught craftsmen: they work with greater dedication.
For those who have passed the selection, Zhenya continues to help in the process of work: she explains if something is unclear and records video instructions.
Zhenya also has an assistant. She runs the CRM, controls the shipment of books and communicates with couriers.
Until June 2022, sales guys worked on the staff. They received 15 thousand rubles a month and 10% of sales. But the number of orders grew, and one seamstress had to sew 1.5 books a day. The production did not have time to deliver work on time, and it was not possible to hire and train new seamstresses: the youngest son of Zhenya and Maxim was not yet a year old, he required attention. To close his tail, Maxim refused advertising and management services.
Seamstresses work at their own schedule. The main thing is to meet the sewing quota - now it’s ten standard books a week. You can work in the workshop and at home. Seamstresses with such painstaking work develop motor skills. A millimeter to the side - the page of the book is ruined
Animal patterns
You can introduce your child to domestic and wild animals with the help of an educational book. The cat can catch fish, and the dog can put bones in the doghouse, which can later be counted. There can be as many options as you like, it all depends on your imagination. We offer you a selection of simple and original templates for educational felt books.
A bright tiger cub will definitely delight your baby; to make it you will need two colors of felt fabric:
The following template will help you create a cute baby elephant:
To create a fawn, use the following pattern:
A popular idea for an educational book is a farm where you can collect various domestic animals, including a cow:
Felt fairy tale book templates
Fairy tales not only captivate the baby, but also contribute to rapid development. It won’t be difficult to please your child with such a product.
To make it you will need:
- multi-colored felt;
- scissors;
- threads with a needle;
- patterns of elements.
Work stage:
- We draw on paper the characters necessary for the fairy tale or use ready-made templates for an educational felt book.
- We trace the finished parts on felt fabric and cut them out.
- We sew together the parts of the characters.
- The edge of the book can be processed on a sewing machine by selecting the “zigzag” function
Beautiful and captivating
Teachers recommend games with such books. Let's find out why they are useful and interesting.
- study of color. So, by creating a composition with a rainbow image, you can not only beautifully design the page, but also learn the color sequence;
- shapes of objects;
- concepts of more and less;
- develop fine motor skills. A variety of buttons, fasteners, ties, clothespins, and pockets are useful for this;
- learn numbers and letters, learn to count and even read the first words;
- get acquainted with the first fairy tales and stage a theatrical performance;
- learn more about the world around us: what kinds of animals and plants there are, who lives where, the change of seasons, natural phenomena, various professions, etc.
Basic recommendations on how to make elements for a felt book using a template
It's simple. Making an educational book out of felt is considered not a difficult task. But to make them you also need to be smart. The following steps will help you navigate the pattern:
- After we have chosen the necessary templates, we prepare the fabric, filler, threads and scissors.
- Print the pattern on paper and cut it out. We apply it to the fabric, trace it and use scissors to create the desired shape.
- If necessary, we glue the necessary elements for the product onto the finished workpiece. For example, the face of an animal can be embroidered with threads, decorated with buttons or beads.
- You can fill the elements of the book with holofiber, padding polyester or medical cotton wool.
Where did we start?
Zhenya studied to become a designer and was fond of handicrafts. In 2016, on the Etsy website, she saw a craftsman with felt books. The girl bought this material, sewed similar gifts for her children and posted the photo on social networks.
At that moment, representatives of a charitable foundation in Moscow were looking for someone to make felt books for their wards. They saw Zhenya’s work and ordered three lots of 40 pieces. The girl was only paid for the costs of materials, but she took on the order to gain experience and practice the technique. Zhenya sewed one batch herself, and other seamstresses helped with the rest - also for free.
Then we received orders from friends and acquaintances who wanted to buy books for their children. Zhenya’s husband Maxim joined the process: he took charge of finances and promotion, while the girl sewed and communicated with clients. Zhenya hired two seamstresses to help.
The girl already had the status of an individual entrepreneur: she opened it in 2010, when she was engaged in other types of needlework. The wife still had to apply for a patent for sewing activities. It cost 39.6 thousand rubles per year and was exempt from all taxes except pension taxes.
Sales were difficult: strangers doubted the benefits of the books and were afraid of the prices. Then Zhenya told how her own children play with books and that production is completely manual.
In January 2022, we launched contextual advertising that led to the landing page. It was turned on for two days, then it was dismantled and orders were sewn, and then it was turned on again for two days. One launch cost 10 thousand rubles. This period lasted about a month - then the budget was reduced to 4 thousand.
The books for the foundation had four pages with exercises for fine motor skills: fastening with buttons and zippers, attaching parts with Velcro. Zhenya’s first attempts are very different in appearance and quality from what she does now