Do-it-yourself finger puppets are a huge world, which, once you open it for your child, you will not be able to close for anything and under any circumstances. It is amazing, rich, magical and just amazing! Would any of the children agree to part with him voluntarily? However, this is not necessary: believe me, when you see how much joy it brings to your baby, you yourself will not want to give up what you started - and you will create more and more finger puppets with your own hands . There will be only one problem - which doll to sew next? To ensure that your inspiration never leaves you, we have selected a few simple and interesting ideas that will inspire you to new and cool achievements. You can stage entire productions and fairy tales, or you can limit yourself to small interactive dialogues with the child and monologues. In general, there is no limit to creativity, if only you have the desire to create!
How to sew finger puppets with your own hands - 5 master classes:
Preparation of materials
Before starting work, you need to assemble a “utility box”, it will include all the necessary tools and materials that you cannot do without, namely:
- multi-colored soft felt 1 - 2 mm thick (country of production does not matter);
- a simple pencil and pen (professionals prefer self-disappearing fabric markers, in this case colored and white);
- 2-3 crayons with thin edges (since the details will be small);
- 2 types of sharp scissors (with blunt and sharp ends for ease of cutting patterns);
- pins or needles (the thinner the better);
- glue (as an option, “Moment Crystal”; ordinary second glue is not suitable, since it impregnates the felt and leaves marks), or a glue gun (if available);
- hole punch (for cutting out small circles);
- ready-made eyes for fairy tale characters (they are sold in handicraft stores) or beads;
- multi-colored cotton threads for hand and machine sewing;
- multi-colored satin ribbons 5 mm thick;
- thick cardboard measuring 20 cm by 30 cm (more is possible), you will need 2 sheets;
- padding polyester for stuffing the house (sold in Fabric stores).
Felt and working with it implies knowledge of the characteristics of this type of fabric , which will greatly simplify the process of sewing finger theater with your own hands and creating a pattern, namely:
- there are many types of felt (to create small parts it is more convenient to work with soft synthetic felt 1 mm thick);
- You can buy felt fabric in handicraft stores or on the Internet (both in sheets and by the meter). For fairy tale characters you will need many different colors, so it is better to purchase plain felt in sheets;
- felt does not fray or crumble when trimmed, which allows you to avoid processing the edges of the products;
- it is wear-resistant (however, with intensive use, pills form on some types of fabric);
- felt toys are very light due to the porous structure of the material;
- the fabric is very plastic and does not break when bent (hard felt can form creases when bent, so it is used for working with large parts).
Is it difficult to do
It probably sounds a little scary: make a puppet theater! But in reality there is nothing complicated here. Most of us attended kindergartens in our early childhood.
It was mandatory for any group to have a theater area, and, of course, the dolls were made by the teachers themselves. Now this process has become much easier. It is enough to look at various photos of a do-it-yourself puppet theater on the Internet, and immediately, firstly, it will become clear that making the scenery is not at all difficult, and, secondly, you will probably want to get to work as soon as possible. Making puppet theater with a child is very interesting.
How to make patterns
Before you start making patterns, it is useful to get acquainted with the types of finger theaters, which will help determine the direction of work.
Classification of finger theaters:
- A collection of toys that fit onto children's fingers, hiding them inside the doll.
- A set of characters with 2 round holes in the lower part of the body, into which the child’s index and middle fingers are inserted, creating movable legs for a fairy tale or cartoon character.
The first option is more practical and durable; these are the pattern patterns that will be offered in this article. However, if desired, any template can be slightly adjusted by adding holes and sewing the toys using the second method. You can make a finger theater from felt yourself, or find ready-made templates in books on handicrafts or on the Internet.
To make your own pattern, you need:
- determine which characters are to be “brought to life” and find what they look like;
- draw on paper the characters of the required size and all the details separately (arms, legs, cheeks, ears) or print a ready-made template from the computer screen. As a rule, toy patterns consist of the main part and the front parts;
- cut out parts;
A felt finger theater is made in several stages
- attach with pins to felt fabric and cut out according to the design without deviations;
- if the characters are planned to be double-sided, then the number of pattern pieces will double (the main thing here is consistency and not to get confused, first cut out one character and put the pieces together, then proceed to the next one). For beginning craftsmen, it is easier to start with single-sided dolls.
The importance of puppet theater in the development of a child
Most often, puppet shows are common in preschool institutions for children. Dolls play a huge role in a child's life. They become the first friends with whom the child begins to communicate. The movement of a favorite character brings joy to the baby and an ordinary day becomes a holiday for him.
But such performances are not just entertainment for children. With the help of puppet theater, educational and cognitive processes occur. At the age of 4-6 years, the child’s character is formed and interests in the environment appear. It is then that you need to instill in your child a sense of kindness, hard work, the ability to make friends and tell the truth.
Children enjoy taking part in performances
With the help of a puppet theater, you can find a common language with a child who does not talk to strangers. Such a child will trust the doll more. He will laugh at her jokes, offer his hand or allow himself to be touched.
Important! Regular communication with a doll character will help a preschool child become familiar with the environment and teach him to be courageous when interacting with peers and teachers.
Older children are taught to perform puppet shows themselves.
- Thanks to the theater, children become accustomed to art and develop their imagination.
- Over time, they begin to develop a talent for drawing, music or sculpting.
- While playing with dolls, the baby vividly imagines what the character is going through and thinks about what the right thing to do is.
- He shows all his emotions through gestures and facial expressions.
Puppet shows are an integral part of holidays in kindergarten.
Most often, it is the finger theater called bibabo that is used. The glove hand puppet is distinguished by emptiness inside and is so called because it is used as a glove, with the head placed on the index finger of the hand, and the middle and large ones replacing the character’s hands. The other fingers remain inactive and form a fist. You can learn how to make such a toy from this article.
You might be interested in this: Colored paper and cardboard dogs - craft options
Scene
For easy storage of dolls, the stage can be made flat in the form of a book spread or voluminous from hard felt. This creates a finished decoration and an envelope for storing the toys.
Stages of creating a flat scene in the form of a book spread:
- Take 4 pieces of felt measuring 20 cm by 30 cm (or larger), 2 of which are green (this will be the inside of the scene) and 2 more pieces of any other color for the cover.
- Make flat one-sided patterns of trees, a house, the sun, clouds (they will serve as permanent decorations for the intended fairy tale (for example, in a “kolobok” it makes sense to sew a house, a path, several trees, grass and the sun).
Here is an example of the scenery for the fairy tale “At the Order of the Pike”:
- Sew the decorations onto the green pieces of felt.
- Sew 2 sheets together along the inner edge (like the binding of a book).
- Sew the cover to the finished inside of the stage and trim the edges (decorate with braid).
This is roughly what it should look like:
The advantage of a flat stage spread is its versatility for several fairy tales at the same time with similar scenery (only the characters change).
And if the decorations are not sewn on, but placed on Velcro tape, then there are even more options. An example of such fairy tales: “Kolobok”, “The Three Little Pigs”, “At the Command of the Pike”, “Turnip”, “The Thirtieth Kingdom”, “Geese-Swans”. An example of such a theater from one scene and the characters of 3 fairy tales is given below.
Stages of creating a three-dimensional scene from hard felt:
- Gather materials: 3 large sheets of hard felt, 30*30 cm (or 30*20 cm) in size and 3 mm thick (it is possible to use thinner felt, but for strength and stability it will need to be sewn to cardboard).
- Draw a pattern on paper of the desired shape of the scene (front part and two side parts), transfer it to the fabric, trace it with a marker and cut it out with a stationery knife or scissors.
- Decorate the main facade of the stage with lace curtains or fabric.
- Connect the three parts of the stage together with seams.
This is what the approximate result should be.
Features of felt
It is very easy to work with felt, this material is:
- does not require processing of cuts, does not crumble;
- pleasant to the touch, soft, warm and fleecy;
- maintains a neat edge when cutting with curly scissors;
- the material has a wide selection of colors, bright and rich;
- holds its shape well, is durable and does not wrinkle;
- has no back or face, identical on both sides;
- you can not only sew, but also simply glue;
- does not change color after washing or when exposed to the sun;
- does not form pills and does not become shaggy during sewing and use.
House for finger theater
If you plan to sew a finger theater for a fairy tale, the action of which mainly takes place in a house (for example, “Teremok”, “Three Bears”, “The Wolf and the Seven Little Goats”, “Masha and the Bear”, “Hen Ryaba”, “Zayushkina’s Hut”), then it makes sense to make the scene in the form of a house book.
Like in this photo:
And if you want to complicate your task, then you should try making a three-dimensional house from felt. Like in this picture:
How to sew a three-dimensional house - step-by-step description (guideline photo above):
- Prepare materials (felt in 4 colors (light brown for the house, gray for the roof, orange for balconies and green for the large base), 2 types of braid for curtains).
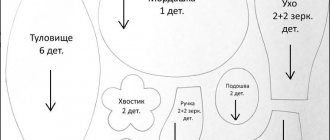
- Make a paper pattern of all parts of the house (according to the table):
| House detail | Pattern | How many felt pieces will you need? |
| House walls | 1 square with all sides 20 cm long | 6 |
| Window | 1 square window with sides 5 cm long | 2 |
| Balconies and door | 1 rectangle 3*10 cm | 3 |
| Front and rear parts of the roof | 1 equilateral triangle with edges 25 cm long | 2 |
| Roof base | 1 rectangle 20*25 cm | 1 |
| Roof roof | 1 rectangle 50 cm by 20 cm | 1 |
- Cut out all the details of the house according to the pattern.
- First you need to sew windows, a door and a balcony onto the square walls of the house.
- Sew curtains on the windows from braid, decorate the balcony with lace.
When sewing on the balcony, form a pocket so that later you can put a finger toy there.
- Sew the walls of the house from 6 parts and fill it with synthetic padding.
- Sew a balcony onto the front part of the roof and decorate it.
- Similarly, sew a roof from 2 triangles, a base and a roof. Also fill with padding polyester.
- Sew the roof to the base of the house.
- For greater stability, it is recommended to sew the house to the base (which is made from 2 large identical sheets of green felt, between which cardboard is inserted and everything is sewn together at the edges).
What kind of glove puppets can you sew yourself?
Characters wolf and goat
In order to organize a puppet theater, first of all you need to think about where to get actors. You can make your own heroes by carefully considering which dolls you need to make for the performances.
The most common remain:
- fox;
- hare;
- English frog Kermit;
- parsley;
- bear;
- wolf;
- three piglets;
- shark;
- herringbone;
- Father Frost.
In addition, you can make a bun, grandfather and grandmother, and chicken. With the help of these characters you can not only act out scenes from famous fairy tales, but also come up with your own scenarios.
Masha and the Bear
This DIY felt finger theater (patterns are included) includes several funny characters (the girl Masha, a bear, a pig, a rabbit, a bear and 2 wolves).
Since the cartoon takes place in a bear's hut and in a vegetable garden, it would be interesting to create a scene in the form of a double-page book (as described at the beginning of the article), making a hut on one page, and on the second - scenery in the form of a vegetable garden with trees and vegetables, as well as Wolves Ambulance.
Examples of decorations (they can be movable or Velcro):
- Ambulance of two wolves from the cartoon (pattern);
- Trees, vegetables in beds, fence.
It will be very interesting for children to play if, instead of a stage, you sew a voluminous vegetable garden and a house (which move and create more opportunities for imagination), as in this photo.
Step-by-step description of sewing heroes
You can start with sewing the characters of a fairy tale, as well as with the scenery or stage.
Masha
To sew the heroine of a fairy tale - Masha, you will need:
- felt in pink, flesh, light yellow colors;
- eyes and beads, pink ribbons;
- prepare a pattern from a template on paper;
- transfer to felt, trace and cut out all the details.
Assembly of Masha:
- Sew a hairstyle onto the front part, glue on eyes, embroider a smile.
- Sew the 2nd piece of hair to the second part of the head and sew the head, stuffing it with padding polyester.
- They put 2 dresses on the body so that the body remained inside. Secure with pins and sew, leaving a hole in the hem of the dress for your finger.
- Sew the head and dress.
- Tie ribbons to the waistband of the dress and to the hairstyle.
Bear
How to sew a bear is described in detail in the fairy tale “Teremok”.
Ursa
The bear's girlfriend is sewn similarly to the bear, only with the addition of a 2-piece dress (yellow with decoration at the discretion of the master), which is sewn on top of the finished base.
The pattern is attached.
Pig
To sew a funny cartoon pig you will need:
- Pink felt in 2 shades (the patch should be darker);
- Transfer the paper pattern to the fabric, cut out 2 parts of a pig and 1 part of a snout.
Pig parts connection:
- Sew on the patch, embroider the nostrils and glue on the eyes.
- Fold the two parts of the body and sew, leaving a hole between the legs.
Rabbit and wolves
How to sew a hare and a wolf is told in the fairy tale “Teremok”. The second wolf can be made a little darker or lighter in color.
Bear House
To make a bear’s dwelling, you can take as a basis the hut described in the fairy tale “Ryaba Hen”, or the recommendations for sewing a stage or house at the beginning of the article.
Master class “Fairy tale on the apron “Kolobok” made of felt”
Tatyana Lybina
Master class “Fairy tale on the apron “Kolobok” made of felt”
»Fairy tale on the apron "Kolobok" made of felt.
Theatrical activities bring variety to a child’s life, give him joy and are one of the most effective ways of corrective influence on a child, in which the principle of learning is clearly manifested: learn by playing.
I bring to your attention this kind of theater, for its implementation you will need:
- felt (brown, yellow, green, grey, orange, white, red, blue)
-calico fabric (green)
-satin ribbon (2.5-4cm width, 1.5-2m length)
1. First, we make a pattern for the apron , fold the edges and stitch it.
2. We use satin ribbon to make ties for the apron . The apron is ready .
3. Next we proceed to designing the apron , for this we draw patterns on paper
(house, trees, sun, clouds, hemp, paths, grass)
.
5. Sew all fabric patterns to the apron .
7. Let's start making fairy tale . I’ll show you the example of sewing a bear for the fairy tale “Kolobok” .
10. We embroider the necessary elements and glue the eyes and nose from black felt .
This is how we got the bear.
11. And this is what all the fairy tale .
12. Finished apron.
This is how my fairy tale .
I wish you creative success.
Master class “Pictures made of felt” Dear colleagues! I want to share with you my knowledge that I gained while I was on maternity leave. While. Master class: “Flower pendant” made of felt. Joint work with children 5-7 years old. We made this pendant with the children for the holiday of March 8th. goal: development of design abilities, skills. Master class for teachers “Making a theater on an apron with your own hands” Master class for teachers on the topic: Making a theater on an apron with your own hands The purpose of the master class. Formation of teachers' ideas. Master class “Felt Pencils” I bring to your attention easy-to-make DIY crafts from felt and tin cans. It took to make pencil holders. Master class “Owl made of felt” Materials and tools: Soft felt 1mm (white, blue) Needle and thread in contrasting shades. Glue “Moment” Scissors Filler (sintepon). Master class “Owls from pumpkin and felt” I have two children and I made two owls from natural material for each group for the exhibition of autumn crafts. To make them for me. Master class “Tiger Cub” (felt brooch) Hello, dear colleagues, I want to share my master class with you. Recently, an educational festival was held in our city. Master class “Hedgehog” made of felt Master class “Hedgehog” made of felt What are you doing, hedgehog, right in plain sight? I'm picking apples in your garden. Why are you cowering? I'll inject myself. But why? Master class “Giraffe” made of felt I bring to your attention a master class of Giraffe made of felt. With a long neck, all spotted, on high legs, walked handsomely, muscular. Original felt bookmark. Master class Can e-books replace the rustle of paper pages of regular printed books, preserve the smell of smoldering pages, and take you back to childhood?
Source
turnip
Everyone's favorite children's fairy tale "Turnip" is represented by the following characters: grandmother, grandfather, granddaughter, cat, dog, mouse. The action takes place in the garden near the hut. Accordingly, the ideal stage would be a flat composition in the form of a fold-out book with a hut, trees and a large turnip (you can see how to make such a scene at the beginning of the article).
Example scene above.
Step-by-step description of sewing characters from the fairy tale “Turnip”
An important aspect before starting work will be the step-by-step production of characters in order to maintain their sizes (animals should be correspondingly slightly smaller in size than people).
Grandparents, Granddaughter
The sewing algorithm for Grandmother and Grandfather is described in detail in the fairy tale “Ryaba Hen”. To sew a granddaughter, you should use the description of the creation of Masha from the cartoon “Masha and the Bear”.
Cat
To sew a cat for the fairy tale “Turnip”, you will need:
- 2 pieces of gray felt;
- eyes or 2 black and 1 pink beads;
- prepare a paper pattern using the template and transfer it to felt;
- cut out 2 parts.
Cat assembly:
- Glue eyes to the face, sew on a nose, embroider a mustache and a smile.
- Connect and sew the 2 main parts, leaving a bottom hole for the finger.
- You can decorate it with a bow around your neck.
Dog
To create a dog you need:
- Have brown felt in 2 shades and a white piece for the eyes.
- Black buttons or beads.
- Create a paper pattern and transfer it to felt.
- Cut out pieces from fabric.
Dog Bonding:
- Sew on eyes and ears.
- Sew the tail.
- Embroider a smile and mustache, sew on a nose from a button.
- Connect the 2 parts of the body and sew, not forgetting the tail and the hole at the bottom.
Mouse
The method of sewing a mouse is described in the fairy tale “Teremok”.
turnip
The turnip is sewn very simply from 2 yellow pattern pieces and green felt tops.
In this case, you must fill it with padding polyester. Do not leave holes.
We sew finger toys. Fairy tale "Kolobok"
Every mother knows that the best toys for a baby are those that we made with our own hands with love. I want to show you how you can sew finger toys for your child.
Russian folk tale "Kolobok".
Materials for work:
- felt 20*30cm thickness 3 mm;
- green cotton fabric 22*32 cm;
- scissors, needle, thread, glue;
- felt 1 mm thick in different colors;
- decorative eyes;
- metal corners;
- elastic band 50 cm;
- yellow bead;
- interlining.
Let's draw a road for the kolobok on a piece of paper.
We cut it out of brown cotton fabric and glue it with non-woven fabric.
At the places where the road turns, we make cuts in order to tuck the fabric inward and get beautiful, neat edges. Iron and baste for convenience. Using a sewing machine, we attach the road to the green base (we don’t touch the felt backing yet).
.Cut out bushes and grass from felt. Sew to the base.
We draw character patterns (you can translate these or take any you like from the Internet).
We cut out a house from felt and sew it on, inserting an elastic band for the bun on the inside. We measure the length along the bends of the path (about 50 cm, it is better to take it with a reserve). On the places where the bun will run away from animals, we sew small circles for density (about 2 cm in diameter, so that your bun can easily fit into the slot).
We sew fairy tale characters using patterns. To make it easier to sew on the sides of the toys (if you sew on a machine and not by hand), cut out only the front part, and cut out the back after sewing, then the seams will definitely not slip. Before sewing, sew adhesive tape onto the back of each toy. Be sure to leave the bottom unstitched for the finger. Glue the eyes, nose, hair, edges of the animals.
We sew Velcro onto the places where the characters are attached. Sew a loop at the top. Glue the fence, stump, mushrooms. We sew the base with a backing made of thick felt. We cut out holes for moving the kolobok, thread an elastic band, put on the kolobok and sew it on the back of the work.
We fasten the metal corners. In order for the corners to hold better, first glue them with glue, and then clamp the fasteners on the back side with something hard (do not forget to place fabric on both sides of the corner so as not to wrinkle it). The work is ready!
This fairy tale can also be used as a picture for a child's room (there is a loop for a nail).
I hope my master class is useful to someone 
If you have any questions, I will be happy to answer them! And I will be very glad to see your works, sewn according to my master class!
www.livemaster.ru
Kolobok
One of the oldest and most popular fairy tales is represented by the following characters: grandparents, fox, wolf, hare, bear and bun. A fold-out book is perfect as a stage.
Step-by-step description of sewing characters from the fairy tale “Kolobok”
First, it’s better to sew the characters together, and then proceed to the stage and decorations:
- Kolobok
It is sewn from 2 circles of yellow felt, on one of which facial features (eyes, smile and rosy cheeks) are embroidered.
- Grandmother and grandfather. The algorithm for sewing toys is described in detail in the fairy tale “Ryaba Hen”.
- Fox, Wolf and Bear. These characters can be sewn based on algorithms.
Scenery
For decorations, you can use familiar children's toys: doll furniture, children's dishes. It’s not at all difficult to choose suitable decorations for common plots.
For the fairy tale “Teremok”, you can make a house out of cardboard: windows are cut out in a rectangular sheet, decorated with small curtains, and a triangular roof is cut out on top. For the fairy tale “Kolobok”, it is enough to make 2-3 trees, and the main character will travel through this mini-forest.
Three piglets
This DIY felt finger theater (patterns will help you make original characters) is represented by two animals: a pig and a wolf.
To increase interest in the game, it is better to use three different piglet patterns and sew a voluminous hut house and a flat scene in the form of a forest with a path and trees.
Piglet 1
To sew your first pig you will need:
- 2 shades of pink felt;
- ready-made eyes, ribbon or lace for the tail;
- Using the template, make a paper pattern of all components;
- transfer it to the fabric, outline and cut out all the parts.
Connecting the parts of 1 pig:
- Sew a snout and ears onto the front part, embroider nostrils, and glue on eyes.
- Sew hooves onto the upper and lower limbs.
- Fold the 2 parts of the body and sew them together, inserting the hooves. Don't forget to leave a hole at the bottom between your legs for your finger.
- Sew the head from two parts and stuff it with synthetic padding, then attach it to the body.
- Form a tail from ribbon or lace and sew on the back.
Piglet 2
To sew the second pig you need:
- the other 2 shades of pink felt;
- eyes and pink lace;
- Similarly, we prepare the pattern and felt parts.
Assembling the parts of the second pig:
- Sew a patch to the head, form nostrils, embroider a smile and make eyes.
- Sew 2 parts of the head and stuff with filler.
- Sew all the hooves onto one part of the body.
- Sew the body parts together, leaving an opening at the bottom.
Piglet 3
To make the third little pig, instructions from the fairy tale “Masha and the Bear” are suitable.
Wolf
The wolf is sewn according to algorithm.
House and stage
These parts of the decoration can be sewn using the examples and descriptions at the beginning of the article.
Izfetra
The characters in this version of the puppet theater come to life on their hands. Felt is a very pleasant and flexible material to work with. Soft, bright characters will certainly interest the baby, and he will be happy to put his fingers up to play. The following materials will be needed for the theater:
- thin felt of different colors for the number of characters and for the tower, preferably 1 mm thick;
- Moment Crystal glue or glue gun;
- sewing threads;
- scissors, needles;
- template on paper.
Progress:
- First, you should draw patterns for all the animals, then cut them out and attach felt of the appropriate color.
- You can start making animals: frogs. For it you need to prepare the following details: 2 green bases, white eyes, black pupils. Glue small parts to the base: first white, then black. Using red threads, embroider the strip of the mouth using a “back needle” stitch. Then fold the parts of the bases and overcast the edges with a buttonhole stitch, leaving an opening at the bottom.
- For a small mouse, you need to prepare two bases, a tail and a muzzle made of gray felt. Embroider eyes with threads. Glue the muzzle and nose from black felt. Cut out the beige belly and sew it on. Then sew both bases like a frog.
- For a bunny, pink ears and a muzzle need to be glued onto the white base. Embroider eyes, mustache, nose, mouth with black thread. Cut and sew on the pink belly. Glue a white circle to the back - a tail. Overcast both warps using the buttonhole method.
- Cut out the details of the chanterelle from orange felt: 2 parts of the base, a muzzle, a tail. The eyes, breast, and end of the tail are made from white material, and the nose is made from black material. The muzzle of the imanishka needs to be sewn on, and in the middle of the eyes, a stitch of black thread should be made, similar to the narrow pupil. Glue the tip to the tail, and then sew it to the back base. Glue the eyes and nose as well. Sew both pieces together using a buttonhole stitch.
- The next hero is the wolf. Its parts are made from gray felt: body, muzzle, tail. White - eyes, chest, tip of tail, black - nose. Glue the tip to the tail, sew the breast, and sew the muzzle onto the base. The pupils are made using stitches. Glue on the eyes and sew the tail on the back. Sew both parts as indicated above.
- For the bear, in addition to the brown bases, you will need an oval face and belly of beige felt, and white eyes. Embroider the mouth and nose on the muzzle with black thread, and pupils on the eyes. Sew all the details onto the bear. Sew both bases together using a buttonhole stitch.
- The heroes of the finger theater "Teremok" from felt live in a house. Therefore, it also needs to be done. Cut out two large rectangles from felt of the same color for the base of the tower, two small ones for the pipe, two triangles to make the roof, and also five rectangles for the balconies of a different color.
- Sew four balconies onto one base and cover the fifth one. The pockets should come out. Sew the parts for the pipe using the loop method. Sew the roofs to each base. Place the resulting parts one on top of the other, and can be secured with pins. Sew along the outline using a buttonhole stitch, leaving the bottom of the house free, the edges of which are then simply overcast. Glue the pipe to the roof.
Seven kids
To bring this wonderful fairy tale to life, you will need patterns of 3 animals (a wolf, a goat and a kid), as well as scenes with a house.
This is what the finished composition might look like.
Goats
You will need seven baby goat patterns, but to make them different from each other, the finished toys need to be tied with multi-colored bows or numbered.
To make kids you need:
- white and gray felt;
- black beads or eyes (7 pairs);
- multi-colored ribbons;
- prepare a paper pattern and transfer it to fabric;
- trace and cut out 7 sets.
Assembling the kid:
- Glue eyes to the face, embroider a nose and a smile.
- Sew the head from 2 parts, stuff it with synthetic padding, and sew on the horns.
- Sew 2 parts of the body, leaving a hole at the bottom.
- Connect the head to the body, attach a bow to the neck.
- Repeat for 6 more kids.
Goat
The mother goat is sewn from 2 main parts of white fabric according to the pattern.
The eyes are glued on and the nose and smile are embroidered.
Wolf
The wolf is created using an algorithm.
House and stage
These parts of the decoration can be sewn using the examples and descriptions at the beginning of the article.
Three Bears
The tale “The Three Bears” is created very quickly, since one pattern of a bear is used (the clothes of the heroes and the size of the figures change), a pattern of a girl and scenery with a scene.
This is what the scene looks like.
The Bears
To make bear parents, you can take patterns from the cartoon “Masha and the Bear”.
Make the teddy bear similar, but smaller in size.
Girl
To create a girl, use Masha’s pattern from the same cartoon.
House and stage
The scenery is created by analogy with “The Pockmarked Hen”.
Smeshariki
A DIY felt finger theater (patterns with step-by-step descriptions are included) for “Smeshariki” will attract the attention of fans of the animated series. The game set consists of heroes and a scene.
You will need 9 characters (teenage children (Krosh, Hedgehog, Nyusha, Barashik), adults (Losyash, Pin), and elderly (Kar Karych, Sovunya, Kopatych)). All patterns are quickly made, since they are based on a circle (recommended diameter is 5 cm).
Patterns with templates:
Making Smeshariki:
- create a paper pattern using the template;
- attach it to felt fabric, trace and cut out all the details of the toy;
- connect the parts and sew one by one, starting from the front part;
- Don't forget to leave holes for your fingers.
The stage for playing an animated series can be the technology described at the beginning of the article - a spread in the form of a book with scenery (forest type).
Zayushkin's hut
To create a finger game of the fairy tale “Zayushkina’s Hut” you need to make a house, a hare, a fox, a bear, a wolf, a rooster and a dog. The most suitable house would be a three-dimensional toy with windows and balconies where you can place dolls while playing a fairy tale.
To make a hare, fox, bear, wolf, you can find a description with patterns in the fairy tale “Teremok”. Take the dog template from the fairy tale “Turnip”.
Rooster
To make a rooster you will need:
- multi-colored pieces of felt fabric;
- eyes or beads;
- make a paper pattern in parts and use it to cut out the constituent parts of the rooster from felt.
Rooster assembly:
- Head (glue on the eyes, sew 2 parts of the head along the side parts, not forgetting about the comb, beak and earring).
- Fill with padding polyester.
- Sew or glue the wings to the body on both sides.
- Sew 2 parts of the body, inserting the tail feathers. Do not sew up the hole at the bottom.
- Connect the head and torso.
To make a three-dimensional house, find the description at the beginning of the article. The tale is ready.
The game will comprehensively develop in children:
- creative and acting abilities;
- emotional experiences;
- positive motivation for communication and learning;
- lexicon;
- intonation, imagination;
- kindness and responsiveness.
It is not so important which of the presented fairy tales will be chosen to create a felt finger theater with your own hands. And the proposed patterns and templates will significantly reduce the time of sewing the game, which, if desired, can be turned into a universal encyclopedia of Russian folk tales.
Author: Polovnikova Lyubov
Article design: Natalie Podolskaya
Plasticine figures
Children love plasticine very much. Now plasticine is produced with a very good composition and bright, saturated colors. If desired, it will not be difficult to mold the necessary character figures and act out scenes from familiar fairy tales on the table.
It is difficult to overestimate the benefits that such activities bring to children:
Note!
- Do-it-yourself bead brooch: photos of the best options, step-by-step master class on how to create it yourself, weaving patterns
Do-it-yourself felt toys - TOP-120 photos of toy ideas, do-it-yourself instructions for making them for beginners
How to make a lapbook with your own hands: a detailed master class on how to make it yourself, reviews of lapbook elements
- develop fine motor skills, memory, imagination;
- forms coherent speech, teaches retelling;
- introduces children to literary works, broadens their horizons, instills love in artistic creativity...
Is all this comparable to spending time in front of a tablet or phone? This is a rhetorical question - the answer is obvious!
It’s strange, but in the modern world, when we have so many helpers around the house and many processes are mechanized and automated, we often don’t have time to play with our own children. Creating a small theater with your own hands will appeal to both children and adults, and who knows, maybe these few hours of time spent with your child will remain in his memory as the best childhood memories.