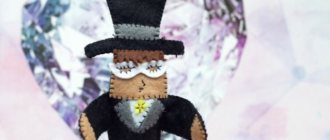
DIY fleece snowman
Even a child can sew fun textile toys using a detailed master class. Seams can be done by hand or by machine.
To sew snowmen we will need:
- white and blue fleece;
- sequins, beads;
- beads for eyes;
- clay for making a spout;
- dry blush, acrylic paints;
- embroidery threads – iris or floss;
- filler;
- transparent glue;
- sewing tools.
How to sew a snowman
First, let's sew a big snowman from three parts.
We mark the elements on the material - circles with a diameter of 6 cm, 8 cm and 10 cm. Cut out the circles. Draw and cut out the pattern of the handles.
To make handles, we sew together two pieces of fleece in white and blue colors. Then we mark the details of the handles on the material folded in half. Sew along the contour, leaving a gap for stuffing. Cut it out, turn it inside out and stuff it with filling.
Next, let's start sewing clothes. It will be a little - a scarf and a hat. We cut out two rectangular blanks from blue fabric. We determine the dimensions for the hat by taking measurements from the toy’s head. Fold the cap in half and stitch along the edge. On one side we cut the fleece, imitating fringe. We sew this edge of the part, gathering it into a pompom. We also make cuts at the ends of the scarf. If desired, you can decorate the hat and blue mittens with bead embroidery.
Let's start assembling a snowman with our own hands. We sew round parts of the body along the contour. We tighten the thread without cutting. Fill the parts with filler and tighten the thread if necessary. Fasten and cut the thread.
Let's start designing the face of the toy. We fasten the thread to the uncovered part of the upper part. We gouge it out in place of the peephole. We sew on eyes - beads, embroider a mouth. We make a nose in the shape of a carrot from clay. We paint the part with carrot-colored acrylic paint. We draw lines with a marker, giving a natural look to the root vegetable.
We connect all the parts of the snowman. To do this, they can be sewn or glued. We highlight the cheeks with dry blush.
Let's continue making snowmen. For kids we use simple templates.
The manufacturing process completely repeats the previous MK. Options for hat models and their decorations can be varied according to your wishes.
Terry toy
In order to sew a terry snowman you will need the following materials::
- white and green terry cloth;
- fleece of any color;
- holofiber (or other filler);
- glue;
- zigzag scissors;
- black beads;
- pins.
Procedure for creating a body:
- The terry snowman consists of three balls of different diameters. Each ball consists of six wedges. First, draw and cut out wedges from paper. The diagonal of the first wedge is 10.5 cm, the second is 8.5 cm and the third is 7.5 cm.
- Fold the white terry cloth in half and trace the paper templates so that you get three wedges of each size. When cutting out parts, you need to leave small seam allowances. You should end up with nine pairs of wedges, three pairs of each size.
- We sew each part on one side, after which we put the parts of the same size into a future ball and stitch it, leaving a small hole.
- We turn the parts inside out and stuff them with filler, and sew up the remaining holes.
- Sew the resulting balls together. The largest ball should be at the bottom and the smallest at the top.
- To make a nose toy, cut out a triangle from orange fabric, sew it together, turn it inside out and stuff it with stuffing. After this, we sew the finished nose with a hidden seam to the head of the toy.
- We attach beady eyes above the nose.
- For arms and legs, you can use the pattern from the second option. Using this template, we cut out parts from white terry cloth, sew them together, turn them inside out, stuff them with holofiber and close the hole with a hidden seam.
- We attach the hands to the middle ball of the snowman using a thread method.
- We fasten the legs at the bottom with a hidden seam.
Description of clothing production:
- We make a hat for a snowman from fleece. Cut out a 21x15 cm rectangle from the fabric, fold it in half and sew it together.
- We cut one of the edges of the workpiece with curly scissors, and on the other side, with the same scissors we cut strips, creating a fringe.
- We turn up the edge of the cap and put it on the snowman. We gather the fringe into a bun and tie it with a strip of fleece.
- Glue the cap along the edges to the head of the craft.
- Now we make a scarf. To do this, the fleece is folded in half again and a strip measuring 25x6 cm is cut off. A fringe is made at the ends of the scarf using curly scissors. We tie the finished scarf on the snowman.
- It's the turn of the mittens. Again, take the fleece, fold it in half, mark the size of the mittens and cut it out. After that, we sew it together, turn it inside out, cut along the edge with curly scissors, turn in the edges and put it on the toy.
Making a Christmas tree
- The final touch will be a Christmas tree made of green terry cloth. For it we cut out a triangle measuring 17x16 cm.
- Fold the resulting triangle in half and sew it together, leaving a hole for the filler.
- We cut out the base circle for the Christmas tree and sew it to the workpiece. We turn the future Christmas tree inside out, fill it with holofiber and sew up the hole.
- We place the almost finished Christmas tree in the hands of the snowman and sew it on.
- All that remains is to decorate the Christmas tree. To do this, cut out circles of different colors and glue them to it.
Snowman "Brrr"
This Tilda snowman will surely become children's favorite New Year's toy. And such a fairy-tale character will also come in handy for adults during Christmas.
To sew a snowman with your own hands using ready-made patterns you need:
- white and blue fleece;
- filler;
- buttons for decoration;
- sewing tools.
Description
We start by making a pattern. Print it out in full size and cut it out.
On white fabric, folded in half, we mark out the main details. We cut out palms and a hat from blue fleece. We sew the parts along the contour, leaving small holes open. On the body we leave the bottom edge open. Cut out the parts and turn them inside out.
Fill the body with filler.
Sew the bottom with hidden stitches.
You can immediately perform decorative embroidery. It is advisable to choose threads close in tone to blue fleece.
Nose
You can easily make a nose for a snowman costume with your own hands. There are two options for attaching the nose - on a cap or hood, or directly on the child’s nose. It is more convenient to sew it on a hat, so nothing will interfere with the child’s face. You can make it flat by simply sewing a long triangle of orange felt, or voluminous.
In order to make a voluminous “carrot”, we cut out a circle from thick felt, the radius of which is equal to the length of the desired “nose”. We cut it along the radius to the center and cut out a small segment, it is extra. We roll the circle into a cone, sew it together and fill it with something soft.
In the same way, you can make a cone from thick orange paper. If you want to secure the “nose” to your face, you will need to sew an elastic thread to it.
Funny company
If you use your imagination when making such a simple toy as a snowman, it turns out that there are a lot of design options. For example, clothes for a snowman boy and a girl should be different. Even the design of the face can be done in different ways. The hat can be in the shape of a bucket, or it can be very glamorous with a brooch. Let's try to sew soft toys in different versions.
To make a large company of snowmen you need:
- fleece in different colors;
- thick dark-colored felt for the feet of boots;
- thin black felt for a hat;
- green felt for the Christmas tree;
- light wool yarn for hair;
- filler;
- threads matching the color;
- beads and buttons.
Description
Let's start with two-color white and yellow toys.
The patterns used are very simple - two circles for the head and body, one rectangle for the hat.
For the head we use white fleece, the remaining parts are sewn from yellow material.
We sew the parts of the body and head with small stitches along the contour and gather them together.
Fill tightly with filler and tighten the thread. Fasten the thread and cut it off.
The result was funny balls.
For the scarf, cut out a narrow strip and cut narrow kititsa at its ends.
Fold the hat blank in half with the right side inward and stitch the edge with a blanket stitch. We assemble part of the hat by tying it with a strong thread or a narrow cord.
We sew together the parts of the head and body, joining them with open parts.
We dress up the snowman in a hat. To decorate the face, we sew on black beads for the eyes and a red bead for the nose. The body can be decorated with buttons.
We perform the second snowman in the same way.
Now let's start making a snowman - a girl. We will have her in a pink hat and brown boots.
Cut out the snowman stencil.
We cut out the details of the head, body, and arms from white material.
We cut out a hat, a tassel for it, a scarf and mittens from pink material.
Stylized boots - we cut out the stand from felt.
We fold the parts of the body with the front side inward and grind them down, leaving the upper section free. Through it we turn the part inside out and fill it with padding polyester or other filler. We make the round head in the same way as described above for the previous toys.
We sew the pink mittens from two parts using an overlock stitch and fill them with filler. We insert the parts into the sleeves and stitch them. In this case, the edge of the sleeve should be sewn with a slight overlap, which is gathered into the frill.
We fill the handles with padding polyester and sew them to the body.
We make a blank for a brush from a narrow strip.
Sew it to the hat.
Attach the snowman with glue to a stylized shoe stand. We put on a hat and sew on small beads for the eyes. We will make the nose from a pink bead.
Beautiful ideas for girls
Now, as I promised, there will be ideas for girls. Everything there is also simple, but it’s better to see it once and imagine everything.
This photo provides a complete description of how the costume was created.
Step-by-step instructions for a faux fur outfit.
With a tutu and a white turtleneck it looks so beautiful.
For a while, the skirt can be sewn to a blouse and decorated with a bow and felt appliqués.
The idea of decorating the skirt itself.
What a laconic snowman in a hat.
I think you got the idea. The resulting costumes are simply stunning and stylish.
We sew a snowman with our own hands: master classes and patterns
There are many holidays in the world. But there are those special ones where families gather. And I really want to decorate everything with my own hands. One of these holidays is New Year. Its attributes are Father Frost, Snow Maiden and, of course, the New Year's Snowman. It is very simple to sew a fabric toy with your own hands, as you will learn about in this article.
What you need for work
The snowman craft can be made from any type of fabric. But there are mandatory attributes for sewing:
- fleece, felt, felt - to choose from;
- pattern paper;
- scissors;
- paints;
- different types of beads, buttons, beads;
- glue;
- threads;
- needle.
Adviсe
Many people wonder how to sew a snowman out of fabric so that the toy lasts a long time.
So, when choosing fabric, pay attention to textiles that do not fray when sewn by hand: terry, fleece. Felt will give stability and shape to thin parts. Knowing these secrets, you will succeed.
Snowmen made from socks
We sew a snowman with our own hands from socks. How to do it? Just.
- a high-waist sock, preferably white;
- rubber bands for money;
- rice or buckwheat;
- thin ribbon of a bright shade;
- glue gun;
- beads;
- buttons.
- The toe and heel are cut off from the sock. It turns out 2 separate halves.
- Take any part and assemble the edge into an accordion and tie it with an elastic band. Very tight.
- Rice is poured inside to the top and tied again.
- Take the product and form 2 balls, so that the top one is smaller. Tighten with an elastic band.
- The second part of the sock is cut in half. You only need one piece of material.
- One of the sides is again gathered into a bun, forming a hat. Place on the top ball.
- Using ribbon, make a scarf and decoration for a hat.
- Take a glue gun and form eyes and a nose. And don't forget about the buttons.
Your DIY snowman is ready for the New Year.
Instructions in the video
Crocheted snowman (amigurumi) with pattern
The amigurimi technique is very popular among needlewomen. The simplest elements of crochet are taken there: double crochet and single crochet. This is done to create integrity.
Do you like this toy? Below is a knitting pattern!
For those who do cross stitch, you can use this pattern as a basis.
These snowmen are also made using a simple knitting technique.
Let's give one more detailed diagram for these snowmen.
Flat crafts are made using single crochets. Each row increased by 1-2-3 loops from the center.
Knit with pleasure!
Felt snow cuties
Even children can sew a snowman using the pattern.
- felt;
- a snowman cut out of cardboard, mittens, a hat and a nose;
- needle and thread;
- scissors.
- White felt is folded in half and applied to the snowman pattern. Trace with a pencil and cut out.
- The rest of the parts are treated similarly, but are made from any other colors.
- Blue felt is good for a scarf. Where would we be without him?
- Start sewing a snowman. A hole is left at the bottom for the filler. They sheathe everything in a circle.
- The craft is stuffed with holofiber through the hole and sewn up, but the thread is not exposed.
- A needle is pulled through the inside to sew on the mittens.
- A cap is placed on the top of the snowman and sewn with an overcast stitch in a circle, without tearing off the thread.
- And again, a nose is sewn through the inside, and hands and a mouth are made for the snow baby.
- For decoration, you can sew a bead onto the cap.
- The eyes are made with black thread using knots.
- A scarf is tied around the neck and its corners are sewn together.
Overalls
If you know how to sew a little, you can make a snowman costume in the form of a one-piece jumpsuit. And to make it more believable, you don’t need to cut the trouser legs; a model with the lowest possible step is just right.
You can make a snowman costume pattern with your own hands directly on fleece. For the top of the overalls, simply trace around any child’s T-shirt, adding a few centimeters on each side for a loose fit. Let's continue it from the waist to the desired length in the form of a wide trapezoid.
In the lower corners of the trapezoid we make short “pants legs”, and draw a line between them in the form of an arch. This is how we get a skirt-pants. The bottom of the legs can be gathered with an elastic band or a white knitted cuff can be sewn onto them.
We cut the shelf in the center and sew in a zipper. We remove the sleeve pattern in the same way from the long sleeve of the T-shirt. You can complement them with “mittens”, so the snowman will turn out to be solid. The hood will cover your head and you can sew on your eyes and nose.
DIY fleece snowman
How to make a big snowman from the office? Easily!
- white fleece;
- a piece of purple fleece 25x30 cm. And already cut mittens and a scarf of the same color;
- a foam ball with a diameter of 9 cm;
- a bag of salt for the head;
- cut out pattern for the body;
- the tip of a sushi stick, sharpened and painted to resemble a snowman's nose.
- From white fleece, according to the blank, the body is cut out and folded, sewing it on the sides.
- The lower corners of the workpiece are folded and sewn across so that the toy is stable.
- Turn the product inside out.
- Salt prepared in advance is placed on the bottom of the bag. The remaining space is filled with padding polyester and the top is tied with thread.
- Using hot glue, glue the foam ball to the top of the workpiece.
- The fleece for the hat is folded in half and sewn on the sides. Turn it inside out and sew another side. They turn it inside out again and make a lapel.
- The top of the cap is tied with thread and a fringe is made.
- A scarf is tied around the neck.
- Use a permanent marker to draw eyes and a mouth.
- The nose is glued with hot glue.
- They also use it to fix the handsome man’s hands. They will be from branches. It is best to do this under a scarf so that it is not visible. Mittens are glued to the tips of the branches. Hands are ready.
Instructions in the video
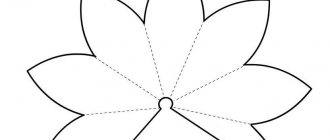
Making a headdress and a carrot
So, the cylinder is not difficult to make. It can be worn completely on the head or held in place with an elastic band or hairpins.
To create it you need three parts. The picture shows two circles and a stripe. The width of the strip is the height of the cylinder, and its length is the diameter of the first circle.
The first circle is cut out from the inside, there are lines.
On the second circle, cuts are made to the marked circular line.
We roll the strip into a cylinder.
Next, at the second circle, insert the cut allowances inside the cylinder and glue them together. And the first circle is the brim of the hat; we glue the resulting structure into its middle.
Sew a snowman in tilde style
Tilde style? Yes! And it's possible!
- fleece: white and a little bright;
- patterns;
- sewing tools: threads, needles, pins;
- sushi stick;
- scissors;
- filler;
- handle spring.
- White fleece is folded in half and cut according to patterns.
- Each piece is sewn in a circle, but leaves a hole for the filler.
- The lower corners are folded to the side and stitched. The products are turned inside out and filled with padding polyester.
- A hidden seam is made at the bottom corners for stability.
- Sew the handles so that they are free to move.
- Use black thread to model the eyes.
- A nose is made from red or orange fleece and sewn onto the snowman. Here you can come up with your own option.
- 2 circles are cut out of blue fleece - these will be headphones for the toy. They are turned inside out and connected to each other using a spring from a ballpoint pen. Sew on like regular headphones and tighten the thread a little so that the spring bends.
- The scarf is cut out of any bright color and tied around the neck.
Let your holiday be special!
Interesting ideas for inspiration
Well, now there are different ideas that can give you an idea. Let's watch.
An interesting suit with a hat and red scarf.
The simplest option is with a blouse and pants.
Large buttons look great.
What a cute bucket idea!
It was also an interesting idea.
The costume is decorated with a hat and scarf. This style is more like European))
Short and long suits. Option with a hood.
Crochet hat for outfit.
What furry slippers does the baby have?
The idea with headphones is also good. Just make them shaggy, as if covered in snow.
Someone came up with the idea of making a version on foam rubber.
For the top we simply used a white shirt.
This is the idea we got from the laminate cover.
That's how it was cut.
The boy is dressed up. What a beautiful combination of white and red.
This suit is unfolded.
Overall, I think you liked it. Now let's take a closer look at how to make a hat and a carrot for an outfit.