- We create a hydroponic installation ourselves
- ACS system
- DWC installation
- Drip irrigation system
- DIY aeroponics
- Where can I get the components?
In the modern world, you can grow flowers, harvest lettuce, vegetables and other crops not only in a garden or greenhouse, but also in an ordinary city apartment.
To grow plants at home, it is necessary to create artificial climate conditions for them. One of the most effective growing methods is hydroponics. Hydroponics is a technology for soilless cultivation of plants, which has a number of advantages over the traditional method of growing in soil, namely:
- no need to loosen the soil, fight weeds, or regularly water the plantings;
- complete control over plant nutrition;
- In hydroponics, plants easily receive all the nutrients and do not waste energy on developing the root system.
We create a hydroponic installation ourselves
In order to assemble a hydroponic system with your own hands, you do not need to be a highly qualified engineer. The simplest model will consist only of a container, a compressor with a sprayer, seats and an inert substrate. In some of the more complex systems there may be additional elements, but these are mostly minor.
In the article we will look at several types of different hydroponic systems, but first we will talk about the general rules that must be followed when purchasing components.
Rule 1
The tank intended for the nutrient solution must be made of a neutral material that is resistant to fertilizers and does not allow light to pass through.
Rule 2
The volume of the container should correspond to the number of plants and their “appetite”. Otherwise, you will have to refill the container too often.
Rule 3
Among inert substrates, you can choose mineral wool, expanded clay, coconut fiber, perlite, vermiculite or their complexes.
Advantages and disadvantages of hydroponics
When choosing a method for growing certain plants, it is necessary to take into account both the pros and cons of the technology. The advantages of the hydroponic growing method are as follows:
- Accelerated plant growth. Due to the fact that the roots of the grown plants are fed with the optimal amount of nutrients, growth rates increase by several percent;
- All-season cultivation. Using this method, plants can be grown at any time of the year and in any climatic conditions;
- Space saving. Plant roots do not need to spread over a large area in search of nutrients, as they do in regular soil. Therefore, you can plant them closer to each other.
Video on the topic
Review video
about hydroponic methods
growing
Well, a few words about the disadvantages of hydroponics :
- Complexity of technology. Everything must be calculated and verified to the smallest detail. Any error can lead to the death of plants. Success in hydroponics is influenced by the quality of the substrate, nutrient solution, light, temperature and other factors;
- Dependence on electrical energy. Hydroponics uses pumps for forced supply of a nutrient solution, aerators for oxygen enrichment, and in some cases, artificial lighting;
- Some types of plants require special conditions and cannot always be grown this way.
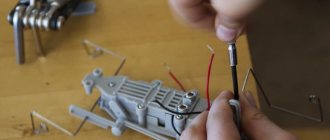
ACS system
This instruction will help you create a budget system from scrap materials.
You will need:
- 2 plastic containers + 1 lid;
- disposable plastic cups;
- 1 plastic and 1 rubber tube (the plastic drain must have a larger diameter);
- pump with a capacity of 380 l/h (we recommend considering the SP-650 model from the Resun brand);
- knife or drill for punching holes;
- Azud seals and hot melt adhesive;
- 2 G-fittings. You can take connecting elements from high-strength plastic and save money without losing quality. The Azud brand has these.
It is very easy to assemble such a system. To do this, follow the instructions:
- It is necessary to make holes in the lid of the container for seats.
- Cut holes in the bottom of the glasses for the roots.
- Place the upper drawer on the lower one, then one end of the rubber hose should be removed through the cut hole.
- In order to supply the nutrient solution from the lower tank to the upper one, you need to purchase a pump and attach a 10-15 cm long hose to it. The pump must be placed in the lower tank with the nutrient solution.
- The end of the plastic hose should be cut at a 45 degree angle and installed with the cut side down. To seal the holes, you must use special gaskets or hot melt adhesive.
- In the upper container, on opposite sides diagonally, there should be two holes for supplying and draining water. Afterwards, all that remains is to pour the nutrient solution into the lower tank, turn on the pump and check if there is a fountain from the tube (to test the drain for leaks).
- We place the glasses in their places. The hydroponic system is ready!
DWC installation
DWC is a deep water culture method. With this method of cultivation, the root system of the plant is completely immersed in a nutrient solution, which is constantly aerated. An example of such a system is a ready-made AquaPot installation. It is excellent for growing large annual crops. Thanks to its compact size, it can easily be placed even on a windowsill. All that is needed for high yields is to change the solution every 7-10 days, monitor the pH and EC indicators. If desired, you can assemble a similar installation yourself.
For this we need:
- container with a volume of at least 20 liters with a lid;
- mesh pot with a diameter of 16 cm made of non-toxic high-strength plastic;
- sprayer ASC-02;
- single-channel compressor.
Build process
It is necessary to make a hole in the lid of the tank to match the diameter of the pot. Directly under the cover, another hole should be made for the wire of the compressor connected to the aerator. The connection points should be sealed.
The germinated seed in a rockwool plug should be placed in an inert substrate such as expanded clay drainage or rockwool. Accordingly, place the substrate with the seedling in the planting area. 12-15 liters of nutrient solution are poured into the tank. The compressor in such a system must operate 24 hours a day. The nutrient solution must be changed once every 7-10 days. Remember that when growing hydroponically, it is important to control the pH and EC levels of the solution.
Drip irrigation system
It should be considered as temporary help for plants, especially when you are not at home. If assembled correctly, this system will be able to irrigate plants without your presence. Often, growers use drip irrigation to irrigate their pets grown on coconut or any other inert substrate.
Here's what you'll need to create a drip irrigation system:
- tank for nutrient solution (depending on the number of plants);
- two 16 mm main pipes made of durable plastic;
- microtubes;
- seals;
- microfittings;
- G-fitting;
- punch.
How to assemble drip irrigation:
- Make a hole in the tank for the main main pipe (seal with a sealant);
- Place lines from 16 mm pipes;
- Using a punch, make a hole for the microtube
- Next, the micropipe is connected using a microfitting to the main pipe;
- Droppers are installed;
- A pump should be placed in the tank;
- At the end of the line we install a drain valve.
You can assemble a drip irrigation system yourself. You won't have to look for components for a long time. Everything you need for assembly is in our store.
DIY aeroponics
The term aeroponics refers to growing plants in a soilless environment. Only unlike hydroponics, their roots are in the air and irrigated with a nutrient solution supplied from nozzles.
Accessories:
- large capacity 70-100 l;
- PVC sheet;
- mesh pots.
- water pump with a capacity of 3000 l/hour;
- part of metal-plastic 50 cm;
- 2 adapters for metal-plastic;
- injectors.
Assembly diagram
- One end of the adapter must be screwed into the pump, and the other must be connected to the turntable through the barrel;
- Place the structure at the bottom of the pot;
- Cut a plastic lid to the diameter of the top of the pot;
- Make holes in the lid for seats;
- Perforate the pots using a soldering iron;
- Close the central hole with a plug;
- All that remains is to add the substrate to the pots, place the plants, fill the container with a nutrient solution with an adjusted pH level (5.8-6.2) and turn on the pump.
Adviсe:
- pour no more than 50 liters of solution;
- select a watering mode lasting 15 minutes at intervals of 30 minutes;
- use large expanded clay as a substrate.
Pipe characteristics
To manufacture modules for a hydroponic system, a material is required that is inert to chemicals, has high strength, and does not deform under constant exposure to liquid. Modules are made of plastic or stainless steel. Home gardeners use PVC pipes.
To make it more convenient to place hydroponics in a greenhouse or box, choose a system of long cylinders. They make efficient use of space and resemble standard garden beds.
The shape of the cylinders can be square or round. System manufacturers most often produce square containers.
At home, growers assemble hydroponics from round pipes or from square vent boxes.
The thickness of the walls of the modules matters. The structure must be durable, reliable, not allow light to pass through and not be heated by sunlight or lamps in the greenhouse.
The minimum wall thickness of the material from which manufacturers make containers is 4 mm. A thickness of 2 mm will not work. Such material transmits light to the solution and quickly deforms, unable to withstand the load.
Home growers use pipes for external sewerage equipment. Wall thickness 3.2-4 mm. The material for internal sewerage is not entirely suitable. Wall thickness 1.8-2 mm.
There are cells on the top of the modules. They are located in increments of 20-30 cm. Cups with substrate and seedlings are placed in them. During the growing season, the roots of the plants come out of the glasses and are located inside the cylinder.
The shoots greatly increase in length. So that the root can develop freely, containers of a certain cross-section are used. Manufacturers make hydroponics from cylinders with a cross section of 125*125 mm.
This is the optimal size for growing medium-sized plants, berries and vegetables. At home, gardeners choose sewer pipes with a cross-section of 110-130 mm. Products with a larger cross-section will clutter the greenhouse.
When creating a trough for hydroponics, manufacturers and agronomists think through every detail, including the color of the material. The gutters contain a solution that is sensitive to sunlight.
The recommended liquid temperature should not exceed 20 0C. To ensure light is reflected from the module, they are coated with a light dye. The gutter should not be transparent. Growers often choose dark-colored modules.
They protect the growing medium and plant roots from light, but the solution heats up and loses its characteristics. For home hydroponics, it is recommended to choose products in gray, beige, and white colors.
To create hydroponics at home, choose pipes with the following characteristics:
- PVC plastic pipes;
- square or round shape; preference is given to products with a round shape; the solution does not spread, the module is easier to clean; sediment from mineral fertilizers remains in the corners of the square gutter;
- optimal diameter 125*125 mm, 110*110 mm;
- wall thickness from 2 mm to 4 mm;
- choose light-colored material so that it reflects light.
It is recommended to clean hydroponics every time you change the nutrient solution or at the end of the plant growing season. To do this, a hydrogen peroxide solution is fed into the system. Boric acid can be used. Vinegar is not recommended. It leaves a smell.
To clean pipes, manufacturers have created a special product, Flora Clean. It can be added during the operation of the system. It does not affect plant growth and does not reduce the nutritional value of the solution.
Where can I get the components?
Many elements of hydroponic installations and drip irrigation systems can be purchased at regular hardware and gardening stores. You can save your time and buy most of the components at a progressive plant growing store. For example, in the product catalog of our online store Agrodom.com you will find compressors, pumps, filters, containers, tubes, as well as connecting elements, substrate, fertilizers and water quality monitoring devices. This list is far from complete. There are also ready-made hydroponic systems on sale. Among them is the Easy2grow Extension Kit for home use. It is enough to purchase a tank and a suitable substrate (coconut-perlite, earth-expanded clay, expanded clay-mineral wool) and add the solution as necessary. High yields will be guaranteed!
Recommendations for growing plants
In order for plants to grow well and not get sick in unnatural conditions for them, it is necessary to observe some subtleties:
- You need to constantly add nutrients, but do this only in quantities acceptable for seedlings.
- With a separate tank and pump, nutrients are added directly to the tank and then mixed with water by running the liquid through pipes. If you are using a structure with compressor aeration and adding water directly, you need to mix the fertilizer before applying it to the plants.
- In the run-through option, the seedlings are planted in an empty pot, the roots are fixed with expanded clay. In a closed installation with a compressor pumping air, you can use some light soil.
- Mature bushes need a garter. This will protect the seedlings themselves from damage and prevent the hydroponic structure from tipping over.
- The fluid level should be checked every day.
- Monitor the performance of the compressor.
- Carefully inspect the seedlings. The infected plant must be removed immediately, the water must be completely replaced and, if possible, the entire structure must be rinsed.
If the plants look weak, the leaves have become faded, and the stems have become very elongated, then the seedlings do not have enough light. This problem can be solved by installing additional fluorescent lamps or by ensuring that the device is placed in a place with good natural light. Wide window sills or stained glass windows are perfect.
Source