- June 5, 2019
- Production
- Afanasyev Yuri
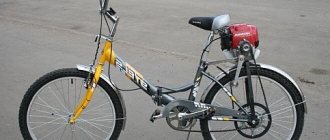
Who, as a child, or maybe even as an adult, didn’t dream of going karting? Given the opportunity, rarely did anyone refuse. Previously, many did not have extra funds for assembly, but now with access to a huge amount of practically free or simply very cheap materials, it is possible to assemble these small cars in the garage. Let's see how to make a go-kart from scrap materials and with little investment.
Materials:
- profile pipe 50x50 mm;
- profile pipe 20x20 mm;
- corner 20x20 mm;
- steel strip 20 mm;
- sheet steel 5-10 mm;
- flange housing bearing 2 pcs.;
- rear wheel traction axle for kart;
- gasoline engine assembly from a motorcycle or moped;
- brake disc with brake cylinder;
- 2 front and 2 rear wheels for kart assembly;
- seat;
- steering wheel with steering column and rods;
- plywood;
- battery.
Brake system
Since the equipment will accelerate to significant speeds, do not forget about the braking system. The hubs of the bearing housings are made of aluminum casting and processed on metal-cutting machines. The brake system is a hydraulic disc mechanism. According to technical specifications, the Pioneer is equipped with only a pair of rear brakes. The disc is fixed on the rear axle. The mechanism will be installed on the frame. The caliper body is aluminum, the cylinder is made of steel, the piston is made of brass or aluminum. When installing the caliper, be very careful to center the brake disc.
What is karting
Karting is car racing using mini cars (karts). A kart is a mini sports car of the simplest design without a body with a small-displacement engine. But there are such cars with powerful engines, this will already belong to the class of “superkarts”. Cards of this class are capable of reaching a maximum speed of up to 260 km/h.
Device card
PIONEER class karts
1 — front upper bumper; 2 — gas pedal; 3 — brake pedal; 4 — gear shift lever; 5 — rear bumper; 6 — brake disc; 7 — main brake cylinder; 8 — frame (chassis); L — steering column bearing; B — steering column thrust bearing.
Overall dimensions of the go-kart:
- Length: 1015 mm;
- Front width between wheels: 750 mm;
- Rear width between wheels: 730 mm.
Even small children can take part in karting races. Below is a table of ages and racing units corresponding to power.
| Class | Age of participants | Machine frame | Engine | Rules |
| Micro | 6-8 | Homologated | IAME Parilla 60 (Italy) | The speed is about 60 km/h, competitions are local and throughout Russia. The technology is reliable. There are many participants. |
| Mini | 9-10 | Homologated | IAME Parilla 60 (Italy) | There are many participants, the speed is about 80 km/h, competitions both in Russia and local ones. The technology is reliable. |
| Super Mini | 10-12 | Homologated | IAME Parilla 60 (Italy) | There are many participants, competitions both national and local, the equipment is reliable, the speed is about 100 km/h. |
| Pioneer | 8-11 | Any | Domestic 50 cm³ with gearbox | An outdated class, there are few participants in all-Russian competitions, the equipment is unreliable, speeds are about 60 km/h. |
| Cadet | 10-13 | Any | Domestic 50 cm³ with gearbox | An outdated class, there are few participants in all-Russian competitions, the equipment is unreliable, the speed is about 80 km/h. |
| Mini Rocket | 8-11 | Any | Raket-85 (Sweden) | Outdated class, only local competitions, reliable equipment, speeds about 60 km/h. |
| Rockets | 11-13 | Any | Raket-85 (Sweden) | Outdated class, only local competitions, reliable equipment, speeds of about 80 km/h. |
| EasyKart-50 | 5-8 | Birel E.K. | IAME Parilla 50 EK (Italy) | Mono series, only local competitions, reliable equipment, speeds of about 40 km/h. |
| EasyKart-60 | 8-13 | Birel E.K. | IAME Parilla 60 EK (Italy) | Mono-series, many participants, reliable equipment, speeds of about 80 km/h. |
Steering.
- Steering wheel.
- Rotary mechanism.
- Steering column.
- Emphasis.
- Main thrust.
- Intermediate row (trapezius).
- Rubber-metal hinge.
The length of the steering column is selected taking into account the height of the driver. A rotating bipod, 60 (mm) long, is welded to the column. By selecting its length, you can change the gear ratio between the steering wheel and the wheel.
How to make a homemade go-kart
Karting is one of the most popular hobbies today. Not only children, but also adults do it. These small but very fast cars give you the first driving skills and also allow you to get a dose of adrenaline during an exciting race around the circuit.
What is karting or kart? A go-kart is a mini sports car that has no suspension and is capable of reaching high speeds in a short period of time. Often, karting enthusiasts have the opportunity to buy their own personal karting or want to create an exclusive karting with their own hands. Of course, making a homemade go-kart is not only cheaper, but also very exciting at any age.
In addition, if we recall the history of karting, this sport originated precisely as racing on homemade go-karts. Only over time, karts were put into production. Let's consider the main stages of design.
Recommendations for drawing
It is preferable to make drawings of the frame in its natural size on sheets of graph paper. For ease of working with such a schematic image, after drawing it is pasted onto thick cardboard. In the future, the drawing will serve as a model according to which other structural elements will be adjusted. The frame must be drawn in two projections - this is a side view and a top view. The front spar is shown separately. There are no exact dimensions of the go-kart frame, which means that such a go-kart can be made not only for a child, but various design details are adjusted locally.
Assembly card
The card frame is made from a 50x50 mm profile pipe. Its size is calculated depending on the height of the rider. The frame should be U-shaped. Moreover, its rear jumper is made to match the width of the existing traction axle, taking into account the installed wheels. The frame parts are held together using bolts and mounting plates cut from a thick steel plate.
In the rear part of the frame, near the crossbar, through holes are drilled to install a traction axle through them with a sprocket and brake disc already screwed to it. The axle itself is attached to the frame through bearings with flanges bolted to the profile pipe. Wheels are immediately put on it.
To make the front axle, a 50x50 mm profile pipe is taken. At the points where it intersects with the frame, 3 walls are cut off. This will allow the bridge to be mated to the frame. It is important to make a cut at the bottom with a width of 50 mm, and towards the top with a slope towards the wheels by several degrees. Then the frame and bridge are tightened together with bolts and a sheet steel square. In this case, the part of the bridge protruding beyond the frame is bent upward, due to the resulting gap from the cut with a slope.
Then the edges of the bridge need to be trimmed on the front wall and bent towards the frame. After this, the front wheel brackets are attached to the axle through brackets made of plates.
The kart is already on wheels, but its front axle is still dangling. Therefore, you need to cut 2 plates and screw them on top above the intersection with the frame. Before this, the plates will have to be bent. Thanks to this mounting method, the center of gravity of the front end of the kart will be lowered, which will provide stability when cornering in the future. The bending of the edges of the front wall of the bridge allows the wheels to turn normally over the entire radius.
Next, the engine is installed on the frame. A fastening is made under it from a corner, a thin profile pipe and a strip. He only needs 2 points of support. It is positioned so that the drive chain can be placed over the sprocket on the axle.
A seat is attached to the frame in front of the engine. It can be placed on crossbars made from a corner or profile pipe.
In the center of the front axle, the steering column is screwed onto a mount made from 2 pieces of angle iron. Then an upper stop is made for it from 3 pieces of strip. Of these, one is attached to the bridge and two on the sides to the frame. The final stage of assembling the control system is the installation and adjustment of the steering rods.
Next you need to make a protective frame for the engine. For this, a 20x20 mm profile pipe is used. First, a U-shaped stand is made between the seat and the engine, then it is reinforced with oblique jumpers. The part between the protective frame and the seat is covered with plywood. A bracket for attaching the gas tank is screwed to the plywood wall.
At the next stage of assembly, you need to install the muffler, connect the tank and deal with the electrical wiring. Then a hydraulic cylinder is installed on the brake disc, and the pedal for it is placed under the left foot.
A rod is made from a steel strip, which is attached with a hole to the foot lever of the gearbox. To prevent it from flying off, it should be tightened with the standard rubber band of the lever. The rod is connected at the beginning of the seat to a second lever from the same strip. It is attached to it slightly below its center, the lever itself is attached to the frame below. It needs to be equipped with a knob on top; you can simply use a tube as it.
The clutch cable is routed from the engine to the front axle, where it is connected to the pedal mounted under the right foot. The pedal itself must be equipped with a limiter so that it cannot be pressed beyond the permissible cable travel.
The final stage of assembly is installing the bottom. It is cut out of moisture-resistant plywood and screwed to the frame from below. After this, the battery is mounted, and the card is ready.
The result is an excellent entertaining mini car, unfortunately, with unusual controls at first. But after riding it for a few laps, further gear changes will take place automatically, and confusion with the pedals will also disappear. Using this principle, you can make a kart using an engine with a variator from a scooter. This will be even easier, considering that you only need to remove the gas and brake pedals.
Engine
If you only have a gasoline saw engine as a go-kart engine, then this is an excellent option. Such an engine is quite suitable for a drive with a single gear. However, here it is not possible to adjust the gear ratios, so the torque on the go-kart wheels will be the same both during acceleration and when driving.
If you manage to get the engine from the scooter, then you can use the gearbox with it. This way you can increase the torque during acceleration. Additionally, you will have to install a clutch and gear selection mechanism. If a motor from a scooter is installed, then a clutch is not needed - there is a variator inside. The gear ratio will change as the kart speed increases.
Video
This video explains in detail how to make a go-kart with your own hands. The video has many positive reviews and comments.
Next is a series of video lessons - homemade karting. This video shows how to make a frame for a go-kart.
Continuation. Buying an engine for a go-kart.
Continuation. How to make a steering wheel on a go-kart.
Continuation. Testing a homemade go-kart.
Author of the publication
15
Comments: 25Publications: 324Registration: 04-03-2016
Slipway
Next you need to assemble a slipway, on which the go-kart frame will then be assembled. It is necessary when the machine will not be produced individually, but at least in a small series. At the base of the slipway there will be an aluminum sheet measuring 1,700 * 900 millimeters and at least 15 millimeters thick. A clear line is drawn along the long side - this is a trace of the plane of symmetry of the frame. The line perpendicular to the long one is the base point for mounting the pin bushing clamps.
The bushing holes are made on a boring machine. The result will be the required accuracy of installation of the bushings during welding work. Steel corners are also installed on the slipway to secure the longitudinal spars. The frame is assembled from two longitudinal spars, three cross members, a front bump stop and brackets for mounting the steering mechanism. For frame parts of a homemade go-kart, it is recommended to use a pipe made of 30KhGSA or pipes of the St20 brand.
Seat and bottom.
The seat can be made from several layers of fiberglass impregnated with epoxy glue (resin). We glue a rubber hose cut along the perimeter of the end.
We will make the bottom from a duralumin sheet, 1.5…2 (mm) thick.
We will prepare drawings, use them to manufacture parts, and assemble the go-kart with our own hands.
This is how it should work out for us.
Order a drawing
Share with your friends!
4WHEELS
Today, a huge number of children and even adults are passionate about karting. These nimble, fast cars allow you to gain driving skills and also feel the rush of adrenaline during fast trips around the go-kart track. But many hobbyists cannot or simply do not want to buy a kart; they want to assemble it themselves. And it is quite possible to do this.
Where to begin
Before starting work, you need to purchase the necessary materials and units, which are difficult to make yourself. For this, there are special kits that include wheels, chassis and steering parts and other small components.
Making a layout
At the next stage, according to the drawing, a mock-up of the go-kart frame is made on cardboard. Pipes of a given length are cut according to the layout, which are fastened with welding seams; if necessary, they can be bent using a pipe bender. The components of the power, steering and chassis need to be attached to the resulting frame.
To start work, 2 U-shaped tubes are welded to the bottom of the card, which need to be reinforced with transverse ties. Each tie is attached at one end to the frame, and at the other end to the corresponding tubes intended for fastening the units. This will give the entire structure the necessary rigidity. Brackets for mounting the engine are welded onto the frame, the location of which depends on the brand of engine chosen for the go-kart. For installation, special engines are used, for example, Rotax.
A more budget option is any air-cooled engine, for example, from a Zaporozhets or a motorcycle. The transmission drive will be attached to the rear axle, so the engine will be installed under or behind the driver's seat.
Control installation and car assembly
Installation of the steering control is quite simple. A gear is attached to the steering shaft, the best option is z = 10. Next, this gear is connected to the rotary cams, which, in turn, are attached to the rods that turn the wheels. Then this entire structure is attached to the frame.
At each stage, you need to strictly check the dimensions on the drawing, otherwise you can break the symmetry, which will not allow the map to stay on the road normally.
The pilot's seat is bent from sheet metal and then mounted on the frame. At the final stage, the wheels included in the go-kart kit are attached to the frame, and the front ones are attached to the steering. The brakes are mounted only on the rear wheels; they are connected to the pedal using cables. At this stage, all sizes and levels are finally measured and adjusted.
Only after this is the fuel supply system, gas tank, fuel lines and carburetor installed, taking into account the requirements presented by the engine manufacturers. Don't forget about the air and fuel filters. After this, you need to configure its operation and you can go for testing.
Did you like the article? Subscribe to the channel to stay up to date with the most interesting materials
Design
Below is a list of the necessary materials to make a go-kart with your own hands.
- Steering/brake system:
- Transmission;
- handbrake;
- steering wheel;
- wheels;
- steering and drive shafts;
- gas and brake pedals;
- bearings.
- Engine:
- engine (you can use the engine from a chainsaw or lawn mower-trimmer);
- chain;
- fuel tank;
- bolts and washers.
- Chassis:
- 2.5 cm square pipe, 9.2 meters long;
- steel pipe with a diameter of 2 cm, a length of 1.8 meters;
- pipe with a diameter of 1.5 cm, a length of 1.8 meters;
- a steel plate slightly larger in size than the engine and 0.5 cm thick;
- metal or plywood for the bottom and seat;
- the seat itself.
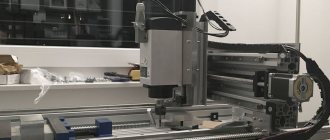
To make a go-kart with your own hands, you will need a welding machine. The chassis is the basis of the go-kart. They hold you during the ride, and they also house the engine. If you have never done welding work, then it is better to use the services of a professional, because parts welded by a non-professional may only seem durable, but in practice they will have microcracks and cracks, as a result of which your kart can become a deadly vehicle. If the chassis consists of several parts, then welding must be carried out at high temperatures and a deep degree of penetration, welding seams must be as neat as possible. If you decide to carry out welding work yourself, then it is better to practice welding small products and only after getting good experience start welding a go-kart.
One of the options for assembling a homemade go-kart is to purchase ready-made parts. So, if you don’t want to go through the hassle of creating parts yourself and then welding them, then you can purchase a ready-made construction set that can easily be assembled according to the diagram using simple tools and without welding. The approximate cost of such a constructor for a homemade go-kart is $550.
CUTTING
Well, all that remains is to cut out the manufactured tarot cards and the job is done. For cutting, you can use scissors or a stationery knife with a ruler.
This is interesting: Files for printing Tarot cards
Using a knife makes it faster and smoother, but you need to act carefully and carefully to avoid injury . When cutting with a utility knife, it’s a good idea to put plexiglass, plywood or some other material underneath so as not to damage the table (or whatever you’ll be cutting on).
Another consideration when cutting is rounded corners. Everyone decides for themselves whether to do them or not.
At the time of writing, several tarot decks had already been made using this method. Namely, the Tarot of Dwarves, Tarot of Shadows, Tarot of Manar and Koshchyuny speak the truth.
Example of ready-made cards
Why does gasoline spoil in the tank, and how long can it be “stored” there? Refinery employee response
Many drivers have noticed that over time the characteristics of the fuel in the tank deteriorate. You can feel this without testing - the car drives worse, and the engine starts to run noisier. In normal times, this situation rarely occurs, since motorists manage to pump out fuel quickly enough. But now many drivers have cars sitting idle, so I decided to cover the topic of the “expiration date” of gasoline.
On the Internet you can find a lot of opinions about modern fuel.
It turned out that gasoline does have a certain shelf life, which depends on many factors. Leaded gasoline, well known to experienced drivers, could be stored for many years . Officially, its shelf life was 5 years, but in practice the fuel did not lose its properties for decades. Now the situation has changed, leaded gasoline has been banned. That is why fuel began to be stored less .
In accordance with current GOST, the shelf life of AI-92 gasoline should be at least a year . It is important to understand that this is often achieved only under suitable storage conditions. It is impossible to create such conditions in a fuel tank, so in practice the shelf life of the fuel is lower . Why does a seemingly non-perishable product last only a year?
Contact with oxygen plays an important role in the shelf life of gasoline . At oil storage facilities it is minimized. The same thing occurs when storing gasoline in a full canister with a sealed lid. The car's fuel tank provides a ventilation system , so contact with oxygen is not limited.
The additive package used in the production of fuel also has an impact. Even AI-92 gasoline contains quite a lot of additives. Some additives are volatile, others, on the contrary, precipitate . This entails a decrease in the octane number of the fuel and, consequently, a deterioration in the dynamics of the car. Gasoline manufacturers use different additive packages. This is why fuel from one gas station can be stored in the tank for months without problems, while another “spoils” after just one or two weeks .
If you experience the problems described above, it is recommended to refuel in small portions or try changing gas stations. From my own experience, I can say that in just three months gasoline can greatly lose quality . Once, at the beginning of winter, I left an incomplete can of gasoline for a walk-behind tractor at the dacha, and in the spring I was unable to start the engine. The fuel didn't even ignite with a match.
Did you like the article? Subscribe to the channel to stay up to date with the most interesting materials
Wheels
Wheel rims are made on a lathe. They are made from 1.5 mm steel sheet. Using 4 M6 bolts, the discs are attached to the hubs and their heads are welded to the hub. Weld the left and right swivel assembly of the front axle. Connect them to the eyes using pins. Then they need to be attached to the front axle beam. The camber angle of the front wheels should become zero. The angle of the pivots should be 12°. The controllability and stability of the kart depends on the angle of inclination of the king pins and the camber of the wheels.