For many projects, a CNC router is necessary for good and fast results. After some research on the current CNC machines, I came to the conclusion that all the machines under 150k could not meet my needs in terms of workspace and accuracy.
What I want:
- working space 900 x 400 x 120 mm
- relatively quiet spindle with high power at low rotation speeds
- maximum possible rigidity (for milling aluminum parts)
- highest possible accuracy
- USB interface
- spend up to 150 thousand rubles
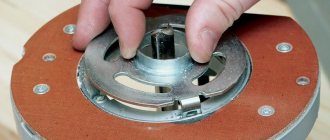
With these requirements, I began 3D design by developing schematics and drawings, testing the many parts available. The main requirement: the parts must fit together. In the end I decided to build the machine on a 30-B nut with 8 aluminum frames with 16mm ball bearing spindles, 15mm ball bearing guides and 3 amp NEMA23 stepper motors that fit easily into the off the shelf mounting system.
These parts fit together perfectly without the need for special parts.
Operating principle
Milling machines are ideal for precision wood processing. The technology will be similar to the work of a sculptor who cuts off unnecessary parts of a part. In such a situation, the main functions will be performed by the cutter.
A tool with sharpened edges will rotate at high speeds, which will speed up operations PHOTO: promzn.ru
The device is driven by an electric motor. To ensure the required precision of movements, special mechanical devices are used.
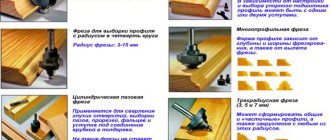
Do-it-yourself copy-milling machine for wood
A large number of parts, furniture elements, and other products require shaped, highly precise and accurate execution. At the same time, it is necessary to ensure complete analogy in the entire circulation of blanks. It is almost impossible to achieve such an effect with your own hands. For this, a copy-milling machine is used.
The undoubted advantage of such a device is that, despite the simplicity of the device, it performs quite complex patterns PHOTO: youtube.com
In addition, the device will be indispensable for drilling holes for a number of elements (for locks and handles, forming frames for mirrors, and other work).
To ensure that all parts, blanks and products are identical, the wood cutting machine uses templates in its work. They are three-dimensional samples made of wood, plastic and other materials. To ensure high-precision work, vacuum pressing of workpieces and automatic template feeding are used.
Thanks to the perfect copying of the template boundaries, you will get identical finished products with complex patterns and holes of the required shape PHOTO: met-all.org
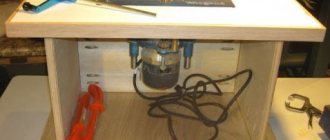
Electronics
Now it's time to connect the Arduino, drivers and stepper motors. Use one driver per separate stepper motor. Each driver needs power to operate. I used a 24V 15A power supply. Drivers are selected based on the current (A) required by the stepper motors. A+, A-, B+, B- correspond to each of the two motor coils and their poles. CLK+ (Clock) is connected to the step pin on the Arduino, CW+ (Clock Wise) is connected to the direction pin, CLK- and CW are connected to the GND pin. EN+ EN- does not need to be connected.
The link below contains the Arduino GRBL connection diagram and some necessary explanations.
Grbl connection.
What is Arduino?
Arduino is a combination of hardware and software. It is used to simplify electronics development.
The hardware includes various Arduino boards, which contain programmable microcontrollers, and additional modules. The software part includes a development environment in a fairly simple programming language, as well as a large number of ready-made libraries.
After its creation, Arduino quickly became a success. The open architecture allows you to create microcontrollers and make firmware for absolutely all interested people. Schemes and code are in the public domain. After widespread adoption, a large number of electronics manufacturers began to use Arduino for their products.
After entering the Chinese market, the boards became much cheaper and became even more widespread. Now on the Internet Arduino is sold at a price of 70 rubles.
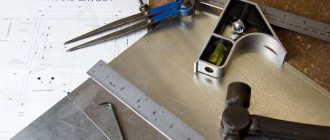
Tools you will need
For CNC milling you will need the following tools:
- Welding machine for the manufacture of metal housing. The advantage is automatic welding;
- It will be necessary to turn the studs, and perhaps some other turning work. Therefore, ideally, one would need to have access to a lathe to carry out component manufacturing work;
- Grinder or hacksaw for metal;
- Screwdriver;
- Hammer;
- Soldering iron;
- Scissors;
- Pliers and pliers;
- Insulating tape;
- Super glue;
- Fumlente and sealant;
- Keys for assembly.
This is interesting: How to make a drill with your own hands: assembly instructions and video
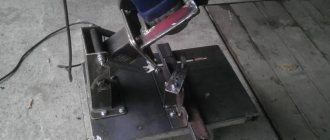
X axis
The role of the X-axis drive is performed by a threaded rod. On one side it is inserted into the stepper motor through a coupling, and on the other it is rigidly clamped in a bearing. The bearing itself is inserted with tension into a wooden block. There are two blind holes in the block along the edges for the guide shafts. The thickness of the fastening parts must be sufficient to ensure rigidity. Excess weight will reduce vibrations and the machine will position the tool more accurately.
What are shields for?
The use of shields allows you to significantly expand the functionality of the router. Most often they are made to fit the board form factor. You can use several shields at the same time. The range of applications is very wide:
- Ensuring independent operation from a computer.
- Connecting peripheral devices.
- Output information to peripheral devices directly from Arduino.
- Simultaneous control of a large number of motors.
- Storage and processing of voluminous information.
- Connect to Wi-Fi.
- Connecting mobile network antennas.
- Playing music on Arduino, etc.
IMPORTANT . When connecting shields, you must be careful not to damage the Arduino board.
Z axis
This axis is noticeably shorter than X and Y. It does not need large strokes because it only provides tool movement. Typically, the parts being milled are not very tall. Therefore, we will limit ourselves to 15 cm
How to make a wood lathe with your own hands: drawings and technology
The easiest way to make a tool yourself at home is to construct a lathe or milling machine from a drill or electric motor removed from another tool. This process is not that complicated, so every master can handle it. To do this, you will need an electric motor, the power of which does not exceed 500 W, and available materials. A drill can also be used as a drive. Of course, making a lathe will require some skill.
The device of the tailstock of a homemade wood lathe
To build the machine, the following elements are required:
- metal frame;
- electric motor;
- handyman;
- tailstock.
It wouldn’t hurt to get a drawing that will help you navigate the dimensions and correctly manufacture all the structural elements for its subsequent assembly.
How to make a homemade drilling machine with your own hands with a motor
First you need to prepare the electric motor shaft. To do this, a faceplate is installed on it; a steel center with a thread is also suitable. Installation of the second center is carried out in the tailstock tube. To make the frame, you will need a pair of corners measuring 5x3 cm, their length is 15 cm. A motor is attached to the frame using a bolted connection.
An example of a homemade drilling machine
At the next stage of making a homemade machine, you assemble the headstock yourself. This element is formed from a pair of horizontal and a pair of vertical corners. A pipe intended for the spindle is attached to it. You need to insert a bolt into it, the diameter of which is 1.2 cm. First, its head is sharpened at a right angle. Thus, the central part of the spindle is designated. After this, the headstock is installed on the bed. On the top post, which connects to the horizontal corners, it is necessary to secure the tube by welding.
To make a tool rest, you need to take a steel rod with a chamfer. This element must also have a hole that will be used to secure the support ruler. It is necessary to vertically weld the tube with the locking screw to the long angle. Then the tool rest rod is inserted into it.
The motor rotor on which the faceplate is attached will be used as the headstock spindle. You need to make several holes in it. A fork will be inserted in the central part. The holes along the edges are intended for fixing the part with screws.
Even with the help of simple tools you can create interesting wooden products; for this you need to study the technology of working with the tool and practice
How to make a wood lathe from a drill with your own hands
Having a workbench with a strong and flat working surface at hand, you can build a lathe without resorting to building a bed. The electric drill in this case will serve as a rotary drive and headstock. According to the simplest drawing of the machine, it is enough to fix this tool on the surface of the workbench through the neck. Clamps and a clamp are suitable for fixing.
Next you need to make a stop that will act as a tailstock.
This element is mounted opposite the drill. To create it, you can take two blocks of wood and an adjusting screw, sharpened at one end to a cone. If you intend to use the machine for processing massive wooden workpieces, then it is advisable to fix the stop on the table using clamps.
To make a tool with your own hands, inexpensive materials are enough. A drill-based lathe can be used to turn various parts:
- door handles;
- structural details of the staircase;
- decorative items, etc.
Using a workbench with a durable and flat working surface, you can make a lathe from a drill with your own hands
To expand the functionality of the tool, its design can be supplemented with attachments and other devices that can improve the quality of work.
Such improvements include:
- winding on transformers;
- applying a coloring composition over a rotating part to create patterns;
- applying spiral notches to the workpiece, etc.
Installing a special attachment in the form of a copier will allow you to use the machine to create a whole series of identical parts or products according to a template.
An example of a multifunctional homemade woodworking machine from a drill
How to install GRBL
Firstly, to be able to install or load GRBL in Arduino, we will need the Arduino IDE.
Then we can download the GRBL firmware from github.com.
Download the .ZIP file and follow these steps:
- Open the grbl-master.zip file and extract the files
- Open the Arduino IDE, go to Sketch > Enable Library > Add .ZIP Library…
Adding GRBL Firmware to the Arduino IDE
Go to the extracted “grbl-master” folder, select the “grbl” folder in it and click on the open file. Now we need to use GRBL as an Arduino library.
- Then go to File > Examples > grbl > grblUpload. A new sketch will open and we need to upload it to the Arduino board. The code may look strange since it's just one line, but don't worry, everything happens in the background in the library. So we just need to select the Arduino board, COM port and click that download button and we're done.
Manufacturing Features
The arsenal of home craftsmen's tools is extremely diverse.
Particular attention is paid to the milling machine. This device is equipment that allows you to perform many operations on metal, wood, plastic and other materials.
The dimensions, power and set of functions of milling devices may vary, but each machine is based on a standard principle: a fixedly fixed workpiece is processed with a milling cutter - a special cutting tool with teeth (cutting blades).
Having all the necessary tools and materials available, craftsmen in their workshops can easily and in a short time assemble a compact device - a homemade router. Of all the existing types of milling machines, the most popular in home workshops is the vertical milling machine. This tool has a very simple design and uses inexpensive materials to assemble it. However, the type of machine is determined by the tasks that the master needs to perform. The following types of milling equipment exist:
- horizontally positioned tool;
- vertical device;
- copying device with pantograph.
In addition, you should consider the size and location of the machine - floor or tabletop.
Owners of any milling machine can perform high-quality processing of blanks and products made of metal and wood. In industry, milling machines are classified as multifunctional units. Self-made structures are endowed with a sufficient number of operations through which high-quality finishing is available, so they can also be considered multifunctional.
Materials for developing a CNC machine
List of materials and components you will need:
- Plywood
- Threaded shafts
- Steel rods
- Ball bearings
- Nuts
- Bolts
- Stepper motors (Nema 23 used in this project)
- TB6560 Stepper Motor Drivers
- Power supply 24 V 15 A
- Arduino UNO R3
- Wires
- Bushings made of nylon (caprolon, fluoroplastic) and metal bushings
Selection of design features
The list of actions when developing and manufacturing a mini device for wood milling is as follows:
- First you need to decide what kind of work you are talking about. This will tell you what dimensions and thicknesses of parts can be processed on it.
- Make a layout and a proposed list of parts for a homemade desktop machine for making it yourself.
- Select software to bring it into working condition so that it works according to a given program.
- Purchase the necessary components, parts, products.
- Having the drawings, make the missing elements with your own hands, assemble and debug the finished product.
Main products
Today there are a huge number of items that can be made using a CNC machine, such as:
- Unique furniture made from various materials, including precious woods.
- Souvenirs: various boxes, photo frames, figurines, etc.
- Advertising products: beautiful massive letters, signs, etc.
Let's take a closer look at each of the proposed options.
Designer furniture. It surrounds us everywhere: bedrooms, kitchen, children's room. Modern furniture production is very thoughtful and has high precision.
Steps to create a product on a CNC machine:
- Sketch development. For this item, there are a large number of programs that help virtually simulate the situation. To create a 3-dimensional layout of a drawing, use computer programs such as CAD. The prepared computer files will make it possible to produce a furniture product on a CNC milling machine.
- Preparing the model for the machine. A ready-made sketch in 3D as a basis for the manufacture of any set of parts. To this sketch it is necessary to add a ray function (a vector that will be responsible for the direction of the cutter relative to the workpiece). There is also automatic model formation, which is quite convenient and will help save your time. Modern equipment simplifies the manufacturing process and transfers even the smallest and most difficult lines.
- Selection of the type of cutting tools, setting the power and processing mode.
- Loading files into the machine's memory, installing cutting tools, securing the workpiece and starting production. The CNC milling machine does further work independently according to an already specified program.
- Final assembly. It will take a small amount of time, there is no need to adjust parts.
Souvenir products. These may be the following souvenirs:
- wooden boxes that can be decorated with ornaments;
- boxes for beads or sewing supplies;
- jewelry boxes;
- icons and much more.
The most popular products among souvenirs are those products that are made using 3D or 2D vector drawings.
Also, multi-spindle machines (2-16 spindles) are now being introduced into production on a large scale.
Promotional Products. Its creation is a relevant type of activity today, in which the use of milling machines with numerical control is very popular. Such machines cope well with tasks such as the production of light boxes, stands, panels, curly inscriptions and outdoor advertising signs, as well as the preparation of structures for exhibitions.
A CNC machine helps to perform the following operations that are related to advertising products:
- cutting wood, acrylic and other materials;
- engraving/cutting of massive inscriptions;
- creation of a logo, emblem;
- production of signs, stands, etc.
To summarize, we can say that the number of products that can be made on a CNC milling machine is huge. All you need is equipment, a desire to work and a little experience.