Home decor from old keys - craft ideas
You will also resolve this issue if you use old keys.
Make curtain ties out of them. For this you can use beads and various chains. Using wire, attach the keys here by their holes; you can further decorate these items. Even pillows can be decorated with old keys. Such textile products are sewn from fabric. You can decorate them with braid and ribbons of a suitable color. Tie keys with ribbons or sew these items directly to the pillowcase, then you will have an interesting and unusual home decoration.
If you have a boring, plain wall in your home, look at how you can decorate it. To do this, first make a border out of the keys, so that you get a heart. Then you need to attach the keys inside it. To do this, you can use a metal base, for example, a mesh, and simply tie these objects here. This is what they did in the left photo. And in the right picture you can see how wonderfully the keys fit into the part of the wall where there are photographs, a flower and a clock.
You can decorate your Christmas tree with them. To do this, just tie the keys to satin ribbons and hang them on the forest beauty. If you wish, first glue a picture of Santa Claus, a snowman, or another New Year's motif onto each key. After this, you also need to fix the ribbon to hang these elements of the New Year's decoration.
Transform these items in interesting ways. To do this, take plastic or cardboard dragonfly wings and glue them to the vertical part of the key. Also make matching ribbons and hang them on the tree.
And if you connect several keys in a circle with glue, you will get a wonderful Christmas wreath. In addition, you can attach a spruce branch to it and tie it with a ribbon.
Malvina's costume from the fairy tale “The Golden Key”
If this pattern works for your daughter, niece or granddaughter, use it. You can increase or decrease the provided template by one size, add or decrease a little in the center or on the sides. Here are the details of this Malvina dress:
- in front of the top of the dress - one piece;
- back - 2 parts;
- sleeves - 2 pieces;
- collar - 4 parts;
- flounces for a skirt.
Making master class:
- First you need to make recesses, pasting them according to the indicated marks on the front and back. Sew the 2 back pieces together, leaving a small space at the top unsewn so you can then sew in a zipper or sew on a button with an eyelet.
- Sew the front and back bodice pieces on the sides. Sew in the sewn sleeves.
- In place of the sleeves, indicated by a dotted line on the pattern, you must first sew in a soft elastic band, stretching it slightly. Then the cuffs will be fluffy.
- Stitch the collar pieces together and sew them onto the neckline.
- Gather your skirt. To do this, you need to cut out several rectangles of different sizes. They are collected on a thread from above. Now place these shuttlecocks one on top of the other so that the largest is at the bottom and the smallest is at the top.
You can do it differently - first sew a flared skirt, and sew flounces of the same width onto it.
Here's how to sew Malvina's costume using a different pattern. Another detail of this heroine’s clothing is pantaloons. The pattern below will help you create them. As you can see, you need to baste the pants, make drawstrings, into which elastic bands are then threaded and secured. If you managed to buy a blue wig, when Malvina's costume will be complemented with this item. If this did not work out, then it is enough to tie a large bow or a silk scarf of the same color on the girl’s head, and the image will be complete. All that remains is to put on the girl beautiful shoes and tights, and Malvina’s costume is ready.
Panel made from old keys - master class and photo
Even a small number of keys can be used to create a beautiful picture. If you want to make a panel, then the cover is key to the base. Then you will need to make a frame round, square or other shape. A similar idea is shown in the top right photo. And on the right and left, the keys were already glued to the finished base. They were pre-painted white so that they would blend in with the oval frame. In the bottom left photo, the keys are copper, the frame is the same shade, so all the elements fit perfectly. If you like a soft blue color, then make a panel like the one in the bottom right photo.
You can make a panel in the form of a dial. In this case, instead of numbers you will glue keys. If you want this watch to run, then fix the mechanism in the center.
To make them even more beautiful, we suggest pre-decorating old keys. To do this, they can be covered with beads, rhinestones, sparkles, and also painted or decoupaged.
Making keychains from beads
This product can be made in different shapes, colors, themes. The choice of which depends entirely on the imagination of the author.
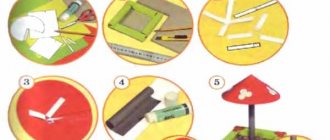
Before starting production, a beginner can use a ready-made example of creation or come up with his own (pre-draw on paper). Whatever option is chosen, the creation principle will be approximately the same.
How to make a hanger from old keys?
To make one, take:
- old keys;
- tablet;
- self-tapping screws;
- pliers.
In this case, a plank from an old parquet floor was used. You can take one that you have on the farm. Then you will need to bend the keys. This can be done with pliers or by placing the key on a round stone and hitting it with a hammer to bend it.
Decide where you will need to screw the keys. To do this, you can use a ruler and a pencil to make even markings. Then connect them using self-tapping screws, and the hanger is ready.
You can do another one. If the keys are old, paint them using metal paint. You can mount such keys on the wall and hang photographs on them. Another interesting idea is to fix these elements on a painted pallet that is attached to the wall. You can hang bags, umbrellas, and outerwear on this hanger.
Try making a jewelry holder. This is where you hang your chains, bracelets, and jewelry. As a base, use an old metal table lamp that has fallen into disrepair. Glue or weld keys onto its metal stand. Then paint your creation.
Magnetic key holder
Don’t want to drill into the walls, but double-sided tape doesn’t hold a heavy key holder with bundles well? There is an alternative option - glue a fairly strong magnet to it. And then you can attach the accessory to metal pieces of furniture. Or maybe you still have a refrigerator in the hallway from old memory? Then a practical magnet is definitely your option!
Photo: podarkionline.com.ua Photo: fastbox.su
Types of key holders made of leather
There are a huge number of different variations of key holders. Each person will be able to choose the right one for themselves. Key cases come in a variety of sizes, colors, finishes, and of course, shapes. To choose a product for yourself, you need to familiarize yourself with several types.
They include such designs as:
- Key rings. The product received its purpose because of the ring built into the side, with which it is convenient to attach it to bags, purses or any other things. The appearance is standard - a leather case, closed with a zipper or a miniature button.
- Cases. The device resembles a regular case for protecting glasses. Inside, for the convenience of storing keys, there are several rings; their number is unlimited.
- Lace-up key holders. This option is more suitable for people who are used to wearing keys around their necks, like in childhood. Convenient design for use by children or the elderly. The case itself is soft and closes with a zipper or button.
- Purse. Usually the accessory is considered an attribute of businessmen, but this is a stereotype. A convenient and compact key holder will suit any person. The product can hold more than just keys. Specially made compartments for cards, business cards and even notebooks.
- Extended covers. Outwardly, it somewhat resembles a regular wallet. This option will appeal to those who have to carry long, non-standard-shaped keys with them. Closes with a zipper or riveting.
You can make a case for storing keys with your own hands. You can sew a unique key holder.
What other keychains are there?
A car keychain in the form of a license plate for a car is not the only product option that you can make yourself. Appearance, purpose, materials used are limited only by the author’s imagination.
Above we discussed the answer to the question: how to make a car key fob with your own hands. However, you can make a product from beads, paper or other available materials that you are lucky enough to find at home.
Below are photographs of various keychains made from different materials that any beginner can make. For example, the algorithm is analyzed: how to make a keychain from beads with your own hands.
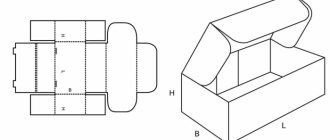
Windows and doors in a cardboard house
Of course, you shouldn’t put glass in windows; it’s still not safe. But if you carefully seal the windows with film or transparent tape, the effect will be very similar to the inserted glass. The child will be happy.
We recommend reading:
- DIY paper orchid - a review of the best ideas and tips from craftswomen. Step-by-step instructions + master class (photo + video lessons)
- DIY paper hyacinth: the best master class for beginners with step-by-step instructions and diagrams from A to Z (130 photos)
- Paper stars - instructions on how to quickly and easily learn how to make beautiful stars with your own hands (100 photos of finished works)
It is better to make the door from cardboard, and it is enough to simply make three cuts and bend the resulting part. The door will open in both directions. To make the door look more natural, it can be covered with self-adhesive wood-like film.
You can put real wallpaper in the house itself, it will make a splash on the child! To do this, take pieces of wallpaper that were left over from the renovation or use the same self-adhesive paper.
You can make any accessories from foil, for example, lamps around the perimeter of the entire house. And on the floor of the house you should lay some small rug. To prevent the rug from slipping and being pulled out of the house, simply place it on the glue.
Accessories for a children's party: silver key and lock
Perhaps the most common accessory for various children's parties and competitions is the key. It can be silver, gold, copper, made of cardboard, paper, wood, etc. The main thing is that the essence is preserved: the key must be found, obtained in various competitions, using ingenuity, courage, skill and dexterity. A silver key can also be magical, opening magic locks and gates to fairy tales. In general, the application of this sample is so limitless that only your imagination can create the framework.
How to make a wall-mounted key holder with your own hands
What is needed to make a wall key holder? First, understand what you could make it from. It can be classic wood, plywood, or completely unexpected things, for example, a children's unnecessary construction set or old cutlery. There are actually many options.
You can make your own key holder.
The main thing is to equip yourself with a place before starting work:
- Well lit
- Preferably separate so that you are not disturbed during the process
- All kinds of tools must be in place to eliminate the possibility of injury
Made from plywood or wood
In order to make a wall-mounted key holder from plywood with your own hands, you will need, first of all, the material itself - plywood. The huge advantage of this type of wood board is that it can be given any look using a jigsaw for this purpose.
Popular articles Unusual do-it-yourself curtains: recommendations for creating them (photo)
Plywood is cheaper than wood, but less durable and strong.
But first of all, of course, you need a drawing, which you will transfer to a sheet of plywood using carbon paper. There is an option that if you are excellent at drawing, then you can apply the drawing directly to the material. Then we give the required shape with a jigsaw, make the surface smooth by sanding it with coarse, medium sandpaper and begin decorating at your discretion.
The jigsaw is universal, is in great demand and is available in a large number of models.
A key holder carved in the shape of a house, with separately cut out human figures that serve as keychains, is popular among many. When loved ones come home, the voids in the house are filled and you can see who is in the apartment and who is absent.
A key holder in the shape of a house is a popular option
You can start from another option. Find a suitable wooden block, sand it in the places you want to level, treat it with stain, and then either apply a design or coat it with a clear varnish.
To hang the key holder on the walls you need to attach fasteners.
The key hook simply screws into the surface. This way you will get both a natural wall decoration and a useful item.
From scrap materials
Independently choosing materials for a key holder does not always bring successful ideas. Ask your loved ones, maybe they know about some things in your home that you have no idea about.
A wall-mounted key holder will not only become a permanent meeting place for all your keys, but will also decorate the hallway.
Many people make key holders with their own hands from a variety of available materials, but they look original and, of course, are unique.
From a picture frame
An interesting do-it-yourself key holder can be made from a frame from a painting or photograph. This will not be difficult to do, because you already have a structure frame. You can select various backgrounds (pictures, photographs and even embroidery) and decorate it in accordance with the design of your hallway.
A key holder made from a frame is a good option.
Based on the master’s idea, key holders can be screwed onto both the inside and outside of the frame.
From the thread
The now fashionable ecological style can inspire you to decorate your key holder using an ordinary branch. We find one that suits us and dry it well. We use stain, sandpaper to sand if necessary, a drill to create holes, nails or purchased hooks.
A key holder made from a branch will be unique.
Whether to varnish or decorate with drawings, it all depends on your desire.
Very important: treat the material to kill possible bacteria and insects
Leather
Wall key holders are less often made of leather. But making a pocket leather key holder is quite simple.
A high-quality leather key holder is an elegant fashion accessory.
The order of execution is as follows:
- We find a small piece of skin the size of a ligament
- Making a pattern
- We fasten with a thick thread with a lining (if required) and a fastener
- We attach a carabiner to the inside for attaching keys
- You can decorate with decorative details, but this is not necessary.
A DIY leather key holder is a necessary and convenient accessory.
Eco-style key holder
If you are a fan of eco-styles, country and rustic style are close to you, you will appreciate the following simple idea. You can make a wooden key holder with your own hands using sticks with knots. When going for a walk in the forest, collect and bring home knotty sticks. When you have enough of them, you can start working. Saw off equal sections of sticks, each of which has a Pinocchio knot.
Depending on your preference and the overall style of the entryway, you can remove the bark, leave them bare or paint them in bright colors, or use them as is with the bark. Screw all the sections to one surface with self-tapping screws. To prevent the wood from cracking, you should first drill holes with a thin drill.
Note!
- DIY furniture made from pallets (140 photos) - step-by-step master class with diagrams and drawings, design ideas
- DIY coffee table - manufacturing guide with a full description of the steps, choice of materials (120 photo ideas)
Do-it-yourself laundry basket (130 photo ideas): step-by-step master class for making it yourself, choice of materials, design options
Decorating bottles and cans with old keys
And old keys will also help with this.
To make the same craft as in the left photo, take:
- glass bottles;
- thread or twine;
- keys.
Wash the bottles, if they have labels, put them away. Tie the dry bottles with thread, at the same time fixing the keys here.
In such containers you can store various bulk products, as well as leave notes for family members.
To decorate the bottle as in the middle photo, take:
- glass jar;
- a piece of lace material;
- threads;
- keys;
- button;
- a needle.
Measure the size of the jar, cut out a piece of lace of the appropriate size. Wrap the jar with this material, tie a satin ribbon or wind a rope around the neck. Sew a button of the same color here, you can put a key on it.
And to decorate the bottle, as in the legal photo, just tie the neck with a beautiful thread and fix the keys here. You can put flowers in such a container by first pouring water into it.
Use a bottle to create a metal one. You will cover glass containers with keys
But then you will need to carefully break the glass, remove it, and you will have a bottle of keys
You can create a glass in the same way. And to make round balloons to decorate the room, you will need to inflate a balloon, then cover its surface with keys. When the glue dries, burst the ball and remove it.
Read how to decoupage boxes, plates, champagne bottles
Key holder with shelf
To combine useful things with useful things, combine the key holder with a shelf - and you can immediately put your wallet, business card holder or sunglasses on top. You will again need a sheet of plywood or chipboard, self-tapping screws and a screwdriver, the hooks themselves and, optionally, corners for mounting the shelf.
Photo: guardebem.com Photo: loudounballet.org
How to make a dressing room with your own hands?
Plywood key holder
Working with plywood is much easier than working with wood, and there is minimal dirt and dust, as well as noise from work. Since it is practically impossible to use untreated wood boards at home due to sawdust, very fine wood dust, noise and the inconvenience of transporting the material, then Plywood is a good alternative to boards.
Required tools and materials
Before starting work, you need to check that you have all the necessary tools, so as not to be distracted from the entertaining process of creation:
- plywood sheet;
- linseed oil;
- wood varnish and, if artistic painting or just color design is planned, paints;
- metal nails or hooks for hanging keys.
Tools for work:
- burner;
- hacksaw;
- plane - for processing joints and the surface of plywood sheets;
- sandpaper - to give smoothness to rough plywood;
- brushes that are needed for applying varnish and paint;
- sponge for linseed oil;
- ruler and tape measure;
- an electric jigsaw, since complex elements cannot be cut with a hacksaw.
Manufacturing instructions
You should start with the roughest work, gradually moving on to finer work (from sawing the material to its design and adding gloss):
- Idea. This is the most important stage, at which you need to think through in detail what you want to do most. It is advisable, before you start thinking about the design of your own key holder, to look at several dozen photographs of original similar products. If you like something, you can take away essential elements from this work and incorporate them into the idea of your own product.
- Visualization. When the idea is fully formed, it needs to be transferred to paper in order to finally be convinced of the possibility of its implementation. Surely at this stage you will want to add some elements to your concept or change or delete something.
- Calculation of sizes.
Using a ruler, you need to transfer onto a sheet of plywood the drawing that was made on paper, taking into account the dimensions. The same key holder, drawn on paper, can be embodied in completely different volumes by changing the size, texture and location of the key holder on the wall. You can draw a pattern for the future key holder yourself - Materials processing. When the drawing is transferred to the plywood sheet, you need to trim off all the excess that extends beyond the outer contours of the key holder using an electric jigsaw and a handsaw. Then the cut edges need to be trimmed using a plane and sandpaper. To reduce the amount of dust in the apartment, you can first spray the room with water, which will settle, catching wood dust particles.
- Spot processing. Now you need to cut out the internal elements of the product, if required. An electric jigsaw is also used for this. If the key holder is very small, then you can use a small needle file, with which you can sand the cut edges of the plywood.
- Artistic cutting.
The key holder is almost ready, but it lacks decorative elements and the hooks themselves. At this stage, you need to apply a pre-designed design to the product using a burner or fire the entire surface. In addition, you can use a burner to make indentations for small parts (buttons, pins, matches, snaps, etc.). Firing should be carried out on a concrete surface - Impregnation with linseed oil, application of paint and varnish.
To give the product a finished look, it should be soaked in natural linseed oil or covered with several layers of varnish/paint (depending on the idea). If you plan to apply paint and varnish, then the first layer should be paint, and only then wood varnish. It will take 1-2 days for the key holder to dry completely, after which you need to check the applied layer again: if it is too thin, there is no glossy effect and smoothness, then you need to cover the key holder with several more layers of varnish. Flaxseed oil is a natural, environmentally friendly product that will help protect wood from drying out and cracking. - Adding hooks and decorative elements. All that remains is to decorate the key holder and attach hooks to it, on which the keys will be hung. This can be done with glue or small screws, but using the latter can lead to chips and cracks in the plywood sheet - you need to be careful! The distance between the hooks is determined by the master
- Re-impregnation with linseed oil.
The plywood key holder is ready! Flaxseed oil is a water repellent
Popular articles Turkish tulle with embroidery - a new way to transform the interior
Key holder for partygoers
Sometimes ideas for making key holders come out of nowhere. Wine bottle corks are an excellent decorative material. It’s such a shame to throw them away, and if you have accumulated enough of them, you can make interesting crafts.
Even if you have only a few wine corks, you can fix them on one surface, for example, on a narrow board vertically, nailing them with thin nails. Based on the principle of how a corkscrew enters a cork, special self-tapping screws with a half-ring instead of a head are screwed into the lower base of the corks (they are called a half-ring hook).
This way we get a number of hooks on which it is convenient to hang keys. To ensure that the keys do not get confused with each other, it makes sense to screw the hooks not into each plug, but through one.
What can be made from old keys, nuts and bolts / I
And you can do, as you will see, a lot of interesting things. Something like: decorative balls, bottles, vases. And they will become unique decorations for your home and garden.
One Austrian company (Moerkey) produces large-scale original crafts that decorators use in the design of modern homes. And really, they are good! Of course, sticking keys onto the bottle, and some of them will have to be bent, is beyond the power of female hands. If only because we don’t have such devices at hand. And for men, they will definitely find them. We do it around the bottle But there are also a lot of interesting hand-made things for us girls...
from stenciled pillows to creating artistic fabrics
shabby chic style
This is great steampunk! Do you understand how to use these things, right?
And these are new trends in steampunk: we take apart pendants and bracelets (old ones, of course, or children’s ones) and glue the parts onto keys, even rusty ones, and then use them in creativity
Just a good idea for hallway decor
Men's ideas, but very, very good. I definitely wouldn't refuse a set like this for my kitchen.
another lovely craft... I think you understand that the keys are glued to the ball, which is then removed from the craft
The example below shows how easy it is to bend and bend a key. If you have such a thing in your house, you are lucky, because you can easily make a bottle from keys and a ball. You just need to bend gently and carefully for beautiful and not strong bends.
and here they bend the keys for the hanger - a super idea for a dacha, by the way
And this young lady made her own design out of wire, “put” her keys in it and got a lampshade - not bad!
How do you like this for the bedroom? Part of a table lamp + keys. Only I would paint it gold for my bedroom. Well, either in silver... or decoupaged
And this is how you can stylishly hang a photo in frames
and make handles for cabinets...even kitchen ones
A lampshade for a table lamp, decorated with stencils of keys and the keys themselves - why is it a bad idea for the home?
And a pillowcase made of cotton fabric, also with a stencil
Wall decor made easy! And in the hallway there is also a stylish solution
Master class for panels of keys
Metal sculptural vase. Here, in my opinion, welding is needed to hold the washers the way we want
Garden bench from an old bicycle, tires are an important detail
Metal objects are especially valued by artists. Those who dye fabric using the Shibori technique
I see, but how to do this? Place rusty keys on a damp cloth, press down with something heavy and wait for the desired effect
These are the amazing canvases that artists create today using rust.
And to make everything clear to you about rust, here is a scarf made using the shibori technique. Painted with rust
Washers and bolts and also welding. But what an idea!
You know about door handles, they are very diverse and fashionable today, why not make one for yourself?
Without words - you can see all the beauty for yourself. And from what is stored in garages, you can make something useful for the same garage or cottage! Look at this bodybuilding table! Those who don't like an uneven surface can put a sheet of glass on top
You can use a bicycle fork to make a toilet paper holder
Decorative and stylistic design
Decorating is a fascinating creative process. Thanks to him, a boring and faceless product can turn into a work of art. By decorating your creation, you will be able to show remarkable imagination and discover hidden talents in yourself and acquire new skills.
If the craft has a wooden or plastic base, you can decorate it using the decoupage technique. It is quite simple to implement. A thin layer of PVA glue is applied to the surface, then a selected fragment of a napkin with a beautiful pattern is fixed and secured with transparent varnish. The napkins consist of three layers. For decoration, use the top one, on which the image is applied. There are many options for such napkins. There are products that imitate stone, granite or wood. Using this technique, you can quickly decorate it and give it an interesting, original look.
There is another technique, the name of which is similar to the first. It goes by the name – cardboard. To successfully use this technique, you will have to find a variety of pieces of cardboard and fabric. By combining them randomly or according to a drawing, you can create a unique pattern. The good thing about this technique is that it doesn’t require any money, just a little patience and accuracy.
Wooden products can be decorated using a burning device. The image is transferred using tracing paper or simply drawn on the lid of the cabinet and then burned out. The same tool will help you create unique embossing on leather or foil.
Stickers, paint, glitter, beads, shells, miniature decorative elements and even figurines are often used for decoration. Such decorations will make the accessory unique.
Conclusion
Fill your interior with unique things. If you are a creative person, standard accessories are not for you. Handmade work into which people put their souls always attracts glances and collects admiring comments. An original handmade key holder will become the highlight of your home and will give you ideas for further creativity. It can be accompanied by an original lamp, a mirror in an unusual frame, a decorative panel, an umbrella stand or a shelf for newspapers. Having mastered one of the manufacturing techniques, you can fill your home with cute little things that will fit together perfectly.
Decorating bottles and cans with old keys
And old keys will also help with this.
To make the same craft as in the left photo, take:
- glass bottles;
- thread or twine;
- keys.
Wash the bottles, if they have labels, put them away. Tie the dry bottles with thread, at the same time fixing the keys here.
In such containers you can store various bulk products, as well as leave notes for family members.
To decorate the bottle as in the middle photo, take:
- glass jar;
- a piece of lace material;
- threads;
- keys;
- button;
- a needle.
Measure the size of the jar, cut out a piece of lace of the appropriate size. Wrap the jar with this material, tie a satin ribbon or wind a rope around the neck. Sew a button of the same color here, you can put a key on it.
And to decorate the bottle, as in the legal photo, just tie the neck with a beautiful thread and fix the keys here. You can put flowers in such a container by first pouring water into it.
Use a bottle to create a metal one. You will cover glass containers with keys
But then you will need to carefully break the glass, remove it, and you will have a bottle of keys
You can create a glass in the same way. And to make round balloons to decorate the room, you will need to inflate a balloon, then cover its surface with keys. When the glue dries, burst the ball and remove it.
Read how to decoupage boxes, plates, champagne bottles
“Each cricket has its own nest” or types of housekeepers
So far, no one has come up with any serious classification of key holders, but everyone divides them into two categories according to the method of use: there are wall-mounted key holders for apartments (houses) and those that a person carries with him all the time (they are called pocket key holders). Pocket key holders are usually made of leatherette (less often - leather, due to the high cost), the now popular eco-leather, suede, and there are even fabric versions.
It is very convenient to store your keys in such a bag-case: they are all concentrated in one place, they are easy to quickly find in the bag even by touch; The cover protects the walls of the bag or pocket from contact with keys, which can damage their inner fabric surface. A bunch of keys in such a pocket key holder are secured inside the case using a metal or cord loop.
If you are puzzled by the right gift for near and dear people, then a key holder for pockets and bags is a very interesting option. Choose an expensive option made of genuine, beautiful leather, and success is guaranteed: the gift will be practical, in demand and memorable. We usually give wall-mounted key holders to a young family for a wedding, as well as for any wedding anniversaries. It will be very good if this key holder also contains the key to your treasured apartment, car, etc. - then your gift will be unforgettable and the most generous!
Wall key holders can be of open or closed access. If you use the key holder constantly, then opening and closing the door is not a very convenient task. In this case, it is better to provide a key hanger without a door. With this option, you will eventually be able to pick up and hang your keys on your hooks without looking, without wasting time opening the door of the box with the keys.
If you rarely need keys, then you can use a closed key holder, the door of which can be either sliding or hinged, that is, hanging; you can also make the door lifting or folding (it all depends on your needs and desires). Such a door is usually decorated with an interesting inlay, a painting, or an applique. The main thing is that the key holder with the door fits organically into your interior and decorates it, and not vice versa.
Open key holders, which are hung on the wall, usually in the hallway, are the most common in everyday life, as they are very simple and practical. Among such samples there are all kinds of options: wooden rectangular planks with hooks; and strips made of wood with pendants; and miniature framed posters, which also have hooks for keys.
Self-tapping screws, screws, furniture nails with heads, ready-made hooks, and also those made by hand from thick wire are used as hooks; small furniture handles; You can also find hangers - wooden knots. There is plenty of room for your imagination to run wild when choosing original hooks: these could be old keys, bent as needed; even ordinary nails can be fun to paint, make hooks and use successfully; Small children's toys (for example, toy soldiers) will also be used - in a word, everything that you can put a key ring on. Invent and create!
Popular articles Options for remodeling Khrushchev buildings: 1, 2, 3, 4 rooms, before and after photos
Wall-mounted key holders can be made from the most unexpected materials, and not just from the generally accepted ones - wood, plywood, MDF, sheet metal, etc. The main thing is that the base for the hooks with keys is strong and can withstand a certain weight. If you decide to make such a key holder yourself, without waiting for a gift from friends, then it will be more convenient to use, of course, wood or plywood, which are easier and more convenient to work with. In this case, everything should definitely work out for you!
Handmade key holder
Do you think that making a key holder for the hallway with your own hands is difficult? This is wrong. Making things for the interior is a very exciting and interesting activity.
It is worth noting that handmade accessories can emphasize the taste preferences of homeowners; in addition, a handmade key holder can be an excellent gift for relatives or friends.
Check it out here too!
How to make a bench from pallets: do-it-yourself bench from pallets- Instructions on how to make a table with your own hands: step-by-step photo instructions, drawings, assembly diagrams for tables of different types for the garden and at home
- How to make a hanging chair with your own hands - 100 photo ideas for chair design, instructions for their implementation. Creating the perfect vacation spot
By making a key cabinet yourself, you will save a lot of money, since the materials for making it can be found in any home.
If you have never created such things with your own hands, then first try making a simple, open key holder.
This option can be made from any materials on which key holders can be firmly attached.
Photo ideas for homemade key holders
Sources
- https://dnevnikmastera.ru/klyuchnica-svoimi-rukami
- https://svoimirykamiinfo.ru/klyuchnica-svoimi-rukami/
- https://sumki.guru/dlya-klyuchej/87-klucnica-iz-dereva
- https://www.vseinstrumenti.ru/bezopasnost/orm/sistemy-hraneniya/klyuchnitsy/
- https://sdelatlegko.ru/klyuchnica-svoimi-rukami/
- https://fishki.net/3447603-kak-sdelaty-kljuchnicu-svoimi-rukami.html
- https://roomester.ru/dekor/svoimi-rukami/klyuchnica-svoimi-rukami.html
- https://kallibry.ru/klyuchnica-nastennaya-svoimi-rukami/
- https://lafoy.ru/nastennaya-klyuchnica-dlya-prihozhey-svoimi-rukami-10-idey-469
- https://stroychik.ru/raznoe/kak-sdelat-klyuchnicu-na-stenu
- https://kak-sdelano.ru/raznyie-poleznyie-sovetyi/nastennaya-klyuchnicza-svoimi-rukami
- https://kakpravilnosdelat.ru/kak-sdelat-klyuchnicu-svoimi-rukami/
Panel made from old keys - master class and photo
Even a small number of keys can be used to create a beautiful picture. If you want to make a panel, then the cover is key to the base. Then you will need to make a frame round, square or other shape. A similar idea is shown in the top right photo. And on the right and left, the keys were already glued to the finished base. They were pre-painted white so that they would blend in with the oval frame. In the bottom left photo, the keys are copper, the frame is the same shade, so all the elements fit perfectly. If you like a soft blue color, then make a panel like the one in the bottom right photo.
You can make a panel in the form of a dial. In this case, instead of numbers you will glue keys. If you want this watch to run, then fix the mechanism in the center.
To make them even more beautiful, we suggest pre-decorating old keys. To do this, they can be covered with beads, rhinestones, sparkles, and also painted or decoupaged.
And no hooks at all
The key holder can be made without hooks at all, using magnets. This is also more convenient, because you don’t have to carefully place the ring on the hook, you simply press the key against the magnet.
If you manage to purchase a magnetic strip (such holders are used for storing knives), you can attach it as an element of a large organizer.
How to make jewelry from old keys?
You can decorate not only keys for panels, but also decorate yourself with them. The keys will make interesting bracelets.
If you have beautiful locker keys that look like antique ones that you no longer use, then make a tiered bracelet out of them. In the top photo on the left you can see that each key must be tied on both sides with a rope or leather tape. You can connect all four tiers on the reverse side with the same ribbon and put on this bracelet without connecting the turns together. Then you can wear either one bracelet or one consisting of several keys. And if you have one beautiful key, drill small holes in it on both sides to thread the chain through here.
Small keys from locks, even from a mailbox, will be useful to make a bracelet, like in the bottom left photo. To each you need to attach a metal ring, which you will also fix on the chain.
And if you wish, then make a whole set of such products. The next key will need to be bent by placing it on a rounded metal shape. Then you need to knock with a hammer. To make the job easier, you can first warm up the key to make it more pliable. To do this, place it in a preheated oven.
Then you need to carefully remove it with pliers, place it on a round metal form and work with a hammer
An old key can turn into original earrings. You will need to attach earrings here; you can attach plastic roses, beads or metal hearts as decoration.
If you want to make a boutonniere for your wedding so that it is not like others, use the following idea.
This thing is symbolic. After all, we can say that the newly made husband gives the keys to his heart to his young wife. Of course, it’s better to take a beautiful one that looks like an antique one. You can use cabinet keys. If you wish, decorate these items with artificial berries and small branches of greenery. The second idea suggests decorating the key with feathers, artificial pearls and a piece of embroidery or silk. Or you can simply tie the key to a satin ribbon and secure it to the jacket. This is exactly the boutonniere shown in the right photo.
The bride, in order to keep up with the groom’s originality, can make a chain for herself, which will also be based on an old key. Crafts from this material are easy to make from available materials.
The top left photo shows that you can attach a chain that has a faux pearl inclusion to it on a key. In the adjacent photo, the chain is decorated with colored beads and stones. But since it's a wedding, use a heart outline. A small metal one like the one in the bottom left photo will do. You can attach not only beads to an old key, but also an improvised lock.
If you wish, decorate the keys to decorate the venue of the celebration or just your room with such items. To do this, wrap the key with a chain or beautiful wire, creating coils. You can tie metal leaves, an artificial flower, or metal watch parts here.
If you use the idea with a clock, then at a wedding it will be a hint that happy people do not watch clocks.
You can also attach a butterfly or flowers using copper wire to decorate old keys in this way.
Now you know what you can turn an old key into. Crafts made from this material are very unusual and very interesting.
See how you can make a wall clock by decorating it with these items.
Create wind chimes in your garden. When the breeze begins to blow, the keys will develop on the threads and make a pleasant ringing sound. This craft can be placed at home, as Feng Shui advises.
And the third video will give you 12 life hacks, the main characters of such crafts are also old keys.
Related article: What you can make yourself from metal
Summary of “The Golden Key, or the Adventures of Pinocchio”
Toddlers have a hard time understanding long stories, so tell them the story in your own words.
It all started in the Mediterranean. The organ grinder Carlo lived here. One day his friend Giuseppe came to him and brought him a log. A friend said that Carlo was all alone and alone, there was no one to help the old man, and from a log he could make himself a son.
The organ grinder got to work, and soon the log took on the shape of a boy. But when Carlo wanted to shorten his long nose, the workpiece screamed, and he had to leave his facial features that way.
When the organ grinder went to buy clothes for the wooden child, he at that time met the cricket, but managed to quarrel with him. The wise inhabitant of the closet told Pinocchio that behind the painted hearth there was a secret door that could be opened with a golden key.
But on the way there, the mischievous man stopped at a puppet theater to watch a performance. During the performance, he stands up for the unjustly offended character and disrupts the performance.
The owner of the puppet theater Karabas Barabas wanted to punish Buratino, burn him like a log. However, the boy admits that it is impossible to burn it, since he once saw a fireplace, but only poked a hole in it with his nose.
Karabas Barabas perked up, it became clear that he knew the secret of the golden key. Having sent Buratino home, the owner of the puppet theater even gave him money so that he and his father would not die of hunger. Karabas Barabas told them not to leave the closet.
When everyone left, the owner of the puppet theater called his friend Duremar, told him where the secret door was, and the key was hidden with the turtle Tortilla.
But this does not end the summary of The Golden Key, or the adventures of Pinocchio. As a result, the wise Tortilla gave the key to the good Pinocchio. At the end of the fairy tale, he and his friends from the puppet theater open a secret door.
But on the way to success, the little mischief-maker had to show his ingenuity and courage. This is the only way he was able to escape from the clutches of the cunning fox Alice and the cat Basilio. Pinocchio helped Malvina, Artemon and Pierrot escape from Karabas Barabas and Duremar.
The fairy tale “The Golden Key” ends positively. A new puppet theater was waiting for the friends behind the door, in which they would now perform.
After you have introduced the children to a summary of the fairy tale “The Golden Key or the Adventures of Pinocchio,” you can act out scenes with the participation of these characters. Now the guys will know who has what character, which representative of the fairy-tale puppet theater looks like.
Sew costumes in which the kids can have fun at a matinee or at a home party.
Advantages of making a key holder with your own hands
When making your own key storage, you can determine its size, shape, design and number of hooks according to your taste and needs. This option will be cheaper than a ready-made solution from a store. This work requires creativity and freedom of action. The manufacturing process does not take much time, and the result more than justifies the investment of your own effort and money. You can adjust the accessory you made yourself as much as you like if suddenly you no longer like its appearance or simply does not fit into the changed style. Such a hanger will have not only practical value. It will add originality to the decoration of the hallway and the entire room. A unique element of the interior will be remembered by guests and will become the hallmark of the house. Its creation will turn into an exciting journey into the world of creativity, which will distract you from everyday affairs.
Choosing the right material
The choice of material is the very first and most important step in the manufacture of any keychain. The material must be of high quality in order to maximize the use of a beautiful item. Some give the keychain mysterious meanings: a talisman for good luck, a talisman or protection against damage from the evil eye.
List of materials from which a keychain can be made: office paper, sewing threads, fabric, beads for embroidery, plasticine for modeling, various elastic bands or ribbons, amulets stones.
Various hooks, pieces of straps, bottle caps, strings, pencils and much more are also suitable. Images of some materials can be seen below.