Nowadays it is fashionable to decorate your living space with handmade items. Often this does not require special expenses, if only you have the time and desire to create. Materials for arts and crafts can be easily purchased in stores or ordered online. Natural materials are widely used, you just need to see their capabilities: what is hidden under the intricate bottle gourd, what do the cones look like?
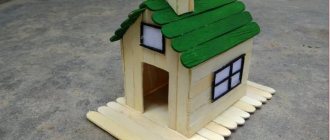
You can get down to business with your children, making houses from polymer clay. They can be of various shapes and sizes - round, square, in the shape of a teapot, fly agaric, strawberry or apple.
What types of houses are there?
If there is a house, then someone must live in it. A dwelling for gnomes is installed in the front garden of a private house. Often mice or frogs choose it for themselves if there is a bowl of water nearby, representing a lake. In the evening, you can light a fire in such a mansion by placing a candle inside. If the house is made in such a way that a hand does not fit into it, this will be difficult to do. Therefore, you should take care in advance about how to get out of it objects or animals that got there.
Small houses made of polymer clay are hung on trees to attract birds. Then they act as a feeder. They are also used in flower beds. It is very convenient to put them in place of already faded daffodils or dug up tulips.
In an apartment, such houses are placed between flower pots, in the kitchen tea bags are placed in them, and very small ones can serve as salt shakers or needle beds.
LiveInternetLiveInternet
Thursday, September 27, 2012 19:33 + in quote book Today we will talk about making handicrafts from clay. You can use both ordinary river clay and special clays for modeling in this handicraft. The latter come in both plain and colored. One of these crafts can be found below. Clay modeling is an entertaining handicraft, and when you make a souvenir miniature with your own hands, it is not necessary to have great artistic abilities. It is enough to take a ready-made drawing or photograph of the house and you can start working.
Making a clay house begins with selecting a photograph or sketching the original. English houses in the Victorian style are usually used, this is done due to the fact that such houses are extremely beautiful and will easily decorate your home or will be gratefully accepted as a hand-made gift. However, you shouldn’t get hung up on photographs; you can stretch your imagination and make an elf’s house located on an old stump. Or, say, an entire village inside a fortress wall. After you have decided on the sample, it is best to make a drawing of the future details: walls, roof slopes, the platform on which the house itself is installed. This is necessary to ensure that parts do not mismatch during assembly.
The clay is rolled out in a layer of 3-4 mm and the details are cut out with a knife or scalpel. Windows are cut into the walls, do not try to observe the geometry particularly clearly, small distortions will only look more interesting in the finished structure. To ensure that the knife blade does not catch on the material from which you are making the craft, moisten the knife blade with water. Decorative patterns are applied to the walls and roof slopes. For example, a coating that imitates straw can be easily made using grooves with a needle, and brick walls can be made using a toothpick. And roof tiles can be easily created using a specially sharpened stick. By the way, sushi shelves from Chinese restaurants are very suitable for making various sticks.
To make a souvenir house from clay with your own hands, it is better to use a mass that self-hardens in air. If you use plastic mass for modeling and then bake it in the oven, then after applying the decorative details, the mass must be baked in the oven. For baking temperature and time, see the instructions for the plastic modeling mass. Don’t forget that in miniatures small details give a special flavor; don’t be lazy to make a decorative lattice or ivy covering the wall. Moss on the lower stones of a tower or house located near a pond is also suitable. You can reproduce in miniature part of the surrounding interior - for example, a boat.
Often, an LED flashlight, or rather its luminous part and a switch with a battery, are often inserted into a homemade clay product made in the form of a house. If you want to make lighting, then do not forget to immediately make holders for these parts. In this case, the back wall is made either with a large hole for access to changing the battery or opening (on hinges). The hinges are very easy to make from a strip of tin (from a beer can) wrapped around a U-shaped paperclip (its upper part). Such a hinge is inserted with the tin part into the part to be torn off and baked together with it, and punctures are made in the mating part for inserting a paperclip. During assembly, the “legs” of the hinge are inserted into these punctures and fixed with glue. After the parts have acquired the necessary hardness (they have been baked or hardened by exposure to air), it is time to paint. It is better to paint parts before assembly. At the same time, you can easily place the part in front of you in the most successful and convenient way.
Acrylic works well as a paint. At the same time, there is no need to buy expensive paints in art stores; ordinary “school” acrylic paints from office supplies are quite suitable! Of course, painting with a brush is a rather delicate task; it’s much easier to use a cheap airbrush. Its price is not high, and its lifespan (unless, of course, you forget to rinse it after use) is more than 2 years. At least, it has already been working for me for 2.5 years at the time of writing this article. Of course, I use it for hobby purposes and it usually works 4-5 times a month, but it has such a simple design that there is simply nothing to break! To assemble, or rather fix the structural elements, the same mass from which the souvenir house itself is made is used. However, if your material requires firing to harden, you can also use an adhesive connection. Butt parts do not glue very well; it is better to use pieces of fabric soaked in glue to connect parts from the inside of the structure. The souvenir house can also be used as a decorative lamp with a candle inside. For such a house, it is best to use self-hardening clay. Then, after the house has completely hardened, it will be completely fireproof, because all connections are made of the same non-combustible clay. However, the baked mass also has the opportunity to participate in the manufacture of a decorative lamp with your own hands - it is enough to make a separate part of the structure for the lamp, for example, a tower adjacent to the house. Remember - the part of the craft in which the candle will burn must have an open space at the top; hot air from the candle and combustion products will escape through it. However, you can also use a fairly large number of windows located under the roof of a homemade souvenir house. If you use an LED flashlight as a backlight, then before assembling your clay craft, you can glaze the windows - the glass is cut out of transparent plastic (use bottles from under carbonated drinks or beer) and are slightly colored. You can apply a design on the glass in the form of curtains. The glass is glued to the windows from the inside of the structure, so make them slightly larger than the window openings. As you can see, making a craft with your own hands - a house from a souvenir shop - is not such a difficult task! The main thing is to choose free time for this needlework and commit to not giving up until you get a finished souvenir! Well, at the end of the article I will give a few more different types of homemade souvenir crafts in the form of houses made of clay.
| Categories: | POLYMER CLAY/interesting MK |
Tags:
clay house do-it-yourself clay house clay crafts
Cited 39 times Liked by: 4 users
Like share
0
Like
- 4
I liked the post - Quoted
- 0
Saved
- Add to quote book
- 0
Save to links
Liked4
0
Pumpkin houses
Natural materials always find their use in the craftsman. Decorative bottle-shaped lagenaria can become the basis for a round house with a removable roof. You can store food in such a pumpkin; previously it was used as a container for butter or milk. It does not allow light to penetrate inside, but retains natural humidity.
For one house you will need two small pumpkins. One will be the roof. Procedure:
- Cut the fruits, remove the pulp, and dry the resulting containers.
- Trim spruce or pine cones - their scales will be used to make tiles.
- The base pumpkin is filled with something to give it stability.
- On the part that will be the roof, tiles made from cones are glued. Start from the bottom row and work your way up.
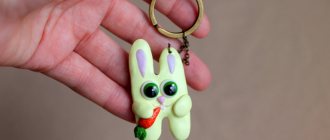
- Windows, doors, roses, and leaves are made from polymer clay. All parts are baked in the oven according to the instructions included with the package.
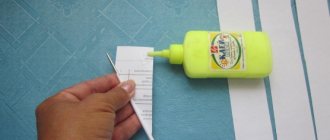
- Glue the clay parts using a glue gun.
- Paint the house with acrylic paints.
- Cover the work with water-based varnish and sealant.
If the roof is made permanent, then it can be glued. But you will still have to use two pumpkins and scoop out the pulp from them.
Consumables
Carefully follow the step-by-step instructions provided, and you will definitely end up with an original fairy-tale house. To make it, you need to prepare the necessary materials.
You will need:
- metal foil;
- cardboard;
- hot glue gun;
- acrylic and watercolor paints;
- sharp knife;
- two glass jars;
- polymer clay.
Below we offer step-by-step instructions for making a fairy-tale house with your own hands.
Houses made from cans
Didn't find the right pumpkin? No problem! You can make fairy houses from jars and polymer clay. To do this you will need a jar with a screw cap. You can take half a liter. You will need more polymer clay than for a pumpkin house. You will need stacks for applying texture and foil.
Procedure:
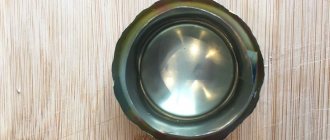
- Roll a volumetric ball out of foil.
- Press it forcefully into the jar with the lid on. You will get a depression.
- Glue the foil ball to the lid.
- The ball is molded into the desired shape of a mushroom cap - pointed, round or with curved brims.
- Unscrew the lid and cover the mushroom cap with a thin layer of polymer clay, making the structure of the mushroom on the inside of the cap in stacks in the form of plates or sponges.
- Roll out the clay and apply it to the jar, completely covering it. If there is not enough for the bottom, they make a patch.
- They cut through the window in stacks, draw shutters, a door, and a house number. They mold a pipe and imitate brickwork on it. A canopy is made over the door, but not attached.
- Pour water into a jar and put it in the oven. The roof of the house and small parts are placed nearby. Bake according to instructions.
- They assembled everything and glued the canopy and pipe. The finished house is painted with acrylic and, after drying, coated with acrylic varnish.
If you use gouache, it will spread under the varnish. Some watercolor colors too. If there are no acrylic paints, PVA glue is added to the gouache.
Materials and tools for decoration
If this is your first time working with thermoplastics, take the time to familiarize yourself with the basics of this craft. Modeling practically does not differ in the technique of working with plasticine, but drying is required . Don’t throw away the packaging, it says how long you need to bake the finished product.
For the master class, prepare:
- a small glass jar with a lid;
- set of polymer baked clay;
- foil;
- plastic bag;
- nail scissors;
- stationery knife;
- stack;
- toothpick
You can also decorate a mug or plate, turning ordinary dishes into designer ones. After heat treatment, the material is similar in properties to plastic - hard and not afraid of water. Don't be afraid to add your own ideas to the decor to get an original piece.
How to bake polymer clay in the oven
Beginners are hesitant to bake the product. But unfired clay is a fragile thing; in order to securely fix your work, you need to keep it at high temperatures. At first there may be a defect - if the clay is overbaked, it will burn and become covered with bubbles. If you take the product out ahead of time, it will not bake inside and will become fragile.
For the process to be successful, all parts should not be thicker than one centimeter. It is better to then glue the product together from many elements. They are burned by placing them on a toothpick. Spread crumpled foil on the bottom of the baking sheet and simply stick toothpicks into it. Large parts are laid out on paper, which is lined with a baking sheet. A regular A4 office paper size will do.
Baking temperature depends on the brand of clay. For Fimo it is 110 degrees and a time of 30 minutes. To know exactly what the oven temperature is, you should purchase a thermometer. They also bake prototypes and check them for fracture. After that, the temperature is increased for fragile products, and reduced for burnt ones.
Master Class
Houses made of polymer clay are a fascinating form of not only creativity, but also relaxation. In the video, the arts and crafts master talks about his dreams while working. After several successful experiments with clay, the skill will come, and while sculpting, only pleasant thoughts will come to you: about your dream house and how to live well in it. Positive energy will definitely appear in the finished work.
This work can be done together with children. Entrust them with simple details.