Preparing for the New Year holidays allows you to especially feel the surge of joy and warmth that is characteristic of the New Year. And when there is not enough atmosphere or you want to fully embrace the upcoming period of fun, it is useful to do various crafts to decorate your home or office. Moreover, this activity is suitable not only for children of different ages, but also for adults. And it will be extremely useful for the family to spend time together during the exciting process of making paper houses for decoration.
Paper house + template
The templates are printed, folded along the dotted lines and glued into solid products in the indicated places. Finally, they are painted in the most suitable places.
Creating a roof
After this they make the roof. Having understood how to make a house from newspaper tubes, and having studied photos of finished projects, you can choose the most suitable solution.
The simplest option is to make a rectangle using the same technique (“rope”), bend it in half and secure it with glue on the 2 triangular ends of the walls of the house.
Another way is to take a sheet of cardboard and cover it with any available material that imitates tiles, for example, wine cork cut into thin plates. You can cover a cardboard base with golden yellow-painted tubes to create a thatched roof.
Mini paper lantern house: step-by-step MK + template
The template can be printed or hand-drawn onto paper and then cut out. After that, bends are made in future gluing areas, and multi-colored thin corrugated paper or film is glued to the inside of the house. All that remains is to glue the houses together and put them on electric candles.
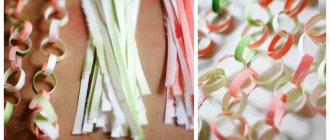
Crafts from cocktail straws - decorations for children.
Together with your children, make cute jewelry from plastic tubes - beads and bracelets. Cut the tubes into pieces, then string them on a thread mixed with beads for a necklace, and to make a bracelet, connect the tubes with an elastic thread.
Natalia Gonchar
For my work I take white office paper
"Snowflake".
And whoever has access to paper
used on one side is even better.
The other side, white, will be the face of the tube
.
So, take a sheet of A4 paper
, cut into 4-5 strips
(depending on how it turns out)
. Let's prepare PVA glue in a small jar with a sharp spout for ease of use and a knitting needle with a smooth surface. I took a stainless steel knitting needle.
tubes at once
, and then weave.
I direct the knitting needle with an inclination approximately parallel to the diagonal of the cut paper strip
, no more than 30 degrees.
Otherwise, the tube
will turn out to be unbendable.
If there is concern that the tube
unwinds after being removed from the knitting needle, then drip glue in several places along
the paper strip
.
And usually everyone only fixes the tip of the tube
.
The tube is ready
.
I had a desire to use a ready-made color of writing paper
. Of course, this method is somewhat more expensive, but the product requires less care.
We start work with two tubes
. In the middle we glue them together with PVA glue and secure them with a commonplace clothespin. Fortunately, you don’t have to wait long, like with stationery glue.
One more tube
We attach it to one of the legs of the cross using glue and clothespins.
Now we select the volume for expanding the cylinder
.
I chose a huge pencil for the sample. Let's put a cross on top and start twisting the tubes
.
the tube
on which the additional one rests
on top of each other
.
Then we intertwine the next tube with the superimposed
.
And so on indefinitely in a circle.
And so on until the length of the tube
.
Next you need to grow it. The tubes
will have one side with a larger volume than the other.
Drop some PVA into the larger hole and insert the narrow tip there. If you can’t join them, just crumple the tip and glue it together. This is how we increase the length of the tube
.
So weave endlessly until the desired length of the cylinder
. The rod must be pulled up periodically, otherwise you will not be able to remove it.
This is what you get from two sheets, 10 tubes
.
You can take different volumes for construction. But the larger the volume, the more you need to glue into a cross from the very beginning.
To join the seams, you need to purchase a hot glue gun.
The product can be tied with threads and then secured with hot glue.
Here's what you can get from cylinders of different diameters
.
Cone weaving
, starting from the top of the head.
And my cloud coffee pot had a cone that started from the bottom and ended in a pigtail.
Heart made of white tubes
It is necessary to fix it in this form with PVA glue diluted with water in a ratio of 1:1.
And then add the desired color and the art object is ready.
Sometimes you want to do something original for friends and family. For example, for my graduate, I wove a family amulet for their wedding day that decorates their interior.
Or for New Year 2012, I wove the symbol of the year - the Dragon. To profile:
In front:
And the symbol of this year 2013 settled in my corner of nature.
I really hope that the symbol of this year 2013 will be favorable to me.
I really want everyone who is interested in this art of weaving to succeed
, what is intended. If something doesn’t work out right away, I’ll be happy to help, please contact me. I wish you new creative success!
All women in the world are trying to create a cozy nest from their home. In the modern world, you can buy a lot of little things to decorate your apartment. But now more and more representatives of the fair sex use the advice of our ancestors (wickerwork) to decorate their homes. The most chic items are considered to be products made from wood wicker, which is prepared in advance. This is a labor-intensive and time-consuming process; not every tree branch is suitable for weaving. Proper harvesting of the vine, soaking and drying is required. The most interesting method has been invented and is easier to make, simply by replacing the twigs with newspaper. Therefore, today you have the opportunity to learn how to weave from newspaper tubes for beginners; we will tell you all the step-by-step lessons of the skill, and teach everyone who wants to master this technique. And after several trial products, it will be very easy to create your own unique masterpiece!
Log cabin made from paper tubes
An ordinary A4 sheet is cut into 3 parts, rolled into tight tubes and glued along the edge so that they do not unwind. The house is gradually laid out from the tubes, constantly being held together with glue. Then it is complemented with decorative elements in the form of curtains, doors and a roof frame. Thick colored paper or cardboard is fixed on top as a roof. All that remains is to complete the image of the house with additional decor.
How to properly prepare paper vine
The first stage in the work is the selection of the necessary material. You can work with regular blank paper, but since such paper is quite thick, it is difficult to work with. It's great if you know where to find the paper that printing houses use. As long as it is clean, it is easy to work with in terms of painting the product. But, if not, then we use regular newspaper in huge quantities. Using a utility knife or razor, cut the newspaper into wide strips, about 10 cm each, but no more. Weaving products is much more convenient and easier if the newspaper is cut into long strips.
We take one strip and place it near us; we place a thin, long metal object at the sharp corner. This could be a knitting needle or a bicycle spoke. We wind the strip onto this knitting needle, quite tightly.
Don't be alarmed if one end is thicker, it happens. But still, keep an eye on the thickness; the difference should be minimal. To ensure that the tube has a shape and does not unwind, wet the edge of the strip and secure the corner. This method requires winding about 50 tubes. How many of them you will need directly depends on how complex the product will be and what size it will be.
Before continuing work, you need to decide whether you will paint the woven product. Or paint the sticks first and then weave.
It is worth remembering that you need to select the appropriate varnish. If this is not done, the sticks will become brittle and harsh, the entire appearance will be ruined. The best option is acrylic varnish, which is used for artistic purposes.
House coloring book
It will be exciting for children not only to assemble a ready-made image, but also to bring something of their own to it. To do this, you will need to print out your favorite template or several, or draw it yourself. Then cut it out, glue it and, armed with pencils, paints or felt-tip pens, color it as you wish.
Materials
We’ll start our master class on making a tea house by making a list of the materials we need.
- Newspapers. One newspaper should be enough for us, but a lot depends on the number of sheets in the newspaper and the size of the sheets.
- Paints. You and I want to get a beautiful house, so we will have to paint the tubes before assembling the house.
- Ruler, scissors and pencil. A standard set for any paper work.
- Patience. It will take us a lot of time to make the required number of tubes. The house you saw in the photo above required about 450 tubes.
The tubes are quite simple to make. Strips of newspaper are cut out the length of the entire sheet and a width of about five centimeters. The strips are rolled crosswise into a tube. If necessary, roll lengthwise, that is, along the length, not the width.
Christmas village
To create a multi-component decoration, you can make a full-fledged Christmas village. To do this, the templates of all buildings need to be printed, cut out and carefully glued together. The finished layouts are decorated with paint, pencils or felt-tip pens and arranged into a single composition.
Gingerbread house
Bakery
Church
A toy shop
Tools for assembling tubes
The material has been selected, in our case it is newspapers, now we need to prepare the tools for assembling the tubes. The most important thing is a stationery knife or scissors, with which the newspapers will be cut.
The second is glue, any glue will do: from construction glue to a pencil. The best option is ordinary stationery PVA glue.
In addition, you will need a thin knitting needle with a diameter of 1-1.5 mm. Our newspaper will be wound onto the knitting needle.
The smooth surface of an ordinary table is not suitable for rolling, so many people choose the option of rolling out mats. They are made of silicone and have a bit of rubber, but large cutting boards made of plastic or vinyl also work well.
Everything is prepared and you can get down to business. The first thing you need to do is cut the newspaper correctly. For this purpose, the newspaper strip is folded in half crosswise and cut along the fibers. After that, fold each half in half again and cut again in the same direction.
The newspapers are ready, you can twist the vines. We take one strip of newspaper and place the tip of the knitting needle about 5 centimeters on the lower right corner, begin to twist while holding the tube.
The upper corner is coated with glue and the tube is glued. That's all, the tube is ready, you need to make a lot of them, they are painted and impregnated with the composition in order to make it easier to weave with them.
Fairytale castle
It will be interesting for a child to make his own fairytale castle. The process will consist of standard printing, cutting and gluing of templates. Then the assembled castle is decorated and complemented with various decorative elements. Particularly relevant will be shiny metal parts, beads and beads, as well as shiny dense threads.
Procurement of “building materials”
To make a house out of paper tubes with your own hands, you will need parts. To create them, the existing sheets will need to be divided into several parts, drawing them with a pencil. The size of the elements is a matter of taste of the creator.
Then the blanks are cut and twisted. To make the process easier, you can use cocktail straws by wrapping paper around them. This will give the desired shape in advance, and all that remains is to glue the parts. To avoid damage to the elements, twisting should begin from the sides, otherwise the material will wrinkle.
The number of such blanks depends on the scale of the idea, so it’s worth making them as you work, rolling up 10 pieces in advance to get used to the upcoming construction.
Box house
The craft can be used for good. To do this, print out, cut out, glue and decorate the box house template. Then it can be filled with candies, sweets or other small items that can be given as a gift.
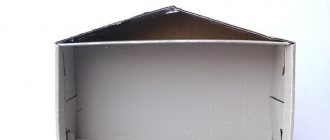
Making the base
Step-by-step instructions with a description for beginners will help you figure out how to make a house correctly:
Draw a rectangle (for example, 8*9 cm) on a sheet of cardboard using a ruler. Cut out the workpiece.
Using a glue gun, attach to the base of the tube. They need to be glued 2 together, according to a certain pattern: at 4 points at equal distances from each other on each side of the rectangle and in the corners.
One of each pair of tubes must be bent upward, the remaining ones must be used to weave the bottom. It is performed using the rope technique. The elements glued to the bottom are the frame.
Take 2 pieces from the stack of remaining tubes and begin to braid the frame. Both of them should go in the same direction, but mirror each other: one passes through the first post from the outside, the other from the inside. The tubes go around the next column in reverse, the first goes from the inside, the second from the outside. Do this for 3 rows.
If the length of the tube is not enough, extend it - coat the tip of the one that ends, and put a new one on it. Continue weaving. After finishing the third row, hide the ends inward and secure them.
They move on to weaving the walls of the house. To make it more convenient to work, it is advisable to place a container of a suitable diameter (mug, bottle) on the base. They begin to weave in the same way as the bottom, but they go not wide, but upward. Perform several rows. After this, you need to mark the location of the future hole with a pencil.
Using a utility knife, carefully cut a hole. The cut area is glued with a tube, having first slightly flattened it.
Taking a clothespin, connect the ends of 3 tubes. Weave a regular braid. This braid is used to decorate the entrance to the house (using a glue gun, glue it around the perimeter of the entrance hole).
They continue weaving the walls of the house. When they reach the desired height, close the weaving of the sides, and hide the ends of the tubes in the frame. The wall on which the entrance hole is located and the wall opposite it must continue to be weaved, but gradually narrowing it.
First, several rows are made, increasing the tension of the tubes, then the racks are connected in pairs, and at the very end the remaining ones are woven into one. The result should be 2 triangles.
Advent calendar
Nowadays, Advent calendars or Christmas calendars are becoming more and more popular. They contain several cells with numbers, the opening of which allows you to conduct a fascinating countdown of the days until Christmas or the New Year. The content of such calendars can be anything: sweet treats, small gifts, cosmetics, wishes or even financial resources. The main thing is that every open day brings something new that is not present in any other.
Putting together such a calendar for the New Year is quite easy. To do this, all parts are printed or transferred by hand onto paper, cut out along the contour and bent in the places indicated by the dotted line. At the end, all this is carefully and step by step glued together, filled with the appropriate content.
and not toys.
Want to do something more serious? What do you think of the idea - such a fluffy colored lampshade?
It will require about two hundred straws, which must be glued to the glass shade using transparent glue. And from bright pieces of colored straw, using the same principle, you can make such a small cube lamp. With it, your baby will not be afraid of the dark! And an adult will be delighted with such a creative, bright gift.
Don't want to struggle with small pieces? You can glue long straws vertically - it will turn out no less beautiful.
You can decorate the door of your home for the New Year with this New Year's wreath. Using a glue gun, glue straws of different lengths onto a small cardboard circle with a “sun” and decorate with a bright bow.
A fruit stand can be not only a decoration, but also a useful thing. To do this you need:
- String the required number of straws onto a nylon thread, secure the other, unstitched edge with adhesive tape and cut the straws obliquely, starting at a length of 3 cm, and then longer and longer until you reach the full length of the straw.
- Pass the thread through the trimmed edge as well, placing beads and glass beads between the straws.
- Then pull the edge together to create a snail shape and secure the ends of the thread with beads, and also pull the thread on the other side. A useful decoration is ready!
To get a perfectly flat stand, try to string the straws exactly in the center. You can use a different number of straws, then the stand will be larger or smaller. The main thing is to maintain the proportion in the ratio of the length of the straws.
Every year, countless fast food chains hand out more than 50 million plastic straws along with drinks, and this is only in America! A huge number of straws from juices and cocktails end up in landfills. But there is good news - you can make a variety of crafts from cocktail straws with your own hands! This, of course, will not solve the global problem of plastic pollution, but you can make your small contribution to saving nature!
Mini house for Christmas tree
A homemade house can even be a Christmas tree decoration. You just need to print it, cut it out, glue it and paint it with colorful paints or even sprinkle it with glitter. To create a unique image, you can also use additional gluing on the model of shiny paper.
Decorations
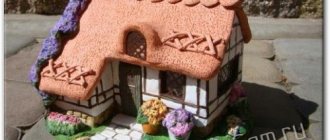
After the craft (a house made of paper tubes) is essentially ready, you can move on to decorating and detailing it. If desired, the building can be supplemented with various elements: a porch, shutters, a fence, etc. If you have imagination and additional materials, the possibilities are practically unlimited.
By the way, the stairs to the door are made from the remaining tubes, covering them with various self-adhesive wallpapers. This gives the house a naturalistic and unique ambience. If time allows, you can do the same with the parts for laying the walls. Naturally, you should decorate them in advance. Actually, this material is used for absolutely any purpose.
If large-scale work is planned, all parts, including the building, are fixed on a single surface. For example, cutting plywood or wood. In general, any thing that is useless individually can become a decorative element that will make a house made of paper tubes more vibrant and original.
Circus
Many people associate the circus with fun and celebration, just like the New Year, and therefore it will be interesting to make a similar craft for New Year's days. The template is easily duplicated or printed on paper, cut out, glued and painted in circus-specific or other desired shades.
Gift DIY tea house
A great holiday is approaching - Victory Day. The girls of the “Skillful Hands” club, together with their leader, decided to make an original gift for Victory Day for a veteran.
Tea house as a gift to a veteran
Spring crafts group “Skillful Hands”. Master Class
Authors:
Petrova Liza -7 years
Bazzaeva Milena – 8 years old
Romanova Masha – 9 years old
Club leader: Nikiforova Alevtina Gennadievna, artistic director of the Lyubynsky SDK, MBUK "Shimskaya TsKDS"
Goals:
– revival of interest in applied creativity,
– formation of labor skills through weaving,
development of aesthetic taste through the decor of an object
Scene in a winter house
Not only for decoration, but also for children’s entertainment, you can print and assemble a template of a room in the house, as well as characters - the inhabitants of the house. The finished work can be easily placed in any place in the house, and children will always be interested in playing with the figures, acting out various scenes. Parents can also join in to spend time in a warm family circle.
Weaving from newspaper tubes video lessons for beginners
Also, to visually familiarize yourself with the process of weaving from newspaper tubes for beginners, we recommend studying several videos from experienced designers and craftsmen. These reviews will talk in detail about the technology as well as visual examples of finished products.
Video: Lesson on rolling tubes from newspapers - secrets and nuances
Video: How to weave a basket with a rectangular bottom
Video: A basket of magazine tubes for beginners.
Video: Basket made of newspaper tubes for beginners
Video: Weaving a heart basket from newspapers
Turn your ideas into reality, and you will succeed, we wish you success in your endeavors!
Below we have put together a gallery of photo ideas for weaving from newspaper tubes that will help you customize and choose exactly what you like. We offer more than 50 photo options:
Sometimes parents don’t know what kind of activity they can engage their child in. Try making interesting crafts for children from juice straws and cocktails. Our exciting master class will help novice craftsmen make crafts from straws for themselves and as gifts.
Crafts from cocktail straws
Vase with flower
A vase made of tubes can be made as a beautiful decor for a child’s room or as a gift to a grandmother or godmother for any occasion. The child will certainly enjoy this task, because making a vase is not at all difficult, and the result will please you in any case.
- To make the vase more stable, cut the tubes in half, fasten them with rubber bands and glue the base of the vase onto a disposable plate or card.
- We decorate the vase with bows or any other decor and start making a flower for our vase.
- We cut the tubes into small pieces of 2-3 cm. A large flower will consist of small inflorescences, which are made by cutting half of the tube into a “fringe”. We insert several tubes into each other and attach such an inflorescence to a plasticine ball. The more inflorescences a flower has, the more magnificent it looks.
- We insert our flower into the vase - the composition is ready!
Christmas tree decoration
A Christmas tree decoration made from cocktail tubes looks much simpler than store-bought decorations, but such a craft, made by a child’s hands, will take pride of place on your holiday tree.
Photo frame
This craft in the form of a photo frame made from multi-colored cocktail tubes is quite practical and original. It will harmoniously fit into the interior of any children's room.
- First, we will make a cardboard blank the size of the photo for which we will make a frame.
- We cut the tubes into equal segments and measure the dimensions of the corners of the frame. We cut out several segments that are equal to the length of the corners.
- We glue the segments to the cardboard blank using double-sided tape or glue.
- Attach your favorite photo to the back of the frame - the frame is ready!
Bright decorations
All girls love jewelry and decorations. You can make cute beads and a bracelet for your wrist from cocktail straws. Such jewelry is great for wearing in summer, especially on the seaside. Your fashionista will look no worse than a mermaid.
- We cut the cocktail tubes into segments of different lengths. You can make the beads symmetrical, then cut out 2 identical segments.
- We string parts of the tubes, alternating them with beads, onto a strong thread or fishing line.
- The more varied the tubes are - in width, color, design - the more interesting your beads will be.
Crafts from juice straws
Geometric figures
Thanks to juice straws, you can play interesting geometry with your child. With the help of original and simple crafts, the child will easily remember the new names of geometric shapes and have an interesting time.
- First, let's try to make a pyramid. To do this, you need to fold the short part of the tube lengthwise and insert it into the long part of the tube. We fasten two triangles in two places using transparent tape. In the same way we attach the third and fourth triangle to them. A regular triangular pyramid consisting of 4 triangles is called a tetrahedron.
- In the same way, you can add other regular geometric shapes: square, pentagon, etc.
- Six squares can be used to form a hexahedron.
- Eight regular triangles create an octahedron.
- From twelve pentagons we get a dodecahedron.
- Twenty triangles stuck together are called an icosahedron.
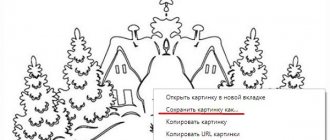
Winter city made of paper + template
A beautiful and minimalistic decoration will be the whole image of the city, which can be transferred to paper or printed, then cut out and, bent in the indicated places, installed in any suitable place.
Or this option
Finishing of the finished product
When the house is completely ready, they move on to decorating it. You can cover the craft with stain, paint it in the desired color, decorate the roof with a ladder made from tubes, make flower pots - original house ideas and instructions for making them will help with this.
If you wish, you can make a window in the house: cut a hole in the right place, cover the cut with a pigtail, glue two tubes perpendicular to each other, which will act as a frame.
Making a beautiful house from newspaper tubes is quite simple, the main thing is to understand the principle of weaving.