Preparing for the New Year holidays allows you to especially feel the surge of joy and warmth that is characteristic of the New Year. And when there is not enough atmosphere or you want to fully embrace the upcoming period of fun, it is useful to do various crafts to decorate your home or office. Moreover, this activity is suitable not only for children of different ages, but also for adults. And it will be extremely useful for the family to spend time together during the exciting process of making paper houses for decoration.
Paper house + template
The templates are printed, folded along the dotted lines and glued into solid products in the indicated places. Finally, they are painted in the most suitable places.
Materials for work
The first and most important task for the master is to prepare the necessary materials, as well as tools and a workplace.
As a suitable workplace, you should choose a wide table and a comfortable chair of sufficient height.
To prevent visual impairment, the young master should be provided with high-quality lighting.
If the work on making crafts involves the use of paints and adhesives, it is better to take care of reliable ventilation in the room.
Also at the first stage you need to prepare the following set:
- An organizer in which the child will store small parts, fasteners, decorative items, brushes, pens, needles. With this approach, all tools and materials used will be in a certain place, in strict order.
- A set of paints and brushes for decorating finished crafts.
- To fasten parts together, glue, paper clips, and self-tapping screws are often used (the specific choice of fasteners depends on the level of complexity of the craft).
- Scissors and a sharp utility knife are useful when cutting out small parts for later assembly.
- Consumables can include pine cones, wooden twigs, ice cream sticks, wooden slats, and cardboard boxes.
Very original houses, serving as a souvenir or gift, can be made from bottle caps or ordinary matches. A novice master will definitely need templates or samples according to which the child will conduct creative work.
Mini paper lantern house: step-by-step MK + template
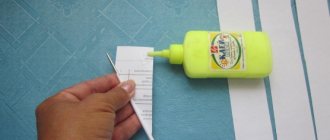
The template can be printed or hand-drawn onto paper and then cut out. After that, bends are made in future gluing areas, and multi-colored thin corrugated paper or film is glued to the inside of the house. All that remains is to glue the houses together and put them on electric candles.
Assembly of the structure
For exclusively paper houses, the main task is to glue the house together correctly. When preparing parts, always leave 0.5 cm for folds.
Note!
- Mushroom craft - reviews of ready-made DIY crafts + step-by-step instructions and diagrams for children (180 photos)
- Crafts from toilet rolls: step-by-step instructions for creating crafts. Master classes with simple work schemes (140 photos)
- Crafts from corrugated paper - step-by-step master classes on how to create crafts from corrugated paper with your own hands + photo diagrams
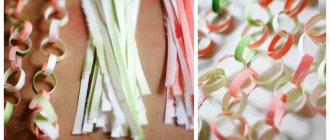
The remaining strips of fabric are folded, glue is applied to them and adjacent parts are connected to each other. A similar model of a house can have a separately assembled roof (for the convenience of the master).
For appliqués, the parts are simply glued onto a prepared base, assembling a whole structure from individual components.
The craftsman needs the most time and effort when assembling a three-dimensional model:
- When working with ordinary cardboard, you can only use glue.
- To assemble parts from corrugated cardboard, you can additionally use a stapler and staples.
Assembly is carried out strictly according to the scheme so that the house turns out stable, with a solid foundation.
For full-length dollhouses, the surfaces are additionally coated with moisture-resistant compounds, which give sufficient strength to the product.
Log cabin made from paper tubes
An ordinary A4 sheet is cut into 3 parts, rolled into tight tubes and glued along the edge so that they do not unwind. The house is gradually laid out from the tubes, constantly being held together with glue. Then it is complemented with decorative elements in the form of curtains, doors and a roof frame. Thick colored paper or cardboard is fixed on top as a roof. All that remains is to complete the image of the house with additional decor.
House for Santa Claus
The child is wondering where Santa Claus lives? Tell and complete the story with a house. Before you make such a house out of paper, it is better to enlist the help of your dad. Next you will understand why.
What we need for Santa Claus's house:
- box;
- scissors;
- emery cloth;
- scotch;
- paint brown, white and blue;
- brushes;
- polyurethane foam.
Let's get started:
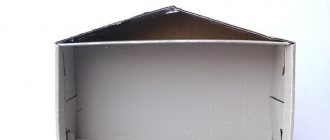
- Prepare a box (preferably made of thick cardboard; further processing should not soak it through), give it the shape of a house. To do this, we cut the components of the structure and glue them in the required order. Cut out the windows and doorway. For convenience, mark them on the workpiece with a pencil. House for Santa Claus. Let's start applying foam
- We decorate the house using polyurethane foam. Dad's help will be needed here. It will make the job more accurate. In addition, polyurethane foam is almost not washed off from hands and clothes; be extremely careful when working with it. Apply foam from the ends
- The foam should be applied to the product in strips no wider than one and a half centimeters. Leave a distance of three millimeters between the strips. The material will swell as it dries.
- Leave the product for at least half an hour, preferably an hour until it hardens completely. Waiting for the foam to dry
In the meantime, while our house is drying, let's make a stand for it. The house is intended for Santa Claus, and he loves the cold, so we’ll make a snow meadow.
Making a stand:
- Cut out a rectangle from cardboard. Its area should be larger than the base of the house. We decorate the perimeter of the stand with foam; it will help imitate snow. If the foam runs out, you can replace it with polystyrene foam or cotton wool. Glade for home
- You can use cardboard slides, snowdrifts, Christmas trees and a snowman as decorations. If foam was used, do not forget to trim it with a knife after drying. We paint all the products, install the house in a clearing and you can invite residents.
House coloring book
It will be exciting for children not only to assemble a ready-made image, but also to bring something of their own to it. To do this, you will need to print out your favorite template or several, or draw it yourself. Then cut it out, glue it and, armed with pencils, paints or felt-tip pens, color it as you wish.
Christmas village
To create a multi-component decoration, you can make a full-fledged Christmas village. To do this, the templates of all buildings need to be printed, cut out and carefully glued together. The finished layouts are decorated with paint, pencils or felt-tip pens and arranged into a single composition.
Gingerbread house
Bakery
Church
A toy shop
Templates of colored houses for cutting out for the New Year 2022
When the houses are already decorated, it is much more convenient:
- Both adults and children can easily handle such models;
- the time required to make such a craft is much less;
- you can work on it even “in the field”, that is, you need the minimum to prepare the product: a printer and a sheet of paper. You don't even need colored pencils!
And another advantage of this assembly is that you can choose both the color and model of the craft in advance.
I'll start with the most difficult multi-level house. It's really nothing complicated. Just cut and glue! The diagram is here.
Here the places of the parts are numbered to make it clearer what to glue where.
What I liked most were these colorful, truly festive houses (pictured below), the kind for a Christmas tree or a gift. There are 4 options for printing. .
There’s also this cottage, not exactly New Year’s, but also very beautiful! It is colorful, interestingly shaped - not just a box, with a bright blue roof. If the roof is decorated with sparkles or snow, then it may well become winter.
The second is a cottage from the same series, but in a different color.
What follows is simply a selection of different models from which you can choose the ones you like.
Fairytale castle
It will be interesting for a child to make his own fairytale castle. The process will consist of standard printing, cutting and gluing of templates. Then the assembled castle is decorated and complemented with various decorative elements. Particularly relevant will be shiny metal parts, beads and beads, as well as shiny dense threads.
Box house
The craft can be used for good. To do this, print out, cut out, glue and decorate the box house template. Then it can be filled with candies, sweets or other small items that can be given as a gift.
Making a cat shelter
In addition to children, a family or a single person is often content with a cat or cat. Such a pet should also not be left without proper attention when there is so much cardboard around. One box is enough if its width, length and height are at least 400x400x500 mm. Your pet will feel comfortable in an appropriate container if you follow the following rules:
- A passage starting from the floor so that the animal does not cling to the edge;
- Soft flooring so that the pet can rest;
- Dark space (cats see and feel great at night).
Therefore, a cardboard cat house should have a minimum of holes - one and only for passage. An exception is playgrounds for cats, which are made up of several boxes with two or three holes.
Advent calendar
Nowadays, Advent calendars or Christmas calendars are becoming more and more popular. They contain several cells with numbers, the opening of which allows you to conduct a fascinating countdown of the days until Christmas or the New Year. The content of such calendars can be anything: sweet treats, small gifts, cosmetics, wishes or even financial resources. The main thing is that every open day brings something new that is not present in any other.
Putting together such a calendar for the New Year is quite easy. To do this, all parts are printed or transferred by hand onto paper, cut out along the contour and bent in the places indicated by the dotted line. At the end, all this is carefully and step by step glued together, filled with the appropriate content.
Master class on making a large house for a child
By building a toy house in the middle of a children's room, a little more than a meter high, you can keep a child or even two children, aged from one to six years, occupied for a long time. The design imitates a multi-story building, a village hut. It is carried out according to sketches and patterns or, more simply, from a large box of large household appliances. Suitable dimensions of the structure are 120 by 80 by 80 cm. Some stores sell “moving boxes,” but if you can’t find similar ones, buy sheets of corrugated cardboard—you will need at least two or three of them.
If you combine two or three or more cardboard boxes of various sizes, you will get a “multi-room” play complex in which several children can play at the same time.
Materials, tools
Tools and materials you will need:
- corrugated cardboard;
- sharp scissors or a stationery knife;
- PVA glue;
- wide tape;
- long ruler;
- remnants of wallpaper or colored paper, fabric;
- markers, pencils;
- glue gun.
First you need to draw a diagram and determine what the details will be.
Manufacturing process
For work, separate pieces of cardboard or one or two large boxes from a washing machine, refrigerator, etc. are used. The structure must have four walls and a gable roof, the ends of which are left open to allow air to flow. The parts are connected with tape and glue. On one side, a door is made of such a size that a child can climb into the house. The windows are covered with tulle and transparent film, the walls are painted and covered with paper. A more interesting option is made using ready-made patterns downloaded from the Internet. The picture is enlarged to the required size, the details are cut out, glued onto corrugated cardboard, assembled - the result is a house already decorated on the outside. It is also easy to find suitable patterns for interior decor.
A soft rug is placed in the playhouse so that the baby does not feel cold when playing in it.
Mini house for Christmas tree
A homemade house can even be a Christmas tree decoration. You just need to print it, cut it out, glue it and paint it with colorful paints or even sprinkle it with glitter. To create a unique image, you can also use additional gluing on the model of shiny paper.
New Year's hut
When making crafts, you need to focus on diagrams and templates of cardboard houses. After you choose the most suitable option, you should transfer the markings to the workpiece. Well, then there’s nothing complicated:
Cut out the parts from a white sheet of paper according to the template and glue them in the prescribed sequence onto the cardboard. You can use glue or double-sided tape.
All cardboard parts are carefully cut out. To arrange windows and doors, you should use a stationery knife.
Adhering to the drawn folds, bend the workpiece and glue the structure. For strength, a primer can be applied to the house.
The hut should be decorated and decorated, for example, the roof is often sprinkled with glitter. Having attached a rope to the structure, the hut is used as a Christmas tree decoration.
Circus
Many people associate the circus with fun and celebration, just like the New Year, and therefore it will be interesting to make a similar craft for New Year's days. The template is easily duplicated or printed on paper, cut out, glued and painted in circus-specific or other desired shades.
How to make a craft with your own hands
By spending a little time working with your children and giving free rein to your imagination, you can build many original designs. And we will tell you how to do this further.
Scene in a winter house
Not only for decoration, but also for children’s entertainment, you can print and assemble a template of a room in the house, as well as characters - the inhabitants of the house. The finished work can be easily placed in any place in the house, and children will always be interested in playing with the figures, acting out various scenes. Parents can also join in to spend time in a warm family circle.
Benefits of working with paper
Paper and cardboard are the materials of choice for creating crafts, both volumetric and applique. A number of advantages distinguish paper from other working materials:
- Availability. Every craftsman always has paper sheets and cardboard at hand. And the cost of paper does not exceed reasonable limits.
- Ease of working with basic materials. Working on crafts does not require special skills from the master.
- Large selection of models.
- A huge range of ready-made templates, step-by-step instructions and educational video lessons for beginning craftsmen.
- Creative activities are an excellent hobby for adults and children, which allow them to develop memory, thinking and logic.
To create paper houses you do not need a wide range of materials and tools. Every detail for the job can be found among the set of office supplies at home.
Winter city made of paper + template
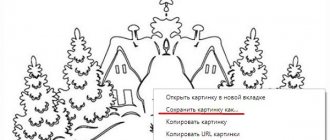
A beautiful and minimalistic decoration will be the whole image of the city, which can be transferred to paper or printed, then cut out and, bent in the indicated places, installed in any suitable place.
Or this option
Black and white three-dimensional house templates for cutting out of cardboard: can be printed on A4
Here are some easy and not so easy options. Choose which one you liked the most and go ahead and make it! Here you will find both simple huts and entire palaces: