On New Year's Eve, a small spark of hope for a miracle comes to life in the soul of every person. Children enthusiastically and impatiently await the holiday, gifts and believe that Santa Claus will fulfill all their wishes.
We present a step-by-step master class that will help you make a fairy-tale house of Santa Claus with your own hands.
This toy will be a New Year's surprise for a child and will help create that magical atmosphere at home, thanks to which everyone will believe that a miracle will definitely happen.
Master class using the “glitter house” technique
Such a Santa Claus house can be placed under the Christmas tree, on the window, or taken to a kindergarten or school for a New Year's crafts competition.
The material must be prepared in advance:
- Cardboard.
- Textile.
- Scissors.
- A jar of artificial snow.
- Two brushes.
- Glue.
- Two jars of crystal glitter. One with small and the other with large crystals.
Preparing the layout
If you take colored cardboard, the product will not need to be painted or glued. You can use packaging boxes, they are in every home.
You need to find a sketch with dimensions on the Internet and transfer the diagram onto a cardboard blank.
After the frame is cut, the walls are painted or covered. You can use bright fabric or wrapping paper. After this, windows and doors are selected. A fabric is glued to the back of the windows to represent curtains.
Next, the frame of the house is assembled, the roof and pipes are attached. The hut is mounted on a base - it can be a sheet of foam plastic or a flat part of a large box.
To make the composition complete, you can add decorative elements - Christmas trees, winter trees.
Making snow
The craft store sells ready-made artificial snow. From the package it must be transferred to a small cup. Using a brush, apply snow along the perimeter and top of the roof, around the pipe. Create small snowdrifts near the foundation and near fir trees and trees. Create a winter fairytale landscape.
Decorate the craft with crystal glitter
After the artificial snow has dried, you can begin to cover the product with glitter.
First you need to apply glue to the walls and roof of the house using a flat brush. Then open the box of fine glitter powder and sprinkle on the prepared surfaces. You need to work quickly so that the glue does not have time to dry. After hardening, the product is shaken to get rid of excess shine. Missed places where it has not fixed are processed again.
Large glitter granules are combined in a small cup with glue. Using a thin brush, apply it to the snow along the contour of the house.
The snowdrifts are generously covered with coarse glitter, which gives the effect of a real ice crust.
Final finishing
After the glue has completely dried, you need to finish decorating the craft with decorative ornaments.
Use small Christmas balls, bows from bright ribbons, and festive tinsel.
Printable house templates
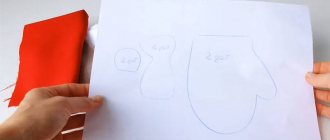
Craft Santa Claus in the shape of a paper cone for kindergarten for a competition
Can kids help us (oops, I got everything mixed up))) Can we help our kids create Santa Claus? Certainly! We hope that we will be able to design a craft together!
We twist the colored A4 sheet with the narrow side so that the craft is tall (if you want to make the DM thick, roll the cone with the wide side).
We apply glue along the edge of the sheet and fold the sheet to the end, securing the workpiece.
Cut out a second, long oval piece from a white sheet. The edges of the rest are cut out in a wave-like manner.
Bend in half. We step back a couple of centimeters from the edge and make a small, centimeter-long incision in a semicircle.
We unbend the fold and bend the part that we cut out forward.
We put this beard detail on the cone. Cut out the white mustache. Cut out a circle from red paper. This is the nose. Glue the nose onto the mustache.
And glue both parts onto the beard under the curved part. We make cuts from the edge of the red rectangle, like a fringe. Glue the eyes above the beard.
You can glue a circle to the top, or you can glue a kit, as in the photo below.
To do this, lubricate the fringed strip with glue and roll it up into a tube. We glue this fringe onto the top of the hat and fluff it up.
Draw a mouth under the beard. And we make cuts on the mustache and beard of Santa Claus.
The work is very simple! If you want, you can use the same technique to make the Snow Maiden together with your baby.
More options that you can simply print, cut and glue - click on the picture in the gallery.
Ceiling tile house
A do-it-yourself Santa Claus house made from ceiling tiles is an opportunity to make a cool craft from scrap materials.
Prepare:
- ordinary ceiling tiles;
- glue;
- stationery knife;
- 10 cc syringe (it is needed to make it convenient to apply glue to sections of parts);
- foam sheet for the base;
- a simple pencil with a soft lead or a pen;
- ruler;
- plinth with a relief pattern;
- cotton pads.
We build walls
For the walls, prepare 4 equal squares with sides of 27 cm. Cut out windows on three of them, and a door on the fourth. Make shutters from the remaining material.
For the frame, you need to connect two walls together, the angle between them must be straight. Then glue the resulting pieces together to form an even square.
In order to make the top and bottom of the building, two surfaces are needed. Their size will be larger than the length and width of the walls, since the tiles themselves have a certain thickness.
We cut out a couple of square blanks with a side size of 28 cm.
Apply glue along the perimeter of the walls above and below, secure the elements, the result should be a durable cube.
Assembling the roof
It is necessary to prepare two side triangles and rectangular surfaces.
Triangles with a base of 29 and a height of 25 cm. Rectangles - 30 by 40 cm.
First you need to glue the triangular side planes. After they are firmly fixed on the square base, we attach the rectangular parts.
The house layout is ready.
We design and decorate
We decorate the top of the house with cotton pads, gluing them all over the roof. The tiles are ready. We trim the base of the roof with a relief corner. We assemble and fasten the pipe from its scraps.
For the base of the composition, you must use a sheet of foam. You can build a fence around the house from the remains of the tiles, and cotton wool will help make snow and snowdrifts.
If you additionally use small decorative decorations - Christmas trees, balls, tinsel, sparkles, you will get a bright and original thing.
The fairytale palace is ready, children's delight and amazement will be a pleasant gift and reward for the time and effort spent!
Templates for New Year's houses
In the previous example, it was necessary to glue a house from separate parts, but you can use diagrams in which the entire house is drawn in expanded form.
Using them, you should cut out the workpiece, bend it along the marked lines and glue it in the right places according to the allowances - we will immediately get a 3D craft that can be painted with colored paints (or done in advance before cutting) or left as is, white, because when using backlighting, everything is a fairy tale will be equally provided.
You will need to work a little more to make a beautiful carved house, like Olga Kachurovskaya’s. If its size is small, you can even hang it on a Christmas tree.
House made of paper tubes
Another way to make Santa Claus's house with your own hands is to use paper tubes. Currently, such crafts are very popular. They do not require much skill or financial investment, and the results are excellent.
Prepare in advance:
- newspapers;
- cardboard;
- scissors;
- wide tape;
- PVA glue;
- flat brush;
- acrylic paints - brown and yellow;
- cocktail straw;
- cotton wool
- a can of artificial snow.
INTERESTING: Let's make our own Christmas tree from cotton wool
The work process consists of several stages
Preparing the building frame
Place an image of the building details on a sheet of cardboard. Do not allow for gluing at the joints. Cut out each piece separately. Make holes for windows and doors.
Connect the walls using tape. After that, glue the floor with it. Attach triangular roof bases to the sides of the house.
Coat the inside of the resulting workpiece with PVA glue. Glue pieces of newspaper in papier-mâché style over the entire inner surface.
You also need to treat the floor of the house from the bottom from the front side.
Prepare paper straws. For them, you need to prepare rectangles from newspapers measuring 14 cm * 22 cm.
Using a cocktail straw, roll up the newspaper blank. You need to roll diagonally into the rectangle, starting from the bottom corner. At the end, lubricate the top one with glue and fix it on the workpiece.
Cover the base with newspaper tubes.
Cover the outside of the cardboard frame of the building with glue. Attach newspaper tubes to it. It is assembled according to the type of a log village hut.
In those places where the windows and doors are located, we cut the tubes to size. Openings must remain open.
We glue vertical tubes in the corners of the building - this gives the product an aesthetic appearance.
After all the walls and the base of the roof are decorated, you need to coat them with a continuous layer of glue and let them dry.
We paint the workpiece. Cover the interior surface of the house with yellow acrylic paint. Glue openwork fabric to the windows - these are curtains.
Roof and chimney
Using tape, assemble the roof surface from two cardboard rectangles. Glue it to the base. Spread the roof with PVA glue and cover it with pieces of newspaper. Apply glue in a continuous layer and cover with newspaper tubes. They are located horizontally. Cover all the tubes on the roof with glue and let them stand.
After the workpiece has completely dried, treat the outside with brown acrylic paint.
What kind of house is it if it doesn't have a chimney? We prepare the pipe in the same way - we connect it with tape from four cardboard rectangles. We cover it with newspaper like papier-mâché, paint it brown and glue it to the roof.
Final decoration
We place a lush snowdrift of cotton wool on the pipe.
Using a glue gun and a piece of polyethylene, we prepare icicles. To do this, draw them on the film with hot glue. After they dry, we attach them along the entire perimeter of the roof.
Around the house you can place artificial Christmas trees and trees, figures of Santa Claus and snowmen.
At the end, we spray artificial snow from a can on the roof of the house and on the entire composition as a whole.
How to make a candlestick in the shape of Santa Claus's house?
On New Year's holidays, it is customary to decorate your home with garlands, candles and light figures. If desired, it is not difficult to make the New Year's house glow. The simplest option is to place part of the garland inside the craft and think about connecting to the network. You can also use an electric candle or any other battery-powered luminous element. You can also make a full-fledged candlestick. However, if you have a winter house made of cardboard, you should pay attention to fire safety. Use the smallest “tea” candles; in a figure made of flammable material, they can only be placed in heat-resistant glass cups. It makes sense to make a candlestick based on the size of the candle and its stand. The souvenir figurine itself should be larger in size and not heat up.
New Year's roombox
Both Santa Claus and ordinary dolls can live in such a room.
Making a roombox consists of several stages.
Making a frame - the base of a room for dolls
It requires a large cardboard box, which can be bought at the post office. A box measuring 70 * 40 * 42 cm will work well.
Place the box on its side, cut off the top part completely, since the ceiling is not needed. Glue three walls together, leaving the fourth unfastened. It can be opened or closed.
We cover the walls of the room with red wrapping paper. On the floor there is wallpaper with a parquet board effect.
We make furniture
For the sofa, prepare parts from thick cardboard (all in centimeters):
- back 12*15;
- seat 5*14;
- front part of the bottom of the sofa 5 * 15;
- armrests 2 parts 8 * 5.
Cover all blanks with white paper. Attach a piece of lint fabric to the seat.
Then connect the elements tightly. Decorate the finished product along the contour with silver braid.
For the chair cut:
- back 12*7;
- seat 5*6;
- front protruding lower part 5 * 7;
- armrests, 2 pieces, 5 * 8.
Similarly, cover everything with white paper and secure a pile cloth to the seat. Connect the parts. Decorate the finished chair along the contour with a silver cord.
Table details:
- table top 19 * 10;
- lower side parts 2 pcs., 1.5 * 15;
- lower short side strips 2 pcs., 1.5 * 7;
- 4 wooden pieces for legs, 10 cm high, they can be made from sushi sticks.
Cover all blanks with paper. Assemble the table. Glue a beautiful openwork braid along its contour. For a New Year's setting, it is better to use a red ribbon.
Chair blanks:
- back 6.5 * 16.5;
- seat 6.5*6;
- 4 parts 4 * 1;
- 4 wooden sticks for legs, 6 cm high.
Cover the chair parts like the rest of the furniture. Then assemble the product.
Fireplace for roombox
Sketch - download a drawing of a fireplace on the Internet. Place the details on the cardboard. You can change the specified dimensions; a fireplace measuring 19 * 17 will look good.
Prepare the elements of the fireplace and form the craft. Glue black cardboard on the back wall. Cut the grille out of black material. Make a flame from metallized cardboard in fiery shades. Secure it to the back wall and glue the fireplace grate on top.
Cut out 1.5 * 1 bricks from brown corrugated cardboard. Glue them over the entire outer surface, imitating brickwork.
The doll room is ready, you need to decorate it.
To do this, you can use an artificial Christmas tree, figures of Santa Claus and a snowman. Pictures are pasted onto the walls of the room, which can be easily made from bright stickers, postcards and decorative paper.
The Christmas tree can be decorated with small Christmas balls and tinsel. The above describes how to make a New Year's wreath. It can be hung above the fireplace.
A fluffy carpet will be a good finishing touch to your interior design. It needs to be cut from fleecy fabric that remains from the upholstery.
How to make a Christmas tree toy house from cardboard
Until now, we have mainly considered creating different compositions for decorating windows and rooms, but you can make a very small house as a Christmas tree decoration. Watch the manufacturing process in Tatyana Abramenkova's video. The principle is similar to the master class described in the first section of the article.
So, we have a lot of house templates, we know how to make a New Year’s fairy tale with them, so let’s get creative! Good luck to you and pleasant pre-holiday efforts!
- DIY New Year's toys - the best ideas
- Crafts for the New Year: the most interesting and easy
- Making tigers by 2022 from different materials
- DIY snowmen
Throne of Santa Claus
A wonderful craft - the throne of Santa Claus with your own hands will be made with special love. Moreover, if the fairy-tale character himself is sitting on it.
- You need to draw or find on the Internet an image of the future throne.
- Based on the finished sketch, draw the details of the product on paper.
- Cut out paper templates, fix them on a sheet of polystyrene, and trace along the outline with a pencil.
- Using a utility knife, cut out the parts.
- Sand the edges of the resulting blanks with fine sandpaper until smooth.
- Make soft padding on the back and seat, like on chairs. To do this, use a glue gun to first attach the padding polyester to add volume and softness. On top there is red fabric.
- Firmly fasten all the parts together.
INTERESTING: Making spring crafts for kindergarten
The throne is ready, you can put Santa Claus on it and place it under the Christmas tree.
Printable Santa Claus pictures and templates for cutting out
These templates are very convenient to use. They are already part of the finished card or craft. You just need to find a suitable template and print it. All! Cut out, color if necessary and use in your works. Using templates, you can make a postcard, applique, cut out only a part (for example, a head) and glue it to the finished work.
I'll start with the applique of the real Grandfather Frost - I really liked it. Download the template, print it out and cut it out from paper of the appropriate color.
Next are cards in the shape of Santa. All you have to do is trace from the screen or print and color!
Another garland of Santa Claus - cut out the template, apply it to paper and cut it out, color it. We make holes and connect them with rope or tape.
You can make the same garland, but as an applique. To do this, cut out a completely red figure along the contours of the SC.
And then from white paper we cut out a single piece of hair, beard and fur on the coat. And also a separate circle - a balloon and 2 ovals - fur on mittens. A face made of beige paper. And we glue everything together.
If Santa Claus has a long beard on the template , then you can make a NEW YEAR EXPECTATION CALENDAR. The New Year's calendar is made in the form of the numbers of the month of December pasted onto the beard of Santa Claus. Every day you need to close the number, so the child can see how long it will take to wait for the desired holiday. Remember we made an advent calendar, it’s something similar but without the surprises.
And here is a template for an interesting photo frame that can be made from paper and cardboard, or foamiran, or felt. In all cases, cardboard is needed for density.
And here is a template of a moving Santa. We secure the arms, legs and heads with a thread and a button or stick on the back so that the head and arms are movable.
You can fasten moving parts with forked buttons. If you don't have them, you can use flat buttons and wire. To do this, pull the wire through the holes of the button, insert it into the pierced holes of the parts and move apart the ends of the wire, which will hold the connection. Sharp ends can be “covered” with pieces of eraser. Or you can use brads, as in the picture.
Then just different pictures to cut out. I think you already understand how to distinguish Santa from Father Frost. Grandfather has a long fur coat and beard, his hat is not a clown’s, but rather a boyar’s, without a bubo.
Just in case, I’ll give you pictures of colored Santas, in case you don’t have colored paper or the desire to color, but need to quickly make a card.
Fireplace for a winter house
A toy New Year's fireplace will be an interesting addition to the holiday decoration. Fire is a symbol of light and comfort, so it will add a touch of warmth to the interior of the room.
Step-by-step instruction
- The base will be the back wall of the fireplace - a sheet of cardboard. You need to put on it a diagram of the location and fastening of parts.
- We prepare the lower and upper stepped elements - four steps and three, respectively.
In order to prepare the top ones, you need to cut out the parts according to size (all parameters are given in centimeters): three - 18 by 5; two - 17 by 4.5; two - 16 by 4.
There are four steps at the bottom. To make it, we cut out 10 rectangles - 7 of them are similar to the upper parts, plus three pieces 15 by 3.5.
To assemble the steps, glue the layers of cardboard together. You should get seven blanks. Three for the top and four for the bottom.
We cover each step with white paper. After that, we assemble the upper and lower elements from them. We fasten them together.
- We firmly fix the workpieces from below and from above on the rear plane.
- There are columns on the sides of the fireplace.
To make them, you need to cut out two rectangles - height 12, width 10.
Then divide each blank into three equal-width parts and form columns by bending the cardboard. Then also cover them with white paper.
Before attaching the columns to the base of the fireplace, we apply decor to the back wall. To do this, draw brickwork on white paper with a pencil.
When the decor is pasted, we fasten the columns.
All that remains is to prepare and secure the top bar. It is located under the stepped element.
- Width 17, height 3.
- The size of the cubes on the sides is 2.5 by 3.
To finish decorating the fireplace, you need to roll up six tubes of paper, 9 cm high, and glue them to the columns, three on each side.
That's it - the fireplace is ready. You can decorate it with small decorative elements. It will perfectly complement the interior of the DIY Santa Claus House.
Chocolate House
A cardboard house can be covered with anything, even chocolates and sweets! Look how interesting it will look. To do this, sometimes it is not even necessary to specifically cut out a house out of cardboard; it is enough to use a candy box.
Let's watch a detailed video together on how to make such an amazing house with your own golden hands. Are we watching?
Fireplace for dolls with live fire
A small fireplace with a video of a real fire will help create a Christmas atmosphere. You can put it on the holiday table and admire the cozy toy. The operating time depends on the phone charge.
- You need to find a layout diagram with dimensions on the Internet. This is easy to do - use the query window in any search engine. You can also see a sample of the craft there to get an idea of what the end result should be.
- Cut the cardboard blanks into the required shape and glue the edges of the parts. For a better fit, they can be additionally secured with paper clips and masking tape.
- There should be four large parts: the main one - the front side of the fireplace with a window, a stand for the phone inside the product, the upper and lower shelves. Plus two side shelves and stands.
- Assembly - glue the phone stand to the inside of the main part. Secure the top shelf above the front workpiece. Attach shelves at the bottom and sides of the craft, as well as the lower part - a stand.
- Inside the fireplace, along the contour of the hole under the window, glue a frame for mounting the phone. The device must be secured at the rear with a cross bar. Secure it to the side walls of the front part. This bar will fix the phone screen near the fireplace window.
- To decorate the front surface with decorative elements in the form of stones, it is necessary to use polymer clay. You will need two small packages. Roll out the material in a thin layer and cut out the blanks using metal templates. Bake the resulting stones in the oven.
- While the blanks reach the required state, you need to paint the inner frame of the portal window black.
- Cover the entire front surface, except the top shelf, with ready-made stones. When forming the masonry, we leave small distances that imitate seams.
- Cover the seams with a regular primer, which is sold in an art store. It should completely fill the space between the pebbles. You can spread it over the surface using a piece of cardboard. Remove excess from stones with a damp cloth.
- Cover the top shelf with a dense layer of white soil. Apply matte varnish.
- Find a video of fire on the Internet and place the phone on a specially prepared shelf.
A wonderful Christmas product is ready. You can put a fireplace under the Christmas tree; it will warm the whole house with its cozy crackling fire.
DIY Santa Claus made of paper for the Christmas tree (applique)
The Christmas tree toy should be small and light. This is exactly the craft I’m going to show you now. This is an applique that will require some details. When we glue them all into place, we will have a cute Santa Claus.
Cut out in advance:
- the main part is white in the shape of an egg,
- 2 small black circles,
- one middle red circle,
- slightly larger than average white circle,
- red triangle with cut corners,
- and about 20 thin white stripes and one slightly thicker.
Turn the “egg” over with the pointed end down. Glue a red triangle and a hat to the top of the “face” of the DM.
Glue a white circle-bubo on top of the triangle-cap.
At the bottom of the triangle we glue a wider strip. Glue 2 small black circles under Santa Claus's hat. These are the eyes.
Glue a red nose underneath the eyes.
Now comes the real magic! We will use the stripes to make a luxurious beard for Frost.
We wind each strip onto the paste from the handle.
Carefully remove the paper. And so on for all 20 strips. We glue each blank by the very edge to the bottom of the “face”.
All that remains is to glue the loop and you can hang our toy.
Author
The second option is more voluminous and interesting. You will need colored paper, preferably double-sided, if you plan to hang it on the Christmas tree. If you do DM, and not Santa, then simply do not attach the balabon and belt.
We fold the A4 sheet into an accordion and tie it with thread in the middle.
We glue the outer strips of the accordion and get a semicircle.
On the other side we also glue the edges and get a circle.
We make another red and white accordion and glue them to each other.
From one edge we shorten the accordion by 1-2 cm and tie it in the middle.
We make a circle out of it in exactly the same way as from the first accordion.
We fix the circles to each other with glue and a stapler.
Glue a strip of fur - just round the edges of the rectangle. We also make eyes, beard and mustache. If you are making Santa Claus, then make the beard longer.
Attach the belt and you're done!
Author https://www.youtube.com/watch?v=L61DkZ_wBSk
Well, the third option in this menu item is a multi-tiered application. For it we need a paper plate and a grandfather figurine. Bend the plate in half. On one side of the plate we draw a sleigh.
Cut out and open the plate.
We paint it red and make the rim gold. Draw a figure of SK or DM up to the waist. You can cut the finished one from the pictures a little lower in the post.
We draw and cut out boxes with bows - gifts. We color and glue them to each other like a ladder.
We put the character in the sleigh along with gifts. Ready. And the best part is that the craft itself stands on the table.
But no, this was not the last one. Here's another. Remember how we made paper lanterns as children. And if you glue a hat and a face to the flashlight. Really cool idea!
New Year's roombox decor
Making a Christmas tree
- Prepare the materials - buy a five-pointed plastic connector in advance at a regular hardware store. For the base, use a sushi stick. For the branches - leftovers from an old artificial Christmas tree. You can also use a wire Christmas garland.
- Using a glue gun, we begin to attach the branches to the trunk. The crown needs to be formed from the bottom up. To make it thick and fluffy, you need to glue eight branches in each circle.
The interval between the rows is 1.5 cm. We arrange the circles in a checkerboard pattern. In each subsequent row the branches should be slightly shorter. Give the product a pyramid shape.
Decorations for Christmas tree and fireplace
- Balls can be made from beads by hanging them on strings.
- Tie small bows from a bright ribbon - they look great on the Christmas tree.
- Alder cones will be a beautiful decoration. They can be painted entirely or simply brushed over the top, emphasizing the texture.
- Form a New Year's wreath from the remnants of fir branches. Decorate it with balls, bows, cones.
The Santa Claus house craft will be a wonderful addition to the interior and will help complete the decoration of the holiday. A huge advantage is that the financial costs are small, but the results are excellent.
Souvenir or useful item?
Minimalism is all the rage these days, and many people are careful not to buy too many beautiful decorative items that don't serve any practical purpose. Can the “Winter House” craft be not only beautiful and decorative, but also useful? Why not? Take the time to make the roof removable and beautifully decorate the inside of the base box - and you will have an unusual box or even a small hiding place. An interesting idea is to decorate a “house” for tea in a New Year’s style. This craft is easy to make from a liter package of kefir, milk or juice. All you need is to wash the workpiece well and dry it, and then decorate it to your liking. It’s not at all difficult to make such a winter tea house with your own hands. The craft is designed for storing tea in bags and is a worthy alternative to factory-made boxes. Such a house should have a removable roof, and a window should be cut and beautifully decorated at the bottom. Accordingly, the bags can be loaded through the top, and conveniently taken out through the bottom if necessary.
DIY New Year's house made from cotton swabs
Place two cotton swabs parallel to each other on shiny cardboard. We place two more sticks across them. Glue on the triangular roof and add a few more layers of ear sticks. We place Santa Claus inside the New Year's house. We complement the picture with a New Year's landscape made of disks and cotton wool. The cotton swab house is ready.
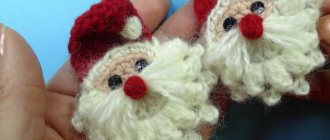
Master class on how to make a Santa Claus toy using the paper-plastic technique
You can make a three-dimensional figure out of paper using a technique such as paper plastic. I'll show you a simple job. It's easy to repeat. But it will be possible to complicate the process, for example, by making a larger craft.
We will need red stripes: 6 pcs. 1 by 15cm and 6 pcs. 1 by 10cm.
From the strips we make 2 balls, a larger one and a smaller one. How to make balls:
- We lay out the stripes like a snowflake, that is, they are all connected in the middle, but their rays look in different directions. Glue the middle. To be honest, after gluing, I also secured them all with a stapler.
- We collect the rays all together, from above the middle and also fasten them (it’s more convenient to do this with a stapler).
We have the torso (larger ball) and head ready.
Cut out 2 red ovals and glue them under the large ball. These are DM's legs.
Cut out 2 small ovals from corrugated white paper (cardboard). Glue it on the sides of the ball like hands.
Cut out an orange circle. Glue small white circles above the middle line of this circle. And inside them there are even smaller green circles. These are the eyes.
Cut out a mustache and beard from white corrugated paper.
Glue the mustache and beard to the bottom of the circle (face).
Glue a small round red ball into the middle of the circle. It can be made by crumpling up paper and rolling it into a ball between your palms.
Glue the face onto the head. Glue the head onto the body. It turned out to be the cutest Santa Claus!