DIY outdoor swings have long become not a luxury, but a necessary garden attribute. They are usually installed in courtyards, dachas, gardens, and terraces. They fit harmoniously into landscape designs and are easy to use.
You can make different types of swings with your own hands. But having little carpentry skills, the easiest way is to make a garden swing from pallets, which are often left over after purchasing building materials. This is exactly what this article will discuss.
Advantages and disadvantages of pallet swings
Many summer residents use pallets for garden furniture for good reason. After all, for their manufacture we use high-quality boards designed for heavy loads.
Therefore, the advantages of swings made from pallets include:
- speed and ease of assembly;
- minimum costs;
- pallets are an environmentally friendly material;
- the ability to assemble different designs, from a simple bench to an ottoman.
Such furniture has only one drawback - the wood is susceptible to rotting, but this problem can be easily solved by treating the pallets with special protective compounds.
Pre-treatment of pallets
Before starting work, all wooden pallets should be subjected to special treatment, which includes the following steps:
- Surface grinding.
- Impregnation with antiseptic, antipyretic and antifungal solutions.
- Primer or stain finish.
- Painting wooden blanks.
Each stage is carried out sequentially and is mandatory to ensure a long service life.
To avoid future problems with exposure to moisture or the development of fungus on wooden structures, it is necessary to thoroughly impregnate the wood with antifungal solutions. An antipyretic will protect the product from possible fire.
Surface grinding involves removing sharp raised edges, smoothing corners, and eliminating uneven surfaces on the workpiece.
Place for a swing
The choice of location for the swing largely depends on the design. So you can make a stationary or portable rocking chair from pallets with your own hands.
Portable swings can be removed at any time and are best suited for small areas or for a summer house where the owners prefer to relax only in the summer season.
The main condition for installing any structure is that there should be no trees or bushes with a dense crown, or walls near the swing. The distance from the swing to the nearest object is the maximum length from the bottom of the seat to the top bar plus one meter.
Important! The swing cannot be placed in the sun, it is better in the shade of trees or, as an option, equip the structure with an awning.
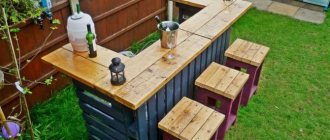
Bar counter
It will decorate a compact kitchen and even a living room. The basic material can be obtained for free, additional materials (paint, varnish, fasteners) are inexpensive, and it can be done in a couple of hours.
Pallets must be carefully disassembled, being careful not to damage the planks. Thoroughly clean and polish the parts. If the room where such a bar counter will be installed is designed in the loft style, the structural elements do not need to be painted, but simply varnished or stained.
From bars and planks we make the base of the stand and the side walls.
We assemble the tabletop and additional shelves on the inside. It is better to fasten parts with metal corners and self-tapping screws from the “wrong side” of the structure.
The open bar counter looks good with LED strip lighting. But if you do not have knowledge in the field of electrical engineering, then it is better to entrust their installation and connection to the network to specialists.
Before starting work, it is important to measure the place where the pallet rack will be installed and create a design drawing for it. It should take into account not only the dimensions of the structure, but also the expected number of guests who will be simultaneously “served” in the home bar.
You can complicate the task by adding shelves for bottles and glasses to the counter. More details in the video:
Types of pallet swings
In addition to the fact that pallet swings can be portable or stationary, they can differ in their design features.
- A bench is the simplest option when pallets are hung on ropes or chains. This swing can be made a little more complicated by adding a back or armrest. Also, the bench can be designed for one place or as a sofa assembled from two or more pallets.
- Bed - the design of such a swing can be presented in the form of an ottoman or trestle bed, if you install sides.
- Suspended playground - children especially like this swing.
In fact, the pallet serves as the basis, everything else is auxiliary materials, thanks to which the design can be made more convenient and original.
What to pay attention to
Before installing a swing in your dacha made from a pallet, you need to pay attention to some points:
- if the boards and beams from which the pallet is made have many defects: cracks, chips, rot, knots, etc., you should not use this container for a swing;
- the same applies if the pallet elements have high humidity and are infected with fungi and mold;
- the tray used must be treated with antiseptic compounds;
- if the swing is assembled from two or more pallets, then under them it is necessary to lay a solid base of boards at least 5 cm thick, please note that suspensions in the form of chains and ropes are attached specifically to them;
- the entire structure of the swing must be sanded, coated with oil or varnish, this especially applies to the planes to which the human body or parts thereof will be applied during operation;
- It’s good if the seat and back are upholstered in fabric with foam rubber or covered with mattresses.
The video shows what else can be made from pallets besides swings:
Pallet swing materials
Depending on the chosen design, the choice of materials will depend. If you plan to make a swing from pallets with your own hands, you will need a strong rope or chains. For a structure on an L-shaped support - racks made of logs, timber or pipes.
For swings on stands you need to prepare the following materials:
- Pallets - the number depends on the type of seat. If it is a bench with a back, then two pallets are enough, and if the seat is in the form of a bed, then four.
- Support - racks made of timber or logs are suitable here, but the best option is a profile pipe, it is more reliable and durable.
- Primer, antiseptic, impregnation are necessary materials to protect metal or wooden elements from the harmful effects of sun, rain, snow, and frost.
- Paint will give the swing an attractive appearance and also serve as an additional protective agent.
- The movable fastener is the main unit of the swing; hinges on bearings are most often used here, but there are other devices, it all depends on the load for which the swing is designed.
- There is no way to assemble a swing without tools, so you need to prepare a saw, drill, grinder, hammer, tape measure, screwdriver and paint brushes.
- A welding machine and a grinder - such tools will be needed if the supporting frame consists of metal profiles.
If the side supports are in the shape of “L” or “A”, then the frame is simply installed on the ground. But if the support is in the shape of a “U”, that is, there will be only one rack on the sides, then for stability and reliability the racks will have to be concreted. This means you will need sand, crushed stone and cement.
To attach the swing itself, you can use a rope or chain. If the swing is light, then the rope will easily support it. But if the structure is assembled from several pallets, then it is safer to use a chain, so the rope will stretch under the weight.
A few words about safety
A garden rocking chair is a rather dangerous design. An improperly secured chain or poorly welded crossbars can cause serious injury. Therefore, when constructing a swing from pallets, a number of requirements must be observed to protect people from possible danger.
When choosing the type of supports, it is better to give preference to the design in the form of the letter “A” with an additional horizontal strut. This design is more stable and reliable.
If the choice is made in favor of a U-shaped support, then the lower ends should be dug into the ground at least half a meter. It is necessary to properly concrete the support columns so that the structure does not fall when it swings.
It is better to use metal chains for hanging seats. They can withstand heavy loads and have high tensile strength.
An example of attaching a garden swing with chains
You can use nylon cables, but they can stretch over time. It is better to avoid ordinary ropes: they quickly fray and deteriorate in the open air (rotting).
Having decided to install such a structure, you need to carefully check the condition of the pallets so that they do not have rotten, cracked or knotted boards.
Installation of the support structure
From the construction of a private house, there is always a beam with a cross section of 100 by 100 cm; it can be used as a support for the entire structure. Here you will need two posts for racks 3-3.5 m long and one beam for a horizontal crossbar 2 m long.
If the place for the swing has already been chosen, then you can proceed with installation:
- Using a garden drill, we dig holes 0.5-1 m deep and 20 cm in diameter from the supports at a distance of 2 m.
- The lower part of the supports is treated with bitumen mastic and wrapped with roofing felt.
- We install the pillars in the holes, align them exactly vertically and fill them with concrete mortar.
We leave the supports for a day so that the concrete sets well. Then we attach a horizontal crossbar to them. This can be done using steel angles with self-tapping screws or bolted connections with pre-drilled holes.
Preparation of the drawing
Having decided on the furniture option, you should start making the drawing. The diagram should show the following aspects:
- Eurobook sofa - 130 photo recommendations on how to make and assemble a comfortable and compact sofa
Assembling furniture with your own hands - 105 photos and a detailed video of how various furniture elements are assembled
Do-it-yourself bookshelves - ideas for building shelves and shelves quickly and easily from scrap materials (155 photos and videos)
- Product dimensions: height, length of the tabletop (if available), width of the structure.
- Form.
- Fastening mechanisms.
- Auxiliary devices.
Supporting structures can include drawers for a chest of drawers, soft mattresses for a garden sofa, or a support structure for a dining table.
Assembling a swing
If the swing is in the form of a bench, then there is no special assembly. The pallet needs to be sanded, treated with protective agents, painted if desired, and then simply hung. Here the question is different - how to securely and safely secure it.
You can hang the pallet on a nylon rope with a thickness of at least 12 mm. We simply tie the pallet, bring out the ends, which we attach to the supporting structure. But a more reliable option is to wind and bring the ends to one point, followed by fixing two ropes, as in the step-by-step photos.
Another method with ropes, here you will need two pieces for each side. We wrap the pallet with one rope, the crossbar with the other, and then we connect the two sections with a carabiner. This method is convenient because the tray can be removed at any time.
The most reliable option is to hang the pallet on steel chains, which will last for decades. It is important to choose the size of the chain links here, but even the smallest parameters are designed for heavy loads. To attach the chains to the pallet itself and to the crossbar, you will need a special fastening in the form of a bolt and nut. You can recognize such a bolt by its hook- or ring-shaped head.
To attach the chain, you need to drill holes in the support and in the pallet, insert the fasteners and secure with a nut on the back side.
Bedroom
In the bedroom, on a bed made of pallets, you will have creative dreams. We promise! A large double bed will require eight pallets and a comfortable mattress. Easy, simple and fast.
By disassembling the pallets into their components, you can construct an original bed from the resulting boards. Use transportation boxes to store things and bedding.
The pallet can be placed instead of the head of the bed. And this will kill two more birds with one stone - a shelf on top and a place for attaching lamps.
Swing with backrest
For greater convenience, you can make a swing with a backrest. To do this, you will additionally need three boards 20-30 mm wide, but their length depends on the position of the back, that is, how comfortable it will be on such a swing. The back can be made vertical, but it is better to set it at an angle of 30-45°.
- First of all, we dismantle the top board of the pallet, that is, the one located at the very edge of the structure.
- We insert three boards into the opening at an angle and fasten them with bolts. This will be the base of the back.
- Now we nail 20 mm thick boards across the base at a distance of 5-10 cm, but the back can be made without gaps, that is, solid.
For the back, you can use a smaller pallet; taking into account the height, we cut it across and attach it directly or at an angle to the base.
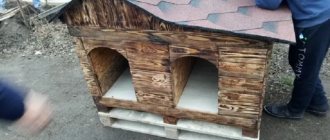
Flowerbed
As the first way to make DIY crafts from pallets for your dacha, let’s consider a flower bed. For this craft you will need at least 4 identical, square-shaped pallets. In order to form a strong flower bed from them, you will need:
- 4 pallets;
- Nails;
- Hammer;
- Paint, optional.
First you need to prepare the pallets. If there is no need to decorate or stylize them, you can limit yourself to standard sandpaper processing. Next, when all the corners have been processed, you need to assemble the frame. To do this, you need to connect all 4 pallets so that they form a hollow cube.
After this, the cube can be placed in the country house or on the balcony. It is quite possible to place flowers and seedlings inside the cube. If the flowerbed is located on the balcony, then you will need 5 pallets, one of which will serve as the bottom. It needs to be covered with a durable film to prevent soil from seeping through the cracks between the boards.
Useful tips
Making a swing from pallets is not that difficult, but it is still worth listening to some tips.
- Old pallets must be sanded, as after use, sharp areas, chips and cracks form on them. All this can be traumatic. After sanding, the pallets need to be treated with protective agents and painted.
- For a comfortable rest, you can sew pillows, a mattress, but the back can be upholstered with thick foam rubber and then covered with a tarpaulin.
- If there is only one pallet, then you can make a swing in the form of a bench. To do this, we cut the pallet in half, connect it at an angle, and use the remaining jumpers as a support for the armrests.
- If the swing is in the form of a bed, then it is better to make it not flat, but with sides.
- For children, such a swing can be hung directly on a tree, the main thing is to find a strong branch.
It is better to make the swings collapsible so that you can store them in the shed in winter and thereby extend their service life. As an option, the seat will be removable, and the supports will winter outside.
Making a swing with your own hands from pallets is not so difficult, a little time, effort and a comfortable place for adults to relax and children to have fun is ready.
Post Views: View statistics 528
Recommendations
Swings are more in demand by children than by adults. The design should not only be beautiful, but also safe. A few recommendations will help make this an attraction:
- Pallets are designed for transportation of goods. They are subjected to heavy loads, which causes defects to form. Before use, check the integrity of the boards and the strength of fixation to the internal jumpers.
- Shields impregnated with chemicals and other substances that emit unpleasant odors should not be used. You won't be able to get rid of them even after painting.
- Pallets are heavy. Reliable support is required for hanging.
- For ease of riding, a canopy is being built. The roof will protect from the scorching sun and light rain.
The base of the roof will be the pallet as a whole or one layer of it
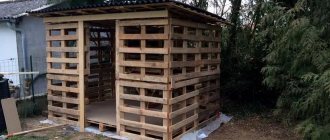
Terrace
For this craft from wooden pallets, you will additionally need timber to create a full-fledged terrace. This method can safely be called budgetary, since the pallets after construction remain free of charge; as a rule, they are not taken away or thrown away. The only expenses will be the purchase of timber and consumables such as varnish and paint (if necessary).
The terrace is an extension to the main building. Therefore, it is necessary to create columns in the far corners, as well as along the wall of the main building. Where the roof touches the main structure, small supports located at an angle are used. They are attached to the columns, and the columns themselves are attached to the main structure.
Note!
Christmas crafts - how to make them yourself? 150 photos of the best themed crafts- Crafts made from stones: creative options for crafts made from stones + step-by-step instructions for making your own, methods and schemes of work
Crafts from disks: a step-by-step master class on how to create them yourself, creative ideas for crafts of varying complexity + simple patterns for beginners
In this way, it is possible to achieve maximum strength and resistance to weather conditions. Ordinary construction pallets, laid out in layers, are also used as the roof and floor. Next, timber is laid on the floor to eliminate gaps between the boards, ensuring greater strength and a more aesthetic appearance.
The roof is placed on top of the pallets to prevent leakage during rains. Or covered with a waterproof film.
Shelves
Pallet crafts are, in fact, widely popular among men. The pallets themselves are primarily intended as a convenient platform for moving cargo using a forklift. However, due to their structure, they can be used for slightly different purposes.
Many pallets have quite large gaps between the boards. These are most suitable for homemade shelves. As in previous cases, security must be taken care of first.
Next, you need to mark the pallets with a pencil, noting where everything will be located. If necessary, the markings should also include new holes that are planned to be made.
If we are talking about a garage shelf, then it is quite simple. As a rule, a wall is used as a placement location. This allows you to significantly save space, given that most garages are small.
Various types of hooks are used for fastening. The design of the pallets makes it easy to hang them on them without installing any additional devices.
The crafts themselves made from pallets can be used as a solid shelf, or as a surface for placing various items. In the first case, there is no need to redo anything. In the second, it is necessary to leave that part of the surface that has the most frequent arrangement of boards. Next, appropriate mounts for tools are mounted on them.
Sofa
Flight crafts can also be styled to suit everyday life. For example, create a sofa.
For this you will need:
- Pallets 4 pcs;
- Hammer;
- Nails;
- Sandpaper;
- Dye.
With the help of these items you will be able to create a strong base for a unique sofa, which at the same time will be very light and mobile.
Having sanded and cleaned all the unevenness and rough surfaces, you can begin to fasten the pallets together. The classic design is an arrangement of pallets in 2 layers, on top of each other. This will ensure sufficient height, strength and reliability.
Note!
Crafts made from polymer clay | Step-by-step master class on creating beautiful crafts- DIY epoxy resin crafts - options for original crafts, step-by-step instructions for pouring and making them yourself
Lego crafts: step-by-step master class on creating simple DIY crafts + original versions of Lego products (photo + video)
After the structure is fastened with nails, it is necessary to clean the problem areas again, then cover them with paint and varnish. In fact, at this stage the construction of the sofa ends. The base is placed near the wall to make it convenient to place pillows without having a backrest on the sofa. A mattress and pillows are laid out on the base.
If desired, you can select a separate area on such a sofa, on which, for example, a flower pot or a frame with a photograph will be placed. To do this, at the assembly stage, you need to measure in advance the distance that will be needed for the mattress. Next, install partitions to securely fix it.
In a separate area it is necessary to lay out a PVC sheet, secure it and paint it along with the structure. This will allow you to achieve the effect of a built-in mini-table or stand. If desired, you can create backrests and armrests in the same way.