A small shed at the dacha is a necessary object. You can store gardening tools, tools, some household items not used in winter, and so on, so on, so on. Today, many summer residents use wood heating. So the barn is often used as a storage for firewood. In this article I would like to talk about a woodshed made from pallets, as a type of shed. Why pallets are so well suited for the construction of small objects, the savings from this construction, as well as the technology for constructing a woodshed.
Wooden pallet shed Source pinterest.pt
Advantages of private pallet production
The main advantage of this business is that you will have to produce wooden pallets that are in demand in the market. There is no point in producing unique products that will be extremely difficult to sell. You need active turnover so that you can grow your business and increase its profitability. Even wooden pallets are always needed. There is no such moment when the market is oversaturated with a given product and supply exceeds demand. This suggests that it will be possible to work at full capacity and sell goods easily.
Another very important advantage is that you can work with wholesale buyers. The main point here is that wooden pallets can be supplied to large warehouses, various industries, shopping centers, etc. If you work with a wholesale buyer, you can significantly scale up the production of pallets. Focus on the process of making pallets, and not think about where to sell the next batch of finished products. One large warehouse can place a large order for you, which will load the production of pallets to the maximum.
House
In order to build an entire house, even of the smallest size, you will need a considerable number of pallets. But it is the cheapness of pallets that encourages construction.
When the pallet is in your hands, it needs to be divided into two parts: the thicker base boards will be useful for the frame of the house, and the crossbars will serve as walls. This procedure is the most boring and quite tedious in the entire construction process.
To reduce the cost of construction even more, you need to take the stage of disassembling pallets responsibly, using a nail puller, without compromising the integrity of the wood. These nails can be reused, which will save money. Next, we take measurements and outline the contours of the future house on a previously prepared plot of land.
All work is carried out in the following sequence: first, the base is laid out and secured, after which parallel logs are installed, on which a sheet of chipboard is laid.
After this, vertical supports are installed to form windows and doors. The construction process is completed by the roof, which is also made of boards. With all the supports and frame in place, it's time to take care of the sheathing. Pallet boards are attached to the joists using nails or wood screws, controlling the level of their position relative to the axes of the guides.
The roof is additionally covered with a layer of roofing material, making the top layer of tiles
This will protect the house from moisture and precipitation, which is especially important for wood. When the pallet house is completely ready, it is necessary to treat the wood with an antifungal agent and also paint it
The paint will protect the house from premature rotting, as well as damage by small insects.
Even for such a small structure, a project is required, on the correctness of which the result of all the work will completely depend. You can order a project from specialists if your own drawing skills leave much to be desired.
Blocks for building walls
It is convenient to erect small buildings from blocks, each of which consists of two boards from 1 to 2 m long. Short trimmings (liners) are nailed between the boards, which are always available in abundance during any construction. The length of these liners does not matter.
For blocks intended for the construction of walls, liners are installed on one side just above the edges of the boards. They form protrusions, a kind of ridge. On the other side of the block, the liners are recessed relative to the edges. The ridge of one block, inserted into the groove of another, forms a reliable connection, similar to the connection of tongue and groove boards. The same principle is used when constructing the corner and intermediate posts of the frame.
To save on expensive long materials with a large cross-section, they make a kind of “sandwich”. Blocks from pallets are installed on the inside, and long boards are placed on the outside, strengthening the structure. Before building a house from pallets, you should prepare the required number of such wall elements.
In particular, this is done when installing the lower and upper trim or rafter system.
Look at the house you built from pallets with your own hands - the photo illustrates all the stages of its assembly:
Country house made of pallets for 50 thousand rubles
There are many examples among self-builders who start building houses on their site from a bare field.
Coming every day is tiring, especially if the site is located tens of kilometers from the city. There is nowhere to hide in the rain. Stay overnight too. But I want to come on the weekend and devote full days to construction. Where can I stay overnight? Especially with family. A tent is not the most comfortable option. Some make temporary housing, small summer frame trailers. This is what my neighbor did:
I made a deck for used tires, installed a frame and covered the outside with OSB sheets. Probably purchased used windows from advertisements, a couple of sheets of roofing material and polycarbonate (for the veranda of this house). I spent nights in it with my family on weekends (and even in winter) while I was building a house. Once the construction is finally completed, he will sort it out.
But for the frame you need to buy boards and spend a lot of time building this frame. I came across an example where a self-builder built a country house from used pallets:
The frame of the building and the roof are installed in one day. On the roof, the author used inexpensive roofing felt. Perhaps, when he has the finances, he will cover it with something else.
The frame was covered with OSB sheets. It's unknown what's inside. Can be a planed board. There were also pallets left for part of the fence.
Where can I get so many pallets and, most importantly, should it be free or as inexpensive as possible? First of all, let's look at the advertisements:
Used pallets are sold at a price of 150-200 rubles. They buy it for 100 rubles/piece. For the house (you can count it in the photo) the self-builder took about 33 pallets (including one window and entrance opening). This is a maximum of 6600 rubles. He laid another material on the floor - shown below in the photographs. Plus delivery.
But you can go another way. If someone is building a house from blocks nearby, then the pallets remain there. Not everyone has the opportunity to remove them from the site and sell them (you need a trailer or your own truck). Buy for 50-100 rubles/piece. You can take it from them or take it for free (if you agree).
You can follow the steps in construction in these photographs:
Construction materials were delivered and the piping was done with used timber (there are two timbers inside the perimeter). The sides of the power cable reels are laid as the base of the floors. Sand-cement blocks (cinder blocks) are used as the foundation. About 14 pcs. = 560 rub.
The process of constructing a frame. You can tighten the pallets with self-tapping screws (not black ones - they are fragile). The door is used or you can make it yourself from pallet boards. Even in advertisements on Avito, doors are often given away free of charge with pickup. You can take it out on the roof rack of your car.
Semi-final view of the house. Semi-final view of the house.
We count the costs. In addition to pallets (with costs from 0 rubles to 6600 rubles). Let's take the average option - 3300 rubles. You will need lumber for the roof, walls and floors. Let it be 2 m3 of boards (18 thousand rubles) and OSB sheets. Approximately 18 sheets (800 rub./sheet) = 14,400 rub. Ruberoid - from 300 rub./roll. Two rolls: 600 rub. Windows and doors are free. Fasteners, screws. Let there be another 1000 rubles.
Total: 42,500 rub. Taking into account the delivery of materials and unaccounted costs, we will round up to 50 thousand rubles.
Yes, the house is not insulated. This is a summer housing option. For many summer residents, only the warm season is enough. If the house is not immediately sheathed from the inside, but insulated and laid with steam and windproof films, then the building can be turned into housing for year-round use. True, without communications such as water and sewerage. But these are other costs...
DIY furniture from pallets: preparatory stage
If you receive used pallets, you must first clean them of dirt and dust, and then clean the surfaces. You can save on your labor costs and process only those boards that will come into contact with people during operation. It is advisable to use a grinder to perform this work.
Preparing tools for work
Before starting work, you need to prepare the following tools:
- screwdriver and drill;
- nail puller;
- hammer, screwdrivers, screws;
- glue;
- primer, paint, varnish;
- tassels.
This is the basic set of tools; if additional equipment is needed for any work, we will definitely remind you about it.
A nail puller is necessary for dismantling pallets
Features of choosing pallets
The final version will depend on the quality of the pallet; its choice should be taken with due care. To do this, you need to know that under the general name there are several classifications that differ not only in size, but also in condition and appearance.
Basic rules for choosing pallets:
- structures must be intact, without cracks or signs of rotting boards;
- Pallet marking:
- IPPC means that the wood has been processed in accordance with international safety standards;
- NT and EPAL – processing was carried out under the influence of high temperatures;
- MB and EUR cannot be used for the manufacture of home furniture. Chemical compounds were used to prepare the wood.
EUR marking is undesirable for residential and office premises
Pre-treatment of pallets
The pallets should first be prepared for use. To do this, all boards are cleaned and sanded so that no one is injured during operation.
If subsequent work requires not whole pallets, but individual elements, they are disassembled and sorted by size. It is advisable to treat the boards with a special compound at this time; this is especially recommended if the products will be located outdoors. Otherwise, by the end of the season, the wood will acquire a grayish tint, and the process of rotting will begin in areas in contact with the ground.
A sander makes it much easier to polish boards to perfection.
Building a bathhouse box, main stages
Prepared pallets must be stored under a canopy and carefully inspected; boards with cracks, chips, doused with unknown liquids and with traces of fungus must be thrown away. Typically, pallets are disinfected and branded, but it is better to buy wood bleach and treat it again, rinse and dry. All parts of the future bathhouse must be treated with the fire-retardant and antifungal emulsion Senezh.
Photo
Also, to equip your garage, you will need to buy metal cabinets for tools, shelving, workbenches and other garage equipment that will fit into the interior of the garage.
Cinder block is a relatively inexpensive material with excellent performance and properties. If desired, you can build a wonderful garage out of it without involving third-party workers. How? Now we'll tell you!
Self-construction of a cinder block garage begins with a number of important preparatory activities. Follow the given sequence.
Selecting a location
First of all, we choose a suitable place to build our motorhome. It’s convenient when the garage is located next to the house - in bad weather you won’t have to get wet in the rain and wade through snowdrifts.
It is better that the garage is located at a minimum distance from the exit from the site. The number of turns should be minimal. It is not recommended to build a cinder block garage in a low-lying area, because... this threatens flooding with atmospheric and groundwater.
Be sure to make sure that there are no communication lines at the planned construction site, such as:
- water pipes;
- power lines;
- sewerage and heating pipes.
If the listed communications break down in the future, the presence of a garage will significantly complicate their repair.
Make sure that when constructing a garage in the chosen location there will be enough space for opening the gate. It would be useful to have a free space to park your car during washing and other work.
Construction site marking
Having chosen a suitable place to build a garage from cinder blocks, we proceed to marking the site. At this stage you will need a small set of auxiliary tools, namely:
- reinforcing bars or other similar devices;
- hammer for driving rods;
- dense thread for pulling between pegs;
- tape measure for measurements.
Before starting marking work, you need to accurately determine the dimensions of the future structure. At this point, focus on the following factors:
- available free space on the site;
- financial opportunities;
- individual preferences and needs.
If a cinder block garage will be used as a place to store a standard-sized car, a structure measuring 6x4 m and a height of 2.5-3 m will be enough for you.
The six-meter length is due to the dimensions of the car (on average 4-5 m) with a half-meter margin for unhindered passage. The width of the car is on average 200-250 cm. Approximately 70 cm should be left for passage, installation of shelving and storage of various types of materials used in the garage.
If you wish, you can adjust the dimensions of the building at your discretion. There are no strict restrictions or standard dimensions for cinder block garages.
Calculation of cinder block
Having chosen a place for construction and determined the optimal dimensions of the garage, we begin to calculate the materials. Treat this stage of work with maximum responsibility. Due to errors at the calculation stage, you may simply not have enough materials, or you may waste money on unnecessary blocks.
The calculation will be considered using the example of a garage with dimensions of 6x4 m and a height of 250 cm. The masonry is carried out according to the most common method - half a block. Gate dimensions – 300x230 cm.
The dimensions of one block are standardized - 39x19x18.8 cm. Based on this, 13.6 blocks will be needed to lay 1 m2. You will build the entire building from 586 elements. Typically about 5-10% of the material is added “for reserve”. If the design provides for additional doors and window openings, take this into account when performing the calculation.
You will also need to buy rubble stone for arranging the base, several beams made of metal or wood (in the case of a garage of the specified dimensions, five 430-centimeter x beams will be enough).
Don’t forget to buy concrete for pouring the foundation or components (cement, sand and crushed stone) to prepare it yourself.
You will also need material for the finishing coating of the roof. When choosing it, be guided by your preferences.
Buy concrete or prepare it yourself. Standard proportions:
Design of a change house
A barn is a stationary building that should ensure the safety of country tools, personal belongings and other similar items. Based on your own preferences and free space on the site, you should determine the desired dimensions of the building. Ideally, the length, height and width should be multiples of the pallet dimensions.
In this case, you will not have to cut the elements.
You may also be interested in construction technology.
Example: if pallets of 120x120 cm are available, then the optimal dimensions of the barn are 480 (L) x 240 (W) x 240 (W). You will need 24 pallets for the walls and 8 for the floor.
It is better to make the ceiling covering from boards. Also, boards will be needed to fasten the pallets together. And it is recommended to use timber 100x100 or 150x150 cm as the lower, upper trim and corner posts.
For construction you will also need: sheets of moisture-resistant plywood, fasteners, a screwdriver, vapor barrier film, insulation, fire-retardant impregnation, roofing material, roofing felt, bitumen mastic.
Calculation of approximate costs, prices of materials
Moisture-resistant sanded birch plywood:
- 8x1525x1525 mm – 550 rubles per sheet;
- 12x1220x2440 – 1050 rubles per sheet.
A set of doors with fittings or a gate for a barn can be purchased for 1-5 thousand rubles. Ruberoid costs about 300 rubles. per roll, bitumen mastic - from 270 rubles per container weighing 16 kg.
Materials for the roof and foundation arrangement will cost 2-5 thousand rubles. Mineral wool (8 pieces per package, 1,200×600×50 mm) costs from 65 rubles/m2 or 385 rubles/pack. Izospan (vapor protection) costs approximately 1,650 rubles/roll (70 sq.m).
We start with preparing the material
Pallets are often used to create various furniture, not only because it is a durable and reliable material. You can do many different things with it: glue, cut, decorate, paint, sand, upholster and so on.
In order to create high-quality and beautiful fittings, you first need to carefully prepare the material. It needs to be cleaned of dust and dirt. To do this, you will need a sanding machine; it will polish the pallet well, and also remove excess knots, etc., to make the furniture safe for children and all family members. For safety reasons, this procedure should be carried out wearing protective glasses and gloves, as well as in a well-ventilated area or outdoors.
If desired, you can not process the entire pallet, but only some of its parts that will be involved in the creation of fittings. For example, all flat surfaces that will be painted or covered with fabric.
If this is furniture made from pallets for a summer residence, then it must be protected from moisture and fungus. To do this, you will need a primer with a water-repellent effect or another wood treatment product.
Garden furniture made from pallets Source pinterest.com
Recommendations
It is best to line the outer surface of the shed walls with clapboard or siding. This will not only improve the appearance, but will also make the entire structure stronger at the same time. Often a situation arises when there is simply not enough money or time to build a shed in one go. In this case, the box of pallets can be treated with drying oil and covered with polyethylene.
If the shed is built on a foundation, then the box can be sheathed with clapboard without fear. For free-standing buildings, the walls are usually not lined in a continuous plane, otherwise the wind will topple the barn
If the barn had to be built without a foundation, then the walls cannot be covered with finishing until partitions or spacers are installed inside. Otherwise, a powerful gust of wind in winter can easily collapse the entire structure like a house of cards.
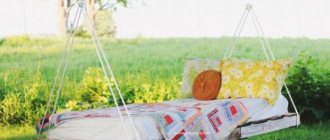
Bed
Looking at the photos of handmade crafts made from pallets, a rather simple bed design catches your eye. It is identical to the design of the sofa, except that it does not require a back and armrests.
The simplest option would be to place a mattress on pallets, at which point the construction of the bed will end. However, if you wish, you can create an internal compartment in which various things will be stored.
Initially, you need to fasten two lengthwise pallets together (any other required quantity). In this case, place the pallets upside down, so as to have access to the hollow parts. Next, you need to remove the middle boards, thus creating a kind of compartment. On its sides you need to create walls from previously removed boards.
Next, fasten 2 more pallets in the same way, but with the hollow part down. Fasten both parts of the pallets on one side with furniture hinges so that the structure opens like a chest. Next, process, coat with paint and varnish. As a result, we have a fairly simple, durable bed design with an internal compartment in which you can store bedding and other bedding.
Door installation
The door to the barn can be made from an edged board, nailing it on both sides to a rectangular frame made of bars. It is better to assemble the door frame from high-quality lumber, securing the structure with long self-tapping screws and polyurethane foam. Once the box is secured in the opening, all that remains is to screw on the hinges, door handle, and locking hardware (such as padlock lugs).
What kind of cellar can you build in your country house? Read the article on our website.
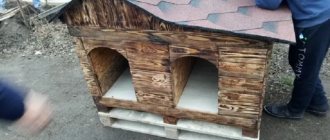
We build an enclosure for a dog on a personal plot with our own hands.
How to install a plastic utility unit? The answer is in the article.
Decor options
Pallet furniture, even carefully constructed, will have a rustic appearance if it is not decorated. There are a lot of ways. For finishing you can use:
- coating with paint, stain;
- varnishing;
- pasting with self-adhesive film;
- finishing using decoupage technique;
- decoration with fabric, lace.
It is recommended to choose the most expensive paint. It gives a noble and respectable look to the roughest boards. Drawings and ornaments can be applied using stencils. The striped pattern is made using masking tape.
Furniture varnish can be transparent or colored. The first will emphasize the texture of the wood and add a bright or matte shine. The second will help to tint the pallets to match the color of other interior items.
If furniture made from wooden pallets will be placed outside, the decor should not be “afraid” of moisture, wind, low temperatures, or heat. Products that will be in the house are decorated with fabric and pillows. The seats of sofas and armchairs can be upholstered with foam rubber, covered with leatherette or matting on top. Convenient removable covers. They are made from easily washable fabric to match other existing furniture in the house.
Typically, summer residents use old pallets to light a fire. But if the owners have a need for furniture, it is irrational to burn them - you can make practical things that will last for many seasons and cost almost nothing. Photos of step-by-step making of furniture from pallets with your own hands will help beginners decorate their cottage beautifully and comfortably.
PaintingVarnish treatmentPasting with self-adhesive filmUsing the decoupage techniqueDecorating with fabric
What types of woodburners exist: photo
Depending on the size of the dacha area and the climate of the region, you can build different woodsheds.
Photo 1. A wooden woodshed attached to the wall of a country house is small in size.
By location they are divided into:
- attached;
- standing separately.
Photo 2. A large woodshed, standing separately on a summer cottage, holds a lot of firewood.
By design:
- closed;
- open.
Photo 3. A spacious open-type woodshed, located on a summer cottage, installed on concrete.
The advantages of attached options are their proximity to the stove, but at the same time they must be isolated from housing. Those standing separately are safer: wood bugs do not enter the house, and in the event of a fire, the fire does not spread to the home. Closed structures are good because they receive less precipitation. But open ones are easier to build and carry firewood from.
Advantages and disadvantages
In recent years, pallet sofas have steadily become a trend. They can be found in the apartments of many craftsmen. A pallet or pallet is a special type of container that looks like a platform assembled from boards and is intended for storing and transporting large cargo. More recently, such furniture was considered suitable only for arranging a garden, since it had a modest appearance and primitive design. Today, simple materials are used to make household items that are not inferior in beauty and originality to products made from solid wood.
The main feature of a sofa made from wooden pallets is its ease of production. The second distinctive feature that makes it popular among a wide audience is its favorable price-quality ratio. Such furniture has many competitive advantages. Its main advantages:
Environmental friendliness. The raw material is natural wood. The products are safe for human health and pets, so they can be safely used to make furniture not only for the living room, but also for the children's room. Budgeting. Making your own sofa from pallets will save you a significant amount of money.
If we take into account that it takes 8-10 pallets to assemble a sofa, and consider that the average cost of packaging is 80-120 rubles, then we get an attractive amount of 1000-1200 rubles. Strength. Pallets weigh 15-20 kg and can withstand a weight of 700-800 kg, which makes them an ideal material for the manufacture of large furniture. Diversity
Sofas made from pallets are the easiest way to add a touch of uniqueness to your home. They are made to individual sizes and decorated to the taste of the owners. Ease of use. There are several standard sizes of pallets available on the market, making the job easier. The finished product does not clutter up the space, which is especially valuable for a small room, both in the country and in a country house. Versatility. A sofa made from pallets has a special appeal, adds natural warmth to the interior, and becomes its highlight. It easily fits into popular styles - loft, eco, Scandinavian; turns into a decoration for a home designed in a rustic aesthetic (Provence or country).
Despite its practicality, furniture made from pallets is not without its drawbacks. The most significant disadvantages:
- Additional preparation of materials. Even new pallets will have to be cleaned of dust and dirt.
- Treatment. The structures originally intended for warehouse needs do not have a flat surface. Many people wonder how to make pallet sofas attractive. To make the furniture look neat and elegant, careful sanding is used, followed by wood processing.
- Protection. The material needs antiseptic treatment, otherwise, with a high degree of probability, bugs will appear in the fashionable sofa.
- Additional expenses. The product is given a presentable appearance by covering all the wooden parts of the future sofa with varnish or paint.
This is interesting: Choosing a desk for two children - summarizing the essence
Manufacturing schemes
After processing the pallets, you can begin to assemble a thoughtful rack design and do it yourself. First of all, we suggest looking at the simplest option. To work you will need:
- several pallets;
- wooden slats;
- holders;
- brackets;
- roulette;
- scrap;
- saw;
- sander;
- sandpaper;
- self-tapping screws
Well, now the work process itself.
- It is necessary to disassemble the upper part of the pallet. Crowbar will come to the rescue.
- The removed boards must be sawn. In this case, several lengths will be required: 9 boards of 110 cm, 2 boards of 45 cm, 2 boards of 25 cm.
- Sawed elements must be sanded.
- 110 cm boards must be laid close to each other. To add uniqueness, you can shift the lengths of the boards slightly up or down.
- Slats are installed perpendicular to the boards and screwed with self-tapping screws. Each board must be screwed to the joint support.
- It is necessary to turn the workpiece over and install pairs of brackets in three different positions.
- 45 cm boards are fixed to the first pair of brackets.
- 25 cm boards are fixed to the two remaining pairs.
- The finished rack must be painted or varnished. Hanging elements are attached to the slats located on the reverse side, allowing the structure to be mounted on the wall.
Next, we propose to consider another interesting option for a rack, which is a bookcase. To work you will need:
- several pallets;
- sandpaper;
- furniture nails;
- saw;
- sander;
- scrap;
- self-tapping screws
Manufacturing process.
- It is necessary to disassemble the upper part of the pallets.
- Use a sander to give the boards a smooth surface.
- Cut the prepared boards to make 24 bases 20 cm long. They will be shelves.
- It is necessary to cut several boards into 24 pieces 25 cm wide.
- The assembly of blocks begins. You will need to measure the full length of the boards and put a mark at the midpoint. Screw 25 cm pieces at the ends of the board. The same is done at the midpoint.
- Take the next long board and fix it on the other side. This creates a long section with a shelf located at the midpoint. Using a similar scheme, 3 more identical frames are made.
- The creation of smaller blocks begins. 2 boards are folded together, aligned as close as possible. Next, measurements are taken and division into 3 identical segments. Small blanks are screwed to the ends of the boards, and the same ones are placed inside the section. Several more frames are assembled using a similar scheme.
- Next, one section is connected to another, preferably offset, to give the design more originality.
- Larger workpieces are attached to small sections.
- Thus, the original design is assembled. The final stage involves painting the rack or coating it with varnish.
Article on the topic: How to cover a gazebo with siding
How to make a rack from pallets for a garage, watch the video.
How to choose pallets for furniture assembly?
Furniture made from pallets has been so popular for many years now that even famous designers include it in their collections. The biggest advantage of pallet furniture is that its cost is absolutely low, and the convenient shape of construction pallets allows you to easily create almost any piece of furniture from them.
A standard pallet weighs about 15 kilograms, the exact weight depends on the size of the product. The most common pallets have the following dimensions:
- 120x100x12 centimeters (standard);
- 120x80x12 centimeters (euro).
Pallet appearance
Another advantage of pallets as raw materials for furniture is the strength of the wood from which they are made. The fact is that a standard pallet is designed to carry a load of about a ton, so after transportation most of the pallets look completely new and do not have cracks, chips or deformations. Such pallets are fully suitable for “living” a second life and becoming functional household items.
You can assemble a variety of designs from pallets
Why are Euro pallets better?
Euro-size pallets are used for exported products and therefore must undergo phytosanitary treatment. Unfortunately, Russian “standard” pallets do not have strict requirements for phytoprocessing, and therefore are less reliable and durable.
Table 1. Why is herbal treatment needed and what types does it come in?
| Type of processing | Why is it needed, description |
| Kiln drying | The lumber from which the pallets will be made is dried in a special sealed chamber at a temperature exceeding 60 degrees. The chamber is configured with a continuous circulation of air flows, which allows you to obtain completely dry wood that will not rot, but will not crack. Chamber drying allows you to balance the structure of the pallets in such a way as to ensure maximum strength, including fracture resistance. |
| Heat treatment | The assembled pallets are kept in a thermal chamber for a long time. The increased temperature allows not only to dry the wood, but also to destroy pathogenic microorganisms and pests. But, such treatment does not allow the pallets to be evenly heated and dried, so the quality of the pallets may suffer. |
| Treatment with fumigates | Pallets or raw wood are treated with bromine methyl, which destroys bacteria and living microorganisms. However, after processing, a certain amount of toxic substance remains in the wood, so such pallets are not used for transporting food or children's goods; accordingly, it is undesirable to install furniture from such pallets at home. In a garage or workshop, such pallets are quite appropriate. |
Marking is applied to the left side of the pallets
Where can I get pallets?
Since pallets are used for cargo transportation, they can be found in the warehouses of transport companies, as well as companies producing various products. Often, after the cargo is delivered, the pallets are no longer needed and are simply stored away, taking up space. Accordingly, you can try to negotiate with the company that the pallets will be given away free of charge, but with the condition of pickup.
The maximum “lifespan” of a transport pallet is two transportations, then it is disposed of
There are other options for obtaining shipping pallets. Brand new ones can be purchased from the manufacturer itself; used ones can be purchased through ad sites. A pallet seller can be found in any city; the average price of one piece is about 200 rubles (depending on size and condition).
Garage Organizer Shelves
A garage is a room with a huge number of small parts, sets of wrenches, and replacement tires. Often, owners store carpentry equipment in the garage walls and set up their own creative workshops (wood burning and carving, metalworking machines). Original shelves and racks, assembled from wooden pallets with your own hands, will help keep the room tidy:
- All pallets should be sanded using a plane.
- After preliminary impregnation with oil and complete drying, the future furniture is decorated. For this purpose, stain and clear acrylic varnish can be used.
Hooks can be attached to the inner surface, for example to accommodate a set of wrenches. You can think of an interesting organizer for storing nuts, bolts, nails, and screwdrivers.
The master also has the opportunity to build a real rack or workbench, under the tabletop of which there are drawers:
- First of all, you will need a high-quality drawing. The dimensions of the countertop, support posts, drawers and internal equipment must be displayed on paper.
- Based on the drawing, parts for the drawers are cut, and grooves are installed on the inner sides of the table. Movable rollers corresponding to the groove are attached to the outer body of each drawer.
- We should not forget about the need to pre-impregnate with oil to protect wooden surfaces from fungus and moisture.
The universal shape and size of the pallets allows the master to show his own imagination, bringing to life the most daring ideas.
Floor
First, boards (or OSB-3) of the subfloor are attached between the joists. The protruding edge of the bottom trim beam (150×100 mm) is used as a support.
Do-it-yourself change house floor installation.
Then the surface of the subfloor is covered with waterproofing film. For this purpose, dense polyethylene is often used, but roll materials with bitumen or polymer-bitumen impregnation Gidroizol are considered more reliable. The film is laid with an overlap between the strips of at least 20 cm, with the seams taped with construction tape. The edges of the strips should extend onto the walls (the same 20 cm).
Insulation is placed between the joists. It is better to choose mineral wool, for example URSA. Unlike polystyrene foam, it is not flammable and does not harbor rodents. Its only drawback is its hygroscopicity and the property of losing its insulating properties when saturated with moisture (the same condensate). Therefore, you need a gap between the finished floor covering and a vapor-permeable membrane or use Izospan, which does not allow water to pass through - this will protect the mineral wool from direct contact with water and allow water vapor to erode from it.
The best choice for a finished floor is a tongue and groove board. The tongue-and-groove connection principle of the coating makes it possible to further protect the insulation from water getting into it.
But you can lay the same OSB, and linoleum on top.