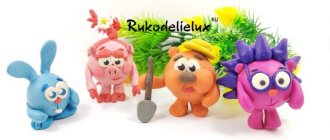
Food for Barbie dolls made of plasticine: donuts
Your children will get delicious and appetizing donuts if they engage in exciting modeling and use ball plasticine for this. Of course, you can’t feast on such food, because it is intended only for dolls. Although plasticine looks bright and you want to try it, it is still better to leave this delicacy to your favorite toys. Ball play dough sets come in very vibrant colors and you can combine multiple shades to create something special. Donuts are popular toys, they will be fun to play with, they will decorate a doll's table, and the toys will feel like they are in an expensive restaurant.
To make doll food, prepare only bags of ball plasticine.
How to make donuts from plasticine step by step
Choose bags of plasticine. 4 colors were used here: white, orange, yellow and pink. Any options are suitable, because the sweet dessert can be prepared with different creams. Skilled chefs add special dyes, so you can't go wrong. The top is decorated with candied fruits, edible beads or delicious chocolate.
First, make the bulk of the donuts into simple bagels. Take plasticine of any color, for example, in this case yellow, orange and white were used. Pull out the sausages and close them into rings.
Prepare the same rings, but flat, in order to cover the top. This will be cream. It can be not only white, but also colored, for example, pink.
Glue the prepared flat rings onto the voluminous ones and press the edges with your fingers to hide the transitions and bulges.
Finally, decorate your treat. Use different details: long sausages to show the chocolate coating, colored small grains to imitate fruit or candied fruit, and so on.
A delicious treat for dolls made from ball plasticine is ready. The result was bright donuts. Be sure to make the same ones or come up with your own version of doll food.
On the topic: methodological developments, presentations and notes
Seasonal question: healthy and harmful fruits and berries for nursing mothers
Introduce children to the main vitamins A, B and C, what foods contain them, and what role they play for human health. Systematize children's knowledge about gender.
Summary of classes on a healthy lifestyle.
Notes on a Healthy Lifestyle.
“Learn to take care of your health.” Summary of a lesson with older children to introduce them to a healthy lifestyle. Purpose: to form ideas about health, its value, useful habits, and measures.
Environmental education is relevant at any age, so in my work I pay due attention to this area. Preschool age is characterized by increased curiosity in the
Summary of the lesson-conversation in the senior group “Healthy eating - healthy life.”
Source
Plasticine cake: how to make it
Everyone loves to eat cakes, especially if they are delicious, chocolate and decorated with beautiful roses. Dolls can also be offered such a treat, but it is not necessary to buy such a toy in the store. You can make a cake from plasticine. The master class shows how to make food from plasticine, in particular a cake, to feed your favorite dolls. Girls will definitely like this kind of work, because these are young housewives, expectant mothers who happily work in the kitchen. Here you also have to bake a cake, but use not flour, eggs and milk to create it, but simply plasticine of different shades. So, let's look at the sculpting process step by step.
Materials for modeling
- plasticine of different colors;
- stack for dividing bars;
- board;
- wet napkin for wiping hands.
How to make a cake step by step
Take several blocks of plasticine of different colors to work with. Knead them in your hands and roll them into balls. You can make the cream layer white, yellow or any other color. Today, chefs prepare absolutely incredible masterpieces and add all kinds of food colorings.
Make a flat cake out of each piece. Give this flatbread a triangular shape, but round the corners of the triangle. And the sizes of the cakes must match, so that later they can be placed on top of each other.
Place all the tortillas on top of each other. If you decide to make the cream layer yellow, then leave it inside.
To make a decoration in the form of roses, take the same plasticine from which the cream is made. Roll very thin plasticine sausages. Twist one sausage into a spiral and attach it on top of the cake, make braids from the remaining pieces, and also attach them on top.
Food for dolls, a “cake” made from plasticine, is already ready, the dolls can taste it. But such plasticine treats are contraindicated for children. If you want to add chocolate chips, use brown play dough. Sprinkle your culinary masterpiece with small brown pellets.
Volume applique
Preschoolers are taught about the technique of volumetric appliqué at an older age. With the help of adults, they learn skills that will be useful to them in labor lessons at school.
In junior grades, children are asked to perform the composition “Fruits on a Plate.” For crafts, stock up on cardboard, a set of multi-colored paper, templates, hard glue, pencil, scissors, and felt-tip pens. The application is performed in the following sequence:
- Two squares of different colors are cut out of cardboard, one for the background, with a side of 20 cm, the other for the frame.
- A yellow sheet of paper is folded in half twice. A pear template is applied to the workpiece and the outline is drawn with a pencil. Cut along the line and get 4 parts.
- Step 2 is repeated using your own color of paper for plum, apple, kiwi and orange.
- Fold all the parts of the fruit in half, ironing the fold lines.
- Apply glue to the first part of the pear. Two halves of the second and third parts are glued to it, aligning the fold lines in the center. Spread the last part and glue it to the glue-free halves.
- Step 5 is repeated with the apple, plum, kiwi and orange parts.
- A plate is cut out of paper according to a template.
- Glue it on cardboard, and on it - voluminous fruit.
- Draw branches with a brown felt-tip pen and decorate them with leaves.
- The work is placed in a frame: the applique is glued onto colored cardboard.
The plate is decorated with an ornament, pattern or flowers from circles prepared using a hole punch.
Food for light plasticine dolls: ice cream
Miniatures in the form of ice cream made from ball plasticine are wonderful children's toys.
They are not at all difficult to do with your own hands. When the mass hardens, the craft will become suitable for play. Bright and appetizing miniatures will look beautiful on a doll table. Materials for creativity:
- a set of ball plasticine (can be replaced with hardening light plasticine);
- stack in set;
- modeling board;
- damp cloth.
How to make ice cream step by step
The very bright shades presented in this set of unique plasticine are suitable for creative experimentation. Ice cream can be white, coffee, fruit, so choose absolutely any combination and try to create your own delicious masterpieces
To sculpt a multi-layer popsicle on a stick (the most popular delicacy for children), prepare pieces of plasticine in several shades.
Connect 3 pieces together, giving a suitable shape, rounding on one side. Glue a small stick at the bottom.
Make several servings of this food. The layers in the popsicle can be swapped by color.
Finally, add small crumbs from the same plasticine to the tops of the desserts. This will be an imitation of nuts or candied fruits.
Delicious and beautiful doll food is ready.
Step-by-step photo lesson:
What fruits are good for pregnancy?
To work, we will need three colors of plasticine: green for sculpting the tree crown, brown for the trunk, and one more for the fruits. Ripe pears can be yellow, red, green, so you can choose any of these shades of plasticine, or maybe mix them.
Knead all the prepared colors. Most of the plasticine will be spent on sculpting the green crown. Warm and soften the mass. Also make the blanks soft for sculpting the trunk and delicious pears.
Prepare a cone-shaped green crown. Make a suitable piece, then use your fingertips to make indentations to make the effect more believable. Pull out the barrel. Also select fasteners – a match or a toothpick.
Pinch off many small balls from the soft yellow piece to make oblong pear fruits.
Make the pears uniform, shaped like light bulbs. Pull out each ball and press it around the circumference with your fingers. The number of small parts should be sufficient to cover the tree crown on all sides.
Fasten the crown and trunk using the selected fasteners. Press the lower part of the trunk onto the board. Stick yellow fruits around the entire circumference.
The elegant pear tree with fruits is ready. It reminds us of sunny summer, so this craft can rightfully be considered a summer craft. Or maybe even in autumn, because some varieties of pears ripen in autumn.
Source
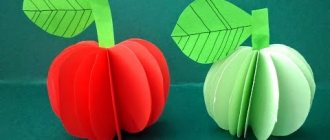
Food for dolls - plasticine pumpkin
Today a new generation of plasticine has appeared on sale.
A bright, pliable modeling mass with an unusual texture bears this name, but is radically different from the usual blocks. Making a pumpkin, as suggested in the lesson, is not difficult. Together with your kids, you can learn basic modeling techniques, consider different shapes, shades, and get an autumn vegetable. The toys will freeze, so you can play with them later. Materials for modeling:
- light ball molding mass in orange and green colors;
- toothpick or plastic stick.
Make a pumpkin from plasticine step by step. The pumpkins should be orange and the leaves should be green. Most likely, on sale you will find sets of unique plasticine, which contain only very bright, almost fiery shades, but you can use them without modification or mix them with darker ones. The stalk on the pumpkin should be brown or gray, if such colors are not available, then take yellow.
For each vegetable, prepare a ball of orange plasticine.
Using a toothpick or plastic stick, determine the centers of the balls on both sides. Then press down, highlighting the meridians.
Insert a yellow (but preferably brown) tail into one of the holes on each vegetable.
Make carved leaves from small green slices.
Glue the leaves to the cuttings.
When the mass hardens, you can safely press on the crafts, they will become very strong and will not be deformed.
Tomato
There is nothing easier than making a tomato! Even three-year-olds can cope with this task.
Again, you need to start with blanks. First we make the fruit, for which we roll a ball of red plasticine. Now we make a green stem with leaves in two stages: first, you need to roll a ball from a material of the corresponding color, then use two fingers to pull out five short sausage-leaves from it.
The last step is to collect our tomato, that is, we simply attach a green stem with leaves to a red ball. If everything is done correctly, you will get a vegetable like the one in the picture below.
Lemons and tangerines made of plasticine in balls
Thanks to the unique gel plasticine with foam balls, every child can independently make any toy for themselves, even entire play sets.
Both adults and children can make doll food. Due to the fact that the gel, which is located between the foam balls, hardens quickly and irreversibly, each product retains its shape for a long time, it seems plastic to the touch. This lesson shows how to make food for dolls with your own hands from ball plasticine, in particular citrus fruits. Let's look at modeling using lemons and tangerines as an example. For interesting modeling, prepare:
- jars or ziplock bags filled with gel-based ball plasticine (orange, yellow-green and green);
- a thin stick or match.
How to sculpt fruits from plasticine
The very bright mixture contained in the set is perfect for sculpting realistic miniature figures for dolls. Choose those shades that are close to the citrus fruits you are copying.
For lemons, use yellow-green plasticine. Roll into balls.
Press the balls with your fingers. Don't align the sides. Sharpen one side. Pierce the opposite side with a stick or match. Insert the green capsule into the resulting hole.
Prepare all the bright lemons this way. You will get beautiful rough fruits. They are very similar to real sour citrus fruits.
Also make orange balls for the tangerines. Leave their shape round. Press in one place with a stick.
Insert the green capsule into the hole. Delicious tangerines are ready. You can even hang them on the Christmas tree on New Year's Eve.
When the fruits have frozen, they can be placed on a doll plate. Plasticine lemons and tangerines are ready.
More complex options that require cutting
I would like to note that there are a great many ways to cut an apple beautifully, and it is simply unrealistic to consider them all in one article. Therefore, today only the main ones will be discussed. Moreover, the production of such works of art does not require the skills of an artist. The main thing here is accuracy.
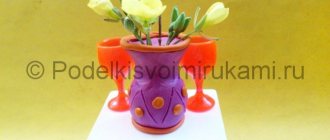
Amazing flower blooming on the festive table
Surely everyone who has held a vegetable peeler in their hands has noticed a protrusion on the side of the blade, with the help of which the eyes of potatoes are removed. The initial preparation of the future flower is done by it. Using this protrusion, grooves are made at approximately equal distances from the top to the bottom of the apple.
Light plasticine strawberries in balls
The appearance of ripe strawberries evokes an appetite and a desire to try these juicy berries. Healthy food is also necessary for pupae.
All girls love to play mother and daughter; they have a whole arsenal of favorite toys that need to be constantly fed. This lesson shows an option on how to make strawberry-shaped food out of plasticine. Ball plasticine was used for the work. This mass quickly hardens in air, and the result is hard crafts that resemble plastic. Making such a play set is much more interesting than buying it in a store. You can do this immediately after purchasing a set of plasticine.
Materials for work:
- a bag of red or pink plasticine;
- a bag of green plasticine.
How to make strawberries from plasticine step by step
Prepare a mass of red and green for work. If you have a set with bright plasticine, then red can be replaced with pink. Unusual white foam inclusions, which are present in the modeling mass, imitate strawberry seeds, so they do not need to be sculpted additionally. This makes the work easier, but it must be done quickly, without waiting for the plasticine to dry.
It is better to make doll food miniature, so for each berry you need to prepare a small pink ball and a little green plasticine, from which a tail will be fashioned in the future.
Point the pink balls on one side and give them a shape reminiscent of strawberries. Divide the green pieces into 5-6 parts, pull each into a small stick and connect them together in the form of a tail.
Attach each tail to the wide part of the berry. The delicious strawberry is ready. All you have to do is wait until the plasticine hardens.
Broken applique
At 4 years old, a child is introduced to mosaic techniques and taught how to create pictures from pieces of torn paper. Autumn themes that are understandable at this age: vegetables and fruits. Children are given templates of an apple, pear, plum, and orange. Then they are shown the procedure for making the craft:
- Contours are drawn on a landscape sheet.
- Tear the paper into small pieces.
- Spread glue on the leaves and stick pieces of green paper on them.
- Color the tails of the fruits with a brown or black pencil.
- Apply glue to the apple. Glue pieces of red paper first along the contour, and then fill the entire middle with them.
- Step 5 is repeated with pear, plum and orange.
The work is decorated with a colored border. Cut out 4 strips 1 cm wide and glue along the edges.
Vegetables made from ball plasticine: carrots
For bunnies, bunnies, mice, bears and favorite dolls, children can easily make carrots. An appetizing and healthy vegetable should always be on the table. For modeling, it is better to use a special ball mass, which hardens in air after a short time. In this case, the resulting doll food will become durable and you can play with it for a long time. Carrot sculpting is a very simple job.
Materials for modeling
- gel ball mass of orange and green colors;
- stack.
We sculpt a carrot from plasticine step by step.
Prepare a mixture of a suitable color. Usually the shades presented are very bright, alluring, and the small inclusions are crushed weightless foam. Due to this filling, the finished products are very light. Prepare small portions of the two indicated shades.
Make cones from the orange balls, divide the green ones and pull them out into leaves.
Press the wide part of each root vegetable with the sharp part of the stacks. Collect 3 leaves in bunches. Insert the ends of the bunches into the holes in the vegetables.
Prepare the puppet vegetables. Carrots can grow on a toy farm or show off on homemade topiaries; you will find a use for such miniatures.
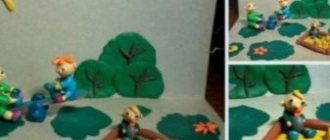
Progress of the lesson
Before starting the lesson, you need to prepare the basis for creating a plasticine picture - an image of a tree (trunk and green crown)
on cardboard. To do this, make an applique from colored paper - a green crown and a brown trunk, or draw the outline of a tree with colored felt-tip pens. The application can be prepared in advance with the children in another lesson. Give the children blanks with the image of a tree and plasticine.
Educator. Guys, look today the doll Katya came to visit us and wants to tell something. Do you want to listen to her?
The children and the teacher listen to the story of the doll Katya.
Fruits made from ball plasticine: pears
Ball plasticine is a unique mass that is not at all similar to ordinary wax plasticine. Firstly, it contains small foam balls, which make the products very light, and secondly, the crafts harden very quickly in air and become quite durable. It’s pleasant to knead the bright pieces in your hands, only sometimes small balls can fall out. You need to work quickly with ball plasticine. This process is fascinating. This tutorial shows how to make doll food - pear shaped fruits. The bright colors are very diverse, and you will definitely find in the set those shades that are suitable for modeling. You can even mix two or three colors together.
What you need to prepare for sculpting:
- ball plasticine;
- stack.
How to make pears from plasticine step by step
For this work, you can use yellow or peach-colored mass, as well as green material for sculpting leaves.
Here's how to make 3 fruits in yellow, peach and a two-color version.
To make a two-color blank, simply connect 2 small pieces without kneading them. They will stick together well. From each prepared blank, fashion a part that resembles a light bulb in shape.
Make holes in the narrow part of the pears using a stack.
Insert thin green sticks into the resulting holes. These will be the ponytails. Additionally, make oblong leaves from green portions of plasticine.
Glue the leaves to the top stick-tails. Appetizing ripe plasticine pears are ready.
After just a few hours, the plasticine will harden and the pears will become strong, reminiscent of plastic toys.
Bananas
Making bananas from yellow plasticine is very easy! First you need to roll two thick, elongated sausages and bend them slightly. Then, with a sharp object (for example, a toothpick), draw several longitudinal shallow grooves along them. Now make the sausage thinner and shorter with a small extension in the middle. Stick two bananas to this shoot and you get a bunch.
If you did everything correctly, your playdough bananas will look like the picture above.
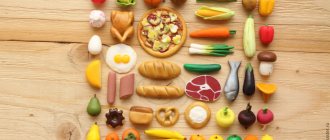
Food for plasticine dolls: other ideas
We have collected enough ideas to make a doll kitchen filled with different products. You can sculpt not only from ball plasticine. but also from ordinary clay, as well as from polymer clay - this is how the toys harden and become like ordinary plastic figures.
Making food from plasticine with your own hands is quite easy. Check out our selection of ideas and get creative. Good luck!
Interesting design
There should be aesthetics in everything. Therefore, vegetables and fruits made from plasticine cannot simply be thrown into a box; they need to be beautifully placed, for example, in a basket or on a plate. The child will do this with pleasure.
Here on the plate there are eggplants, like real ones.
Another plate is filled with a variety of plasticine vegetables. On it we see peas, radishes, carrots, cabbage and even a small pumpkin in the center of the composition.
And here the craftsmen put all their products in a basket. Also a very interesting solution. Try it yourself and you will see that sculpting fruits from plasticine (and vegetables, of course) is a fun activity.
To summarize the above
Setting the table for the New Year and having a variety of dishes on it is very important, you can’t argue with that. However, aesthetics and beauty are no less important
The decorative elements made from apples described today will help with this, which everyone will want to try, but only at the end of the feast. After all, it would be a pity to “destroy” such beauty. But closer to the end of the celebration, fruits will come in handy, serving as a beautiful dessert. This is especially true for a basket of berries with a flower. And you can be sure that guests will remember such a New Year’s table for a very long time, trying to do something similar themselves. Isn’t this the same effect that all hospitable hosts who invite friends to celebrate a wonderful New Year’s Eve try to achieve?
Apple decor: amazing home decoration for the New Year
The kindest and most beloved holiday is approaching - New Year. And with his arrival, people are waiting for some kind of miracle. The same applies to the New Year's table. After all, no one wants to be boring. But there is no need for unnecessary decorative elements on it; there may not be enough space for all the dishes on the table. Therefore, it is better to use natural rather than artificial elements for decoration. Today’s article will look at ways to effectively serve fruit, namely apples, on the New Year’s table, suggested by the authors of the YouTube channels “Ann STYLE” and “COOKING AT HOME”. After all, apples are precisely those fruits that no holiday can do without.
Fruit hedgehog
This composition is more suitable for a children's party. Making a fruit hedgehog will not take much time, but the result will delight the little birthday boy.
To create a delicious craft you will need:
- Avocado;
- Banana;
- Orange;
- Lemon juice optional;
- A little pumpkin seeds;
- 2 cloves;
- A handful of raisins;
- Toothpicks.
Creation:
- To begin with, select beautiful festive dishes to display the fruit hedgehog. Then peel all the fruits (except lemon), and remove the pit from the avocado. Place the avocado on a dish, attaching pumpkin seeds to it in the area of the tail and legs;
- The nose is made with raisins, and dried grapes or cloves are also used for the eyes. Cut the orange and banana into the required pieces. Using toothpicks with a banana and an orange strung on them, make fruit needles for the hedgehog;
- Before serving, it is recommended to sprinkle the craft with lemon juice (to preserve the color of the fruit). The work of creating a fruit hedgehog is completed.