Paper can handle anything! She is a grateful material and embodies any creative ideas and solutions, whatever they may be. It is available and cheap. You don’t need to go to the park to get it or worry about the fact that it’s raining. It's just there at hand. We will use it to make autumn crafts: interesting and not banal.
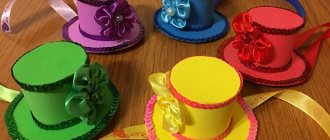
“Oseniny” - the holiday of autumn - is just around the corner. And every family is faced with the task of building something supernatural in the form of a craft for school or kindergarten, making a costume or hat-mask with “gifts of nature,” and decorating the assembly hall thematically.
Well, this mission is possible! Let's get acquainted with a new selection of ideas for paper harvest from vegetables and fruits.
Apple
Now we need red and green paper. On the back side we also draw an apple of the required size and cut it out.
We make several of these parts and glue their halves together. In general, we repeat all the steps described above.
We will make leaves from green paper.
If you want to come up with a more interesting option, then make the twig brown.
Examples for the younger group
The leading place among handicraft lessons for children 2-3 years old on the topic of vegetables is canning.
At the preparatory stage, it is worth discussing with the children what vegetables they would like to see in their future creations.
After that, they can independently choose what they have voiced among pre-prepared templates and glue it to the base. A jar cut out of cardboard is suitable for it.
Banana
To make a banana like this, you will need to use a small template.
Crafts such as fruits will find their place in your kitchen for an amazing and impressive decoration.
Children will also be able to use their work to create an unusual painting to decorate their room. For example, by making a still life.
You can simply cut out the fruits you need and then stick them together with your child in a paper vase. Like this. In the form of an application.
Watch the video below for an easy technique for creating a beautiful fruit bowl. I think children and their parents will really like this process, because... Fine motor skills of the fingers will be involved here. And this is very useful. In addition, children will be happy to tear so much paper into small pieces, which will amuse them a lot.
Let's not forget about vegetables for our interesting compositions.
Paper grapes
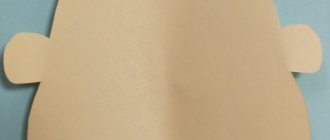
A voluminous bunch of grapes is made from blue, purple, yellow paper - depending on which variety of these berries you like best. You first need to cut out the base for the craft from white paper.
- To do this, you can draw a triangle with a pencil. In its upper part in the center there are two straight lines at a short distance from each other.
- Then draw a wavy line around the cone so that it resembles a bunch.
- The branch does not have to be triangular, but this is guaranteed to make the paper craft as similar as possible to real grapes and you can make a whole grape vine yourself using identical templates that simplify the task.
- And ideas on how to make fruit not look like a cloud will come in handy. Elongated, rectangular grape clusters can be made, but only if the vine is large.
The lines at the top of the template cone should be outlined in an arc to create a beautiful branch. On the side you need to draw a grape leaf. You can draw a mustache spring. There are a lot of them on real grape branches.
Further:
- The template is cut out of paper;
- The sheet is colored with a green pencil, wax crayon or paints;
- Colored paper of yellow, blue or purple is cut into small strips;
- Each strip is wrapped in a ring and the resulting paper berries are glued to the template.
The bunch can be painted on one side only, covered with berries, or on both sides, depending on whether you need a three-dimensional figurine for a garland or an applique for a paper picture.
Cabbage
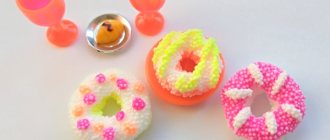
If you cut out green round paper blanks of different sizes and stick them one at a time on top of each other, you will get cabbage like this.
In general, it must be said that when creating voluminous vegetables and fruits, you can use foil, crumpled newspaper, all kinds of cones and foam balls as a base and simply cover them with thin crepe paper for children's creativity.
Vegetables from papier-mâché in a photo master class
A bright, beautiful “assortment” is created in two ways. From hollow blanks:
Materials and tools:
- plasticine;
- petrolatum;
- old newspapers;
- "PVA";
- varnish;
- gouache;
- brush;
- wire;
- knife.
Step-by-step instruction:
First, form vegetable templates from plasticine. Tear paper or newspapers into small pieces. Apply Vaseline to the surface. Cover the blanks with scraps. Using gentle movements, cut in half.
Remove the plasticine. Insert the wire inside. Glue the halves together and re-cover the cut areas with paper. After drying, the vegetables are covered with the first layer of gouache.
When the paint dries, form the stem and leaves. Then you need to color the vegetables again, paying special attention to the shades. Open with varnish.
From whole blanks:
To create a step-by-step “assortment” of vegetables you will need:
- ready-made papier-mâché mass;
- primer;
- brush;
- dye;
- acrylic lacquer;
- semolina;
- textile;
- scissors;
- "PVA";
- napkin.
Step-by-step lesson: Make models of vegetables from paper pulp. Keep in mind that after drying the size will decrease by about 2 times. Prime the workpieces.
Proceed to the MK stage - painting.
If you need “pimples” on dummies, for example, on a cucumber, sprinkle the workpiece with semolina. Vegetable leaves can be cut out of fabric. To do this, it is coated with diluted glue, cut, and painted.
Vegetables are varnished. When the products are dry, leaves are glued to them.
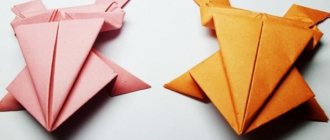
Fruits and berries in origami style
But also use these assembly diagrams using the origami technique for simple products of your creativity.
Well? I hope you had an interesting time with me today and learned how to make fruits from colored paper? Or maybe you also have your own new ideas on how and what to do with your child in the evening.
Good luck and creative mood.
See you on the new blog pages.
Paper carrots
The easiest way is to make a paper carrot. There are several ways to do this.
First option:
- Cut orange paper into strips 1 cm wide, with a length approximately 2-2.5 cm longer than the root vegetable should be;
- There should be as many strips as there are carrots;
- Green paper must be cut into the same strips as orange, in the same quantity.
- The ribbons are carefully folded - green in a zigzag, orange in half.
- Openwork carrots, the ends of the tape are glued and a green stalk is attached.
- You can hang it on a thread, put it around the neck of a toy hare, or place it in the kitchen, on the door of a cupboard.
Second craft option:
- Roll a sheet of orange colored paper into a cone, glue the sheet along the side edge (this can be done from the inside with tape, but on the outside it is better to use PVA);
- Cut a sheet of green paper in half lengthwise, then into two-thirds strips;
- Bend the cone at the top, cut off the corners;
- Place the green part into the carrot and glue the edges of the paper;
- Draw lines with a marker.
You can also make two small circles out of white paper, eyes for a cute paper character, draw a nose and lips for a carrot.
Examples for the middle group
From the age of three, children develop basic skills in using scissors. In this regard, you can complicate the tasks a little. A variety of themes using vegetables will work. This is both canning and a basket with the harvest.
For the second theme, you will need pre-prepared cardboard bases in the shape of baskets. If they are cut out of white cardboard, then it would be appropriate to invite the children to draw a pattern on them themselves. At the second stage, it is worth having a conversation on the topic of vegetables. A short description of each would be appropriate: its shape, color. It would also be useful to discuss their taste and beneficial properties.
For demonstration, you can show real vegetables brought from home. If you let babies touch them, they will also be able to feel and feel their texture.
After the introductory conversation, you can start cutting. It is worth once again focusing on shapes and sizes. To make the task easier, you can draw a sketch with a pencil.
It is worth understanding that few children at this age will be able to cut clearly along the contour. But despite this, a children's applique with figurative images can be assembled. In the next step, all that remains is to arrange all the blanks the way the child wants. And stick them with glue. Still life according to the master class for beginners is ready.
Recommendations for Improving Collaboration
- When learning how to applique vegetables, it is important to follow each step consistently.
- It’s worth preparing all the required materials and templates in time so that you don’t have to be distracted by collecting what you need later.
- At the time of preparatory work, it is of considerable importance to familiarize children with works of art, as well as demonstrate drawings and photos of vegetable appliqués.
- With children, conducting classes in the form of a game is more suitable, since this way the children’s attention is drawn to what is happening and thereby develops emotional responsiveness.
- Adults should create a small plan so as not to lose track of the sequence of actions. Older children can follow the steps themselves.
- It is worth giving young creators more independent work so that they can express their imagination and learn how to realize it.
- During independent work, an adult is obliged to help the children, especially those who are not doing well.
- Upon completion of all the work, it is advisable to hold a collective exhibition, when everyone can look at someone else’s work and thus learn to enjoy the results of their own and other people’s work.
- In addition to individual work, the proposed ideas can also be implemented in group work, when everyone cuts out their own vegetable and glues it onto a large common base in the form of a plate, pan or cup.
- This approach is suitable for many applications. Especially on the topic of fruits.
Strawberry applique
The principle of making this application is similar to the previous one. The only difference is to cut out the correct shape. This time the shape will resemble an oblong heart (see photo).
Decorate the finished applique with leaves (template included) and seeds drawn with a black marker.
Preparatory stage
Preliminary preparation includes an explanation of the obligatory observance of safety precautions and careful handling of cutting tools.
An important component is accuracy during work and listening carefully to the teacher when he names tasks for a future lesson. The materials are:
- Disposable plates.
- Templates for drawing.
- Pencil.
- Scissors.
- PVA glue.
- Paper of different colors or images.
First, the teacher demonstrates how to trace the templates, place them on a plate and glue them. You will need blanks of whole vegetables or parts that subsequently need to be combined. The specifics of age are taken into account.
In the preparatory group, the topic is not of such great interest and may seem very easy. Children aged 3-4 years should not be trusted with scissors to cut out elements of crafts for safety reasons. In this case, ready-made drawings are distributed.
Target
To implement the idea, the following tasks are first determined:
- Familiarization with geometric shapes.
- Training in the correct handling of objects - glue, brush and others.
- The concept of “less” and “more” meanings.
- Reinforcing previously learned colors.
It all depends on the chosen topic. Before voicing it, the teacher prepares a summary for himself in advance. It will be different in schools for different grades.
In it, a game situation is invented to attract the attention of young pupils and evoke appropriate emotions in them.
It is useful to get acquainted with works of art related to this topic, look at drawings, photos and compare the characteristic features of objects.
The benefits of practicing applique on the theme “Vegetables” with children
All lessons related to applications help children of all ages develop. Working with colored paper and scissors helps children develop attentiveness - ripe vegetables are depicted on paper in bright, juicy colors and large geometric shapes, while unripe vegetables are represented by small green and brown fruits. The younger generation develops their views on the world around them, they learn to work with materials and auxiliary tools.
In order for children to develop their qualities that will help them in life: hand motor skills, memory, vision, schools include appliqué lessons in the curriculum. Children, thus, begin from childhood to develop their talents, master new technologies and demonstrate the hidden capabilities of their thinking.
Volumetric paper pear step by step
A voluminous paper pear is an excellent craft, light and interesting. The technique in which the pear is created is widespread; it is often used to give volume to objects and characters. A little earlier, a step-by-step overview of a voluminous apple was presented, and the only difference in the works is the shape of the paper fruit, since in all other respects they are similar.