The main purpose of dolls has always been to entertain children. Since ancient times, people have occupied their little ones with such toys so that they do not interfere with their parents’ housekeeping and work. But today the doll acquires new functions and becomes an object of art! Entire collections are created, and handmade products are especially valued.
Today we will sew a chef doll for a themed collection.
Master class on flat applique from colored paper “Cook”
Oksana Seitmedova
Master class on flat appliqué from colored paper “Cook”
Master class on flat applique from colored paper “Cook”
Author: Oksana Seitievna Seitmedova, teacher, GBOU School No. 1503
Description of the material: This material will be useful for educators, additional education teachers, parents, and is intended for an audience of 4 years and older.
Goal: Creating a flat applique from colored paper.
Tasks:
1. Develop the skills and abilities of creating planar appliqué from colored paper.
2. Develop the child’s fine motor skills.
3. Develop the child’s creative abilities through the creation of applications.
4. Strengthen the technical skills of cutting and gluing parts.
5. Instill the skills of perseverance and accuracy.
Sanitary and hygienic requirements
1. The light source should be on the left.
2. Every 1 – 1.5 hours, the eyes need a 30-minute rest.
Taking a break and relaxing is necessary to restore eye function.
3. To maintain health while working, it is useful to warm up your arms, eyes and back.
For work we will need:
Cut out a head from beige paper.
Draw hair with a black felt-tip pen.
We draw eyes with a black felt-tip pen, draw a mouth with a red felt-tip pen, and draw blush on the cheeks with a red wax pencil.
Cut out a cap from white paper.
Cut out a shirt and sleeves from white paper.
Cut out black circles from black paper and glue them to the shirt; these will be buttons.
Cut out a ladle from black paper.
Draw dots with white paint.
Let's put together our composition.
We glue the cap to the head.
Afterwards we glue the shirt, sleeves, arms, ladle.
Cut out a tie from red paper and glue it to the shirt.
Master class on flat applique from colored paper “Aquarium” Master class on flat applique from colored paper “Aquarium” Author: Oksana Seitievna Seitmedova, teacher, GBOU School No. 1503 Description. Master class on flat applique from colored paper “Cheburashka” Master class on flat applique from colored paper “Cheburashka”. Author: Oksana Seitievna Seitmedova, teacher, GBOU School No. 1503. Master class on flat applique from colored paper “Flower” Master class on flat applique from colored paper “Flower” Author: Oksana Seitievna Seitmedova, teacher, GBOU School No. 1503 Description. Master class on flat applique from colored paper “Rainbow Fish” Master class on flat applique from colored paper “Rainbow Fish” Author: Oksana Seitievna Seitmedova, teacher, GBOU School No. 1503. Master class on flat applique from colored paper “Mermaid” Master class on flat applique from colored paper “Mermaid”. Author: Oksana Seitievna Seitmedova, teacher, GBOU School No. 1503 Description. Master class on flat applique made of colored paper “Fish in an aquarium” Master class on flat appliqué made from colored paper “Fish in an aquarium” Author: Oksana Seitievna Seitmedova, teacher, GBOU School.
Source
Fruit fantasies
It does not suit these gifts of nature to lag behind vegetables. But they didn’t even intend to!
Here's a bear cub and a school of funny fish made from lemons, here's a banana dolphin, here's an apple caterpillar, here's a melon ball and a watermelon stroller.
Stick plasticine horns, eyes, arms and legs to an orange - you will get Losyash, the hero of the popular animated series “Smeshariki”. Using the same method, you can make his other characters from other round fruits.
How cute is the pear mouse! To make it you will need two fruits and clove seeds:
- From one of the pears, cut two round pieces of the same size so that one side remains covered with the peel.
- Turn the second pear towards you with the narrow end, remove the stick and stick a clove in its place.
- Clove seeds can also be used to make eyes. But you can also use small berries or beads.
- Mark the places where the ears are attached, make small triangular slits there.
- Insert round pieces into them and secure them with pins or toothpicks.
- The tail can be made from a piece of rope, lace, twine or a green onion arrow.
Combined crafts, including both vegetables and fruits, can be listed endlessly!
DIY toilet paper roll cook
Master class “Cook”
Paper crafts for children of senior and preparatory groups
Author of the master class: Ekaterina Anatolyevna Kupricheva, teacher, kindergarten No. 2444, Moscow
Purpose of the master class : used in the design of a kindergarten, in introducing the profession, in theatrical activities. This master class is useful for teachers of senior and preparatory groups when teaching children aged 5-7 years how to model from cardboard.
Goal : We consolidate the children’s acquired knowledge about the profession of a cook. Teach children to model chefs out of cardboard. Strengthen the skill: folding, cutting, gluing parts. Develop: sense of shape, proportions, eye, fine motor skills, imagination, creativity. Evoke an emotional response to the crafts created (your own and other children’s)
Materials: toilet paper roll, white and colored paper, a piece of cotton wool, glue, scissors, a rag, colored pencils. (Fig. 1)
Progress of the master class:
I want to share an interesting idea for modeling from a toilet paper roll. This craft is not very difficult to do. I work as a kindergarten teacher and love to please my students with something unusual. By making crafts from material that is often simply thrown away, without thinking, you can use it in your creativity. That's why I offer you my master class.
Walks around in a white cap
With a ladle in hand.
He cooks us lunch:
Porridge, cabbage soup and vinaigrette.
1. Before starting work, you need to measure your roll, since the thickness of the base of a toilet paper roll varies.
2. Cover the roll with colored paper. To do this, take green paper (or the child’s choice) and twist it around the roll until the ends join, marking the length of our roll, and the width is slightly more than half, and paste over the bottom of our tube. We cover the top part with pink color. Make sure that there are no wrinkles when gluing; to do this, use a cloth to smooth them out (take your time when gluing).
3. Take a white rectangle and fold it in half, holding it by the fold and cutting out a square in the upper right corner
We unfold and glue the resulting apron in front, add ribbons to it like a real apron.
4. Next we make our chef’s hands. For this we need cardboard or thick paper. We cut out two identical rectangles from it. We round it on one side at the base, depicting hands. Afterwards we also paste them with the chosen color. Let it dry.
5. Glue the arms to the body
6. Next, we make our chef’s cap. To do this, take a white strip of paper and glue the edge along the length and glue it on top of the pink one.
Next, take a piece of cotton wool and a white circle (5 mm larger than the roll), glue a piece of cotton wool on all sides and glue it to the white circle and insert it into our roll. Let it dry.
Source
For beginner cooks|Useful tips
08/30/2015 // admin
If you are just getting started with such a big and important task as cooking, then my tips for novice cooks will help you approach this tasty task correctly.
They will also be useful to those who have already achieved certain success in cooking for the simple reason that cooking is not such a simple science as it seems to many. And even an experienced chef is always a beginner at something.
It is very important to approach the matter correctly. And my tips for new chefs are where you really should start.
9 tips for a new chef
Tip 1 – the right tools
There is an opinion that a beginner can get by with any tools. But if he succeeds... Then...
They buy the child cheap brushes and the most “crappy” (and not expensive) paints. And then they are surprised that the baby quickly lost the desire to draw.
It’s the same with chef’s tools – it’s a chore to cut vegetables with a dull knife or fry in a frying pan, which you can’t fry in at all. It is clear that with such tools, a beginner cook will very quickly lose all desire to cook.
Tip 2 – Constantly improve your kitchen skills
A good instrument requires certain skills. If you bought a knife that literally cuts itself, then it would be a sin not to learn how to cut quickly and beautifully. Today there are a huge number of cooking shows and educational videos on the Internet - watch and learn.
You only need to learn it once, but how much time will this knowledge and skill save you?
Deal with the oven, refrigerator, microwave, etc. Reveal all the “secrets” and use them 100%.
Tip 3 – Store your recipes
Organize your personal cookbook. As a rule, introduction to the world of cooking begins with one recipe. And then there will be more and more of them. And something will certainly be forgotten. But these are not only recipes - they are also invaluable experience that turns a novice cook into a master.
And it’s common to share experiences. For example, with children and grandchildren. They love to remember “what mom fed.”
Tip 4: the most delicious and the most expensive are not the same thing
Tasty doesn't mean expensive. The simplest dish is transformed into a culinary masterpiece not with the help of expensive ingredients, but with the hands of the chef. Look at recipes for dishes that have become internationally recognized “hits” of culinary art - among them there are practically none that are prepared from something expensive and scarce.
Expensive is fashion, not the art of the cook. And fashion tends to change.
Tip 5 – learn to choose good products
If you decide to cook yourself, then you simply must refuse store-bought semi-finished products. You need to learn to understand products. And here no advice will help. Everything will come with experience.
Tip 6 – don’t be afraid to experiment
French chefs claim that a recipe is not a dogma, but only a guide for the cook. And a real recipe appears when the cook adds his own “zest” to it. Therefore, don't be afraid to experiment! And don’t take the word of “culinary myths”. Feel free to experiment and find your own taste for each dish.
Tip 7: Tasty food must be healthy
Just study the properties of the products and don’t chase fashion. There is no junk food. What is harmful is not quality, but quantity. The body needs fats, carbohydrates, salt, and sugar. As a cook (especially if you cook for yourself and your loved ones), it is important to strike a balance.
So that it is both tasty and healthy.
That’s probably all that a novice cook needs to learn (and where to start). I really hope that these simple tips will help you on the exciting path from beginner to kitchen master.
5, total, today
russkayakuhnya1.ru
Capron
The technique of sewing toys from nylon tights is very popular among craftswomen. Basic materials and tools that will be needed for this work:
Please note: choose a bottle that tapers in the top third and then expands again. The narrowing point will serve as the neck of the future doll, and the spherical expansion at the neck will serve as the head.
When everything you need is at hand, you can begin. A cook doll made of nylon is made according to the following algorithm:
The body is ready, but the cook needs the limbs! Hands are made of nylon and padding polyester:
The wire base of the hands will allow you to later place a ladle or toy into the doll’s hands.
All that remains is to dress the doll in a distinctive chef's outfit. The apron is made according to the finished pattern, and so is the hat. You just need to find a diagram, “adjust” it to the size of your craft, cut out the parts and sew.
The nylon chef doll is ready!
From nylon tights you can sew a pop doll dressed as a cook.
Vegetable fantasies
Many ideas for crafts lie on the surface, suggested by fairy tales familiar from childhood: the carriage, Cippolino, Senor Tomato, etc. But if you take a closer look, new images and thoughts appear about how to implement them.
Pumpkin turns...
Okay, let's get into the carriage first.
It can be made either solid or hollow. In the first case, windows, doors and decor are cut out on the peel. In the second, the pumpkin must be cleaned of pulp, and then carefully cut through all the required holes.
For wheels, use round slices of another pumpkin, attached to the main one with toothpicks. You can decorate the carriage with both berries (rowan, grapes, sea buckthorn, etc.) and inedible elements - beads, sequins, plasticine.
Fairy house
This craft will be of interest to girls who dream of meeting these fairy-tale creatures. To work you will need 2 round pumpkins of different sizes (one is slightly larger than the other). It’s good if the larger one still has a dry stalk:
- For a smaller pumpkin, cut off the top and remove the pulp and seeds from the fruit.
- Wash and dry the seeds - they will be useful for decoration.
- Mark windows and doors on the peel with a marker.
- Cut through the windows. The door can be cut out, and then the resulting element can be attached to one of the sides of the doorway, leaving it slightly open, or you can simply cut through its outline pattern. A through door opening looks beautiful if it is decorated with a light curtain made of tulle, guipure, organza or tulle.
- Line the floor of the house with seeds, small flowers or leaves.
- From the peel and pieces remaining on the cuts, construct furniture: a table, a crib, a cabinet, etc. You can also use plastic items from toy sets - it will turn out very interesting.
- Decorate the house - door jambs, window frames - using dry pumpkin seeds, sticking them into the peel or gluing them to it. The decor can be supplemented with beads, flowers, and plasticine elements.
- Cut off the top of a large pumpkin with a dry stem and clean it from the inside - this will be the roof. Glue pumpkin seeds to it like tiles or decorate it in any other way.
- Carefully place the roof on top of the pumpkin house.
- If desired, you can decorate a clearing near the house by lining a dish or tray on which the craft will stand with dill or parsley leaves, paved the path with seeds, making a flower bed or spreading bushes from lettuce leaves collected in bunches.
Welcome fairy!
Zucchini with many faces
This vegetable itself has quite a variety of shapes, sizes and colors. This feature can be used at work. Sometimes it is she who helps the imagination of young masters spread its wings. By the way, about the wings.
Swan Princess
The elongated, curved fruit seems to dream of becoming the graceful neck of a swan! Ordinary or fabulous. The difference will be determined by the decor:
- Take a small pot-bellied zucchini with a dry stem and cut off the thickened end at a slightly angle. The swan's body is almost ready!
- It’s good if the elongated and curved zucchini also has a stalk – it will become a beak. No, it's not scary. This part can be made from carrots or sculpted from plasticine.
- Form the chest and neck from it, cutting the thicker edge so that it fits well with the cut of the torso.
- Insert several toothpicks into the cut flesh of the body or chest and use them to connect the parts.
- Swan wings can be made from halves of another zucchini or squash, decorating them with carvings on the peel. The leaves of Chinese or white cabbage are good for this purpose. But you can also use improvised materials to make them, for example, cotton pads glued to a cardboard base.
- Vegetable wings are fixed to the body using pins or wooden skewers. Wings made of cardboard and cotton pads can be glued with glue.
- If your swan is still a Princess, you need to make a crown. To do this, cut a small piece from the top of the squash, scrape out the pulp and form jagged ridges around the edge. Attach the crown to the Swan Princess's head using toothpicks.
- Eyes can be made from plasticine, beads or berries.
Such a fabulous beauty will easily decorate any exhibition!
Brigantine raises sails
Even and smooth zucchini evokes thoughts of boats, ships and sea spaces. Moreover, there are a great many options for making such a vegetable craft.
You can use zucchini alone for this, or supplement the craft with elements made from other vegetables or scrap materials:
- Cut a large zucchini in half lengthwise and remove the pulp from both halves.
- One of the halves will become the hull of the ship. Cut a small strip from the bottom to give the craft stability.
- The other half will become a sail. Carefully peel off the tough, dark layer of skin.
- Take a long skewer or sushi stick and string a sail onto it.
- Connect to the ship's hull. Design as you wish.
The role of a sail can be played by a cabbage leaf or a piece of cardboard, paper or fabric. You can make several sails using the same materials: if the main sail is made of zucchini, the others should also be made of zucchini.
Well-done cucumber, cheating carrot and onion-your-friend
Those who want, but do not yet know how to make crafts from vegetables, should listen to the advice of the masters and not take on complex work right away. Simple crafts also look impressive if they are made and decorated with love.
For example, a cactus made of small pimply cucumbers. To do this you will need 3 – 4 fruits of different sizes.
As a base - a “flower pot” - you can use a cup of sour cream or yogurt filled with sand or cereal, or make it from the top of a small zucchini or half of a large smooth cucumber, removing the pulp from them:
- Place the largest of the pimply cucumbers in a “flower pot” and secure it by compacting sand or cereal, or connecting it to the bottom, pricking it with a toothpick.
- Stick a couple of toothpicks into it at an angle, at different distances from the “pot”.
- Place a smaller cucumber on each of them.
- Insert one toothpick into the top of the base cucumber.
- Place the smallest cucumber on it vertically.
- Decorate the loose tops of the cucumbers with paper or carrot flowers.
- To add prickliness to the resulting cactus, you can complete the craft by sticking the cucumbers with toothpick halves.
From a cucumber you can make Gena the Crocodile, a steam locomotive with carriages, the Wise Scarecrow, a racing car, a cheerful frog and much more.
A giraffe made from peeled carrots looks cute. One part of it, the thickest, will become the body, the thinner and longer part will become the neck, the small tip will become the head. Ears, legs and tail are small pieces and sticks of another carrot. Everything is connected with toothpicks.
Horns can be made from matches, sticking them into the head with the sulfur heads facing up. And the eyes and spots on the skin are stuck clove seeds.
It is somewhat more difficult to make a horse that rears up. Although the combination of the body, neck and head is formed in the same order as that of the giraffe, differing only in size.
If you cut out a small triangular piece at the bottom of the head - an open mouth - it will turn out that the horse neighs loudly.
The horse's hind legs are cut out from solid, flat or semicircular pieces of carrots (you can use a template). And the front ones each consist of two parts: an oval - from the shoulder to the knee, a parallelepiped - from the knee to the hoof.
The mane and tail can be made from thread, twine or dill sprigs. All parts are attached to pins or skewers.
From a carrot with the thick end cut off, topped with a cap of green bell pepper (the seeds and core must be removed, the lower edges of the formed cup must be slightly cut) a tree is obtained.
And if you cut a groove along the trunk in a spiral, and fix cucumber slices on the top of the head - a tropical palm tree.
The onion, perhaps already tired of the image of Cippolino, this time can turn into a Goldfish with a tail of parsley or lettuce. The mouth for it can be made from pieces of carrots or plasticine, and the crown will be a serrated cup made from the same onion.
To make it, use a sharp, narrow knife to make a slit in the middle of the onion, inserting the blade at an angle to the core. Then make another slot of the same depth so that the top of this slot makes an acute tooth angle with the previous one.
Repeat these steps until this broken line is closed. Carefully separate the halves and separate them into cup layers.
They can make either a crown for a Princess, a Goldfish, a Frog Princess or a Swan Princess, or elegant flowers for a vegetable arrangement.
The options for crafts made from vegetables are as innumerable as people's imagination is rich: penguins made from eggplants, piglets made from potatoes, an elephant made from beets and cabbage! Imagine, combine, surprise and be amazed!
Bag holder
The chef doll is actually useful in the kitchen. How? You can trust a textile chef to store bags!
Sewing such a product requires all the sewing accessories, as well as fabric in four colors:
Below are instructions on how to make such an assistant with your own hands:
A bag doll cannot do without the “working” part:
All that remains is to decorate the doll:
The bag of bags is a relic of the past. But the cook doll is a convenient organizer that will become a stylish addition to the kitchen interior and will bring great benefits to its owners.
Culinary crafts
Every housewife wants to surprise her family, friends and guests with delicious dishes and serving skills. With toothpicks, you don’t need any special knowledge of culinary Feng Shui. Simply cut up snack foods and place them on a toothpick as desired. To prevent everything from seeming empty, decorate the toothpicks with homemade flags or store-bought umbrella toothpicks.
In honor of the holidays and for children, create not just a snack, but a themed table decoration. Spiders and bugs for Halloween. Various animals for children's parties. Fruit hedgehogs and berry goats will greatly delight little kids. Their production can also be done in a family with children.
This way you can accustom your child to an unloved product through play.
Sometimes you have to pack your child's lunch for school. A beautiful lunch setting can lift your child's spirits.
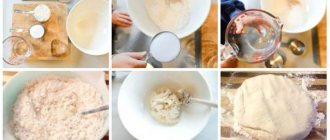
How to make salt dough?
The recipe for salt dough for crafts is very simple. The simplest products that every family has are useful for it:
- 1 glass of premium or first grade flour
- 1 cup regular salt
- ½ cup boiled water
For variety, you can take flax, rice or almond flour. Each time your child will be interested in trying dough made from different flours. At the same time, this will enrich his tactile sensations and help him understand the world.
Step-by-step instructions for preparing the dough:
- Pour flour into a container
- Add salt
- Gradually add water and mix the flour. First with light movements, and then with more sudden movements.
Important! To ensure that the ingredients are easily mixed, water must be added gradually in small drops and stirred a little at a time. And then stir the total mass with large movements.
The finished dough should easily retain its shape, as can be seen in the examples in the photo of dough crafts, and should not stick to your hands and harden easily.
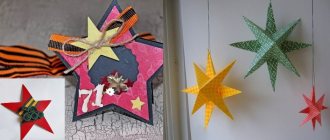
Star
The asterisk is one of the simplest figures that even a one-year-old child can perform.
Step-by-step instruction:
- Form a ball with your hands.
- Make a cake out of the ball by pressing it down.
- Use your fingers to form or cut out the edges of a star.
- Use a toothpick to draw rays, eyes, a smile
- Dry and paint.

