DIY paper dahlias: step-by-step master classes for children and adults. Ideas for creativity.
Dear readers of the site “Native Path”! In this article, I have prepared for you five ideas on how you can make a dahlia out of paper with your own hands. All the flowers - dahlias from this article are very different: very small - on a postcard, and huge - for decorating rooms, different in the technique of execution (from corrugated paper, colored paper, using the origami technique and others). Master classes will be interesting for both children and adults.
In the article you will find five master classes on making paper dahlias with your own hands:
— Master class 1. Postcard with a dahlia: a paper dahlia with children with step-by-step photos and examples of children's work.
— Master class 2. Large paper dahlia for decorating a home or kindergarten for the holidays.
— Master class 3. How to make dahlias from sweets and corrugated paper: video.
— Master class 4. Dahlias made from a hexagonal sheet of paper using the origami technique. Star flower.
— Master class 5. Dahlia from a circle using the origami technique with children.
Paper flowers "Dahlias". Master Class
Natalya Pisareva
Paper flowers “Dahlias”. Master Class
Materials and tools:
• Colored paper of the required color
• Sketchbook
Execution order:
1. Cut colored paper into squares. The size of the flower will depend on the size of the square. I recommend 3X3, 4X4 or 5X5 (for this job I did 4X4)
.
2. Glue “balls” from the resulting squares.
3. Cut out circles with a diameter of 8-10 cm from cardboard, and glue “balls” on them, changing the color shade if possible.
In a similar way, we make two more flowers, preferably of a different color.
4. Now we cut out the leaves and make the stems.
5. Then we glue the blanks onto the base in the form of a bouquet.
Our craft is ready. You can decorate your interior with it or use it as a gift.
Handicraft master class (working with paper and napkins) “Easter card” The Easter holiday is coming, It brings good feelings, In our souls, as if in a fairy tale, A blessed revolution. Goal: develop creative abilities.
Holiday card “Bells”. Master class Materials: - colored paper - scissors - glue - sketchbook - felt-tip pens For the background, take a sheet of colored double-sided paper.
Paper flowers: dahlias for September 1 | 33 Crafts
We continue to prepare for September 1st. Today we will tell you how to decorate a gift for a teacher. More precisely, how to make decorative flowers to decorate an existing gift. We will make paper flowers with our own hands - gorgeous dahlias, inside of which you can hide a wish.
Of course, such flowers can be used to decorate not only a gift for a teacher, but also any other present. It is best to decorate a gift box with such dahlias. Just stick them on top of it - it will look very cool.
What do we need?
- decorative paper in several colors
- paper cutter (a machine is better, but you can cut with scissors)
- glue
- satin ribbons
Tip: take double-sided colored paper or scrapbooking paper, as well as corrugated paper - combine them in one flower to achieve an even better result
How to make flowers from paper?
We cut out long strips of paper 4 cm wide (more or less is possible - it depends on the size of the desired craft). We stack the strips on top of each other, mark them every 4 cm and cut them. The output is many identical 4*4 squares.
We roll them up into a little bag like this. The tip can be carefully fixed with glue or simply bent at the bottom of the “bundle”.
Now we take the box that we will decorate. First, you can stick a satin ribbon so that it sticks out beautifully from under our dahlia. Then we fold the petal bags one after another.
Until you get a circle.
We fix the petals with glue at the very tip. Then we put another layer on top and glue it, then another layer and glue it again. Do this until the flower becomes lush.
If you wish, you can place a wish inside each petal.
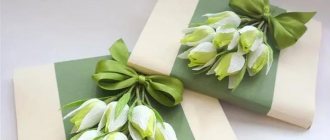
Beautiful dahlia made of paper
In winter, you really want to feel a piece of summer or spring. I would like to decorate the interior with something bright and sunny. Today I will help you make your wish come true and teach you how to create beautiful bright flowers to decorate your interior.
What you will need:
Colored paper. Ruler, scissors, pencil. PVA glue or any other reliable glue for paper.
First we need to cut out a circle for the base of our flower. We cut it out of any paper, it will not be visible, and put it aside for a while.
Now we take a new sheet of colored paper and begin to draw it. We need 7 by 7 cm squares.
Cut out all the marked squares. This can be done with scissors or a stationery knife, whichever is more convenient for you. For the flower we will need squares from one whole and one half of an A4 sheet.
Now the most time-consuming, but quite interesting work begins. We begin to roll our squares into small envelopes, such as those in which grandmothers used to sell seeds.
When all the squares have been twisted, we take the circle that was previously set aside for the base and begin to collect the dahlia. We glue the first row of petals and let it dry.
Now it's time to glue the second row. Petals of different rows must be glued in a checkerboard pattern.
We glue the remaining rows in the same way until the entire base is filled with bags - petals. So, simply, but not very quickly, we got a beautiful dahlia. You can hang it by a string on the wall, glue it to a postcard, put it in a frame, attach a leg and put it in a vase. In general, there are plenty of options!
This beautiful paper flower looks like a real dahlia. When your guests see it, they won’t believe that you made it yourself! Make a lot of these flowers and give them to all your friends, they will be delighted!
Master class 1. Dahlia made of paper: making a card with the children
With children you can make a three-dimensional card with a flower - a dahlia from paper. The idea was shared by Vera Parfentyeva, a technology teacher, the head of an art circle, a reader of “Native Path” and a participant in our Internet Workshop of educational games “Through the game - to success!” All the flowers - dahlias, which are presented in the description below, were made by the children with whom Vera works.
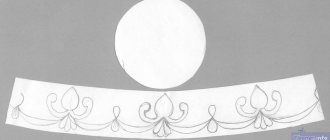
Step 1. Making the base of the dahlia card. To do this, you need to bend a sheet of two-color cardboard in half.
Step 2. Making a dahlia petal template. You can make the dahlia half petal template wider or narrower - at your discretion.
Step 3. Cut strips of colored paper and fold them in half lengthwise.
Step 4. Apply the dahlia petal template with a straight line to the fold of the paper and trace it repeatedly along the entire length of the strip. Cut out the dahlia petals.
We will get blanks of dahlia flower petals.
Step 5. Draw a small circle in the center of the top of the card and glue the petals, overlapping them a little on top of each other until the entire circle is filled with petals.
Step 6. Making the middle of the flower. To do this, you need to roll up lumps of yellow crepe (corrugated) paper and glue them into the middle of the flower.
These are the flowers - paper dahlias - made by preschool children.
In addition to Vera’s ideas, I found several more interesting, detailed and high-quality video master classes on how else you can make a dahlia with your own hands.
How to make dahlias
To understand how to make a dahlia from paper, you should familiarize yourself in advance with the possible options for crafts, choose the method you like, and prepare the materials. Then, according to the diagram, make the craft in stages.
Required materials and tools
To assemble the flower, you should prepare the following materials:
- plain or corrugated colored paper;
- cardboard;
- simple pencil, felt-tip pens, paints;
- scissors, stationery knife;
- wire, wooden stick - for stems;
- tape or stapler.
Frames, stands, or strings for hanging on the wall, ceiling or furniture are welcome for decorating applications. And for life-size crafts, stands-frames are needed.
Step-by-step assembly of a three-dimensional craft made from corrugated paper
Let's look at how to collect a voluminous dahlia step by step so that it is no different from a living one. Step-by-step photo instructions will make assembly easier:
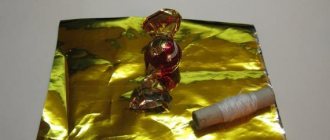
- Roll a dense ball of 1.5-2 cm in diameter from foil.
- Hot glue is applied to the wire and a prepared foil ball is threaded onto it.
- Blanks (2 pcs.) from corrugated colored paper for (initial) petals are cut to dimensions of 15x3.5 cm.
- Small petals are cut out from the first blank, folded several times, and fine fringe cut out in the form of triangles.
- Each petal is stretched, giving shape.
- From the second blank, large sharp petals are cut out in the same way, also stretching them.
- Small elements of the first piece (in a circle) are glued to a ball of foil (on a wire), closing the ball - this is an imitation of unopened leaves in the middle.
- Next, glue the second blank with large petals using the same pattern (carefully in a circle).
- Now the petals themselves (25 pieces) are cut out of paper - (they are larger than the previous ones) of an elongated shape, gluing the bottom and stretching the top. Then they are fixed in a circle with glue to the base exactly to each other.
- The next petals are larger (25 pcs.) – the assembly is the same (step 9).
- The sepals are cut out of green paper, the bottom of the flower is decorated, the stem is wrapped in green paper and the leaves are fixed.
Popular articles When is Forgiveness Day 2022 - March 14
The dahlia is ready.
Video master class
After watching the master class, usually no one has any questions about the assembly - the craft turns out very beautiful and natural the first time.
Beautiful DAHLIA made of corrugated paper SIMPLE AND QUICK
Origami with a simple diagram
You can make a beautiful flower with your own hands using an original and simple origami assembly. Even a child can handle it if he works in stages:
- prepare squares of colored paper (any size) - 8 pcs.;
- the first square is folded twice diagonally, then straightened;
- on four sides, fold the corners towards the center and iron;
- each side is folded again towards the center;
- the workpiece in the form of a rectangle with sharp outer edges is folded again in the middle, and then in half;
- The sides are fixed with glue - a double petal is obtained (with sharp outer edges);
- The remaining 7 blanks are assembled using the same scheme;
- All the elements are glued together - you get a beautiful dahlia.
A circle of colored paper, a button, or a bead is glued to the middle.
Complex scheme:
Dahlia Flower origami, Dahlia Flower origami
Applications for children
Your favorite children's applique can be made easily and quickly. They choose a composition - whether it will be one or several flowers, and where they will be placed - a vase, a flowerbed.
You can make a more complicated version - voluminous. The work is carried out step by step:
- Using a template or independently drawn elements of the future applique (flowers) are cut out.
- When choosing a prefabricated and three-dimensional form of a flower, the module is assembled separately according to the leaves, gluing them together, for example, in the form of small bags.
- Place blanks on a base (colored cardboard or paper) - flowers, a vase, other details.
- All details are fixed with glue, the panels are supplemented with decorative elements, or small details are drawn with paints and felt-tip pens.
The craft is placed in a frame, or placed on a stand, or hung on ribbons.
Ideas with candies
An original idea for making a dahlia with sweets. To do this, during classic assembly, add candy packed in a bag to the middle of the flower (at the very beginning of work). Next, the craft is assembled in the usual way - this is a wonderful surprise gift.
Dahlia with crepe paper candy | Master Class
Ideas for life-size flowers
Volumetric dahlia flowers made of colored paper look status, noble and very solemn. Recently, this particular assembly technique has become very popular.
It is practically no different from the classic look, except that the base (pedestal) can be purchased ready-made, or made from durable reinforcement or wood (painted with enamel or paint).
Large dahlias made of corrugated paper
Dahlia from foamiran: petal formation
The petal must then be heated on an iron, and it must be shaped very quickly, before the material has cooled. You do this manipulation with all the petals. This will take a lot of time, but you need to achieve maximum similarity.
And then in your work you will need a foam ball:
- A ball with a diameter of 30 mm will do;
- First, glue the smallest petals onto it, then the larger petals;
- You can use something else instead of a ball, it’s just the most popular thing that is ideal for these purposes;
- When the small petals are glued, you proceed to larger petals - they are no longer so twisted, they are glued in a checkerboard pattern, but on the pre-processed petals, veins are made with a needle on both sides;
- In the next row, as you might guess, there will be even larger petals;
- So, in the same checkerboard pattern, all the existing petals are glued.
It is necessary to form a dahlia petal very quickly
The authenticity of the created image will depend on how carefully the petals are painted and how accurately you glue them. You can cut out a sepal from green foamiran if it is needed in this composition.
How to draw an autumn flower dahlia step by step with a child
Autumn is a wonderful time of year: golden trees, fresh air, beautiful sky. There are also many interesting and varied colors.
Do you want to learn how to draw autumn flowers? Let's get started and start with the dahlia