Often crafts are considered some kind of frivolous trinket. Especially when waste material is used for their production. However, it is not. Tin cans can be used to make wonderful, yet useful things that will decorate your garden plot.
Tin is an excellent ornamental material. To cut it you need the most basic tool; it bends and paints perfectly. Easily connects with other parts.
Therefore, handmade crafts from tin cans have become popular among craftsmen. Craftsmen have invented many ways to reuse this container.
Products made from tin cans
Canned food, bulk products, cookies and liquids are packaged in metal cans. There are some rules for working with empty containers:
- When working, you must wear gloves, as it is easy to cut yourself on sharp edges;
- Before use, remove labels and clean material.
- When you have the required amount of containers, you can start creating decorations.
Tools and materials
Tin cans are not as easy to decorate as glass or plastic. To work with them you will need the following tools:
- pliers for processing edges and bends;
- an awl and a hammer for making holes;
- acrylic, aerosol or spray paints;
- brushes with nylon hairs.
For decoration, beads, beads, ribbons, jute cord, foil, satin and lace ribbons, plasticine and other available materials that can be found in the house are suitable.
Decorative flowerpots for the garden
This method is the most popular and favorite among summer residents. Large containers are better suited for it.
Manufacturing procedure:
- Smooth the top of the can with a file. It is very sharp, you can cut yourself with it. It can be bent using pliers or another tool. It is advisable to apply sealant on top, which will serve as a protective layer.
- Make holes in the bottom of the jar for drainage. They can be drilled with a drill or pierced with a nail using a hammer.
- Paint the jar the desired color. Before doing this, sand and prime so that the paint adheres better.
- Decorate the pots to match the style of the site.
Original flower pots look great on a fence, flower bed and lawn. You can make a whole flower stand out of them on your site, hanging them vertically.
Flower pot
Aluminum cans make stylish flower pots. Succulents and cacti thrive in miniature tin containers. To remove moisture, drainage holes are made on the bottom using an awl or nail.
The degreased surface is painted with gold acrylic paint or aerosol. Stencils allow you to decorate a “tin” with smooth parallel lines, winding patterns, and geometric shapes. To decorate in an eco-style and give the pot a unique look, it is wrapped in birch bark, jute, and covered with vertical branches. Instead of birch bark, photo paper with a printed wood pattern is often used.
Flower pots look delicate and elegant if they are decorated with lace, a patterned napkin, an artificial flower, beads, beads, or scraps of fabric.
“Tin cans” decorated in white and pastel colors are used to decorate weddings. Fresh flowers in beautiful stands set a gentle mood.
Products from cans
Any feast is rarely complete without canned food, which is why the accumulation of cans from them is increasing. They can be different in:
- configurations;
- size;
- blossom.
This allows you to create crafts from cans with your own hands.
Preparing cans for use
The jar is a universal packaging. A huge range of bulk, solid or liquid products are sold in a variety of containers. Some of them are interesting source material for creativity. For safe and comfortable work, experienced craftsmen carry out preparatory treatment:
- remove the paper wrapper and stickers;
- thoroughly rinse the emptied container from food debris;
- “torn” edges of cans are bent with pliers to avoid scratches and cuts;
- Before applying paint, degrease the surface of the container with any product that contains alcohol.
With a creative approach, any unpresentable container can turn into an amazing craft, souvenir, stylish decorative item, or simply a useful item in everyday life. Ideas can be gleaned from thematic Internet resources, where many photos of decorated cans have been published.
Garden sculpture
Figurines made from cans will add originality to the garden plot. Children will especially like this design. When making sculptures, it is advisable to use jars of various shapes and sizes.
Characters from any fairy tales look great. Let's give an example of making a woodcutter.
Materials:
- one jar for the head;
- one hat jar;
- one large capacity jar for the torso;
- two cans for arms and legs;
- two rectangular cans for boots.
Manufacturing procedure:
- All necessary material is prepared.
- The cans are sanded and coated with primer.
- Paint elements from spray paint cans silver.
- Drill holes at the joints.
- Assemble the structure using nuts and bolts.
It is advisable to involve children in the design of the sculpture. Their ideas can be very useful and correct, especially in terms of what else can be added to the product.
Stationery storage organizer
Not only vases and flower pots can be made from simple “tin cans”. Every schoolchild or student needs a functional organizer that holds ballpoint pens, markers, and pencils on their desk. A store-bought organizer is inexpensive and easy to buy. But a homemade item is pleasing to the eye, allows you to be creative, and, most importantly, it is made from waste material, which takes a long time to decompose in a landfill and harms the environment.
There are many options for creating an organizer:
- paint with stained glass paints in a special style;
- decorate using decoupage techniques;
- wrap with leather cord;
- glue beads and artificial flowers;
- print funny images of butterflies, birds, animals, flowers using acrylic paints and a sponge through a stencil;
- crochet or knit the jar with yarn of different textures.
Everyone chooses the option that he likes. The scope for imagination is unlimited.
Use of beer cans
Beer cans can be made of aluminum and tin, which is very suitable for creating DIY crafts. It should be noted that this is also the name for containers used for various drinks, not just beer.
From them you can do the following:
- Garden figurines and decorative elements;
- Covering the roof of small buildings in the garden;
- Fences for flower beds.
Homemade beer cans: cool and not childish
How much can be done from objects and things that a minute ago the owner was going to throw in the trash can. For example, homemade items made from beer cans are a creative and useful way to use waste material.
A simple ashtray is not the peak of a creative mind. Really interesting projects are created with deft fingers.
Great sofa for friends.
Cool racing car.
Tin cans can continue to serve even after the foamy contents have already been drunk.
Organizers, toys, lampshades, candlesticks - there are a great many options for crafts.
Whether it’s a decorative craft or a useful thing for the home or garden is up to the creator to decide. After all, his imagination can create unimaginable products.
Candlestick for the veranda.
Beautiful dragon. A decoration for any shelf.
Tank truck for transporting draft drinks.
The original use of tin cans is a competent and wise approach to objects in this life.
Source
Flower
These flower models will decorate your summer cottage at any time of the year. Creating them does not require much time. Required:
- quick-drying glue;
- flower template;
- cutting tool.
Procedure:
- Cut off the lid and bottom of the jar.
- Cut the resulting cylinder lengthwise.
- Having straightened the cylinder, place the template on the sheet and draw along the contour.
- Cut out the elements according to the outline. You must be careful when working.
- Squeeze out a pattern like veins on the elements of the petals.
- Paint the parts in the required colors. It is possible to use acrylic or oil based paint.
- Glue all the parts together to assemble the flower.
- Using the same scheme, you can make a variety of decorations for the site.
- Wonderful examples can be seen in the photo of DIY crafts from jars.
Food storage jar
DIY glass jar crafts are most often intended for storage. This material does not allow foreign odors to pass through, reliably protects the contents from the penetration of pests, and is usually available in unlimited quantities to any housewife.
- The surface of the can also needs to be degreased before starting work.
- You can paint the jar with acrylic paint, then you will have to come up with a system of signatures so that without opening the lid you can understand what is stored in the container.
It is best to leave the jar transparent and stick on the decor in the form of various beads, lace or jute, or draw it in the form of a pattern. This jar can be placed in a closet or on an open shelf. Some even hang them on the wall.
You just need to think carefully about the mounting. And the can is inserted into an iron clamp, which can be unscrewed or screwed in order to remove and put the container back.
Not only food is stored in glass jars. Many zealous housewives use them for various products in the bathroom. You can even put cotton swabs there and remove the cotton wool discs.
Candlesticks
Glass is an excellent material for construction. It is used in the construction of greenhouses and houses. Glass containers are also used to make various things.
If there are only a small number of jars to do something serious, you can opt for candlesticks. Even baby food jars are suitable for these crafts; all this can be easily done with your own hands.
Procedure:
- The neck of the jar is tied with wire and made into something like a handle.
- Paint the jar with waterproof paint as soon as desired.
- A candle is inserted inside.
Such products are very suitable for romantic dinners in the garden. Skilled gardeners are inventing new ways to use various packaging. By doing this, they save nature from clogging and make the area beautiful and cozy.
Vase from a jar
Any jar is suitable for creating a vase:
- Glass,
- Tin,
- Aluminum.
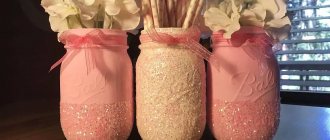
The jar can be painted, covered with decor, fabric or lace. Vases covered with small pebbles or even lace look very beautiful.
An aluminum can can first be slightly crumpled so that it loses its usual shape, and then painted. Such a vase will look very unusual and original.
Such vases are also decorated with decoupage. Material for the technique can be cut out from newspapers or magazines, use napkins with a pattern, or take sheets from music notebooks.
It is best to coat the surface with a protective layer after the vase is ready to prevent the coating from peeling off when exposed to moisture.
Photos of crafts made from jars with your own hands
Variety of ideas
What can you make from old jars? In fact, there are a huge number of existing options for using glass jars, but if you are a creative person and not deprived of a vivid imagination, you can come up with something original and unique, and even share your experience in the future.
However, today I would like to consider no less interesting and popular ideas for transforming ordinary jars into a work of art.
Beautiful “pumpkin” jars
You will need:
- acrylic paint
- glitter paint
- brushes.
1.
Start painting the jars. You will need 2-3 layers of paint. If the theme is “Autumn” or “Halloween”, then you can use orange paint (like a pumpkin).
2.
Once the paint is dry, apply a coat of glitter paint on top.
3.
You can use a brush and black paint to paint eyes and a mouth on the jar.
* Fill the jar with sweets and you're done!
Decor
Jars can serve a variety of decorative purposes. For example, you can place a cardboard goldfish inside and complement the interior of a nautical-style nursery. The jar can also become a temporary home for a real fish.
A “snow globe” can be an interesting decorative element or even a hand-made gift. This is everyone's favorite souvenir, consisting of a glass ball with liquid and some kind of display. Small grains inside swirl like snow when the ball is shaken. This snowball can be replaced with colored sparkles and make the ball not only winter.
How to do it: take a small jar and fill it half with water and half with glycerin from the pharmacy. Glue a decorative object to the lid and add glitter to the liquid. Before screwing the lid on, coat the inside edge with epoxy (water-resistant) glue to ensure security. The souvenir is ready!
Photos: 5waysto.net, instructables.com, quadradohome.com, marthastewart.com, bystephanielynn.com, homesthetics.net
Add to favorites20
- Tags
- with your own hands
- creative
- glass
- decor
do it yourself, creative, glass, decor
Decorative aquarium for fish
In principle, a glass jar can already serve as a house for underwater inhabitants. Inside it you can lay a base of soil, place decorative algae, colored pebbles, shells and fill the interior space with inhabitants, which you can make together with your child from plasticine. Bright colors and LED lighting will add irresistibility and fabulousness to such a composition.
Recommendations for working with tin cans
Simple three rules will help you avoid health problems, avoid cutting yourself and get a beautiful result after all your efforts:
- Hand gloves will save you from small and large cuts.
- The container must be thoroughly washed, dried, in other words, prepared for use so that the smell of food is not heard from them.
- It is recommended to use spray cans to apply paint evenly on the surface of the can.
The preparatory work is done and work can begin. Of course, the simplest thing that comes to mind is to make cheerful colorful flower pots for your winter garden. Let the brightness of the colors give you a cheerful mood.
Vault of Memories
As we already recommended in the Vacation Memories post, you can use jars to make decorative arrangements with memorable pieces. These can be things from some place, or reminiscent of an important event.
Very often our memories are embodied in photographs. Cans make original photo frames.
Interesting: if you pour olive oil into a jar with a photograph, you get an antique effect.
Lighting
By placing a luminous garland in a jar, you can create an original night light.
Romantic lighting can be set using pill candles inside glass jars. If you paint the jars with paints, the light will cast patterns on the surface.
You can even make an oil lamp from a jar.
Home terrarium
Not everyone will like this idea, but believe me, many will prefer this option, because in this case there is no need to interfere with various insects or other creeping things inside the container.
It is enough to place moss, a rock rose, a pine cone, a piece of tree bark and other hardy vegetation in the container. Close the filled jar and place it upside down, the original craft from the jar is ready.

