Every entrepreneur understands how important outdoor advertising is, and especially a noticeable illuminated lightbox. It is not difficult to order such a design from a specialized company; the cost of such a product is on average 10,000 rubles. Not every aspiring entrepreneur can afford to invest such an amount. But this is not required if you approach the issue from the other side. You can make volumetric illuminated letters yourself, while spending three times less on material. And if everything works out, then making advertising layouts can turn into another profitable business.
Our business assessment:
Starting investment - 100,000 rubles.
Market saturation is average.
The difficulty of starting a business is 4/10.
Stages of creation
- Use a professional marking board or a regular ruler to correctly mark the dimensions of the workpieces. Having decided on the desired size, draw the shapes with a simple pencil on cardboard. Then you need to cut out the blanks with a sharp stationery knife. We will need two parts for each letter, so we need to make them in two copies at once.
- We measure the length of each side of the workpiece around the perimeter. We cut out the sides: the thickness can be any, we will make them 5 cm thick. To do this, we cut out cardboard strips of the required length, 7 cm wide, leaving a centimeter allowance for hemming on each side. Having folded the allowances with your hands, we glue them to one side of the base with double-sided tape, forming the sides.
- We apply the second side of the letter to the side and also glue it with tape.
- We use regular adhesive tape to secure the part in random places for reliability.
- We decorate the resulting blank according to our own taste and desire.
A simple and quick way to design a blank is to attach it to beautiful paper (you can use bright wallpaper for this purpose), trace the shape with a pencil, adding a few centimeters on each side for folds. Cut the paper with scissors and glue it to the cardboard blank with PVA glue. Allow the glue to dry, then additionally decorate the facade with lace, beads, pearls, and artificial flowers.
Common options for words in capital letters for a wedding photo shoot: love, married, wedding, happiness, love, happy, just married, amore, amour. The phrases “I agree”, “Forever”, “Yes, I do”, “Family” also look beautiful in the pictures. Inscriptions with equation signs look elegant, for example, “Masha + Sasha = Love” or the inscriptions “Husband” and “Wife” with arrows facing the heroes of the photo shoot.
Volumetric letters with backlight
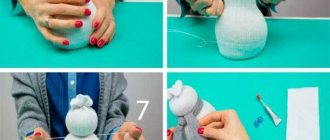
Three-dimensional luminous letters will become an original decoration for any holiday.
For illumination, you can use a New Year's garland or make individual light bulbs yourself and connect them using a wire.
Tools and materials
To work you need:
- thick cardboard;
- thin cardboard;
- stationery knife;
- ruler;
- a simple pencil;
- hole puncher;
- glue;
- glue brush;
- spray paint;
- narrow tape;
- box for painting letters;
- electric garland.
Step-by-step instruction
The manufacturing process consists of the following stages:
Stages of creating volumetric letters with backlight
- First of all, you need to select a letter template and calculate the size of the future figure.
- Transfer the template onto a sheet of thick cardboard with a simple pencil and cut out blanks for the future letter with a stationery knife or a sharp scalpel. This will make the edges of the parts smoother.
- Holes for light bulbs should be made along the perimeter of all blanks using a hole punch. Their number should be sufficient to understand which letter glows in the dark.
- Thin cardboard should be cut into strips about 5 cm wide and pasted over the outer surface of the product. This technique will give the figure additional volume.
- The completed letters should be placed in a prepared box and painted on all sides with spray paint of the selected color.
- Using the described method, you need to make several letters necessary to form an inscription or phrase.
- After the paint has completely dried, the produced liters must be laid out on a flat surface according to the inscription and the garland bulbs must be inserted into the holes on the back side. The wire should be secured with narrow tape.
Before installing the garland, you must make sure that it is in full working order.
Having mastered the basics of creating three-dimensional figures, you can make any inscription to decorate the interior or any holiday.
A decorative element that can add a festive mood to your home, regardless of the season.
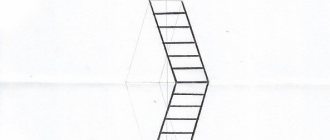
Step 2: Cut out the letter
Attach the plywood firmly to the table or metal frame with clamps and cut out the shape with a jigsaw. In places where you will need to make a sharp turn, make large holes in advance using a drill.
Advice:
If you are going to cut a large circle, a good solution would be to make transverse cuts initially - this way stress will not accumulate in the plywood, which can lead to strong kickback. Also, you will not have to additionally support the heavy cut piece.
Step 3: Sand the plywood
Using a grinder or by hand, sand the workpiece, especially the ends. Now you can bring the shape itself to perfection, if the saw leads a little in the second step, you can also do this with a grinder with coarse sandpaper.
Advice:
If you need to remove more than 3-4 mm, use a jigsaw.
Step 4. Make holes for the light bulbs
You need to buy a garland, initially having an idea of the future letter in your head, or, conversely, adjust the size of the letter to the garland. In any case, at this stage you have to count the number of light bulbs, divide it by the length of the letter and thereby understand the distance between them.
In my case, due to the complexity of the shape, I had to use two garlands of 20 light bulbs at once, one of them went along the bottom circle, the second - from top to bottom, in the center.
Mark future holes with a pencil. Place unnecessary pieces of plywood under the letter and secure them together with clamps - this way the holes will be neat on both sides. Drill holes slightly larger than the garland bulbs or the diameter of the sockets if you are using large lamps.
Step 7. Metal walls
Let's move on to the most interesting part - the moment when a two-dimensional object finally becomes three-dimensional. If you are making a simple letter, consisting mainly of right angles, this step should not be a problem - you need to measure the lengths of all the ends and sequentially transfer them to a strip of aluminum.
In my case, I had to take a more complicated path - stick masking tape along the length of all ends and mark the corners with a felt-tip pen as carefully as possible. After this, the tape must be glued directly onto the aluminum.
Advice:
When bending the walls, do not neglect the checks - it is better to check once again whether you are bending the metal in the right direction than to make a mistake.
If the metal used is soft enough (such as aluminum) then you shouldn't have any problems. Place two pieces of plywood on the table strictly parallel to each other, leaving a gap of 1.5-2 mm and fasten them tightly. Place a strip of metal on top so that the fold mark is exactly in the center of the gap between the plywood. Once again, make sure that you do not confuse the top with the bottom - the side lying on top will become the inner corner.
Place a wide spatula in the place of the future bend and hit it with a mallet, thus walking along the entire length - having received an even shallow groove, you can continue bending the aluminum with your hands to the required angle.
Step 8. Attach the walls
Having prepared the metal walls and bent them to size, you can proceed to the penultimate step - making an indent from the side of the strip, along the entire length, mark the future location of the nails at a distance of 6-9 cm from each other, re-place the unnecessary plywood and drill holes with a diameter of your nails .
It is not necessary to do this, but the prepared holes, firstly, will greatly facilitate the process of further driving nails into the plywood (the nails will not slip and there will be no need to apply additional force) and, secondly, will not allow the aluminum to bend unsightly at the point of hammering.
All that remains is to apply the metal to the end of the letter and, holding the structure tightly, secure everything with nails, being especially careful at the joints of the strips, if any.
Source
Making three-dimensional letters from wood with your own hands
Wood products are more difficult to make, but such letters will last longer. You can use both wood blocks and plywood. However, in the second case the letters will be flat. To make an inscription, you also need to make a stencil, which is transferred to the workpiece, and then cut out with a jigsaw.
It is very important to subsequently properly process the wood using sandpaper (eliminate irregularities and remove excess material). The letters can be painted, decorated with any material, and additional lighting can be installed in them.
The product must be varnished so that it is not afraid of exposure to moisture.
Volumetric letters made of paper
Three-dimensional letters are made from paper simply and easily. Such figures will be an excellent decorative element for wedding celebrations, photo shoots, etc.
Tools and materials
To work you will need:
- letter template of the required size;
- large format thick paper: whatman paper, designer paper or colored paper for creativity;
- scissors;
- stationery knife;
- a simple pencil;
- ballpoint pen with a non-writing refill;
- ruler;
- glue Titan or Moment;
- several books for the press.
Step-by-step instruction
The process of making a three-dimensional letter from paper consists of the following steps:
- First of all, you need to decide on a template, print it on a printer, transfer it with a simple pencil to a sheet of thick paper in two copies and cut it out.
- To form the ribs, you need to prepare several long paper strips with a width of 2 to 8 cm. The thickness of the figure depends on the width.
- On the prepared strips, press the fold lines using a non-writing pen.
- On the paper strips, you need to measure exact segments with a ruler. The corners also need to be drawn with a non-writing rod and bent. At the folds, the corners need to be cut off. On rounded areas, the parts to be glued should be cut on both sides with scissors at intervals of 2–4 mm. An important condition for working is that the ruler is positioned strictly at a right angle.
- Distribute the glue evenly over the entire surface of the rib area to be glued and join the front blank to it.
- The product should be turned over for a few minutes and fixed with your hand so that the glue sets.
- You need to glue the second (wrong) piece to the finished frame and leave the figure under pressure for a couple of hours.
- After the glue has completely dried, all defects and irregularities on the product must be eliminated using scissors or a stationery knife.
The inner part of the blanks should be cut out with a stationery knife and then continued with scissors.
Ready-made paper inscription-garland
When there is absolutely no time for preparation, but you want to decorate the room in some special way, ready-made templates, which artist-designers have already worked on, will come to the rescue. Each template is a white letter on a colored background in high resolution and with excellent rendering. All you have to do is print them separately on a color printer and combine them into the inscription “Happy New Year!”
Cut out the flags along the colored outline and secure them to the thread. For ease of fastening, make a fold at the top of each product towards the wrong side. Once you have threaded the thread, glue the fold to the base of the sheet.
Fabric pillow letters
You will need: red and white cotton fabric, sewing machine, scissors, thread, pins, centimeter, ruler, sheets of paper, pencil, filler - synthetic fluff or holofiber.
Master Class
- Draw letters on sheets of paper.
- Transfer the letters onto red fabric in 2 copies.
- Make patterns, taking into account an allowance of 1 cm.
- Cut strips for the sides 7 cm wide from white fabric (5 cm width of the side, 1 cm allowance on each side).
- Start with a simple letter L: fold the blank right sides together, leaving 5 cm of the sides free, then stitch the bottom of the letter, 1 cm from the edge.
- When the stitching approaches the corner, make notches to make the corner even.
- Sew the side to the part without finishing 4 cm - this will be the opening for turning it inside out.
- Attach the second part of the letter L and make marks with a pencil on the sides opposite the existing corners so that the letter is even.
- Attach the piece, secure with sewing pins and make cuts in the corners so that the fabric does not wrinkle.
- Sew the second piece, leaving 4 cm for turning.
- Fill the letter with filler and sew the hole closed with a blind stitch.
- Start creating the letter O: fold the two parts of the letter and make symmetrical marks with a pencil every 2cm on two blanks on the outer and inner sides of the fabric. Also make marks on the sides of the outer and inner rings.
- Make notches (cuts) along the marked marks.
- Sew the outer ring on one side, matching the marks, leaving 4 cm for turning.
- Sew the inner ring on one side.
- Stitch the edges of the inner ring strip to form a “tube”.
- Sew the free part of the outer ring.
- Turn the workpiece inside out, secure the inner ring with pins and sew it by hand with a blind seam.
- Fill the letter with filler and sew the hole closed with a blind stitch.
- Sew the remaining letters using the same pattern.
Fabric pillow letters are ready! I recommend watching this video!
Master class “How to sew a pillow letter”
Watch this video on YouTube
Tools and materials
One of the best things about this project is that it doesn't require a lot of materials. You probably have everything you need in your garage, closet or workshop. But even if you have to buy materials, it will cost mere pennies. So, you will need:
- Finishing tiles 10×20 cm with a rough surface texture.
- Wooden blocks 40.5 cm long to hold the tiles in place.
- Plywood as back panel.
- Stain.
- Polyurethane.
- Acrylic paint.
- Neon paint that glows in the dark.
- Screws for connecting the pieces of wood that hold the tiles in place.
- Adhesive Velcro – Used to hold the key in place in the secret compartment.
- Wire for hanging a sign.
Changing capital letters to lowercase letters using the Microsoft Word toolbar
Microsoft Word 2003
- Select with your mouse the piece of text you want to modify.
Select with the mouse a piece of text that will need to be changed - On the word processor toolbar, find the Format tab, located between Insert and Tools.
Click on it. Find the “Format” tab, click on it - In the window that opens, select “Register”.
Click on it. In the window that opens, select “Register” and click on it - In the interface that appears, select the phrase “all lowercase.”
Check the box for “all lowercase” - Click OK and the dialog box will close.
Click "OK"
Microsoft Word 2007
- Use your mouse to highlight the word or sentence you want to edit.
Select with the mouse the word or sentence that will need to be edited - On the toolbar, find the “Home” button.
Click on it. Go to the “Home” tab - In the “Font” group, located after the “Clipboard”, left-click on “Register”.
In the “Font” section, click on the “Aa” icon, which is called “Register” - In the dialog box that opens, select the phrase “all lowercase.”
Click on it. Click on “all lowercase”
So the user can choose the following letter spellings:
- “As in sentences” - the first character in the statement will be capitalized, the remaining letters will be small;
Example text with “As in sentences” included - “ALL CAPITAL” - all characters selected by the mouse will become large after pressing the button);
By selecting “ALL CAPITAL” all selected text will be in capital letters - “Start With Capitals”—the first characters of each individual text element selected in the document will be large;
subsequent characters will become small; Example of text with the “Start in Capitals” option enabled - CHANGE CASE - the text will be converted as follows: small letters will become large, large letters, respectively, will be small.
Example of text with the “CHANGE CASE” option enabled
DIY letter pillow
Nowadays you can no longer surprise anyone with an expensive toy or gift. The stores offer us a huge assortment of all kinds of goods for every taste and budget. But you always want more, you want to surprise and leave as a souvenir of yourself a thing in which you can feel the warmth of your hands and care. And only things made with one’s own hands can make a person smile as soon as he picks it up. Such a thing, for example, could be a personalized letter-pillow, which can be given as a gift for a baby’s first birthday or simply as a sign of attention.
To sew a personalized letter-pillow, we will need:
- cardboard;
- a simple pencil;
- scissors;
- ruler;
- fleece in two colors, in this case blue and white;
- needle and thread;
- padding polyester
First we need to make a stencil of the letter. We determine the size of the letter ourselves; in our case, the height of the letter is approximately 30 cm, the width is 25 cm. We take cardboard and use a pencil and a ruler to draw the letter on it.
If you have difficulties at this stage, you can print the letter on a printer using the Word program, the WordArt function. Cut out the letter and trace it on cardboard.
Instead of ordinary cardboard, you can use any available materials, the main thing is that they are thick enough, otherwise the stencil will slip on the fabric. In our case, for example, instead of cardboard, a regular shoe box lid was used.
Next, use scissors to cut out the letter along the contour. You can use nail scissors to cut out the hole in the letter A.
Now we apply the resulting stencil to the fabric and trace it along the contour. We make 2 parts.
Since the letter A is symmetrical, there is no need to ensure that it is positioned correctly on the fabric. But, if you are sewing, say, the letter P or C, then you need to place the stencil on the fabric in a mirror form. That is, you must have two parts that are “mirror” relative to each other.
After the letters have been outlined, we cut them out, but not along the contour, but 1 cm wider.
From white fleece, cut out a strip approximately 15-20 cm wide. The strip should be long enough to cover the side of the letter along the entire perimeter. The perimeter of the letter should not be measured in advance, since the initial result may differ from the final one. It is better to cut the strip longer and then cut off the excess.
Using the same printer, we cut out the letters of the name of the person for whom the pillow is intended. It is not necessary to cut out the internal holes of the letters; they can be made directly on the fabric.
We apply the letters to the fabric and trace along the outline. Remember about “mirror” letters.
Cut out all the letters along the contour. To cut out the holes in the letters, you can again use nail scissors.
Next, take a strip of fabric and one of the letter parts and, starting from a straight line, sew them to each other along the contour line with a “back needle” seam. In this case, the fabric should be positioned right sides to each other, but we sew the parts on the wrong side.
Sew a strip around the entire perimeter.
After this, we sew the ends of the strip to each other. If the fabric is longer, simply cut off the excess part.
Next, we again cut out a strip of white fleece the same width as the previous strip, but much shorter.
Place the fabric right sides together again and sew a strip on the wrong side around the entire circumference of the hole. The ends of the strip are also sewn on. You will get a “pipe” like this.
Now we sew the second part of the letter to the strip in the same way as the first, but carefully ensure that the parts do not twist. Therefore, first we find the corner of the letter (say, the lower right one on the leg of the letter), mark it on both parts and begin connecting the parts from this point. We also sew the second part along almost the entire perimeter, leaving a small hole at the end. The hole should be wide enough for your fist to fit comfortably into it.
Next, turn the letter right side out and thread the “pipe” of the letter’s hole through the hole of the second part.
Now we sew it to the edge of the hole of the second part using a “hidden” seam.
After this, you can evenly fill the letter with padding polyester through the hole left earlier.
Once this stage is completed, close the hole with a “hidden” seam.
Now we place the previously cut out letters of the child’s name on the side and sew them with a “back needle” seam.
The personalized letter pillow is ready.
The author of the master class is Elena Sharygina.
What are modern illuminated signs made of?
Advertising structures with built-in light bulbs can be ordered from many specialized companies; there are even large production facilities that are ready to provide luminous inscriptions and banners of enormous sizes. At the same time, the price of volumetric illuminated letters is high - after all, this is the most popular type of advertising, on which the company’s traffic and its image depend.
Having visited the manufacturer’s website, it may seem that such products are structurally complex, and their creation requires professional training.
So what are light letters actually made of?
- Front and back panel: PVC, foam or acrylic glass.
- Sides: PVC - colorless or milky.
- Self-adhesive colored film or paint.
- Light scattering film.
- LED strip or modules.
- Fasteners.
In some cases, a plastic base is used, which hides the electrics and acts as a canvas for the letters.
How to make three-dimensional letters from foam plastic
There are several advantages of letters made from foam plastic: ease of use, cheap material, and the shapes hold their shape for a long time. Making volumetric letters from it is much easier than gluing a cardboard frame.
List of materials:
- foam sheets;
- pen or marker;
- ruler, sharp knife;
- thick paper;
- fine sandpaper;
- PVA-based glue;
- newspaper or thin parchment;
- acrylic paint, brush.
Operating instructions:
Buy polystyrene foam in sheets. You can find it in construction stores. Choose shapes that suit your thickness. If there are none, then you will have to glue several sheets together.
Draw the template first on a piece of paper. This way you can adjust it, which would be difficult to do with foam. Transfer the letter diagram onto the material. For convenience, divide the sheet into several parts according to the size of the workpieces.
Using a utility knife, cut out shapes from foam. Use a metal ruler to help you - move the blade along it. This will prevent the knife from slipping off in the wrong direction.
- The cut line must be sanded. Choose one with fine grains to ensure an even surface. Use a brush to brush away any excess foam scraps.
- To decorate the letters, use newsprint or thin parchment. Tear them into small pieces, apply glue to them and secure them to the foam. Super glue and a glue gun are not suitable for this material.
- After you have covered the entire surface of the figure, leave the glue to dry. Additionally, there is no need to prime the surface, since the glue acts as a primer.
- Now you can apply acrylic paint. If the layer turns out transparent, then paint the letters again. But only do this after the first layer is completely dry.
You can leave the figures in this state or decorate them with ribbons, beads, and artificial flowers.
As you can see, there are a lot of ways to make three-dimensional letters. If you make such decor with your own hands, you can not only decorate the interior or enliven a photo shoot, but also save on the original design.
Giving letters color
Stylish and effective PVC letters that can attract the attention of a potential buyer should have color.
For these purposes, you can use several options:
- colored self-adhesive film;
- acrylic paint;
- aerosol paint from a can;
After the material for imparting color has been selected, it is worth rinsing the letters with water and drying, and then treating them with a degreaser. An ordinary solvent is suitable for these purposes.
In professional workshops, letters are covered with two types of film - to give a scattering effect and for color. This option is considered the most correct, but the cost of three-dimensional letters will increase.
How to paste over letters?
This stage requires special care, because this is the form in which the sign will appear before customers.
The first layer is applied a translucent film with a light-scattering effect. On top of it is a regular, self-adhesive colored film of the required shade. Excess is removed using a stationery knife. If desired, the sign can be made multi-colored, transparent or with a variety of effects.
The translucent film must be glued to a damp surface, moistening the letters with water from a spray bottle.
If large luminous volumetric letters will be located on the street in a place unprotected from external influences, then the side parts of the sign should also be covered. This can be done by folding the film from the front to the sides. Thus, they will last much longer and retain their neat appearance for several years.
How to remove unevenness?
To avoid unevenness on the surface, you should use a plastic squeegee. If bubbles still appear during the pasting process, you can resort to the “grandmother’s” method and pierce the swellings with a thin needle. A hairdryer will also help correct the situation by heating the film to the required temperatures, making it movable on the surface.
Use of other technologies
To add color to the letters, you can use other options: acrylic or spray paint. This method will help save money, but will not be as reliable and durable. Any paint, even the most durable, will fade over time. In addition, you should not overdo it with the material - a surface that is too dark will not be able to transmit enough bright light.
Volumetric letters made of cardboard
Cardboard is one of the simplest and most affordable materials for creating three-dimensional letters. It is very easy to work with and you can make shapes of different sizes from it.
To make voluminous inscriptions, it is recommended to use thick paper from packaging boxes.
Schemes and templates
Before starting work, you need to select a stencil with a letter and font.
At the next stage of work, the template of the future letter should be transferred to a sheet of ordinary or corrugated cardboard. Further manufacturing technology may differ.
Three-dimensional letters from cardboard can be made in three different ways.
Method No. 1
The simplest and fastest way is to make figures from several layers of cardboard. Such products are distinguished by their heavy weight and reliability in operation.
Tools and materials
To create three-dimensional figures from cardboard using this method you will need:
- regular or corrugated cardboard;
- scissors or stationery knife;
- PVA glue;
- long ruler;
- a simple pencil;
- decoration material: thick threads, colored or wrapping paper, artificial flowers, shells, small stones, beads or beads.
Step-by-step instruction
The workflow consists of the following steps:
- Using the selected stencil, you need to make from 7 to 10 identical cardboard blanks.
- All blanks should be glued together with PVA glue.
- After the glue has completely dried, the finished volumetric letters need to be decorated.
To decorate finished three-dimensional letters, you can use thick threads, which you simply need to wrap around the figure or paste it with colored or wrapping paper, decorate it with flowers, beautiful shells, small stones or beads.
Method No. 2
The second method of making three-dimensional figures is a little more complicated than the first. But with its help you can make classic letters that will become a real decoration for your interior or holiday celebration.
Tools and materials
To work you need:
- ordinary cardboard;
- scissors and stationery knife;
- PVA glue;
- ruler;
- a simple pencil;
- non-writing ballpoint pen;
- several books for the press;
- materials for decoration: white paper, glitter, beads, shells, bows, satin ribbons, etc.
Step-by-step instruction
The workflow consists of the following steps:
- Using pre-selected stencils, you need to cut out two identical parts from cardboard.
- To form the edge of the future figure, you need to cut a strip 3–4 cm wide greater than the thickness of the product.
- Using a non-writing rod, you need to draw fold lines through which the workpieces will be held together into a single whole.
- All parts must be bent along the formed fold lines.
- One of the blanks should be glued to the edge of the product. For greater convenience, in areas of the figure with smooth lines, the fold of the rib should be cut with scissors.
- In a similar way, it is necessary to glue the second blank to the rib.
- The finished letter should be placed under a press for several hours.
- After the glue has completely dried, the three-dimensional letter can be covered with white paper, sprinkled with glitter, decorated with beads, shells, bows, satin ribbons, etc.
To create three-dimensional letters with your own hands from cardboard, the third method is to use the papier-mâché technique.
Tools and materials
For production you will need:
- regular or corrugated cardboard;
- cardboard paper towel rolls;
- white printer paper;
- scissors and stationery knife;
- PVA glue;
- ruler;
- a simple pencil;
- acrylic paint;
- paint brush.
Step-by-step instruction
The creative process consists of the following stages:
- You need to draw two blanks on cardboard using the selected template.
- The paper towel roll should be cut into several identical rings with a width of at least 2 cm. The thickness of the future figure depends on their width. To create one letter you will need at least 7 such rings.
- The prepared paper rings must be glued onto one of the blanks without going beyond it.
- Apply glue to the free edge of the paper rings and glue a second cardboard blank to them.
- White printer paper should be wrinkled and cut into small strips.
- Use prepared paper strips to cover the surface of the letter in several layers and wait for the glue to dry completely.
- The finished figure must be covered with a layer of acrylic paint.
Decoration of volumetric letters
There are many ways to decorate cardboard letter blanks. They involve the use of a variety of materials. Moreover, the process itself will not be complicated and burdensome.
Corrugated paper
This method is one of the simplest. It will require:
- Crepe paper;
- Scissors;
- Glue.
We follow the instructions:
- We unfold the corrugated paper and cut it into strips 70-100 mm wide.
- We fold the strips like an accordion.
- We cut the resulting accordion along one side. The distance between cuts should not be more than 15 mm.
- We retreat the width of a strip of crepe paper from the edge of the workpiece, glue the cut accordion onto the base with the fringe facing up.
- In this way we glue the entire workpiece, row by row.
Napkins
Paper napkins are an inexpensive and simple material with a soft base. It should be noted that to design three-dimensional figures they will be required in large quantities.
Preparation required:
- Napkins;
- Thread;
- Stapler;
- Scissors;
- Glue.
We carry out the work as follows:
- If possible, divide the napkins into layers.
- Take a few napkins, fold them in half, and fold them again.
- Using a stapler, we fasten the resulting squares in the center.
- We cut the square so that it turns into a circle.
- We lay out the round blanks on the table and lift up all the layers of the napkin with our fingers.
- We attach the resulting volumetric blanks to the cardboard facade using glue.
Textile
To decorate in this way, you need to have patience. All actions must be very careful.
In addition to the cardboard blank, you should prepare:
- Glue;
- Scissors;
- I love any fabric.
We proceed in the following sequence:
- Apply glue to the front part of the workpiece. It is better to use super glue, as it will not create additional volume between the cardboard and the fabric.
- We put the fabric on top and stretch it a little with our hands. There should be no folds on the front surface.
- We press the material and wait for the adhesive to dry.
- Turn the letter over with the side with the fabric already glued down. Carefully and evenly cut off excess material.
- Similarly to the first, we design the second side of the façade of the blank.
- After the glue has completely dried on large parts, glue strips of fabric to the sides.
Letters - alphabet
Letters can be used not only for decorating holidays and celebrations. They will look no less impressive in a children's room. You can always make an alphabet from felt for your beloved baby. This way he can not only play, but also learn letters.
DIY crafts, how to make a clock from scrap materials? Summary of a lesson on applique in the middle group on the theme of mushrooms, stencils, crafts Kanzashi bows for September 1 from satin ribbons for beginners, step by step What you can make with your own hands from a box and a cardboard box, how to decorate an organizer, box, shoe box
To work you will need to prepare:
- Thick threads;
- Multi-colored felt;
- Sintepon;
- Office paper;
- Soap or chalk;
- Scissors;
- A simple pencil.
Making templates for letters is very simple; they do not have to be very large. All necessary blanks can be printed on a printer and cut out, leaving an allowance of 5 mm.
Next we make the alphabet:
We apply the template to the felt and outline the outline using chalk or soap.
- We sew the felt using a thick thread, but not all the way.
- Through the small hole left, fill the letter with padding polyester or other filler. To make it more convenient to push it, you can use a simple pencil.
- Sew up the hole.
To decorate the letters, you can use flowers and figures, also cut out of felt.
.
Three-dimensional letters and numbers can be made in a variety of ways. Moreover, almost anyone can do them. In this way, you can not only make your photo shoot or holiday original, but also save significantly on decor.
In the video below, we invite you to watch a step-by-step master class on making three-dimensional letters from the most affordable material - napkins.
Foam letters
Foam letters with creative inscriptions are a popular accessory for a wedding photo shoot. Lightweight foam words look beautiful in pictures. You can toss them in the air for creative and fun photo ideas. It’s easy to make large foam plastic parts for filming; you just need to acquire the necessary material, imagination and free time.
Necessary materials
- Polystyrene foam (use polystyrene from packaging for household appliances or specially purchase it at a hardware store, where they sell it in various thicknesses, so you can choose the thickness of the material needed for your idea).
- Bright marker.
- Stationery knife (sold at a hardware store in the wallpaper department).
- A piece of fine and coarse sandpaper.
- Various decorating materials: fabric, paper, paints.
Calligraphy inscription
Finally, a few examples of New Year's inscriptions on a transparent background. You can print any of them to create a holiday poster, wall newspaper or craft. Or you can use them as a visual example and try to write a calligraphic greeting inscription yourself - a beautiful font will help you.
When creating New Year's decor, it is not so much the result that is important, but the creative process itself. Take these ideas and have fun preparing for the New Year!