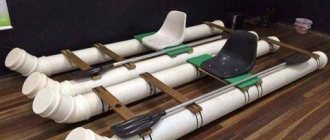
Chandelier manufacturing technology
Many may think that when using pipes and plumbing components, a chandelier will look rustic and even clumsy, but this is not so. With the right approach and careful execution, they create a work of art even from such simple materials.
Build process
For production you will need pieces of metal-plastic pipes, splitters, a ceiling socket, and cartridges.
Watch this video on YouTube
To begin with, they think about the design of the future product and the number of lamps that will be installed. In the center of the entire structure there will be a splitter, to which the pipes are connected and bent into the desired shape. Wires are passed through the resulting workpiece. Since the cord will pass through several end points, it is recommended to run parallel lines into each separate branch, connecting them only under the ceiling rosette, excluding breaks inside the chandelier.
Chucks are attached to each pipe at the ends, having previously connected them to the cable. Through a small piece, connect the socket to the splitter. Then the electricity is connected.
The finished product is painted and equipped with lampshades. The main thing is that the result pleases the inhabitants of the house.
How to choose
A pool ladder can be:
- Foldable. Simple and easy to assemble, it can be stored away during the cold season.
- With transition platform. Allows you to stand up and take a comfortable position. Optimal for children or elderly people.
- With or without handrails. Handrails provide safety, but may not be installed if the design provides for the ability to hold on to other parts of the frame.
- Single or double sided. Single-sided stairs are designed to go up or down only, while double-sided stairs can be used both up and down.
- Inclined. The most convenient and safe. The sloping part is located in the bowl itself and occupies some of its volume, so it is rational to use them in large pools.
- Vertical. Very compact, can be installed in any limited space.
- Roman. It is a structure of cascading diverging steps. Sustainable, safe and original. Suitable for large stationary swimming pools.
The choice of staircase type depends on the type of pool (stationary, temporary), its depth, the height of the sides and the desired options. If the pool will be used primarily by young children, it is recommended to provide handrails and a transition area.
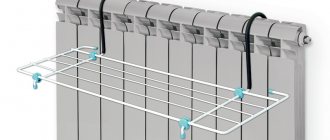
Shoe shelf
For this DIY propylene pipe craft, you will need large diameter pipes. Depending on the planned number of compartments, a different number of pipes may be needed. The structure of the shelf itself can be absolutely anything. The creation process will be the same for any variation.
Initially, you need to measure the required length so that the shoes fit freely. Next, cut the pipes into these sections and sand them with sandpaper to avoid injury and damage to shoes in the future.
After this, all pipe sections are glued together to form a multi-level shelf. The shelf itself can be in the shape of a square, rectangle, triangle, or any other shape.
If the shelf is too high, care must be taken to secure it to the wall it leans against. This will give the product greater stability and strength.
Materials
The staircase is in quite aggressive conditions. High humidity combined with oxygen in the air are factors that cause corrosion of metals and rotting of wood. Therefore, the choice of materials for pool stairs is not so great:
- Stainless steel or aluminum. Lightweight, hygienic and corrosion-resistant metals can be used to make stationary or portable stairs. Most often, a pipe with a diameter of 40 mm is used, which ensures the strength of the frame and handrails. The steps can be made of corrugated sheet or in the form of a lattice to reduce slipping.
- Wood treated with antiseptics. It is advisable that the wooden parts are not in water. This is dictated not only by the fact that wood rots quickly, but also by safety. Wet wood becomes covered with mucus and algae and becomes slippery. And this is a direct path to falling and injury.
- Stone, concrete. In stationary pools there are no restrictions on the use of these materials. As a rule, concrete steps are lined with tiles or stone. It is worth focusing on special types intended for use at high humidity.
- Plastic. Resistant to water and corrosion, but afraid of ultraviolet radiation. For the manufacture of stairs, it is advisable to use plastics with UV protection. Information about this can be found in the technical documentation or material labeling.
If the bottom of the pool is made of waterproofing film, it must be protected from punctures. The lower part of the ladder, which rests on the bottom, is insulated with overlays with non-sharp edges.
Crafts made from polypropylene pipes for the garden
Idea 1. Crafts made from PVC pipes in the form of a country chair
The most important thing to consider when designing country furniture: the more polypropylene pipes included in the design of a chair or garden lounger, the more weight it will be able to withstand. If you need a high chair for a child, a minimum number of PVC pipes is enough, and the seat for the chair can be made of thick fabric. It is better to make a DIY chaise lounge for an adult entirely out of plastic.
Idea 2. Floral vertical gardening made from propylene pipes
If you have unsightly, unattractive walls in a suburban area, be it a bathhouse or a barn, you can decorate them using vertical landscaping made from polyethylene sewer pipes. Polypropylene pipes with holes, plugs covering their sides, and metal fasteners are all that is needed to make a hanging garden flower bed. Here it is good to grow the same flowers that can be planted on the balcony in boxes - petunias, violas, pelargoniums, marigolds.
Idea 3. Border for a crib
The idea is not exactly a country idea, but it will be appreciated by those who have small children. To prevent your child from falling out of bed at night, make crafts from PVC pipes with your own hands in the form of a side for a crib.
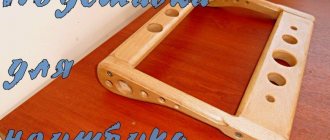
Idea 4. Crafts from pipes in the form of a stand for wine glasses
A great idea for creating a country bar. A slot is made in the polypropylene pipe along the width of the glass leg, and holder legs are screwed on top, with which the structure is attached to the ceiling.
You can make a cool stand for forks, knives and spoons from PVC pipes in your country house. Stylish and tasteful, isn't it?
Idea 6. Vertical beds made of PVC pipes for a summer residence
A fabulous place for friendly gatherings and at the same time vertical beds can be made from plastic pipes. Such an original gazebo will certainly become a favorite place for country holidays. It's done simply:
- Dig in the pipes for the base of the gazebo.
- Strengthen the roof in the form of slopes, make several transverse shelves on which to plant climbing plants, for example, bunched cucumbers.
When they grow up, it will be pleasant to be in the gazebo even on a sunny day. To make the gazebo look more picturesque, use brown polypropylene pipes.
Idea 7. DIY garden swing for children
Plastic pipes with ropes holding the swing will become convenient handrails. The manufacturing process for such a country swing is quite simple. Eight pieces of pipe with holes, rope and a board are all you need.
Idea 8. DIY crafts from polypropylene pipes for dogs
Here's a fun step-by-step tutorial on how to make a backyard shower for dogs. Today I’ll give my husband this idea for Rex!
The author of this device had difficulty bathing his dog for a long time. When the water was briefly turned off, the dog would run away, and the hose would scare the living daylights out of him, so he had to somehow get out of it, and this took a lot of time and effort. Not everyone dares to bathe a dog in their own bath. But even an incompetent person can create such a shower from simple plastic pipes.
For this original DIY craft made from plastic pipes you will need:
- 12 m of polypropylene pipe of suitable cross-section
- 8 corner tees
- 3 tees at 90° angle
- swivel adapter from pipe to hose
- flexible hose for water supply
- metal clamp for fixing the hose
- hacksaw for metal
- screwdriver
- construction tape
- drill with a drill bit for making holes in a pipe
How to make crafts from propylene pipes
Start by preparing the details. Mark the polypropylene pipe into the following sections: 79 cm - 8 parts, 101.5 cm - 3 parts, and one part 100 cm, 93 cm, 6 cm and 4.5 cm. Cut the parts using a hacksaw.
Measure the required length of the flexible hose for supplying water to the shower and prepare a piece of the required size. Then proceed to the preliminary assembly of the structure.
Assemble the side frames from 79cm lengths using corner tees. Also connect them together with long pipe sections of 101.5 cm.
The fourth section is divided into two parts: 93 and 6 cm. Between them there will be an insert for supplying a flexible hose.
Use a drill press to drill holes. Select the appropriate drill size. If there is low water pressure in the plumbing system, it is better to use a smaller drill.
Test the shower before using it. Turn on the water supply and check all connections for tightness
Particular attention should be paid to the metal adapter from pipe to hose. Leakage is possible here if silicone sealant was not used when connecting the parts.
Alcove
These outdoor structures require good materials for construction, and PP blanks are ideal for this situation.
The design configuration can be anything, here everyone can realize their fantasies.
Video: making a gazebo yourself
Canopy made of PVC pipes and bathroom curtains
Partition
The principle of this polypropylene craft is exactly the same as in the previous case. Except for the unnecessary need to select pipes of a specific, identical diameter. Absolutely any will do, but preferably a medium diameter in order to accommodate as many parts as possible.
Initially, you need to take the pipes and make appropriate markings on them. The marking is done in such a way that in the future it will be possible to cut even round pieces of equal thickness. The resulting large number of parts, each about 1 cm thick, can begin to be connected to each other.
Regardless of the required shape of the partition, all parts are connected to each other using glue, leaning against each other edgewise. This creates a beautiful, translucent partition.
This solution can be used as zoning to isolate a certain area from the rest of the room, to designate shelves with books, etc.
Arrangement of the dacha
There is a lot of use for pipe scraps in the dacha area. A beautiful luxurious arch will decorate the site, especially if you put climbing flowers along it (clematis, morning glory, roses).
Pipes can be turned into whimsical planters and small flower beds. Plants live quite comfortably in plastic pots.
If you have a garden, you can make a bird feeder from pipes and scrap materials (planks, polypropylene thread). In addition to products that are pleasing to the eye, for the garden you can make your own frame from pipes for a gazebo, or a woodshed near the barbecue.
The list of ideas for creating useful things that can be brought to life from polypropylene pipes is endless - a stylish vase, a flower stand, a paper towel holder, toys for children, furniture made from plastic pipes, etc. A handmade product will not only delight you, but will also become a reminder that you have made a small contribution to preserving the ecology of our planet.
Staircase requirements: criteria required by responsible developers
When planning to equip a room with a swimming pool, or thinking about a project to build a pool on a personal property, developers must be careful when choosing accessories for a hydraulic structure. In addition to slides, springboards, skimmers, overflows and artificial waterfalls, the bowl must be equipped with a ladder.
There are special requirements for this structural element. It must combine a number of qualities. The first of these is safety. The ladder should ideally allow pool users to gently dive into the water and easily exit the pool when swimming is complete. The presence of flimsy parts, slippery steps or inconvenient handrails is unacceptable, as this can lead to injury when using the pool for its intended purpose.
- Ease of use;
— high ergonomic design;
— comfort;
— reliability;
— long period of operation;
— no need for labor-intensive major and current repairs;
— ease of installation and maintenance.
All these conditions are met by a plastic staircase designed by the developer himself and welded from polypropylene blanks with a special soldering iron.
Tips for choosing polypropylene pipes
This material is so popular that manufacturers began to produce a huge number of products, which are divided by type, structure, thickness, color, diameter, reinforcement and areas of application. Taking these features into account, it is quite easy to select inexpensive and appropriate quality pipes for the construction of a greenhouse.
By type of use, polypropylene pipes are suitable:
- for hot water supply;
- for cold water.
It should be noted that polypropylene pipes intended for hot water have thicker walls. This feature must be taken into account when selecting material for a greenhouse. The maximum permissible pressure inside the pipe depends on the wall thickness:
- 10 atmospheres;
- 16 atmospheres;
- 20 atmospheres.
According to their structure, polypropylene pipes are divided into:
- Single layer. Depending on its purpose, the material is marked as follows:
- РРВ, PPH - pipes with such designations are used in cold water supply systems for industrial-scale reservoirs and ventilation systems;
- PPR - this marking indicates that the pressure in the pipes is distributed evenly, so they are suitable for both hot and cold water supply. In everyday life, pipes with this designation are called universal.
- Multilayer. Pipes contain reinforcing layers of various materials:
- fiberglass fabric;
- aluminum in the form of foil (such pipes are divided into smooth and perforated).
The use of fiberglass makes polypropylene pipes more durable, but significantly increases the weight of the material. Pipes with such reinforcement, unlike those reinforced with aluminum foil, do not need to be cleaned before installation in the connecting parts.
When using several layers for reinforcement, hot melt adhesive is used.
In order to distinguish simple pipes from reinforced ones when purchasing material, it is necessary to inspect the place where they are cut. Reinforced material has a layer of aluminum or fiberglass between the inner and outer layers of polypropylene. It is difficult to make a visual mistake, since the interlayer differs in color from the pipe material.
The reinforcing layer can be seen on a section of the pipe - it will be orange when reinforced with fiberglass or silver when reinforced with aluminum foil
Pipes containing an aluminum or fiberglass layer in their structure have different markings:
- PPR-FB-PPR - for polypropylene pipes with a fiberglass layer;
- PPR-AL-PPR or PPR-AL-PEX - for material with aluminum reinforcement.
The material is made in various colors and shades:
- white;
- black;
- grey;
- green;
- beige;
- blue.
It should be noted that black polypropylene pipes are the most resistant to ultraviolet rays.
Polypropylene pipes are painted in different colors, among which black is the most resistant to UV rays
Polypropylene products are widely used in the following areas:
- cold and hot water supply;
- air conditioning systems;
- warm floors;
- compressed oxygen supply systems;
- fire safety systems;
- complexes for cooling ice arenas.
Having understood the specified features of the material, it will be much easier not to make a mistake in choosing the right products and connecting elements for them. When purchasing polypropylene pipes, you should consider the following material parameters:
- pipe diameter;
- linear expansion coefficient;
- maximum permissible temperature and pressure.
It is also important to pay attention to the manufacturer of the polypropylene pipe. The most famous companies producing polypropylene products are:
- Banninger, Akwatherm, Rehau, Wefatherm are German companies that have proven themselves on the positive side. Their products are of high quality and meet all European standards. Polypropylene pipes from these companies are considered the best.
- Ecoplastic and FV-Plast are Czech enterprises producing polypropylene products. The quality of pipes from these companies is not inferior to manufacturers from Germany.
- Pilsa, Kalde, Valtek are Turkish factories. The cost of polypropylene pipes is lower, and therefore the quality is not as high as that of European manufacturers.
- Chinese manufacturers. They mainly offer low-quality goods at low prices.
- Russian companies. They produce products of average quality, which are more suitable as a budget option.
Benefits of using plastic
The basis of the structure can be ordinary water pipes, fastened together with fittings or other elements. They won't cost much.
In addition, among the important advantages of their use it is worth highlighting:
- resistance to environmental influences;
- long service life;
- parts are easy to replace and the structure can be disassembled;
- ease of installation;
- speed of assembly;
- low price;
- no need to make a foundation;
- the material does not rot or rust;
- the gazebo can be made in accordance with the style of landscape design.
Photo: water pipes
But when starting to make it, you need to remember that this is a shelter option only for the warm season. In winter, the structure should be removed from the street - during severe frosts, the plastic begins to deform.
When purchasing pipes, pay attention to whether there is any odor coming from them. If yes, then it is better to discard this product immediately, otherwise the smell will emanate from the finished gazebo.
Play complex for cats
A play complex for cats is assembled from tubes and plastic bars. After making the structure, each part is covered with thick fabric or rigid cord, which will later be used as a scratching post. The complexity of the design depends on the patience of the owners and the activity of the pet. You can build a simple house with a horizontal ladder, a lounger and hanging toys. Some don’t stop there and assemble real cat palaces with “hammocks”, a complex system of transitions, “booths” and wheels for running, like hamsters in cages.
Concrete staircase
The most reliable, practical and safe. Since it is covered with finishing materials suitable for finishing steps. It has an anti-slip surface, a wide step projection and can serve not only as a descent, but also as a place to rest. The downside is that concrete construction often takes up a lot of space and is not suitable for small pools.
ADVICE!
Approximate proportions for concrete mixture: proportions of M20 concrete 1×2.8×4.8 (cement, sand, crushed stone.). Water is added based on the specific situation.
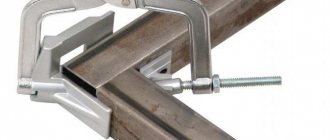
Pipe connection qualities
The service life of pipe products, as well as the performance characteristics of use, depend on the connecting qualities of pipe scraps. Let's talk in more detail about ways to connect material for household items.
Crafts made from natural materials - ideas for making, photos, tips
DIY military crafts - creative ideas, tips, photo examples
Pipe connection options
- Connecting two pipes using sockets. We first clean the pipes inside and out, treat them with lubricant, and then insert one part into the expanded part of another part. This assembly method is very convenient for country houses.
- Gluing parts with glue. This option is more reliable, but will require a lot of time. First, the connecting parts are treated with sandpaper and degreased, and only then glue is applied to the outside of one pipe and inside the socket of the other. At the very end, we connect the pipes, twist the inserted pipe a little, and then squeeze them for a minute to secure them well. We carry out all manipulations with parts very quickly. And we leave our design until the glue dries.
- We connect several blanks using bolts, having drilled holes in advance. This option is the most difficult, but ensures the durability of the structure.
Now let’s look at the most popular crafts that will not leave anyone indifferent.
Interior decorations for every taste
Organizers
Those who are beginning to understand the basics of homemade art can easily and simply make original stands for stationery from pipes of different diameters. Manufacturing is possible by attaching it to a table (wall), having previously cut each part at an angle. For a portable option, the trimmings are glued together. If you wish, paint the finished coasters in your favorite color.
Simple DIY crafts - instructions for creating products from paper, cardboard, pine cones, fabric, bottles
Do-it-yourself foam crafts - features of work, master classes, photo examples
The resulting stand for pens and pencils will perfectly decorate the table and create order and comfort on the desk.
Designs that act as shelves for books will highlight the refined taste of the apartment owner.
Frames for mirrors or photographs
A frame for a photo or a mirror, decorated with short sections of pipes of different widths, will add zest to the apartment. To do this, we lay out rings in an intricate pattern on cardboard and glue them together.
Shoe shelf
An interesting way to store shoes is with shelves made from a large number of homemade wide pipes. To manufacture the product, it is necessary to glue the parts together or fasten them with self-tapping screws. We attach the finished shoe rack to the plywood, and then fix it on the wall.
Children's crafts from waste material - tips, interesting ideas, new photos
Knitted overalls for newborns - choosing a model, patterns, tips for beginners
Flower stands and pots
Flower pots on stands made of PVC pipes will look cute. Such a strong stand will create a living corner in the apartment.
You can make flower pots from small sections of sewer pipes. If you decorate them with paper, stickers or paper, it will be design know-how.
Decorative vase
You can decorate the interior of your apartment in an original way using long pipes, turning them into fashionable vases for dried or artificial flowers.
This craft can be presented as a souvenir for some important holiday.
If you use your imagination, then with the help of segments you will create many useful things: hangers, a trash can and much more.
Drawing up a drawing
It is better to draw the stairs yourself. This will allow you to create the most suitable design for a specific situation. The staircase design includes several important points that cannot be ignored. The drawing indicates the height of the structure, as well as the distance between its handrails.
Also, the diagram must include the number of steps. This takes into account the distance between them. The shape of the handrails will need to be shown in the drawing. The more detailed the design design is, the better. Do not also forget about the fasteners with which the finished structure will be fixed to the pool bowl.
If you approach the drawing up of the diagram with all seriousness, then on your own you can draw up a detailed project that corresponds to the individual characteristics of the tank.
Plastic pipes. Interior ideas
Crafts made from pipes look fresh and not hackneyed in the interior; a significant plus should be seen in the cost of the material. You can create unique things without investing just your time! Below are examples of what you can easily make from leftover pipes.
Work organizer
We advise you to start making crafts with the organizer. It couldn’t be simpler - cut the pipes at the same angle and glue them to a solid base. You can arrange them in a fancy shape, paint them in your favorite color, or leave them natural. Now the workplace will be in perfect order.
Frames for mirrors and openwork partition
To make a frame you will need pipes of different diameters, thick paper (cardboard), a jigsaw, glue and a mirror. Trace the outline of your mirror on cardboard and remove it. Now, cut the required number of pieces and create a beautiful frame for your mirror. In places of contact, spread the pieces with glue, ensure that the parts adhere to each other and leave the frame alone until the next day.
Using the same principle, you can make an openwork partition for zoning a living space. This design of large diameter circles looks beautiful.
Clothes hanger
There is a huge variety of hangers these days. It all depends on the task at hand. If you have a small hallway, then a stand-up hanger will be what you need; if you need to make a hanger for a child’s room, then a U-shaped one with a stable base and additional branches for hanging a backpack will be an excellent solution. For little money you will get a designer item! It should be noted that you can decorate the resulting product in a color that matches the interior.
Pots and vases for flowers
Crazy hands make cool flower pots from sewer pipes of large diameters, and flowerpots from thin ones. You can get a stylish composition from such flowerpots by installing them on a common base made of painted plywood. You can decorate the pots with stickers, you can paint them with acrylic paints and varnish them, you can print family photos on self-adhesive film and wrap homemade flowerpots.
Shoe shelf
Use the remaining pipe from the sewer wiring as a stylish shoe rack. The diameter of the pipe must be at least 150 mm so that you can comfortably place your pair of shoes. Cut the pipe into pieces 25-30 cm long (slightly longer than the length of the boots).
Pipe connection methods
Plastic pipes are like construction parts. By combining pieces of different lengths and connecting them at different angles, you can get anything: a beginner will be glad that he built a simple hanger, and a professional can easily assemble a bunk bed. The main thing is to be able to connect pipes correctly, and then you can do any thing necessary in the household.
Plastic pipes are a collective name for water, sewer and heating pipes that are made from polymers. PVC and polypropylene pipes are in greatest demand. Sections of different lengths and diameters remain after the repair of utility networks in an apartment or country house, and, as a rule, are trashed in storage rooms, or rather, they were trashed until enterprising craftsmen began to use them for other purposes than their intended purpose. Plastic pipes are characterized by low weight, high strength and durability, they are easy to maintain and safe.
Polypropylene pipes are connected using a special welding machine. It is expensive - it is more profitable to rent it, and it will take a little time to learn how to use it. Compression fittings can be used for connection. In any case, the assembled product will not be disassembled.
When we talk about crafts made from plastic pipes, we usually mean PVC pipes, which can be connected to each other in the following ways:
- connection into a socket with a rubber seal. Manufacturers supply socket pipes with a rubber seal located at the end, thanks to which work on connecting pipes is carried out simply and quickly, and the joint is airtight. At the first stage, the bell of one pipe and the smooth part of the other are cleaned of dust and contaminants. A chamfer is removed from the smooth end of the pipe (an angle of 15 degrees, chamfer cutters can be used) and a mark is applied indicating the depth to which the pipe will go into the socket. The o-ring of the socket and the smooth part of the pipe are lubricated with silicone compound and one part is inserted into the other, focusing on the mark. For plumbing and drainage this is a good connection, but if you are assembling shelves or furniture, it is not rigid enough. The main advantages: simplicity and possibility of dismantling, therefore this connection is used for the construction of temporary buildings and things;
- adhesive connection. The ends of the pipes that need to be connected are chamfered (some simply treat the surface with sandpaper), then marks are applied indicating the depth of the fitting. The ends of the pipes are degreased with methylene chloride, then the adhesive is applied with a brush to the pipe and inside the chamfer or socket. The pipe is inserted into the fitting (or socket), turned ¼ turn for better distribution of the glue, then the elements can be pressed for 30-60 seconds. It is advisable to complete all work quickly. The remaining glue is immediately removed and the joint is allowed to dry for several hours. The process is more labor-intensive, but the joint is more reliable;
- flange connection. Individual sections are connected using special fittings. Before carrying out work, the ends of the pipes are cleaned. A flange is put on the cut, then a rubber gasket onto which the flange is pushed. The elements are connected using bolts with a mating flange. Then the bolts are tightened evenly, thereby achieving alignment of the flanges. The connection is reliable, the design is collapsible.
Once the technology for connecting plastic pipes has been mastered, we can assume that almost any craft can be made.
It is only important to draw a sketch or make a drawing in advance, and correctly calculate the length of all segments. You can build anything from such parts - we will list just a few ideas for DIY crafts from plastic pipes
Shaping PVC tube
To make it easy to bend or flatten a PVC pipe, it should be heated with a gas burner, then quickly given the required shape. As an exception, in the absence of a burner, it is permissible to heat the element of the future product on the fire of a gas stove. Cutting pipes can be done with a metal file or jigsaw; parts can be fastened conveniently using cold welding (a special adhesive will be required for this purpose).
From pipe elements you can make beautiful garden chairs with your own hands, the smoothness of whose lines can be envied. As already noted, this result is achieved by heating on a gas burner and then manually shaping the element into the desired shape. You just need to remember to let the PVC pipe cool after processing.
Heating installation guide
Soldering technology for polypropylene pipes
Pre-prepare a diagram of the system wiring, installation of batteries, and connection of the boiler. In the future, you will perform all necessary work in accordance with this scheme.
The actual work of installing pipes is carried out in a few simple steps.
Welding time table for polypropylene pipes
Plastic pipe soldering machine
Second step
Calculate the length of the polypropylene pipe sections in each section of the heating system. Install the appropriate type of fitting.
Third step
Determine the required welding time for the joints. It depends on the diameter of the pipes used and is specified in the relevant reference literature. First bring all the elements of the heating system into the room and let them warm up to room temperature.
Fourth step
In accordance with the calculated data, mark the places where the pipes will be cut using a marker.
Make a cut using special scissors. Cut perpendicular to the surface.
Scissors for cutting polypropylene pipes
Wipe the sections with an alcohol solution and remove any dirt present with a dry cloth.
Seventh step
Take a soldering nozzle that matches the cross-sectional diameter of the pipes, degrease it, and then set it horizontally and let it heat up to 265 degrees.
Place the pipe and fitting into the heater holes, select the required heating time from the table and directly heat the elements being connected. After this, carefully remove the products, insert the pipe into the fitting and hold for the required time. It is better not to touch the elements being connected until they have cooled completely.
Using a similar scheme, solder all the pipes of the heating system, focusing on the drawings you have. Connect pipes to the heating device and radiators also according to the drawings.
To prevent pipes from sagging in the future, ensure that they are frequently attached to the surface using clips. For a polypropylene system, the optimal coolant temperature is 60 degrees.
Follow the recommendations received, and your propylene heating will serve flawlessly for many years.
What types of structures can you make yourself?
A homemade staircase, constructed from profiled pipe, can be of the following types.
- Attached. This is the simplest option. A do-it-yourself extension ladder made from a profile pipe is a structure consisting of two parallel supports. Crossbars are installed between them. It is characterized by mobility and also has a small weight.
- Marching. This staircase made from profile pipes has a more complex structure. It consists of beams fixed at one level, onto which steps are subsequently installed. If a marching building made of metal forms a straight row, then it is called single-level. And when there are two rows and a span, then this is a two-level structure. This homemade structure is built in the house more often than other types. The supports for marching types are the bases of stringers. These are nothing more than beams holding the steps from below. Or it could be strings that support the end of the step.
- Screw. This is a ladder welded from a profile pipe, on one stringer. On one side, a step is attached to the stringer. This row goes around the stringer from bottom to top. On the other side, railings are attached. Independent buildings on one stringer are not made very often. The homemade design on one central base is very steep and awkward.
- Bolts. In this option, the steps are fixed to the walls with special strong bolts. A special feature of these homemade buildings is the need for a solid wall.
Corrugated pipe is an excellent material for creating buildings of any type. But, in this situation, the master will need certain knowledge of the features of welding work. Otherwise, welding a staircase made of profile pipe will result in the creation of an emergency building, which will be dangerous and unreliable.
Before you start welding the stairs, you need to carefully process the metal. It is recommended to pay special attention to the handrails. After all, the presence of sharp protrusions and hangnails is not acceptable for them.
Also, when welding, you need to ensure the integrity of the entire building. To do this, it is necessary to carry out all work in strict accordance with existing rules.
Ladder
The main purpose in this case is the ability to reach a place located at a height. But, for lifting with a load, a prefabricated stepladder should be constructed from corrugated pipe. If you fold it, it will serve as an attached type of structure.
The question of how to weld an extension ladder from profile pipe will not pose any particular difficulties. This design is not difficult to build.
The instructions for working with this structure are as follows:
- two professional pipes are prepared, and markings are made on them (the distance between the steps is 35 cm;
- the required number of steps is prepared;
- steps are attached using a welding machine;
- Plastic or rubber tips are placed on the legs of the finished attached product.
As you can see, welding this device is not difficult. A homemade ladder will last for a long time. If everything is welded according to technology, then it can withstand a weight of more than 100 kilograms.
Interfloor flight of stairs
The staircase between floors in a private house, made of a profile pipe, is a key element that becomes the center of the interior. At the same time, this is a serious engineering structure that provides comfortable access to the second floor of the house.
The structure leading to the second floor in a private house can be a marching structure, a screw structure, or a combination structure. The configuration of the structure for access to the second floor is chosen based on the availability of free space for construction. The best option for a small house is a single-flight building, which consists of sixteen convenient steps.
In a spacious and high room of a private house, the interfloor rise to the second floor contains intermediate platforms and turns. These complex structural elements can be L-shaped or U-shaped.
If the private house is small, then screw options are used. The classic look of such a building is rarely more than 1 m2, and it is easy to install anywhere, even in the center of the room.
In large houses, buildings of a combined type are often installed. This decision is dictated, as a rule, not by constructive relevance, but by the taste preferences of the owners. By the way, it should be added that these buildings are the most beautiful.
Metal frame for marching buildings
The metal frame of stairs from profile pipes is produced as follows.
- Markings are made for the metal frame and the profile is cut.
- Each step is connected by a frame.
- Concreting of the necessary elements of the base of the metal frame is carried out.
- Stringers are installed. The back part of the steps is strengthened and they are welded together.
Installation is carried out in the following sequence.
- Determine the exact number of steps and their sizes.
- The frame of a metal staircase made of a profile pipe is made from a 10x10 cm assortment and a 4x4 cm corner. In this situation, the metal profile material for the frame is installed instead of a channel. And it copes with its task perfectly, since the frame made of a metal profile is more rigid.
- A pedestal is created for a flat building. A point is placed at the extreme part of the platform to start placing the steps.
- A corrugated pipe is welded to the lower platform. And in the upper part of the future building, the surface part is also fixed. Then the corner is welded.
- Railings are welded to the side of the profile. As a rule, when installing railings, an indent of 1 inch is made. from the extreme part, which slightly narrows the opening.
Spiral staircases
If we are welding a helical profile structure, we first cut the tubular products prepared for the steps. The dimensions of the riser are 22 cm. Therefore, the height of the room is divided by this value. Thus, the number of elements from which we are making the structure will be clear.
A metal pipe is used to cut the gasket and console. We cook them, and then the resulting parts are joined with pipe materials.
Steps are placed on the spacers and secured with self-tapping screws. When performing this work, distortions and backlashes should not be allowed.
The railings for the building can be made from a 4x4 cm profile, and a 2x2 cm tubular product is used for the handrails.
Making a stepladder
A stepladder made from a profile, made by yourself, is structurally similar to store-bought analogues made of aluminum. But, building a stepladder yourself is much cheaper than buying it in a store.
Such a device, made independently, is simply irreplaceable in home life, and will serve more reliably than soft aluminum. Therefore, a homemade stepladder will not undergo deformation changes.
You don't need many tools to work. You should prepare an electric welder, a grinder, a drill, a marker, a corner and a tape measure.
Work begins with preparing a drawing. Then, in accordance with the plan, sections of corrugated pipes are cut. After this, the steps are attached to the two main frame pipes by welding. After checking the homemade structure for unevenness, you can firmly fix the steps. The second side of the stepladder is made in the same way. After this, the two halves are connected with suitable canopies.
Next, holes are made in the middle of the stepladder. They are needed to install a belt that will secure the halves of the stepladder so that they do not move apart when we use it.
It’s not difficult to do this kind of work yourself; any home craftsman with a more or less “full” hand can handle it. If you do everything carefully and in accordance with the rules, then installation will not present any difficulties.
Decorative stairs
Decorative flights of stairs made from profile pipes can be found very often. The thing is that the profile is ideally combined with various materials.
Watch the video
ladder frame made of profile pipe/Metal frame ladder
The decorative design of a staircase in a house often becomes the center for further decoration of the room. Everyone will decide for themselves what material to use for decorative decoration, based on their financial capabilities and taste preferences.
Decorative decoration is used for both outdoor and indoor buildings. In both cases, the appearance of the buildings is distinguished by a presentable appearance.
If a home craftsman alone cannot decide how to decorate his staircase, then you can always ask for advice from professional craftsmen. They will help you find the optimal solution and make the necessary calculations.
Staircase structures began to be profiled not so long ago. But this decision, as practice has shown, has become very successful. A properly selected building made from such a pipe will not only fit organically into the overall design of the room, but will also serve reliably for many years.
Staircase to the second floor on metal stringers.
What can be made from unnecessary pipes?
Different pipes suit different options. In general, you can make a lot out of them: summer outdoor furniture (especially for children), devices for watering the garden or fastening greenhouses, shelves, floor lamps, hangers, vases and more.
There are various fasteners and adapters on sale, which allows you to make even complex crafts that might not immediately seem possible to create from such material yourself.
Mirror frame
Crafts made from cardboard tubes do not always reveal the material from which they are made by their appearance. They can be cut into rings and used as a decorative element. For example, this could be an original mirror frame, where such rings are glued to each other, creating a fancy pattern.
Furniture frame
Propylene pipes make good crafts that can withstand heavy weight. This makes them ideal frames for furniture. It will be enough to cover such a frame with fabric, and you will get a chair, table or couch. This often works out cheaper than purchased furniture, even if the pipes were purchased specifically for this purpose and were not left behind after renovation.
Watering the garden
Partially extra pipes can also play a similar role: if you dig them into the ground near the beds, then with their help you can carry out deep watering in hot weather, when any moisture evaporates from the surface quite quickly, without having time to reach the roots of the plants.
This function can be combined with the greenhouse frame if you make holes in the pipes in appropriate places to allow water to be poured through them. There are a huge number of photos of various crafts made from pipes, which demonstrates the popularity of this phenomenon.
However, for those who like to create something original with their own hands, this is great entertainment, which is also useful. Firstly, this allows you not to throw away building materials in vain, and secondly, many crafts turn out to be really useful in the household. Moreover, you can do both simple things and complex ones that require certain skills and abilities.
Calculations and drawings
You can design a chair from pipes on a piece of paper or a personal computer. There is no need to make complex calculations, since the products have a simple design.
When planning your work, you should consider the following nuances:
- Using the curvature factor. Curved fragments look more interesting and attractive than straight links. A chair with a sloping back will fit better into any interior. You can give the workpiece a curved shape by slowly heating it over an open flame. Then it is carefully bent and fixed until it cools completely. Another way is to use factory-made contours.
- The length of the pipes is selected taking into account the fact that part of the workpiece will be immersed in the fitting. This distance is 20-50 mm depending on the type of plastic pipes. Before drawing up the drawing, you need to experimentally measure how far the links fit into the coupling opening.
- It is better to take a sample that is comfortable to sit on as a basis for the project. You can supplement it with your own ideas. Please note that plastic bends under pressure. To increase the strength of the finished product, transverse ties are provided on the legs and seat. Reinforced plastic is much more practical than analogues without aluminum inserts.
- The diagram is drawn to scale with an accuracy of 1 mm. It displays all the details, places and order of joining of workpieces to each other, couplers and partitions. An option is provided for cutting blanks, in which the amount of waste will be minimal.
- If the workpieces are joined without glue or soldering, then the joint must be strengthened. To do this, screws are used, which are screwed in so that they tighten and fix both fragments. It is better to screw hardware on the underside of the pipe and from the back. This way they will be practically invisible.
Frame construction
To carry out the work, we will need fittings, PVC pipes, 4 10 x 10 timber, 10 pieces of 50 x 50 timber, plastic clamps, nails, screws, several polycarbonate sheets, components for vents and doors of a future design, as well as some free time and desire.
Installation of the greenhouse frame
Construction work, as usual, is preceded by an important stage of preparatory activities: the site for the construction is selected and carefully leveled. The timber must be treated with a special antiseptic, which will preserve its original quality for a long time and protect it from moisture and soil exposure. Using timber, the base frame is carefully made.
Attaching to the base of the greenhouse
To give the structure maximum stability, reinforcing bars are used. Special blanks no more than 80 cm long are cut from them. They are driven in around the entire perimeter of the future greenhouse at a distance of 50 cm from each other and to a depth of 40 cm. On the left side, a PVC pipe is put on the reinforcing rod and carefully bent. The second end is put on the reinforcing bar placed on the right. The result is arcs at an equidistant distance from each other (50 cm). The pipes are fixed very simply: they are screwed to the base frame with clamps. We will need 50 x 50 bars to build openings for future doors from the end of the greenhouse.
Attaching the greenhouse frame
In order for the finished structure to be truly strong and as durable as possible, it is recommended to install stiffeners. To do this, a pipe is attached to the central part of the end blocks and secured to all arches using clamps.
Doors are installed in the prepared doorways. The simplest greenhouse design is considered ready-made.
Homemade plastic pipes
- 1. Popular homemade plastic pipes
- 2. DIY pipe flower garden
- 3. Greenhouse made of plastic pipes
- 4. Small fence made of plastic pipe
You recently completed renovations and you still have scraps of plastic pipes - don’t rush to take them to the landfill. Perhaps, from the remains of the pipe, you will like some useful homemade product that will come in handy in the country house or on the balcony.
Most of the homemade products from plastic pipes that are presented in this article will not be difficult to assemble with your own hands. The only tools you will need are a screwdriver, a hacksaw or a grinder, as well as various hardware (screws, bolts and self-tapping screws). So, let's go.
Popular homemade products made from plastic pipes
It’s very easy to make a small chair or table with your own hands from scraps of plastic pipe. True, you need to have a soldering iron on hand for welding pipes and fittings with tees.
The process of making a chair from plastic pipes is quite simple:
1. First, using corners and a pipe, we solder two frames. The lower frame, which will be used under the seat, should be slightly smaller than the main support frame.
2. Next, we weld a U-shaped frame from pieces of pipe and corners, which will serve as a backrest holder.
3. We connect the frames at the intersection points (as in the picture) with bolts.
4. The seat of a homemade chair deserves special attention; it can be made from thick fabric or from scraps of plastic pipes. In the latter option, you will have to fasten each tube to each other with a strong rope, and then fix the seat to the frame.
DIY pipe flower garden
To make the next homemade product from plastic pipes, you will need a 110 sewer pipe or at least a 50 diameter pipe, tees and bends. If there is one pipe, without fittings, then it doesn’t matter, because it will be perfect for making a flower bed.
We take a pipe and make preliminary markings of where and how the holes for the flowers will be located. Using a small angle grinder (125 circle), we cut holes into which the plants could be planted.
In the case of assembling a flower bed from sewer tees and bends, the whole work is much simplified. For these purposes, you only need to connect one tee to another, and insert 110 corners along the edges of the structure.
If desired, a homemade flower bed made from pipes can be attached to the wall with clamps, and then the facade of your house will have an original look.
Greenhouse made of plastic pipes
Who hasn’t dreamed of owning a real greenhouse on their own country plot? In the case of homemade products made from plastic pipes, it is quite possible to make a greenhouse with your own hands. Moreover, in this case, you will be able to save a considerable amount, because factory greenhouses made of polycarbonate and other materials cost a lot of money.
To make a greenhouse from pipes, it is better to sketch out a simple drawing in advance with the dimensions and diameter of plastic products. As support posts for the greenhouse, it is recommended to use a pipe of at least 32-40 in diameter, while for jumpers, a 25 pipe is quite suitable.
It is best to start assembling a greenhouse from plastic pipes from the base; for this, four pipes are welded together through corners in the shape of a rectangle. Then, in each pipe, every 0.5 m, a tee is soldered into which the vertical guides of the greenhouse will be installed.
You should think in advance about strengthening the structure in the place where the door will be provided. After the frame is assembled, it will remain covered with thick polyethylene film, which, if the greenhouse is used correctly, will last for many years.
Small fence made of plastic pipe
You need a small fence that will not only be a barrier for stray animals, but also a real decoration of the site - no problem. Taking into account the fact that plastic does not rot or deteriorate when exposed to moisture, such a fence will last for many years.
To make a plastic fence, you will need a pipe, angles and tees into which vertical crossbars will be soldered. A pipe fence has a very simple design in the form of supports (they are made of thick pipes) and crossbars (vertical and horizontal) that are welded to the supports through tees with corners.
Upon completion of construction, a homemade fence made of plastic pipes can be painted with “silver” or other paint, at your discretion. Such a homemade product made from unnecessary pipes will become a real decoration for any suburban area.
DIY wall horizontal bar + parallel bars
I decided to take up a healthy lifestyle seriously, but it was somehow expensive to leave the house somewhere to look for horizontal bars, morning jogging is also not my thing.
I wanted to buy myself a horizontal bar for the wall, so I started looking around online stores and found a more or less suitable option at a price of 2,500 rubles. And there, among all his photographs, there was a drawing of him, or rather a drawing indicating his dimensions.
Full size Dimensions of wall horizontal bar + bars
I thought why not do it myself, especially since the garage is a five-minute walk away, there is also welding.
I cut all the necessary components: 1) Three square pipes with a cross-section of 20mm, 55cm in length 2) Two round pipes with a cross-section of 20mm, 60cm in length 3) One round pipe with a cross-section of 20mm and 55cm in length 4) One round pipe with a cross-section of 20mm and 110cm in length and additionally 5) Two round pipes with a cross-section of 20mm, 13cm long (for a narrow grip) 6) And two corners for rigidity from the same square pipe, about 25cm long.
I had square pipes, but bought round ones, although, as it turned out later, I also had them.