Who said playing with food is not good?! In this article we want to offer you an excellent set of felt food for creative games, which will teach your kids the culture of eating and its preparation.
Using step-by-step instructions for making felt food and patterns, you can make your own play set of bright and beautiful felt food.
Felt products can also be excellent decorative elements and props for decorating themed parties, holidays, and theatrical productions.
Felt carrots
To make such delicious carrots and ripe tomatoes, you will first need to print a ready-made template (pattern).
Then cut out 2 carrots from orange felt.
Sew the two carrot pieces together and turn them inside out.
Stuff the carrots with cotton wool.
Now cut out the carrot stems from the green felt. Each carrot requires two stem pieces.
Sew the two stem pieces together and stitch around the leaf pattern.
Place the end of the stem inside the carrot and sew with a closed top stitch.
Add top stitches on the carrot itself to make it look realistic.
Understanding the schemes
- Cake.
Using a similar pattern, you can also make various pies. Please note that the pattern is quite simple, you just need to cut out the necessary parts of the required size according to the pattern, sew them together and stuff them with filler.
- Ice cream.
- Strawberry.
- Carrot.
- Cupcakes.
- Burger.
- Corn.
- Toasts.
As you can see, there is no limit to fantasy. You can create endlessly, the main thing is your desire. For beginners, you can sew simpler products, and if you want to try something more voluminous and multi-layered, then we offer you a detailed master class on sewing felt pizza.
Felt tomato
To create felt tomatoes, print out a ready-made template. Then transfer it to red felt. For one tomato you will need one circle.
Sew the circle around the edge using a basting stitch and pull together to create a pouch. Fill the bag with cotton and tighten.
Cut out a leaf from green felt and use a hot glue gun to attach it to the top of the tomato.
For realism, you can add a stem made of chenille wire.
Everything is made of felt - both sausages and candies
Sausages
You will need
● Pink or creamy pink felt ● Scissors ● Sewing thread ● Wadding for stuffing
Description of work Step 1: cut out parts
For one sausage, use the template to cut out two parts with dovetail cutouts at the ends, see photo.
Step 2: Stitch the seams at the ends
Fold each piece so that the 2 internal dovetail sections align. Sew seams on both pieces.
Step 3: sew 2 parts
Fold the 2 parts of the sausage right side to right side and stitch along the outer contour, leaving a hole in the seam in the middle of the concave side for stuffing and turning.
Step 4: Unscrew the part
Turn the part inside out and use a Japanese stick or the blunt end of a pencil to pull out all the corners.
Step 5: stuff with cotton wool
Stuff the sausage with cotton wool, and push the cotton wool into each corner.
Step 6: Sew the Seam
Use blind stitches to sew up the hole in the seam.
Fried egg
You will need
● White and yellow felt ● Yellow sewing thread ● Some cotton wool for stuffing
Description of work
Cut out a white felt from white felt, and a circle for the yolk from yellow felt. Place the yellow circle on a white base and sew it by hand or stitch it along the contour, leaving a small hole in the seam for stuffing. Stuff with a small amount of cotton wool, then finish the seam.
Tomatoes, sliced
You will need
● Tomato red felt in two shades - lighter and darker, and the dark felt should be twice as large in size ● Scissors: for crafts and manicure ● Tomato red threads for sewing ● Yellow threads for embroidery ● Embroidery needle with sharp tip ● Textile marker
Description of work Step 1: cut out parts
For one circle of tomato, cut out 1 circle of a light tomato shade with a diameter of 5 cm and 1 circle of a dark tomato shade with a diameter of 5 cm, as well as 1 circle of a dark tomato shade with a diameter of 6 cm.
Step 2: translate the interior template
On a circle of a dark tomato shade with a diameter of 5 cm, use a marker to randomly draw a figure resembling the inside of a cut tomato with partitions, see step-by-step photos below.
Step 3: Cut out the inside
Using small scissors with sharp tips, cut out the inside of the tomato so that you are left with a rim with partitions, as in the photo.
Step 4: Baste 3 layers
Fold 3 layers of felt: on the bottom there is a circle of dark tomato color with a diameter of 6 cm, in the middle there is a circle of light tomato color, on top there is a rim with partitions. Baste or pin.
Step 5: Sew 3 layers
Using a machine, sew tomato-colored threads along the outer circle of the tomato circle, then along the inner figured circle along all three layers.
Step 6: Easier Option
As an option, you can sew tomato circles in a simpler way; for this you will need to cut out only 2 circles of felt - a lighter and a darker tomato color. They need to be folded so that the lighter circle is at the bottom. On the darker circle, use a marker to draw a border with partitions, then stitch, as described in step 5, through both layers. After stitching, cut out the inner part with the partitions using nail scissors close to the stitches.
Step 7: Trim the seams
Then trim the outer edge allowance close to the stitches. As a result, you have a circle of tomato with a lighter core and partitions.
Step 8: embroider the grains
Using yellow embroidery thread, use small straight stitches to embroider tomato seeds on the lighter core, and unnoticeably seal the ends of the threads on the underside.
Lettuce leaf
You will need
● Green felt ● Pencil or toothed wheel ● Green sewing thread
Description of work Step 1: cut out the part
Cut out a leaf of green felt salad according to a template or at random without allowances - 1 piece for 1 sheet.
Step 2: Draw the Teeth
Use a gear wheel or draw the veins on the front side of the sheet by hand with a pencil.
Step 3: Pin the midrib
Fold the sheet in half with the right side inward along the central vein and pin with two pins close to the beginning and end of the vein.
Step 4: Topstitch the center vein
Using a machine, sew to the edge along the wrong side along the line of the center vein, constantly turning the sheet according to the bends of the marked line.
Step 5: Tie the ends of the threads
Tie the ends of the threads on both sides of the seam with a knot.
Step 6: Topstitch the side veins
Now stitch the side veins in exactly the same way, and also tie the ends of the threads at the ends of the seams with knots.
Tip: It's much easier to stitch straight into the edge, so you can draw the veins of the leaf using a ruler and sew straight stitches into the edge.
Farfalle
You will need
● Yellow felt ● Roller breadboard knife ● Cutting mat ● Zigzag scissors ● Sewing thread
Description of work Step 1: cut out parts
Draw a sheet of felt into squares measuring 6 x 6 cm. Lay several layers on top of each other and pin together. Using a roller cutter, cut the felt into squares of the specified size.
Step 2: cut the sections with “teeth”
Trim two opposite sides of each square with zigzag scissors to create jagged edges.
Step 3: stitch the accordion
Fold the square like an accordion so that you get 4 layers. Sew down the middle several times.
Step 4: Smooth out the creases
Straighten the folds by unrolling the product. Repeat the same with other felt squares. Felt farfalle in a basket is a wonderful souvenir for the hostess or an accessory for kitchen decor.
Dumplings, tortellini
You will need
● Yellow felt ● Yellow threads for sewing ● Regular and zigzag scissors ● Cotton wool for stuffing
Description of work Step 1: sew dumplings
Cut an oval out of felt using a template using regular scissors. Fold in half along the fold line (with dashes) from the wrong side to the wrong side and stitch along the rounded edge, secure the ends of the seam with a couple of stitches in the opposite direction, while leaving a hole in the seam for stuffing. Fill it with cotton, not too tightly, then sew up the hole in the seam.
Step 2: Sew the tortellini
Fold the seam allowances and cut them together with zigzag scissors. To make the tortellini, place the ends of the pieces together and sew by hand using blind stitches.
Bread, croissant
You will need
● Felt of a suitable color ● Scissors ● Sewing thread ● Embroidery thread ● Embroidery needle ● Wadding for stuffing
Description of work Step 1: cut out the parts
Cut out 2 pieces of the appropriate shape with allowances of 0.5 cm on all cuts (templates for cutting out loaves are shown below).
Step 2: Embroider or Topstitch Inside Lines
Perform appropriate embroidery or topstitching: stitch the croissant along the lines of the dough layers, embroider the loaves with straight stitches or a knot stitch using brown or white threads.
Step 3: Stitch the parts
Fold 2 pieces right side to right and stitch along the contour, leaving a hole in the seam for turning inside out. Stuff the product with cotton wool and sew up the hole in the seam.
Fudge Star Cookies
You will need
● Sand-yellow and white felt, and the white felt should be half the size ● White and sand-yellow sewing thread ● Scissors ● Some cotton wool for stuffing
Description of work Step 1: cut out parts
Copy and enlarge the star template, cut out 1 star from yellow felt exactly along the contour, cut out a star from white and yellow felt according to the template with large allowances, and cut out a part from white felt so that it does not completely cover the star template - then you will get the impression that The cookies were covered with white fondant after baking.
Step 2: Fold three pieces
Fold three parts: at the bottom - from white felt, in the middle put yellow felt with approximately cut out contours, on top - yellow felt with the exact contours of a star. Pin together.
Step 3: stitch the parts and stuff the cookies with cotton wool
Sew along the outline of the star through all three layers with the top yellow and bottom white thread, and shortly before completion, interrupt the seam and stuff the cookies with cotton wool, then continue the seam. Tie the ends of the threads in a knot.
Step 4: White Fondant
This is what the cookies should look like from the top side. Tie the ends of the threads in a knot.
Step 5: Trim the allowances
Using sharp scissors, carefully trim the seam allowance along the side of the yellow felt close to the stitches.
Step 6: Christmas tree toy option
These stars can be sewn for a New Year tree. In this case, do not trim the ends of the stitching threads.
Cookies with strawberry filling
You will need
● Sandy yellow felt ● A scrap of red cotton fabric with small red polka dots (you can also draw white dots on a scrap of red fabric with a permanent textile marker) ● Scissors ● Sandy yellow sewing thread
Description of work Step 1: cut out parts
Cut 2 circles from sand-colored felt (see template). Cut a square of appropriate size from red fabric.
Step 2: stitch the heart motif
Transfer the heart motif to one of the felt circles in the middle (see template). Using a tight, narrow zigzag, stitch the heart motif along the contour using sand-colored threads.
Step 3: Cut out the heart motif
Using scissors, cut out the inner part of the motif exactly along the contour. If necessary, use small scissors with sharp tips for more precise cutting.
Step 4: Pin 2 pieces
Place a square of red fabric under the circle with the cut out heart motif and pin it together.
Step 5: Sew the Heart Motif
Sew along the outline of the heart motif using straight stitches or a dense zigzag stitch. Trim the protruding ends of the red fabric.
Step 6: Sew along the outer edge
Place a whole circle of yellow felt on the bottom, pin it in the middle and stitch exactly along the outer contour of the circle along all (two) layers.
Step 7: Trim the seams
Trim excess seam allowance close to stitches.
Step 8: stuff with cotton wool
The cookies are ready. If desired, the cookies can be stuffed with a small amount of cotton wool; to do this, in step 6, leave a small hole in the seam, stuff the product with cotton wool (it should be soft and fine-fibered), and then continue stitching.
Muffins, candies
You will need
● Felt in various shades of brown ● Felt in sandy yellow color ● Felt in cream or pink color ● Embroidery thread in pink, white and chocolate colors ● Embroidery needle ● Sewing thread in felt color ● Cotton wool for stuffing ● Paper rosettes with corrugated walls for candies and muffins ● Textile adhesive
Description of work Step 1: cut out parts
Cut out 1 circle from brown or sand-colored felt for the bottom with a diameter = the diameter of the bottom of the paper rosette + 0.5 cm seam allowance. Measure the circumference of the circle and cut a strip with a length = circle circumference + 1 cm seam allowance and a width = height of the paper rosette + 0.5 cm allowance on each side. Cut a second circle for the top with a diameter slightly larger than the first.
Step 2: Prepare the top piece
Using the allowances of a circle with a slightly larger diameter (for the top), sew by hand using straight stitches about 3-4 mm long, do not cut the ends of the threads. Carefully pull the ends of the threads together so that the circle is exactly the same diameter as the circle for the bottom. Tie the ends of the threads in knots. Embroider with straight stitches using thread for embroidering dots, and chain stitch for curls.
Step 3: Stitch the parts
Sew a side seam on the rectangular strip, folding it right side to right side to create a ring. Sew the top circle with embroidery to the top edge of the ring, right side to right, without turning it inside out. Sew the bottom to the bottom edge of the ring, right side to right side, leaving a hole in the seam.
Step 4: decorate
Turn the muffin inside out, stuff it with cotton wool and hand sew the hole in the seam with blind stitches. If desired, for pink or white fondant, cut out a shape of any shape from felt of the corresponding color and sew it to the top with hidden stitches or glue it with textile glue.
Waffles
You will need
● Yellow or brownish-yellow felt ● Decorative stitching thread in a lighter color than the felt ● Air-fading marker ● Scissors
Description of work Step 1: cut and mark the parts
Cut out 2 waffle parts from felt with allowances along the contour 0.3 cm wide. Draw the contour lines of the hearts onto one part on the front side with a marker, then draw straight lines for stitching using a ruler.
Step 2: sew the lines
Place two pieces of felt together, right side to side. Sew in a straight line with large stitches along the intersecting inner lines, then sew along the contour lines with a tight zigzag. Carefully trim off any excess seam allowance close to the zigzag stitches.
Vegetables, fish, berries, fruits, chips
You will need
● Felt of the appropriate color and different thicknesses ● Sewing threads ● Embroidery threads ● Embroidery needle ● Some cotton wool for stuffing
Job Description Chips
Using the template, cut out irregular rectangles from thin yellow felt.
Broccoli
Cut out 2 pieces of inflorescences from dark green felt. Cut out 2 leg pieces from light green felt. Fold the leg parts back to back and stitch along the contour, leaving a hole at the top. Through this hole, insert a little cotton wool into the leg using a toothpick. Fold 2 pieces of inflorescences, back to back, and stitch along the contour, while inserting a leg into the seam from below, and also leaving a hole in the seam on the side. Stuff with a small amount of cotton wool and sew up the hole in the seam.
Fish Step 1: Prepare the parts
Cut out 2 pieces of fish from felt with seam allowances 0.5 cm wide. Cut out 2 circles from felt for the eyes: white with a larger diameter and black with a smaller diameter. These circles can be punched with a regular stationery hole punch. First sew or glue a white circle in place of the eyes, then a black one.
Step 2: stitch the parts
Sew 2 pieces of fish along the contour, leaving a hole in the seam for stuffing.
Stuff it with a small amount of cotton wool, distributing it evenly, then sew up the hole in the seam. Tip: if you wish, you can sew the body of the fish from 3 parts of different colors, cutting out the head, tail and the whole fish part separately. Then cut out 1 piece of the head and tail from felt of a different color, and then stitch the head and tail right side on the front side of the whole fish. In addition to this, you can also embroider the mouth, and when sewing the body, insert fin details into the seam, also cutting them out of felt of a different color.
Carrots, radishes, apples, pears, etc.
Cut out the corresponding parts, stitch or embroider the veins on the leaves, if necessary. Fold 2 main pieces together, back to back, and stitch along the outline. If desired, leave a hole in the seam for stuffing, fill it with cotton wool and sew up the hole in the seam. Don’t forget to insert and grab details such as legs, receptacle, leaves, etc. into the seam.
Photo: BurdaStyle.
Felt bread
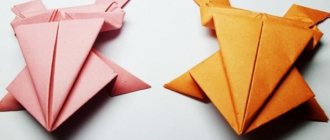
Now it's time to prepare the baked goods. And let's make a delicious sweet donut and fragrant bread (aka toast). Print out the finished template and transfer the details onto colored felt.
Sew two slices of bread together, leaving a small hole through which to fill the bread with cotton wool.
Do the same procedure with the donut parts. Fill it with cotton wool.
Cut out the donut icing from colored felt and glue it on with glue.
Christmas felt toys for the New Year 2022
When the time comes for the New Year's Eve, everyone will immediately start creating, so here are some small ideas for you.
Craft in the form of a deer.
House with a white snow cover.
Beautiful Christmas tree.
Gingerbread men.
Heart.
The symbol of this year is a dog, so you can make one for the Christmas tree; below I will present you with even more patterns with different breeds of puppies.
Felt baked goods
To make chocolate cookies, cut out two pieces of brown felt in the shape of a circle and one piece of padding polyester. Connect the parts together so that the padding polyester is in the center.
Sew along the edge.
Cut chocolate chips from dark brown felt and glue them to the cookies.
Subjects for felt books
In this article we will look at ideas for books with descriptions for making.
What stories the book will be filled with is up to you to decide. There are a lot of options.
- Fairy tale. Make a simple fairy tale on the centerfold of the book, where the characters will be removable (with Velcro or buttons). They can move around, harvest crops, build a house, and cook food.
- Geometric shapes are different in size, they can also be detached and rearranged. It's good to make them in different colors.
- Aquarium with removable fish. They can be caught with a fishing rod or a sap.
- Garden. Vegetables can be collected in a basket and even made into pickles.
- A room with furniture, clothes in the closet, dishes on the table, removable bed linen….
- Shop.
- Zoo.
- Letters or numbers.
- Puzzle: assemble the parts into a whole.
DIY felt pizza
Print out the finished template for the future pizza and transfer it to colored felt. Cut two pizza crusts from brown felt, and make the central layer from padding polyester.
Sew the parts together and be sure to sew an additional decorative seam that will imitate the edge of the pizza.
Cut out sauce from red felt. Then the yellow felt cheese.
From pieces of felt of other colors we cut out greens, onions, tomatoes and olives.
We connect all the parts together using a hot glue gun.
We will be glad if, thanks to this wonderful felt food set, your child decides to become a famous chef.
DIY felt pizza
Tools and materials Time: 6 hours • Difficulty: 5/10
- felt fabric of different colors (depending on what vegetables are supposed to be sewn);
- regular threads - for internal seams and floss for external seams;
- Velcro for fabric;
- artificial greenery;
- floral wire (or regular thin wire);
- filler;
- scissors.
Why vegetables made from felt? - you ask. The answer is simple: this is a very pliable and obedient material, even a novice craftswoman can handle it, and felt toys are pleasant to the touch, safe for babies and children like them
So, let's get to work - create a whole garden for the baby at home!
Necessary materials
For a mask measuring 20*9 cm we will need:
- Sheet felt for the base of the mask - 1 sheet (size 2030; for a mask for an adult size 2511 cm - 2 sheets of felt for the base) For the base, we recommend using thick felt so that it does not bend or lose its shape - Chinese felt does an excellent job of this function ;
- Decorative felt for small parts – 3 pcs. (white, black, bright orange colors). To decorate small elements in the mask, you can use Korean soft felt - it stretches moderately and is easy and pleasant to work with. In addition, Koreans have a huge selection of colors and shades, so you are sure to find one that suits you;
- Shiny foamiran – 1 sheet (size 20*30, gold);
- Threads in felt color (orange, black, white), black floss threads, needle;
- Scissors, pencil (marker) for working on fabric, tracing paper (paper) for patterns;
- Glue gun, glue sticks;
- Tape in the color of the product 0.5-1 m. Be sure to pay attention to a very important point!!!
- A cup of your favorite tea and a creative mood are required)).
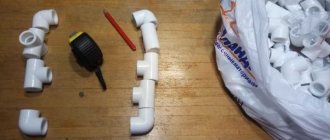
(Photo 1. Photo of the necessary materials)
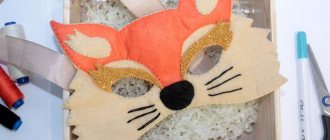
If everything is ready, we will begin our creativity - we will sew a “Fox” mask. Your Fox can have any color scheme; our work is presented as an example.
Stages of work
We are sure that as a result you will receive a unique accessory, the only copy of which will be yours. And, most importantly, it will be made with love and care, by your own hands, with the addition of a pinch of magic from our master class.
First stage
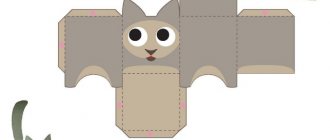
First you need to prepare patterns for the base and details of our mask, namely: nose, eyelashes, ears and muzzle. Transfer the base and details onto the felt using a pencil or fabric marker. On the bases we make slits for the eyes.
We will make the eyelashes from shiny foamiran - a foam material covered with a dense layer of sparkles; a golden color is perfect for our fox.
As a result, we have the following ready on the table:
- two beige bases with slits for eyes;
- two inner ears;
- red muzzle;
- black nose;
- eyelashes made of golden foamiran.
(Photo 2. Pattern, cut out bases and details).
Second phase
2. Prepare threads to match the color. We evenly place the fox's face on the base and carefully sew it on.
(Photo 3. Preparing the muzzle).
We also sew on the nose and light ears.
(Photo 4. Seam shown).
We sew the mustache with floss threads - with one long stitch we make three rays.
(Photo 5. Stitched mustache). (Photo 6. Finished muzzle).
Third stage
We fasten the tapes. We take the second base and use scissors to make two very small holes at the same distance from the eyes - insert a tape (length 0.5-0.7 m) into them and fix it on the wrong side: make several knots, additionally fix it with a glue gun.
(Photo 7. Nodules).
(Photo 8. Securing the tape).
Fourth stage
Sew the two halves of the mask with matching threads. We sew holes for the eyes so that there are no extra holes left in the mask.
It would be appropriate to use a buttonhole stitch - it will make the edges look more neat.
(Photo 9. Sew the two halves together)
Fifth stage
Using a glue gun, attach shiny eyelashes along the eye slits. Apply the glue carefully and not too much so that it does not leak out around the edges.
(Photo 10. Glue the eyelashes, photo of the finished mask).
The felt mask is ready! Just look how great it turned out! Just 5 steps, your diligence and creative spirit.
(Photo 11. Photo of the mask - chanterelles in a box).
Perhaps, such a mask will definitely become the most valuable accessory in the image, and maybe a very expensive gift for a loved one. Using our algorithm, you can sew any mask - the main thing is your desire and creative mood!