To create an incredible New Year's atmosphere, we try to decorate our homes and windows. Therefore, you need to seriously prepare for the New Year in advance and think about how to decorate the premises or decorate the Christmas tree. Just recently we made a snowman from improvised materials
On my website I already have stencils of snowflakes for windows and how to make snow beauties from beads. But, unfortunately, I still haven’t posted master classes on 3D paper snowflakes. I'm correcting myself. I have put together for you a collection of the best beauties with detailed instructions.
Preparations for the New Year are in full swing and you need to make decorations for your home or kindergarten now. To avoid any difficulties, I have prepared diagrams and templates for you that can be printed and cut out.
So, we stock up on the necessary materials and make magic together with the children. Don't let this beauty scare you with its complexity. After studying all the diagrams, you will see that three-dimensional snowflakes are made very quickly and simply. But what an amazing result! It looks very impressive.
How to make a voluminous paper snowflake for the New Year step by step
At first glance, it may seem that making such a voluminous snowflake out of paper is very difficult. Lots of curls and rays. But under no circumstances give up the idea of making it with your children and immediately run to the store for ready-made decorations. You can go through all the steps in great detail in the photographs and make white or multi-colored beauties.
For the craft we will need:
- Colored double-sided paper
- PVA glue or pencil
- Threads
- Scissors
- Foil
We collect a sheet of A4 colored paper into an accordion. Each strip should be 1.5 centimeters wide. Next, fold it in half, but shift the center. The result is that one side is 1.5 centimeters longer than the other. We will see this in the photo below when assembling the parts.
Now we cut the corners diagonally. This must be done at the fold and along the edges.
Unfold the sheet and cut out each strip following the fold line.
We collect all the details, paying attention to the length of the sides. First we apply the short side, the next with the long side. And so we alternate.
We straighten all the strips evenly and tie them several times with thread in the center. You can use the same color as the paper.
Let's start making a snowflake. To do this, coat the area with glue. as shown in the photo and bend the strip inward. We do this with every detail. As you can see, future rays are of different lengths.
Next, each element must be cut with scissors into three equal strips without reaching the end.
Now we take the outer strips with both hands and pull them to the sides. You need to squeeze firmly along the fold line so that the paper is fixed in one position.
Open the snowflake and glue the side parts. In order to decorate the center with a bead, we use foil. To do this, tear off a random piece and roll it into a tight ball. We coat it with glue and secure it in the middle. Since our snowflake is double-sided, we glue the second ball on the back side.
To hang it on a Christmas tree or decorate a wall, you just need to thread a thread through any of the loops of the snowflake. Everything turned out quickly and simply. But the article has many other options. Be sure to check out the following ones.
Modular balls
The craft consists of 6 sections, each of which is an elongated ellipse and flattened at the edges.
Templates:
You can create the pattern inside such an ellipse yourself or print blanks and cut them out.
- First you need to give the workpiece a semicircular shape. We make holes in the circles at the edges
- We thread the thread and needle into the circles at the edges at the top and bottom. We tighten it.
- Glue the first ellipse to the last one. It turns out to be a ball.
- Decorate with beads and make a loop.
Author of the master class
Such a 3D toy can also be part of a garland.
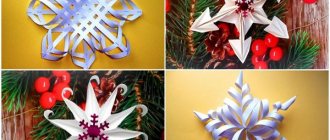
New volumetric snowflakes 2022 with your own hands in step-by-step instructions
Even if the snow doesn’t fall outside the window in fluffy flakes, it doesn’t matter. You can decorate the windows or make voluminous snowflakes and hang them from the ceiling or walls. I offer you a new holiday decoration option for your consideration - this is an eight-pointed beauty, which is not at all difficult to make.
For the craft we will need:
- Thick colored paper
- Glue
- Scissors
Cut 4 identical strips measuring 6 by 20 centimeters from a sheet of paper
Bend each one in half lengthwise
And then we bend it exactly in the middle. We measure 5 centimeters from the side of the fold and from this point to the opposite corner we draw a line obliquely.
Cut along the drawn line. On each piece you need to draw 3 strips parallel to the cut. Be sure not to reach the edge by 0.5 centimeters.
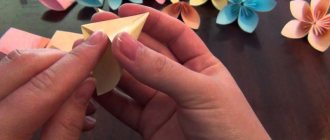
In order to get three-dimensional rays of a snowflake, open the strip and begin to bend it towards the center. First, the inner triangle on both sides. And then through one, as shown in the photo
We bend it lengthwise again so that the folded elements are inside and then fold it in half in the center.
Apply glue to one outer edge and press with the other side.
Now our task is to collect all the details together. To do this, apply glue along the edge of the outer corner, as shown in the picture, and apply the next one evenly.
When the glue sets, unfold the snowflake and glue the outer rays together.
By making a lot of multi-colored volumetric snowflakes, you can decorate more than one room and Christmas tree. In addition, you can change the indicated dimensions and make them of different sizes, as well as assemble them into garlands.
DIY 3D paper snowflake
This 3D snowflake amazes with its depth. It turns out lush and airy that you just can’t take your eyes off it. A special effect is achieved by choosing contrasting shades of paper. For example, you can make a pair of white-blue, yellow-pink or green-white. In general, there are no clear guidelines for color. Despite the fact that a snowflake seems difficult to make, I assure you that a child can handle this process with ease.
For the craft we will need:
- Colored paper
- Ruler
- Scissors
- Glue stick
Step 1. On a sheet of paper, measure strips 20 centimeters long and 1.5 centimeters wide.
We need 10 such blanks. There are also 10 more in a different color.
Step 2. Bend each strip in half and measure 7 centimeters. This is just a recommendation. You can distribute the length of the cut rays by eye. Before reaching the end, cut the strip into three thin strips.
Step 3. Start assembly. To do this, we overlap from the first row, connecting the corners, as shown in the photo. Then we take it from the second row and glue it to the opposite first strip.
This way we got ten droplets of one color and ten of another.
Step 4. Connect them together. If you plan to make several snowflakes, you can experiment with alternating colors. For example, glue a yellow one and then a pink one.
Please note that the tip of each part is turned in one direction. Therefore, it is also necessary to glue. Don't get confused! Otherwise, further assembly will go wrong.
Glue together 5 rays of each color. In total we have four snowflakes.
Step 5. Select the workpiece that will be central. Let it be pink. Rotate the snowflake so that the corners of the rays look up. Apply glue to the very edge and place another snowflake on top. We connect exactly along the corner. But the top blank should now be rotated so that the rays look down. It turns out like an unopened bud.
Step 6. Next, place a yellow snowflake with a pink one collected on it. And cover it again with yellow color.
Step 7. We do the same as with the pink parts. We connect the corners of each yellow ray with glue.
It turns out a very beautiful 3D snowflake. Hang it around the room or in the classroom and these decorations will create an airy New Year's mood for everyone present.
With Christmas trees
Once again, the modular design consists of 6 parts.
Making 1 fragment:
- Fold the sheet in half.
- Draw half of the Christmas tree at the fold, and on top of it are 2 semicircles.
- Cut out the workpiece.
- We bend the middle strip back and glue it.
- We assemble the model. We fix all 6 modules with the herringbone facing outwards.
Beautiful paper snowflakes using stencils for cutting
I couldn't pass by such a beauty. I would like to surprise not only those around me, but most of all myself, with such New Year’s decorations. And a beautiful paper snowflake that you can create with your household will definitely give you that same mood. A ready-made template will help you quickly make several blanks at once.
For the craft we will need:
- Sheet of thick colored paper
- Ruler, pencil
- Fine Tip Adhesive
- Scissors
Let's take a square of 9 by 9 centimeters for such a snowflake. If you want a larger decoration, then increase it proportionally.
Step 1. Measure 2.5 centimeters from each edge of the square.
Step 2. Bend the strips along the measured lines. Apply glue to one edge and join together.
Step 3. Next, on the resulting part, we also retreat 0.5 centimeters from each edge and bend it lengthwise.
Step 4. We did this in order to later carefully and evenly fold the edges inward.
Step 5. Now bend it in half and apply glue in a thin strip. The main thing is that the glued part is only in the middle. Therefore, a glue stick is not suitable for this.
Step 6. Now we draw such a figure. To do this, measure 2 centimeters from the outer edge and draw a triangle. We step back a little from each edge and make sketches in the shape of a triangle from the sides. If you don’t want to measure and draw, just print out the snowflake stencils below with a sheet of 9 centimeters or 15.
Step 7. Cut off unnecessary parts to get a part that looks like a Christmas tree.
Step 8. After the glue has dried, peel back each edge to check if everything is done correctly. It should look like this. Great! We repeat the same thing from the first step. You will need 10 blanks to collect one snowflake.
Step 9. We will connect each other by gluing the central part. Apply a thin strip and press exactly the next part.
Step 10. Press firmly and wait for the glue to dry. Do not hurry. Otherwise, when the snowflake opens, something may come off.
Step 11. And now comes the most bewitching and magical moment. Everyone is excited. What happened?
We glue the extreme sides and decorate the windows, Christmas tree or walls.
Templates for cutting out voluminous snowflakes
I am sharing with you ready-made templates that will help you quickly make voluminous snowflakes. Transfer the diagram onto thick paper or a thin napkin and cut it out. Hanging on a chandelier, they will sway from the light movement of air and create a fabulous ambience.
Such a snowflake can not only be stitched. Using thick paper, cut out two templates and along the dotted line you will need to make a cut only to the middle. After that, just connect the snowflake from the cut sides and hang it like a decoration.
Ballerinas in lacy skirts look very graceful. And if you look closely, these clothes are nothing more than a snowflake. You can create so many outfits from different napkins or paper that they will not look alike. Print and cut out the finished pictures and decorate with your children.
Several options for dancing ballerinas:
And patterns of snowflakes that will look elegant on their waist:
Fan
Remember how to fold a fan?
Processed with VSCOcam with m5 preset
If you fold the sheet into an accordion, then fold it in half, tie it up and cut out the pattern, then unfolding it into a circle you will get a snowflake!
Simple volumetric 3D paper snowflakes
When you need to make something quick and simple, take this snowflake as an idea. Bright red rays will stand out festively against the background of a green Christmas tree. Great idea to use as Christmas tree decorations.
For the craft we will need:
- Colored paper, preferably 180 g/m2
- Note paper 76 x 76 mm
- Ruler, pencil
- Glue
- Scissors
- Double-sided tape
Step 1. Measure out strips measuring 25 by 2 centimeters and cut them evenly. We will need 6 pieces.
Step 2. Connect the edges and cut diagonally, as shown in the photo
Step 3 . Next, we form a droplet from each strip. Fold overlapping with sharp corners.
Step 4. Glue each one, coating it with glue on the inside.
Step 5. To assemble the snowflake together, you can use glue or double-sided tape. We glue each ray at the points of contact at the widest part
Step 6. Assembling all the parts
In order to make a core, you can roll a ball of foil or assemble such a flower in origami style
Step 7. Fold the 75 by 75 mm paper in half. Post-it notes are ideal for these purposes.
Step 8. Next, unfold and fold with opposite corners. It is necessary to ensure that we have such guides on the paper, both along and diagonally.
Step 9. Bend each corner to the center and.
Step 10. Turn over to the other side. It turns out the same square, but smaller in size.
Step 11. Now we bend those lines that are indicated in the picture inward, and where they are solid, outward.
Step 12. Again we have a square shape, but very small.
Step 13. From the sides we bend the corners to the middle and then wrap them inward. (the photo below shows this moment). Next, we bend the paper to the center, where the arrows are.
The previous step, how to press along the edges is shown in this photo.
Step 14. Bend the petals with a ruler, open the cup and the core for the snowflake is ready.
Seven-pointed
We will need:
- 7 rectangles;
- 1 circle.
We make it with our own hands :
- We roll each rectangle into a little bag.
- We fix all of them on the base circle.
- Decorate the middle.
You can paint it with silver paint, or you can use glitter cardboard or foamiran.
Large voluminous snowflakes on the wall
Large snowflakes that glow from the inside with openwork light look amazing. When adding another ray, i.e. instead of 5, make 6, you will get a symmetrical snowflake. Delicate white, bright red. They can be hung on the walls so that the bulbs through the holes cast beautiful patterns and create magic.
For the craft we will need:
- Thick colored paper
- Glue
- Scissors
- Ruler, pencil
- Figured hole punch
Step 1. The size of the snowflake will be determined based on the paper you will use. We need 5 identical square sheets. Or 6 to make it look more like a symmetrical snowflake.
Step 2. To fold evenly, draw a line diagonally and bend the sides towards it. Lubricate one edge with glue and overlap the other.
You should get 5 identical sharp triangles.
Step 3. Measure 4 centimeters and draw, connecting from the central point to the outer corners.
Step 4. Cut off all excess top part
Step 5. And also the corners on each side
Step 6. Now we retreat 0.5 mm from one side, draw a parallel line and cut it off too. Note. Only on one side.
Step 7 . For clarity, I showed with arrows how it should turn out. Where there are red arrows, they cut them off, and where there are blue arrows, they left them. We will connect this edge to the next part. We do the same with all the blanks.
Step 8. Apply glue to the inside of the edge, first bending it. We connect it with the next one, gluing it inside.
Step 9. When everything is connected, press the joints well and wait for the glue to dry.
Step 10. This step can be done in the sixth step. But then you will have to make patterns separately on each sheet. In this case, you will have to use force to pierce a thick stack of paper. You can simply make round holes or use a hole punch in the shape of stars, butterflies or flowers. Apply in random order.
Step 11. This time we will not glue the outer rays, because when the holiday is over, such a pointed star or snowflake will not be convenient to store. Therefore, we connect with a rope, which can then simply be untied.
And finally. To make the decoration shine in the dark, place a garland inside.